This is an easy and quick recipe for Vegetable Noodles. Its a great dish for parties and perfect for kids. Its not spicy, its colorful and its healthy too. There is a lot of “veggie works” going on in the recipe. The trick to a good vegetable noodle is to cut the vegetables thin and cook it to a certain texture. The vegetables needs to be cut as a julienne and the garlic and ginger minced super fine.
Here is how to do Vegetable Noodles.
Heat oil in a pan and add in the super finely minced garlic and ginger. Lots of garlic and ginger. They are flavor bombs for this noodles. I used a full pod of garlic and a 2 inch piece of finely minced ginger. Fry for a minute till the garlic-ginger aroma fills the kitchen.
Next, lets work on the veggies for the vegetable noodles. Add in the thinly sliced onions and saute till the onions are soft.
Now, lets work on more veggies for the vegetable noodles. Add in the carrots and the cabbage. I add a lot of cabbage as it gives a very nice flavor and texture to the noodles.
Saute on medium flame for at least 10 minutes. Keep sauteing so the veggies do not burn at the bottom. I do not add salt in the beginning as the vegetables will turn mushy. We want it crisp. After the veggies are cooked, add in the salt, pepper, rice vinegar and the sliced capsicum. Saute for 3-4 minutes more.
In the mean time, boil water in a big pot. Add in a tablespoon of salt. Add in the noodles and cook until firm.
Remove the noodles off heat and drain. Cook only until the noodles are firm. It will continue to cook after draining in the residual heat. If you over cook the noodles, it will become mushy. So remove the noodles when they are firm but not soft. Add the boiled and drained noodles to the vegetable mixture.
Easy restaurant style Indo Chinese vegetable noodles recipe.
Author: Kannamma – Suguna Vinodh
Recipe type: Main
Cuisine: Asian
Serves: 4
Ingredients
Main Ingredients
2 tablespoon peanut oil
10-12 cloves garlic, minced
2 inch piece ginger, minced
2 medium onions, thinly sliced
2 carrots, julienned
4 cups sliced cabbage
1 capsicum, thinly sliced
1 teaspoon salt
2 teaspoon pepper powder
1 teaspoon rice vinegar
For cooking Noodles
200 grams noodles
1 tablespoon salt
Instructions
Heat oil in a pan and add in the super finely minced garlic and ginger.
Add in the thinly sliced onions and saute till the onions are soft.
Add in the carrots and the cabbage.
Saute on medium flame for at least 10 minutes. Keep sauteing so the veggies do not burn at the bottom. I do not add salt in the beginning as the vegetables will turn mushy. We want it crisp. After the veggies are cooked, add in the salt, pepper, rice vinegar and the sliced capsicum. Saute for 3-4 minutes more.
In the mean time, boil water in a big pot. Add in a tablespoon of salt. Add in the noodles and cook until firm.
Remove the noodles off heat and drain. Cook only until the noodles are firm. It will continue to cook after draining in the residual heat. If you over cook the noodles, it will become mushy. So remove the noodles when they are firm but not soft.Add the boiled and drained noodles to the vegetable mixture.
South Indian Chettinad style Cabbage Kootu – This is an excellent way of having cabbage. The fennel seeds and the coconut makes this dish a winner. This is a great way to do the otherwise boring cabbage. We all love this cabbage kootu at home. Its so satisfying with rice. I am sure you will go for seconds.
“Diets – the ultimate empty promise perpetuating the same cycle over and over again. We’ve all been victims of yo-yo dieting. We stick to some diets longer than others, but c’mon, just how much cabbage soup can a person eat? – Suzanne Somers” – So no more cabbage soup. We can do better things with cabbage. Chettinad style Cabbage Kootu is a great dish to do with cabbage.
This is how we do Cabbage Kootu at home. First, we got some boiling to do. Boil the dal in a pressure cooker for 10 minutes until fall apart tender. I use split moong dal for this recipe. For every half cup of dal use 1.5 cups water if you are cooking in a pressure cooker. If you are going to be cooking dal in a pan, soak the dal for an hour and boil it with 2.5 cups of water for every half cup of dal for 1 hour in low flame. Soaking the dal will help in cooking faster. Do not add salt while cooking lentils. They tend to cook faster without the salt. Once the dal is cooked, set aside.
Next, lets boil 2-3 cups of cabbage with a cup of water until soft and tender. Simmer the cabbage with water and salt. Adding salt brings out the water from the cabbage and aids in cooking it faster. Simmer for 10-12 minutes in medium flame.
Heat oil in a pan and add in a teaspoon each of fennel seeds and cumin seeds. Fennel seeds is the Oomph! factor in this dish. So go for it. Let the seeds splutter. Add in the onions and green chillies and fry till soft. About 3-4 minutes on medium flame. Add in the tomatoes, turmeric powder, sambar powder and salt. Cook until the tomatoes are juiced down and dry. It will take about 5 minutes.
Add in the fresh shredded coconut and saute briefly for a minute. Remove off heat and transfer it to the mixie / food processor.
Add about a cup of water to the pan in which we cooked the onion-tomato mixture. Heat it for a minute until the water is scalding. The little bits that are stuck to the pan are flavor bombs. Just scrape with a spatula. We do not want to waste that. Add the water back to the mixie / food processor and grind it to a smooth paste. The french call this technique as deglazing.
Now add in the cooked dal, cooked cabbage and the masala paste. Add about a cup of water if necessary . Do not add more. We want a thick gravy. Let it simmer briefly for a couple of minutes. Remove off heat.
Now the final tempering.
Add in a tablespoon of sesame oil in a kadai and add in the mustard seeds. Let it splutter. Add in the curry leaves and dried red chillies. Fry until the curry leaves are crisp. Remove from heat and add it to the cooked lentil mixture.
The kootu is ready. Serve hot with rice and a dollop of ghee.
Easy and simple recipe for South Indian style Chettinad Cabbage Kootu. Tamilnadu Muttaikose Kootu Curry.
Author: Kannamma – Suguna Vinodh
Recipe type: Curry
Cuisine: South Indian
Serves: 4
Ingredients
Main Ingredients
½ cup split moong dal
3 cups finely chopped cabbage
1 teaspoon oil
1 teaspoon fennel seeds
1 teaspoon cumin seeds
1 onion, chopped
1 green chilli, chopped
2 medium tomatoes, chopped
1 teaspoon salt
½ teaspoon turmeric
½ teaspoon sambar powder
¼ cup fresh shredded coconut
For the Tempering
1 tablespoon sesame oil
½ teaspoon mustard seeds
1 sprig curry leaves
2 dried red chillies
Instructions
Boil the dal in a pressure cooker for 10 minutes until fall apart tender.
boil 2-3 cups of cabbage with a cup of water until soft and tender. Simmer the cabbage with water and salt.
Heat oil in a pan and add in a teaspoon each of fennel seeds and cumin seeds. Let the seeds splutter. Add in the onions and green chillies and fry till soft. About 3-4 minutes on medium flame. Add in the tomatoes, turmeric powder, sambar powder and salt. Cook until the tomatoes are juiced down and dry. It will take about 5 minutes.
Add in the fresh shredded coconut and saute briefly for a minute. Remove off heat and transfer it to the mixie / food processor.
Deglaze the pan with a cup of water and add it to the mixie / food processor. Grind to a smooth paste.
Now add in the cooked dal, cooked cabbage and the masala paste. Add about a cup of water if necessary . Do not add more. We want a thick gravy. Let it simmer briefly for a couple of minute. Remove off heat.
Final tempering.
Add in a tablespoon of sesame oil in a kadai and add in the mustard seeds. Let it splutter. Add in the curry leaves and dried red chillies. Fry until the curry leaves are crisp. Remove from heat and add it to the cooked lentil mixture.
First time I had this traditional authentic Gujarati Methi Thepla beauty was when I was in college. The goodness came out of my friend Hemangi’s lunch box.
I have some fondest memories of college and methi thepla has to be high on that list.
We ( a group of 6-7 friends) had this methi thepla almost everyday. Hemangi is a gujarati settled in Chennai. She used to bring this methi thepla almost everyday as a snack or for lunch. We will pounce on her lunch box and the methi theplas would disappear in no time. It was a blast of flavors. After some time she started bringing extras and we had a methi thepla fest going on everyday. College got over and we parted ways. But this thepla has stayed with us forever.
All our friends love this and whenever we meet, we still ask Hema to bring thepla for us. And she is ever so happy to oblige.
She has improved her tamil a lot and can converse with an auto guy in tamil these days. Presenting to you the best thepla ever.
We need a lot of cleaning to do. The addition of the greens and spices makes for a fantastic spicy flat bread thats like an explosion of flavors in a single bite.
Here is how to do thepla. First pick and clean the leaves and set aside.
Wash the leaves in lots of water. I leave the leaves immersed in a lot of water for ten to fifteen minutes. That removes off all the dirt. Wash the leaves and gently dry the leaves. Chop the leaves. Set aside.
Take a couple of green chillies and grind it with 1/4 cup of water. Add more chillies if you want it spicy. Set aside.
Add in all the ingredients into a bowl at once. Methi leaves ( 1 big bunch), Atta, Besan (this is optional), Oil – be generous with the oil, salt, asafoetida, red chilli powder, turmeric powder, green chilli paste, cumin seeds, sesame seeds (optional). NO water yet. Just try to combine all the ingredients.
Try to mix well with your hands and slowly add water. 2-3 tablespoons at once. The moisture from the greens will start to make the dough soft. Make a very very stiff dough. It will become softer while resting. Once the stiff dough is made, rest it atleast for half an hour. Very STIFF dough is key.
After half an hour the dough will be very soft and pliable. Make into small dough balls.
Dust the dough balls in lot of flour and roll it into thin sheets / rotis.
In the mean time heat a griddle on medium flame. Flap the chapati between your hands to remove any excess flour, place it on the griddle. Wait for some small bubbles to form.
When some small bubbles form, spread some oil on the thepla and flip.
It should start to puff up. Press down on the edges of the thepla with your spatula and cook till both the sides are evenly brown.
Serve hot with some chundoo (gujarati mango pickle) and yogurt. Delish!
Traditional thepla made with methi leaves and spices. Its a blast of flavors.
Author: Kannamma – Suguna Vinodh
Recipe type: Bread
Cuisine: Gujarati
Serves: 15
Ingredients
250 grams – methi leaves ( 1 big bunch)
2 Cups Atta – Whole wheat flour
¼ cup Besan – Chickpea flour (optional)
5-6 tablespoon Oil
1 teaspoon salt
¼ teaspoon asafoetida
½ teaspoon red chilli powder
½ teaspoon turmeric
2 green chillies
¼ teaspoon cumin seeds
1 teaspoon sesame seeds (optional)
Instructions
Wash the methi leaves in lots of water. I leave the leaves immersed in a lot of water for ten to fifteen minutes. That removes off all the dirt. Wash the leaves and gently dry the leaves. Chop the leaves. Set aside.
Take a couple of green chillies and grind it with ¼ cup of water. Add more chillies if you want it spicy. Set aside.
Add in all the ingredients into a bowl at once. Methi leaves ( 1 big bunch), Atta, Besan (this is optional), Oil – be generous with the oil, salt, asafoetida, red chilli powder, turmeric powder, green chilli paste, cumin seeds, sesame seeds (optional). NO water yet. Just try to combine all the ingredients.
Try to mix well with your hands and slowly add water. 2-3 tablespoons at once. The moisture from the greens will start to make the dough soft. Make a very very stiff dough. It will become softer while resting. Once the stiff dough is made, rest it atleast for half an hour. Very STIFF dough is key.
After half an hour the dough will be very soft and pliable. Make into small dough balls.
Dust the dough balls in lot of flour and roll it into thin sheets / rotis.
In the mean time heat a griddle on medium flame. Flap the chapati between your hands to remove any excess flour, place it on the griddle. Wait for some small bubbles to form.
When some small bubbles form, spread some oil on the thepla and flip.It should start to puff up. Press down on the edges of the thepla with your spatula and cook till both the sides are evenly brown.
Serve hot with some chundoo (gujarati mango pickle) and yogurt.
This recipe for Spicy Gutti Vankaya – Stuffed Brinjal Fry is from my good friend and neighbor Manasa. She always keeps sending little dabbas of great food during lunch time. Her food is spicy and super tasty. We became such good friends because of those little dabbas of love. I have never come across someone who is so caring. What a lovely person she is. When I first tasted these stuffed brinjals, I wiped the dabba clean. Din’t share it with anyone. I am mean. Sorry. Please don’t judge me. It was that good. This recipe is very easy and comes out really good. So make this at your home and share a small dabba with your neighbor.
This is how to do Spicy Gutti Vankaya – Stuffed Brinjal Fry.
First clean and wash the brinjals. Make sure you choose small ones of roughly the same size so they cook quickly and evenly. Cut the tops. Generally for any stuffed brinjal recipe, the stems are held intact and the stuffing is done from the bottom. But Manasa cuts the top off and stuffs it from the top. I thought this way of cutting was genius. It did not break down during cooking. It held all the masalas intact. It did not separate while cooking. So cut the top off y’all.
Cut a cross till 3/4 th of the brinjal’s bottom like the picture below.
Masala time…… Mix together besan (chickpea flour), cumin seeds, red chilli powder, hing (asafoetida) and salt. Set aside.
Take a spoon and fill the cross in the brinjal with the masala powder. After filling just press in between your fingers to make sure the masalas adhere well to the brinjal.
Make sure all the brinjals are nicely stuffed with the masala.
Heat oil in a pan on low flame. LOW flame remember. You will need a flat pan so the brinjals cook evenly. Place the stuffed brinjals and cover it with a lid.
Manasa does something unique. She pours little water on the lid. She says it helps from burning the brinjals. So you also do it. Just pour some water on the lid and let it cook for 15-20 minutes.
Turn the brinjals every 3-4 minutes so it cooks evenly all around. Once the brinjals are cooked, switch off the flame and let it rest for 10 minutes with a covered lid.
Remove the brinjals from the pan and serve hot with rice and ghee.
Easy recipe for spicy stuffed brinjals cooked on a very low flame.
Author: Kannamma – Suguna Vinodh
Recipe type: Side Dish
Cuisine: South Indian
Serves: 10
Ingredients
8-10 small brinjals
¼ cup besan – chickpea flour
¼ teaspoon cumin seeds
¼ teaspoon hing – asafoetida
½ teaspoon salt
2 teaspoon red chilli powder
Instructions
First clean and wash the brinjals. Make sure you choose small ones of roughly the same size so they cook quickly and evenly. Cut the tops. Cut a cross till ¾ th of the brinjal’s bottom.
Mix together besan (chickpea flour), cumin seeds, red chilli powder, hing (asafoetida) and salt. Set aside.
Take a spoon and fill the cross in the brinjal with the masala powder. After filling just press in between your fingers to make sure the masalas adhere well to the brinjal.
Heat oil in a pan on low flame. You will need a flat pan so the brinjals cook evenly. Place the stuffed brinjals and cover it with a lid.
Just pour some water on the lid and let it cook for 15-20 minutes.Turn the brinjals every 3-4 minutes so it cooks evenly all around. Once the brinjals are cooked, switch off the flame and let it rest for 10 minutes with a covered lid.
Remove the brinjals from the pan and serve hot with rice and ghee.
This is a very easy and simple South Indian Tamilnadu style recipe for Thengai Thogayal – Thuvaiyal With Coconut. It tastes so delicious with rice. Lentils and spices are fried and ground with coconut. I like to make it a little spicy. This chutney mixed with rice and a dollop of ghee makes for a very satisfying lunch. Its so simple to make and can be made in less than 15 minutes. I had this chutney for the first time at my husband’s cousin’s place and immediately after lunch, I asked for the recipe and typed it down on my phone. It was very different from any other chutney. I tried it at home the very next day and from then on, it has become a favorite for all of us. Its simple, quick and finger licking good.
This is how to do the Spicy Thengai Thogayal / Coconut Chutney For Rice
Heat oil in a kadai and roast the chana dal / kadalai paruppu in low flame until light brown. Add the dried red chillies and fry briefly. Make sure the red chillies don’t burn. Add the chillies when the dal is almost roasted. Set aside.
Get the below ingredients together. There is raw garlic in this chutney. About 4-5 cloves. The roasted dal, tamarind, and the pungent garlic is what makes this coconut thogayal super tasty. Garlic imparts a very unique flavor to this chutney. Apart from the chana dal and chillies, everything is ground raw. Don’t worry about adding so much garlic. Just go on and grind buddy. My garlic cloves in India are too small. Way too small. So I added 10 cloves.
Grind all the ingredients together with about half a cup of water. Do not add more water. We want a very thick chutney. Transfer to a cup.
Easy and simple South Indian Tamilnadu style recipe for Spicy Thengai Thogayal – Thuvaiyal With Coconut . Delicious with rice.
Author: Kannamma – Suguna Vinodh
Recipe type: Side Dish
Cuisine: South Indian
Serves: 4
Ingredients
1 tablespoon peanut oil
3 tablespoon Channa dal /kadalai paruppu
4-5 cloves garlic
small candy size tamarind
4-5 Dry red chillies
1 cup shredded coconut
1 teaspoon salt
Instructions
Heat oil in a kadai and roast the chana dal / kadalai paruppu in low flame until light brown. Add the dried red chillies and fry briefly. Make sure the red chillies don’t burn. Add the chillies when the dal is almost roasted. Set aside.
Grind all the ingredients above with the roasted dal and chillies together with about half a cup of water. Do not add more water. We want a very thick chutney. Transfer to a cup.
A little story time before Aloo Bhindi Masala. My father is a civil engineer. Whenever I had holidays, I would go along with him to the site where his current project was then happening. The place was noisy, vibrant with all sorts of people. The granite tiles those days were laid by skilled North Indian men in all of my fathers projects. My father always tells no one can lay granite like they do. It was true. Their precision was unbeatable and flawless. Laying tiles is an art. There was something that moved me everyday during lunchtime. Their lunch was the same everyday. They brought their lunch covered in a news paper. These men had rotis with 5-6 fried green chillies on the side. That was it. Every evening after work, they would buy the same veggies everyday from a shop nearby. Onions, potatoes (lots of it), tomatoes and green chillies. No other veggies or fruits. Once in a while they would buy Bhindi. Potatoes meant sustenance. Potatoes were cheap, filling and tasty. They cooked once a day at night. They made excellent rotis. Their families were back in their villages. They all would show me pictures of their children from their wallets. They were very happy, kept talking, joking and worked hard. Last year, one of the tile layer whom I knew very well came to see my father as he was unwell. His name is Somnath. He now has a tile laying company in Coimbatore which employs 20-25 people. Now that’s an awesome achievement. He speaks excellent tamil after all these years. I still remember him having a pencil all the time at the back of his ears. What a craftsman. Every time I make Aloo and Bhindi, I think about Somnath.
This is how I do my Aloo Bhindi Masala.
Cut the Bhindi about 1.5 inches long. Add it to the pan. Add some oil and a couple of tablespoons of yogurt. They say yogurt helps in reducing the slime from the bhindi. Fry for about 15 minutes on low flame.
After 15 minutes, It should be well cooked and no more slimy. Set aside.
In the same pan add in the diced potatoes and fry for a minute. Add in half a cup of water and cook until fork tender. Set aside.
Add oil in a pan and when its hot, add in the cumin seeds and the dried red chillies. Let it splutter.
Add in the finely chopped onions and saute until lightly brown and reduced to half of its original volume. It will take about 7-8 minutes on medium flame.
In the mean time crush and puree the tomatoes in a blender.
Add in the ginger garlic paste and the pureed tomatoes.
Add in the turmeric, chilli powder, coriander powder and the salt. Saute for a couple of minutes.
Cover with a lid and reduce the flame of the stove to low, and simmer it for 10 minutes. Stir once in 3-4 minutes to avoid scorching at the bottom.
When the curry is simmering, powder some roasted peanuts in a blender. Set aside.
Add in the bhindi, potatoes and peanut powder and stir well to combine. Add in the coriander leaves. Remove from heat.
Aloo Bhindi Masala is an easy recipe which is a perfect side dish for chapati , roti.
Author: Kannamma – Suguna Vinodh
Recipe type: Curry
Cuisine: Indian
Serves: 4
Ingredients
250 grams Bhindi / Ladies finger
2-3 potatoes
2 tablespoon yogurt
4 tablespoon Oil (divided)
1 teaspoon cumin seeds
2 dried red chillies
3 medium sized onions
4 ripe tomatoes
2 tablespoon ginger garlic paste
1 teaspoon turmeric
1 teaspoon red chilli powder
2 teaspoon coriander powder
1 teaspoon salt
¼ cup roasted peanuts
4-5 springs coriander leaves
Instructions
Cut the Bhindi about 1.5 inches long. Add it to the pan. Add some oil and a couple of tablespoons of yogurt. They say yogurt helps in reducing the slime from the bhindi. Fry for about 15 minutes on low flame.Set aside.
In the same pan add in the peeled and diced potatoes and fry for a minute. Add in half a cup of water and cook until fork tender. Set aside.
Add oil in a pan and when its hot, add in the cumin seeds and the dried red chillies. Let it splutter.
Add in the finely chopped onions and saute until lightly brown and reduced to half of its original volume. It will take about 7-8 minutes on medium flame.
In the mean time crush and puree the tomatoes in a blender.
Add in the ginger garlic paste and the pureed tomatoes.
Add in the turmeric, chilli powder, coriander powder and the salt. Saute for a couple of minutes.
Cover with a lid and reduce the flame of the stove to low, and simmer it for 10 minutes. Stir once in 3-4 minutes to avoid scorching at the bottom.
When the curry is simmering, powder some roasted peanuts in a blender. Set aside.
Add in the bhindi, potatoes and peanut powder and stir well to combine. Add in the coriander leaves. Remove from heat.
This recipe for Spicy Mushroom Pepper Fry – Kalan Milagu Varuval is a quickie. It has very few ingredients and tastes really delicious. The pepper and the mushroom are the real bold flavors in this recipe.
This makes for a perfect side dish with rice. Its spicy, flavorful and satisfying. The nice thing about black pepper is that the heat doesn’t hit you to the roof. Its mellow. This is my favorite quickie dish for lunch on a busy day. This dish is usually done with button mushrooms.
Here is how I do Mushroom Pepper Fry – Kalan Milagu Varuval
Heat oil in a pan and add in the finely chopped ginger and finely chopped curry leaves. You definitely want to chop the curry leaves. The chopped curry leaves imparts a fine flavor in every bite of this Mushroom Pepper Fry. Fry for half a minute in low flame.
Add in the chopped onions and the cleaned and sliced mushrooms. Add the salt. Let it cook on medium flame for 15 minutes. Keep sauteing. Don’t add any water. The water from the mushrooms will cook it down.
Once the onions and the mushrooms are cooked and have shrunk to half of its original volume, add in the freshly ground pepper and toss for a minute. Use 2 tablespoons of pepper. It wont over power. It goes well with the meaty mushrooms.
Finally add in a tablespoon of ghee and remove the pan from heat. Mix well to combine.
Easy and quick recipe for South Indian Tamilnadu style Mushroom Pepper Fry – Kalan Milagu Varuval.
Author: Kannamma – Suguna Vinodh
Recipe type: Side Dish
Cuisine: South Indian
Serves: 3
Ingredients
1 tablespoon peanut oil
1 tablespoon ghee
2 inch piece ginger, very finely minced
2-3 sprigs curry leaves, finely chopped
2 onions, finely chopped
200 grams button mushrooms, sliced
2 tablespoon freshly ground black pepper
½ teaspoon salt
Instructions
Heat oil in a pan and add in the finely chopped ginger and finely chopped curry leaves.
Add in the chopped onions and the cleaned and sliced mushrooms. Add the salt. Let it cook on medium flame for 15 minutes. Keep sauteing. Don’t add any water. The water from the mushrooms will cook it down.
Once the onions and the mushrooms are cooked and have shrunk to half of its original volume, add in the freshly ground pepper and toss for a minute.
Finally add in a tablespoon of ghee and remove the pan from heat. Mix well to combine.
This is just an excellent variation from the regular chapati or roti we make at home. Addition of spinach makes the dough soft and the resultant chapati stays soft after a long time. Its an easy way to add more greens daily. I add some spices while making the dough and rest the dough for 30 minutes before cooking the chapatis. Resting the dough results in an amazingly hydrated dough that results in soft and tender chapatis.
Here is how to do Palak Chapati.
Make a paste out of yogurt, ginger, green chillies and garlic. Set aside.
Pick and clean the spinach leaves and coriander leaves. Chop them finely and set aside. Take a bowl and add in the greens, cumin seeds, turmeric, asafoetida, yogurt paste, salt and red chilli powder.
Add in the whole wheat flour. Don’t add any water. The yogurt and the moisture from the greens should be enough. Add water only if its really dry. Make a very stiff dough. the dough has to be very stiff. The dough will become soft during the 30 minute rest. The spinach will give out moisture during the rest. So very STIFF dough is key.
Cover the dough with a lid and let it rest for 30 minutes. The dough becomes very smooth after the 30 minute rest.
Divide the dough and make into small dough balls. Dust the dough balls in a lot of flour.
Roll it into thin sheets / rotis.
In the mean time heat a griddle on medium flame. Flap the chapati between your hands to remove any excess flour, place it on the griddle. Wait for some small bubbles to form. When some small bubbles form, spread some oil on the chapati and flip.
It should start to puff up. Press down on the edges of the chapati with your spatula and cook till both the sides are evenly brown. Serve hot.
Flavorful recipe for palak chapati. Chapati made with spinach and spices. Measurements used – 1 cup = 250 ml
Author: Kannamma – Suguna Vinodh
Recipe type: Bread
Cuisine: Indian
Serves: 10-12 chapatis
Ingredients
1.5 cups Whole Wheat flour – Atta
200 grams spinach leaves
50 grams coriander leaves
¼ cup yogurt
2 inch piece ginger
2-3 green chillies
4-5 cloves garlic
¼ teaspoon cumin seeds
½ teaspoon turmeric
¼ teaspoon asafoetida
½ teaspoon salt
½ teaspoon red chilli powder.
Oil for making chapatis
Instructions
Make a paste out of yogurt, ginger, green chillies and garlic. Set aside.
Pick and clean the spinach leaves and coriander leaves. Chop them finely and set aside. Take a bowl and add in the greens, cumin seeds, turmeric, asafoetida, yogurt paste, salt and red chilli powder.
Add in the flour. Dont add any water. The yogurt and the moisture from the greens should be enough. Add water only if its really dry. Make a very stiff dough.
Cover the dough with a lid and let it rest for 30 minutes.
Divide the dough and make into small dough balls. Dust the dough balls in lot of flour.
Roll it into thin sheets / rotis.
In the mean time heat a griddle on medium flame. Flap the chapati between your hands to remove any excess flour, place it on the griddle. Wait for some small bubbles to form. When some small bubbles form, spread some oil on the chapati and flip.
It should start to puff up. Press down on the edges of the chapati with your spatula and cook till both the sides are evenly brown. Serve hot.
Kongu Thakkali Kuzhambu – This is an amazing kurma for idli and dosa and is very popular in the kongu region of Tamilnadu. This is an absolute favorite and every family in Coimbatore has a version of this curry in their repertoire. Juicy ripe tomatoes and coconut are the star of this dish. The spice that elevates it up is the fennel seeds. Its mild. There is a saying about tomato. “Knowledge is knowing that a tomato is a fruit. Wisdom is not putting it into a fruit salad.” Thakkali Kuzhambu goes well with idli and dosa. This is how we do Kongu Thakkali Kuzhambu – Coimbatore Style Tomato Curry at our home.
We need really juicy and ripe tomatoes.
The spices are fried in oil along with onions and tomatoes and ground to a paste. We would need the following spices for our Kongu Thakkali Kuzhambu – Coimbatore Style Tomato Curry.
Heat oil in a pan and add in all the spices shown on the above spice plate at once. Fry for a couple of minutes on low flame. Increase the flame to medium and add in the roughly chopped onions and fry till slightly brown. About 4-5 minutes.
Once the onions are brown, add in the tomatoes, turmeric, salt and a small piece of tamarind. Fry for a good 8-10 minutes until the tomatoes are almost dry.
Its time for coconut. Coconut gives this curry that rich smooth feel in the mouth and also gives body to the curry and makes it thick. Adding coconut in cooking is actually good for you. Never listen to someone who says otherwise. Read my recipe for south indian coconut chutney to know why.
Add in the fresh shredded coconut and fry for a minute.
Remove off heat and let it cool slightly. When cool enough to handle, grind the mixture to a very smooth paste. Add up-to 2 cups of water while grinding.
Heat oil in a pan and add in the curry leaves and fennel seeds. Add in the ground masala. It will be very thick.
Add in some water to the blender (upto 1.5 cups) and add it back to the pan so the thick masala sticking in the blender doesn’t get wasted. Let it simmer for a minute. The masala is already well cooked. So a brief simmer is enough.
After a couple of minutes add in the coriander leaves and remove the pan from heat.
Kongu Thakkali Kuzhambu – Tamil style tomato kurma recipe for idli, dosa with coconut. Popular in Coimbatore.
Author: Kannamma – Suguna Vinodh
Recipe type: Gravy
Cuisine: South Indian
Serves: 4
Ingredients
For the Spice Mixture
2 sprigs curry leaves
1 teaspoon fennel seeds
1½ teaspoon coriander seeds
1 teaspoon cumin seeds
2 dried red chilli
1 teaspoon whole black pepper
2 tablespoon fried gram (pottu kadalai)
For the curry
2 tablespoon Oil
2 onions
6 very ripe tomatoes
1 teaspoon turmeric
1 teaspoon salt
a small candy size tamarind
½ cup fresh shredded coconut
For Tempering
1 teaspoon Oil
1 sprig curry leaves
1 teaspoon fennel seeds
5 stalks coriander leaves
Instructions
Heat oil in a pan and add in all the spices at once. Fry for a couple of minutes on low flame. Increase the flame to medium and add in the roughly chopped onions and fry till slightly brown. About 4-5 minutes.
Once the onions are brown, add in the tomatoes, turmeric, salt and a small piece of tamarind. Fry for a good 8-10 minutes until the tomatoes are almost dry.
Add in the fresh shredded coconut and fry for a minute.
Remove off heat and let it cool slightly. When cool enough to handle grind the mixture to a very smooth paste. Add up-to 2 cups of water while grinding.
Heat oil in a pan and add in the curry leaves and fennel seeds. Add in the ground masala and water. Let it simmer for a minute.
After a couple of minutes add in the coriander leaves and remove the pan from heat.
Serve hot with idli or dosa.
Notes
Measurements used – 1 cup = 250 ml Its traditional to use indian sesame oil, also called as gingely oil in this recipe. Peanut oil works equally good.
This is my recipe for Peas Pulao. Think about it – Peas and Rice. You can eat a hundred of these when you feel like it. Next time you eat peas pulao, stop at the hundredth grain and think about me. Will you? Don’t break the promise. OK. This is an aromatic one pot dish. There are a few small little steps involved in making this recipe. It takes a little bit of time but its totally worth it.
Here is how to do an awesome and fragrant Peas Pulao, Kannamma style.
STEP 1
As I told you, there are a few small prep steps involved. Lets get started with frying some onions. Heat oil in a small kadai until hot and add in 2 medium sized sliced onions and cook in high flame for 2 minutes or until golden brown. Drain on paper towels. Set aside.
STEP 2
Add two tablespoons of oil (the oil that we used to fry the onions) in a pan and fry the cashew-nuts on low flame until brown. Drain on paper towels. Set aside.
STEP 3
Now, lets cook rice. You can do this in your rice cooker or your pressure cooker. I do it in the pressure cooker. Soak 2 cups of basmati rice in cold water for half an hour. Now, lets talk about water. The water to rice ratio while cooking is 1 RICE : 1.5 HOT WATER. So I added 3 cups of hot water to the rice. Add SALT, cinnamon, cloves and cardamom in the water and cook it for 2 whistles in medium flame or follow the instructions of your rice cooker. Once cooked, add in two to three tablespoons of ghee and fluff up the rice with a flat spatula. Set aside.
STEP 4
Soak a generous pinch of saffron in half a cup of hot milk. Set aside.
STEP 5
Boil some peas and set aside.
Chop mint leaves and coriander leaves. Set aside.
STEP 6 – Onion and Peas Saute
Crush some ginger and garlic in a mortar and pestle. We just want it crushed. Not pureed. Set aside.
Add two tablespoons of oil (the oil that we used to fry the onions) in a pan and add in two medium onions and fry till soft. Add in 10 crushed green chillies. I added less as my young son still cannot take heat. He loves this pulao. I do not want his mouth on fire. So I stopped with 3 chillies. Adjust the chillies according to your taste. Add in the crushed ginger and garlic. Add in the salt. Fry for 2-3 minutes till the ginger and garlic is cooked and dry.
Add in some boiled peas and cook for a minute or two. Remove off heat. Set aside.
FINAL STEP
Now is the final step. Lets call it putting together the pulao. Take a heavy bottomed pan with a tight lid.
1. Take half of the onion and peas saute mixture and spread it on the bottom of the pan.
2. Take half of the rice mixture and spread it on top of the onion and peas mixture.
3. Sprinkle half of the fried onions.
4. Sprinkle half of the fried cashew-nuts.
5. Add in few coriander leaves and mint leaves.
6. Sprinkle half of the saffron milk all over the pan
REPEAT the above steps to form another layer.
We need to put it on Dum. You can either do this in the stove top or in the oven.
If you are doing it in the stove top, keep the pulao dish on top of an iron skillet/griddle and cook on low flame (dum) for 15 minutes.
If using the oven, cook in a 400 degree F oven for 20 minutes. The results are extremely good in an oven. I always finish cooking the dum in the oven.
Delicious Recipe for Indian Green Peas Pulao with basmati rice.
Author: Kannamma – Suguna Vinodh
Recipe type: Main Dish
Cuisine: Indian
Serves: 4
Ingredients
For Step 1
Oil for deep frying
2 medium sized onions, sliced
For Step 2
2 Tablespoon Oil
3 tablespoon Cashew-nut
For Step 3
2 cups rice
3 cups hot water
2 sticks cinnamon
3 cloves
3 cardamom
1 teaspoon salt
3 tablespoon ghee
For Step 4
½ cup hot milk
generous pinch of saffron
For Step 5
250 grams peas
10 sprigs mint leaves
10 stalks coriander leaves
For Step 6
1 pod garlic
2 inch ginger
1 tablespoon oil
2 medium sized onion
10 green chillies, crushed
½ teaspoon salt
Instructions
Heat oil in a small kadai until hot and add in 2 medium sized sliced onions and cook in high flame for 2 minutes or until golden brown. Drain on paper towels. Set aside.
Add two tablespoons of oil (the oil that we used to fry the onions) in a pan and fry the cashew-nuts on low flame until brown. Drain on paper towels. Set aside.
Soak 2 cups of rice in cold water for half an hour. The water to rice ratio is 1 RICE : 1.5 HOT WATER. So I added 3 cups of hot water to the soaked rice. Add SALT, cinnamon, cloves and cardamom in the water and cook it for 2 whistles in medium flame or follow the instructions for your rice cooker. Once cooked, add in two to three tablespoons of ghee and fluff up the rice with a flat spatula. Set aside.
Soak a generous pinch of saffron in half a cup of hot milk. Set aside.
Boil some peas and set aside. Chop mint leaves and coriander leaves. Set aside.
Crush some ginger and garlic in a mortar and pestle. We just want it crushed. Not pureed. Set aside.Add two tablespoons of oil (the oil that we used to fry the onions) in a pan and add in two medium onions and fry till soft. Add in 10 crushed green chillies. Add in the crushed ginger and garlic. Add in the salt. Fry for 2-3 minutes till the ginger and garlic is cooked and dry. Add in some boiled peas and cook for a minute or two. Remove off heat. Set aside.
FINAL STEP – Layering the pulao -Take half of the onion and peas saute and spread it on the bottom of the pan. Take half of the rice mixture and spread it on top of the onion and peas mixture. Sprinkle half of the fried onions. Sprinkle half of the fried cashew-nuts. Add in few coriander leaves and mint leaves. Add in half of the saffron milk all over the pan. REPEAT the above steps to form another layer.
Put it on Dum – If you are doing it in the stove top, keep the pulao dish on top of a iron skillet/griddle and cook on low flame (dum) for 15 minutes. If using the oven, cook in a 400 degree F oven for 20 minutes.
Home made pasta sauce is so much better than the bottled stuff any day. The main thing for a good pasta sauce is to have really good ripe tomatoes. The recipe otherwise has very few ingredients and a couple of spices. That is all it takes to make a good pasta sauce. You can substitute canned tomatoes for fresh ones, but we will be using fresh tomatoes today for this recipe.
The tomatoes need to be peeled, de-seeded and juiced before making the sauce. So lets get cooking guys…..
Boil water in a pan and drop in the ripe tomatoes in boiling water. Boil for half a minute to a minute until the skin of the tomato cracks like the picture shown below. Blanching the tomatoes in hot water helps in peeling the skin easily.
Peel the tomato skin and cut the tomato into half. Remove the seeds and let the juices through a strainer / colander. We will be using the juice later.
After peeling and removing the seeds, you will be left with tomato meat and tomato juice. Discard the skin and the seeds.
Puree the tomatoes in a food processor. Set aside.
You just made home made tomato pulp. Congrats.
Lets move on to making the pasta sauce.
Heat olive oil in a pan and add in 3-4 cloves of minced garlic and one finely chopped onion. Add in a teaspoon of dried thyme.
Cook the onions until soft and translucent. About 3-4 minutes in medium flame. Add in the tomato puree along with the strained juices.
There is a little Italian Nonna’s trick while making tomato sauce for pasta. Its adding a teaspoon of sugar. It really rounds out the flavor. So add a teaspoon of sugar. Add in freshly ground pepper and salt.
Simmer the sauce for 10 minutes in medium flame until a thick sauce forms.
Switch off the flame and tear some fresh basil leaves and add it to the pasta sauce.
Your pasta sauce is now ready. You can store this sauce for up to a week in the refrigerator.
Putting together pasta and sauce:
Adding pasta sauce on cooked pasta and serving as is without making the sauce adhere to the pasta is a sin. The sauce should nicely coat the pasta and should always be cooked briefly so the pasta absorbs the flavor of the sauce. This little extra step goes a long way.
Add some cooked pasta in a pan and set the stove on medium heat. Add in some of the tomato sauce and a teaspoon of olive oil. Briefly saute the mixture for a minute. The sauce needs to adhere and coat the pasta. If the pasta is too dry, add in some drained leftover pasta water and cook till desired consistency.
Remove off heat. Serve the pasta with some grated parmesan cheese or any aged cheese of your choice. Serve hot.
Homemade recipe for tomato basil pasta sauce from scratch using fresh tomatoes. Best, simple and basic.
Author: Kannamma – Suguna Vinodh
Recipe type: Main Course
Cuisine: Italian
Serves: 4-5 cups
Ingredients
¼ cup extra virgin olive oil
1 medium onion
4 garlic cloves, minced
1 teaspoon dried thyme
1 kilogram ripe tomatoes or two – 28 ounce canned peeled tomatoes
1 teaspoon salt
1 teaspoon sugar
1 teaspoon pepper
5-6 fresh basil leaves
Instructions
Boil water in a pan and drop the ripe tomatoes in the boiling water. Boil for half a minute to a minute. Peel the tomato skin and cut the tomato into half. Remove the seeds and let the juices through a strainer / colander. We will be using the juice later.
Puree the tomatoes in a food processor. Set aside.
Heat olive oil in a pan and add in 3-4 cloves of minced garlic and one finely chopped onion. Add in a teaspoon of dried thyme.
Cook the onions until soft and translucent. About 3-4 minutes in medium flame. Add in the tomato puree along with the strained juices.
Add a teaspoon of sugar. Add in freshly ground pepper and salt.
Simmer the sauce for 10 minutes in medium flame until a thick sauce forms.
Switch off the flame and tear some fresh basil leaves and add it to the pasta sauce.
Pasta sauce is now ready. You can store this sauce for up to a week in the refrigerator.
Pondicherry Style Egg Curry – Muthaiy curry. The coastal city of Pondicherry has been greatly influenced by the French as it was a French colony for a long time before independence. Pondicherry cuisine is primarily based on Tamil cuisine but with a lot of influence from the french. I first saw Pondicherry’s food chronicler Lourdes Tirouvanziam-Louis in a Rick Stein’s show. She was so passionate about the food of Pondicherry. Very few people have that passion and she sits right on top of that list. Immediately after the show, I placed an order in amazon for her book titled The Pondicherry Kitchen. I am glad I did. The recipes are clear and detailed with a lot of history and authenticity behind. The book is a genius for she has superbly documented the recipes that have been passed on orally through generations.
This recipe has been adapted from Madam Lourdes book.
This egg curry is so flavorful and mild that we make it so regularly. Here it is. Pondicherry Style Egg Curry.
This is a coconut based egg curry. Madam Lourdes uses freshly extracted milk from the coconut. Here is how I do it. Take half a coconut and grind it with 1.5 cups of water in a blender to a smooth paste. Pass the ground coconut through a colander/strainer and squeeze all the liquid. The liquid you get is the first thick milk. Set aside separately.
Add another 1.5 cups of water to the coconut dregs and run it again in the blender. Pass the ground mixture again through a colander/strainer and squeeze all the liquid. The liquid you get is the the second light milk. Set aside separately. Repeat the process one more time adding 1 cup water this time and you will have the third milk. Discard the coconut dregs after extracting the third milk.
Here it is. First milk , second and third milk.
Heat oil in a pan and add in the cloves, cinnamon, and onions. Fry till the onions are lightly golden brown.
In the mean time crush the garlic and ginger. Set aside.
Add in the crushed ginger and garlic. Fry till golden brown.
Now, make a paste of coriander seeds, green chillies, poppy seeds and fennel seeds. Add up-to 3/4 cup water while grinding.
Add the ground paste to the pan along with a teaspoon of turmeric. Fry till the spices are cooked and brown.
Add the tomatoes and the salt and fry till the tomatoes are soft.
Add the second and third coconut milk. Add in the potatoes. Let it simmer in low flame for 10-15 minutes until the potatoes are fork tender.
Switch off the flame. Remove the pan from heat. Add the thick coconut milk, hard boiled eggs, lemon juice and coriander leaves. You really want to add these ingredients after removing from heat else the coconut milk will curdle and the lemon juice turning bitter. So no more fire guys..
Recipe for South Indian Pondicherry style Egg Curry – Muthaiy curry. Adapted from the Pondicherry Kitchen. Measurements Used – 1 cup = 250 ml
Author: Kannamma – Suguna Vinodh
Recipe type: Gravy
Cuisine: South Indian
Serves: 4
Ingredients
For the Paste
1 teaspoon coriander seeds
4 green chillies
1 tablespoon poppy seeds (khus khus)
3 teaspoon fennel seeds
Other Ingredients
½ – ¾ of a big coconut
2 tablespoon oil
2 cloves
2 sticks cinnamon
3 onions, sliced fine
1 inch ginger
6 cloves garlic
2 big tomatoes, finely chopped
1 teaspoon turmeric
1½ teaspoon salt
3 potatoes cubed, optional
5-6 hard boiled eggs
Juice of one lemon
3-4 sprigs coriander leaves, chopped
Instructions
Extract the thick and thin coconut milk from the coconut. Set aside.
Heat oil in a pan and add in the cloves, cinnamon, and onions. Fry till the onions are lightly golden brown.
Add in the crushed ginger and garlic. Fry till golden brown.
Now, make a paste of coriander seeds, green chillies, poppy seeds and fennel seeds. Add up-to ¾ cup water while grinding.
Add the ground paste to the pan along with a teaspoon of turmeric. Fry till the spices are cooked and brown.
Add the tomatoes and the salt and fry till the tomatoes are soft.
Add the second and third coconut milk. Add in the potatoes. Let it simmer in low flame for 10-15 minutes until the potatoes are fork tender.
Switch off the flame. Remove the pan from heat. Add the thick coconut milk, hard boiled eggs, lemon juice and coriander leaves.
Serve hot with rice.
Notes
The original recipe has prawns and cashew-nuts added to the gravy. You might include prawns while boiling potatoes if you wish. You can substitute fresh pressed coconut milk for store bought coconut milk. Just use a can – 250 ml. Adjust the water while cooking. Add half for cooking and half at the end. Add more green chillies if you like a spicy gravy. Pierce the hard boiled eggs with a fork so the gravy gets marinated into the eggs.
Fermented Ragi Dosa
Having Idli / Dosa batter at home equals peace of mind. It comes in handy whenever you are running late, tired, not in a mood to cook, busy…… Here are the other dosa batter recipes on Kannamma Cooks.
Here is how to do an awesome fermented Ragi dosa batter with Ragi Millet. I use whole Ragi and not Ragi flour. I like to use whole millet and not the flour as the soaked and ground millet produces better quality batter. There is this theory behind whole grains and their flours. The moment the grains are ground to flour, the essential oils from the grain gets released and may start deteriorating from that time on. So the older the flour gets, it turns rancid. So wherever possible I use whole grain and try to grind it freshly.
This recipe has just three ingredients. Ragi, Urad dal and salt. I soak the rice and the dal separately as soon as I wake up in the morning for a couple of hours and grind it in a blender. I let it ferment through the day and the batter is ready for dinner.
Wash and soak the whole white urad dal and the Ragi millet separately for couple of hours in lots of water so that the grains are completely immersed in water. Wash the Ragi millet 3-4 times in running water as it might contain a lot of dust and foreign particles. I soaked one cup of dal and two cups of Ragi millet.
Grind the Urad dal with 1.5 cups of water in a blender to a smooth paste. Set aside.
Grind the Ragi millet with a cup of water in the blender to a smooth paste.
Mix the Ragi millet paste to the urad dal paste. Add in the salt and mix well to combine. Cover the bowl with a lid and let it ferment in a draft free place for 6-8 hours. It might take more time if you live in a cold place.
The batter should have increased in volume after 6-8 hours and should look foamy. Mix well using a spatula to release the excess foam. The batter should not be very thick. If its thick, add some water to dilute. It should form thick ribbons when lifted.
Heat a dosa pan / griddle until hot. Let the flame be at medium. Pour a ladle of batter onto the griddle. Using the back of the ladle spread batter into a round. Sprinkle 1/8 teaspoon of oil onto the pan. Let it cook for 30 seconds until the sides are brown and little brown spots start to appear. Flip carefully with a thin metal spatula, and cook until browned. Up-to 30 seconds more. Transfer to a plate. Continue with the remaining batter.
South Indian fermented Ragi Dosa recipe made with whole Ragi millet and Urad dal. Healthy millet dosa.
Author: Kannamma – Suguna Vinodh
Recipe type: Bread
Cuisine: South Indian
Serves: 25 dosas
Ingredients
1 cup Urad dal
2 cups Whole Ragi Millet – Finger Millet
1 teaspoon salt
Oil for the dosa
Instructions
Wash and soak the whole white urad dal and the Ragi millet separately for couple of hours in lots of water so that the grains are completely immersed in water. Wash the Ragi millet 3-4 times in running water as it might contain a lot of dust and foreign particles.
Grind the Urad dal with 1.5 cups of water in a blender to a smooth paste. Set aside.
Grind the Ragi millet with a cup of water in the blender to a smooth paste.
Mix the Ragi millet paste to the urad dal paste. Add in the salt and mix well to combine. Cover the bowl with a lid and let it ferment in a draft free place for 6-8 hours.
The batter should have increased in volume after 6-8 hours and should look foamy. Mix well using a spatula to release the excess foam. The batter should not be very thick. If its thick, add some water to dilute. It should form thick ribbons when lifted.
Heat a dosa pan / griddle until hot. Let the flame be at medium. Pour a ladle of batter onto the griddle. Using the back of the ladle spread batter into a round. Sprinkle ⅛ teaspoon of oil onto the pan. Let it cook for 30 seconds until the sides are brown and little brown spots start to appear. Flip carefully with a thin metal spatula, and cook until browned. Upto 30 seconds more. Transfer to a plate. Continue with the remaining batter.
Serve warm, with chutney.
Notes
If you live in a very cold place leave your batter in some place warm. Leaving your batter inside your oven with the pilot light on works great if you live abroad and your place is cold.
The batter can be stored in the refrigerator for up to 2 days.
Italian Spring Onion Frittelle – I am always looking for easy recipes for snack time. Something quick and something that can be put together in under 10 minutes. Spring Onion Frittelle is one such recipe. This recipe is from the great Italian American Chef Mario Batali. In his Batali brothers cookbook, he says “These easy little scallion pancakes take less than 10 minutes to make, and the batter is a super delicious vehicle for any small bits of leftover vegetables from the night before. Simply substitute 1 cup of anything you have for the sliced scallions.”
Here is the recipe for Italian Spring Onion Frittelle.
In a medium-sized bowl, combine the eggs, flour (maida), baking powder, water, cheese, salt and pepper and whisk well to combine. Stir the spring onions and green chillies into the batter.
The batter will be bubbly.
In a nonstick or cast iron pan, heat 2 tablespoons of Olive oil. Drop by tablespoonfuls into the hot pan to make 2 inch pancakes. Cook until golden brown on the first side then flip to brown on the other side.
Remove from the oil with a slotted spoon and set on a plate lined with paper towels, to drain. Repeat with the remaining batter. Serve hot.
Recipe for Italian Spring Onion Frittelle. Adapted from Chef Mario Batali. Measurements used – 1 Cup = 250 ml
Author: Kannamma – Suguna Vinodh
Recipe type: Snack
Cuisine: Italian
Serves: 15 Frittelle
Ingredients
2 eggs
½ cup Maida – All purpose flour
2 teaspoon baking powder
½ cup water
¼ cup grated cheese
Salt and pepper to taste
2 bunches spring onions or scallions sliced to yield 1.5 cups
1 green chilli – minced (optional)
2 tablespoons Olive oil
Instructions
In a medium-sized bowl, combine the eggs, flour (maida), baking powder, water, cheese, salt and pepper and whisk well to combine. Stir the spring onions and green chillies into the batter.
In a nonstick or cast iron pan, heat 2 tablespoons of Olive oil. Drop by tablespoonfuls into the hot pan to make 2 inch pancakes. Cook until golden brown on the first side then flip to brown on the other side.
Remove from the oil with a slotted spoon and set on a plate lined with paper towels, to drain. Repeat with the remaining batter. Serve immediately.
Notes
The original recipe uses parmigiano-reggiano cheese. The cheese itself is salty. So add less salt to the batter.
I first saw this cake in an episode of Cake Boss. Buddy Valastro made this cake and it looked to die for. Its not always these big cakes and pastries that attract me. I love simple everyday cakes like these. Buddy Valastro tells that the recipe is more than 100 years old and came with the bakery when his father bought it. It is an old fashioned German crumb cake called Streuselkuchen. They used some of the leftover cake scraps from the bakery to make that awesome topping. Genius. The topping consisted of crumbled cake, sugar and butter and of course some secret ingredients that Badabing Badaboom – The Hoboken boy wont tell.
I wanted to try. I wanted to try. I tried a lot of recipes before nailing it on this one. Carlos Bakery describes this cake as “Piled high with thick, jumbo golden crumbs, our crumb cake is the stuff of legends! Made with brown sugar, butter, and cinnamon, over sized crumbs sit on top of authentic German bun dough, a sweet addition to your day!” So come with me, Lets make a copycat Crumb Cake Hoboken Style baby.
First, lets tackle the dough. The dough is very rich, more like a french brioche dough. Its a very very sticky dough.
Take a small bowl. Add in the yeast, 1/2 a cup of warm milk and 1 tablespoon of sugar and let it rest until the yeast is dissolved and foamy, about 5 minutes.
Take a big mixing bowl and add all the remaining ingredients listed for the dough except the butter. Add in the yeast mixture too. Mix everything with a wooden spatula just until combined.
Slowly add in the butter in small pieces and start kneading. I kneaded by hand. If using a stand mixer, knead for 5 minutes on low speed.
Don’t add additional flour while kneading. The dough will be extremely sticky. Knead for a GOOD 10 minutes by hand. Scrape the dough from the bench with a help of a metal scraper and fold it onto itself like the picture below. Scraper is a very essential tool for kneading sticky dough. Repeat till completely kneaded. The dough will slowly come together but will remain very very sticky to touch. Remember NOT to add extra flour while kneading.
It will come together as one single mass of dough. Just scrape the dough and place it on a bowl.
Cover the dough with a plastic wrap and let the dough rise in a draft-free place at warm room temperature until doubled in bulk. I use a shower cap to cover the bowl. Its a cool idea! It will take about two hours to double in bulk.
For the topping
Pulse together topping ingredients in a food processor until many large clumps form. Transfer to a bowl and chill, covered, until ready to use.
Final Rise of Dough and Baking
Butter and line a 13- by 9-inch baking dish.
Remove the dough from the bowl gently and place it on the baking dish.
Wet the hands in cold water and spread the dough evenly on the pan.
Sprinkle all of the topping on the dough and gently press the topping with your fingers.
Cover the dough with a kitchen towel and let dough rise again in a draft-free place at warm room temperature until almost doubled in bulk, 1 1/2 to 2 hours.
Put the oven rack in the middle of the oven and preheat oven to 350°F /180°C. Bake until topping is golden, 55 to 60 minutes. Cool cake in pan on a rack until barely warm.
Sprinkle confectioners sugar on top of the cake. Just sift some sugar in a strainer on top of the cake for even distribution of sugar.
Serve WARM. Always!! Leftovers can be warmed in a microwave for 10-15 seconds and served.
Recipe for Carlos Bakery German Crumb Cake. Old fashioned New Jersey Hoboken crumb cake Cake Boss Buddy Valastro Style.
Author: Kannamma – Suguna Vinodh
Recipe type: Cake
Cuisine: American
Serves: 15
Ingredients
For the Dough
2 teaspoons Active dry yeast
1 Tablespoon sugar
1 cup warm whole milk
½ cup sugar
1 tablespoon fresh lemon juice
3½ cups all-purpose flour
1½ teaspoons salt
2 large eggs
1½ teaspoons vanilla
1½ sticks (3/4 cup) unsalted butter
For the Crumb Topping
1½ cups all-purpose flour
¾ cup sugar
1½ teaspoons cinnamon
1½ sticks (3/4 cup) cold unsalted butter
1 teaspoon vanilla
2 cups leftover cake crumbs/scraps (optional)
Instructions
For the Dough
Take a small bowl. Add in the yeast, ½ a cup of warm milk and 1 tablespoon of sugar and let it rest until the yeast is dissolved and foamy, about 5 minutes.
Take a big mixing bowl and add in all the remaining ingredients listed for the dough except the butter. Add in the yeast mixture too. Mix everything with a wooden spatula just until combined.
Slowly add in the butter in small pieces and start kneading. I kneaded by hand. If using a stand mixer, knead for 5 minutes on low speed.
Don’t add additional flour while kneading. The dough will be extremely sticky. Knead for a GOOD 10 minutes by hand. Scrape the dough from the bench with a help of a metal scraper and fold it onto itself. Scraper is a very essential tool for kneading sticky dough. Repeat till completely kneaded. The dough will slowly come together but will remain very very sticky to touch. Remember NOT to add extra flour while kneading.
It will come together as one single mass of dough. Just scrape the dough and place it on a bowl.
Cover the dough with a plastic wrap and let the dough rise in a draft-free place at warm room temperature until doubled in bulk. I use a shower cap to cover the bowl. Its a cool idea! It will take about two hours to double in bulk.
For the topping
Pulse together topping ingredients in a food processor until many large clumps form. Transfer to a bowl and chill, covered, until ready to use.
Final Rise of Dough and Baking
Butter and line a 13- by 9-inch baking dish.
Remove the dough from the bowl gently and place it on the baking dish.
Wet the hands in cold water and spread the dough evenly on the pan.
Sprinkle all of the topping on the dough and gently press the topping with your fingers.
Cover the dough with a kitchen towel and let dough rise again in a draft-free place at warm room temperature until almost doubled in bulk, 1½ to 2 hours.
Put the oven rack in the middle of the oven and preheat oven to 350°F /180°C. Bake until topping is golden, 55 to 60 minutes. Cool cake in pan on a rack until barely warm.
Sprinkle confectioners sugar on top of the cake. Just sift some sugar in a strainer on top of the cake for even distribution of sugar.
Serve WARM. Always!!
Notes
Recipe adapted from Ruth Cousineau. Crumb cake is best when freshly made, but leftovers can be rewarmed and served. Serve WARM. Always!!
I am from a perfect Sambar eating South Indian family where yellow lentils are mainstay. We never cooked with black lentils. The first time I had black lentils was in a North Indian restaurant in Mountain View, CA. It was a revelation. It was rich, hearty and delicious. It was a velvety smooth dal. It was a perfect vehicle for Indian Naan and Roti. Dal Bukhara is a slow cooked black lentil simmered in a tomato based sauce for hours. The world famous ITC Bukhara restaurant in Delhi slow cooks the dal on wood fire for at least 18 hours. Their dal is ultimate. Dal Bukhara is based on a very simple recipe. It just needs to cook for a long time to get that velvety smooth texture and taste on the dal.
Soak the Black urad dal in water over-nite. Then pressure cook the dal until soft and set aside. Use 3.5 cups of water for every cup of dal in a pressure cooker. It should take about 6-7 whistles or 15 minutes on medium flame.
Take a very heavy bottomed pan. We are going to slow cook the dal. So its important the sauce doesn’t get scorched at the bottom. Heat the pan with a tablespoon of oil and add in the cumin seeds and the cinnamon.
Add in the onions and fry till soft. About 3 minutes on medium flame. Add in the ginger garlic paste and briefly fry for a minute.
This sauce is a tomato based sauce. So make sure you pick ripe tomatoes. We need a good 7-8 tomatoes. Run the whole tomatoes in a blender and add it to the pan.
Immediately, add in the chilli powder, turmeric powder, cumin powder and the salt.
Add in the cooked dal.
To the dal, add in 500 ml of water.
Now, reduce the flame to the lowest possible. Cover the pan with a lid and let it simmer for one hour. Keep stirring every 10 minutes to avoid the dal scorching at the bottom.
After one hour, the dal would have become creamy and thick.
Add in 1/2 a cup of cream and 3-4 tablespoon of butter. Now don’t skip this step. This is what makes this dish what it is. Simmer briefly for a minute and remove the pan from heat.
Recipe for slow cooked Dal Bukhara, ITC style made with black urad dal – black lentils. Measurements Used – 1 Cup = 250ml
Author: Kannamma – Suguna Vinodh
Recipe type: Gravy
Cuisine: Indian
Serves: 6
Ingredients
1 cup Urad Dal
2 tablespoon oil
1 teaspoon cumin seeds
2 sticks cinnamon
2 medium onions, chopped
1 pod garlic and 2 inch piece ginger, pureed to a paste with ¼ cup water
8 Tomatoes
2 teaspoon chilli powder
1 teaspoon turmeric powder
2 teaspoon cumin powder
1.5 teaspoon salt
½ cup cream
3 tablespoon unsalted butter
Instructions
Heat the pan with a tablespoon of oil and add in the cumin seeds and the cinnamon.
Add in the onions and fry till soft. About 3 minutes on medium flame. Add in the ginger garlic paste and briefly fry for a minute.
Run the whole tomatoes in a blender and add it to the pan.
Immediately, add in the chilli powder, turmeric powder, cumin powder and the salt.
Add in the cooked dal. To the dal, add in 500 ml of water.
Now, reduce the flame to the lowest possible. Cover the pan with a lid and let it simmer for one hour. Keep stirring every 10 minutes to avoid the dal scorching at the bottom.
After one hour, the dal would have become creamy and thick.
Add in ½ a cup of cream and 3-4 tablespoon of butter. Now don’t skip this step. This is what makes this dish what it is. Simmer briefly for a minute and remove the pan from heat.
Tamilnadu Style Muslim Chicken Biriyani – தமிழ் பாய் வீட்டு கோழி பிரியாணி
Thahira is a very close friend of mine living in San Diego. She is an amazing cook. I have eaten tonnes of this biriyani made by her. We fondly call it as baai veetu biriyani-பாய் வீட்டு பிரியாணி. My toddler calls Thahira’s husband Sadak as Abba and because Abba brings biriyani every time he comes home, he named the dish as Abba Mummum. Mummum is food. So even today he calls this biriyani as Abba mummum. We have had some wonderful memories that revolve around this biriyani. I miss her a lot after moving to India and this biriyani is filled with a lot of nostalgic memories. Biriyani made in Tamilnadu is different. The rice is not precooked. Its cooked along with the chicken and because of that the flavors penetrate deep into the rice. This is my kind of biriyani. Thahira has two adorable sons Salman and Suhaib and the younger one Suhaib is my sons best buddy. Mine too. He is a rock star. I love you Suhaib.
Here is the recipe for Tamilnadu Style Muslim Chicken Biriyani. You will need the following ingredients.
Heat Oil in a pan and add in the spices. Cinnamon, Cloves and Cardamom. Add in the onions and saute until the onions are soft.
When the onions are sauteing, make a paste of ginger and garlic in a blender. Add up to 1/4 cup of water and grind it into a very smooth paste.
Once the onions are soft, Add in the tomatoes and the ginger garlic paste.
Saute the mixture until streaks of oil appear on the top. Then, add in the green chillies and the chicken.
Add in the salt, red chilli powder and the coriander powder. Add in the yogurt. Briefly saute for a minute to coat the chicken.
Cover the pan with a lid and cook on medium flame for 7-8 minutes. Do not add any additional water. When the chicken is cooking, soak the rice in cold water.
After 8 minutes, the chicken should be almost cooked. Remove the cooked meat to a bowl and roughly measure how much liquid is left behind. Mine had about 1.5 cups of liquid. Just measure roughly. It need not be accurate. Measurements used – 1 cup rice = 250 ml We are using 2 cups rice and 750 grams meat. We require 2 times water to the quantity of rice. So we need to add 4 cups water. There was already 1.5 cups gravy that we measured before. So I added 2.5 cups water to the mixture. Add back the meat. Let the mixture come to a boil.
Drain the rice and add it to the pan. Add in the coriander leaves, mint leaves and juice of a lemon.
I cooked the biriyani in the pressure cooker. If using pressure cooker, cover the lid and cook for exactly two whistles. Approximately 4-5 minutes. If cooking directly on the pan, then cover the pan with a lid and let it cook for the first four minutes on medium flame. Open the lid. Gently mix once from the bottom, cover the lid again and simmer for 10 minutes on very low flame. Remove the pan from heat and set aside.
Wait for the pressure from the cooker to release naturally. If cooking in a pan, Do not disturb for the next 20 minutes. The rice will get swollen and absorb all the left out moisture. This time is very important. Do not rush.
Tamilnadu Style Muslim Chicken Biriyani – தமிழ் பாய் வீட்டு கோழி பிரியாணி Measurements used – 1 Cup = 250 ml.
Author: Kannamma – Suguna Vinodh
Recipe type: Biriyani
Cuisine: South Indian
Serves: 4
Ingredients
2 cups rice
750 grams chicken with bone
4 tablespoon peanut oil
2 stick cinnamon
2 cardamom
2 cloves
2 medium onion, sliced
2 medium tomatoes, chopped
1 pod garlic
2 inch piece ginger
3 green chillies, slit
1½ teaspoon salt
1 teaspoon red chilli powder
2 teaspoon coriander powder
½ cup plain yogurt
15-20 mint leaves, coarsely chopped
6-7 sprigs coriander leaves, coarsely chopped
Juice of a small lemon
Instructions
Heat Oil in a pan and add in the spices. Cinnamon, Cloves and Cardamom. Add in the onions and saute until the onions are soft.
Once the onions are soft, Add in the tomatoes and the ginger garlic paste.
Saute the mixture until streaks of oil appear on the top. Then, add in the green chillies and the chicken. Briefly saute for a minute to coat the chicken.
Add in the salt, red chilli powder and the coriander powder. Add in the yogurt.
Cover the pan with a lid and cook on medium flame for 7-8 minutes. When the chicken is cooking, soak the rice in cold water.
After 8 minutes, the chicken should be almost cooked. Remove the cooked meat to a bowl and roughly measure how much liquid is left behind. Mine had about 1.5 cup of liquid. Just measure roughly. It need not be accurate. Measurements used – 1 cup rice = 250 ml. We are using 2 cups rice and 750 grams meat. We require 2 times water to the quantity of rice. So we need to add 4 cups water. There was already 1.5 cups gravy that we measured before. So I added 2.5 cups water to the mixture. Let the mixture come to a boil.
Drain the rice and add it to the pan. Add in the coriander leaves, mint leaves and juice of a lemon.
I cooked the biriyani in the pressure cooker. If using pressure cooker, cover the lid and cook for exactly two whistles. Approximately 4-5 minutes. If cooking directly on the pan, then cover the pan with a lid and let it cook for the first four minutes on medium flame. Open the lid. Gently mix once from the bottom, cover the lid again and simmer for 10 minutes on very low flame.
Remove the pan from heat and set aside.
Wait for the pressure from the cooker to release naturally. If cooking in a pan, Do not disturb for the next 20 minutes. The rice will get swollen and absorb all the left out moisture. This time is very important. Do not rush.
Serve hot!
Notes
Add or reduce green chillies and red chilli powder according to your taste preference. If you do not want it spicy, omit the green chillies.
Always use chicken with the bone. Bone has a lot of flavour. We use skinless chicken for the biriyani.
Easy tomato chutney for Idli and Dosa – Thakkali Chutney “தக்காளி சட்னி”
This is my mom’s recipe for easy tomato chutney. Its a very easy recipe with very few ingredients and goes well with idli and dosa. This is one of those quick recipes that come together in no time. This is a very Tamilian style tomato chutney or thakkali chutney as its called. Its a little thin in consistency. Its perfect to dunk the idli in. Here is how to do a quick tomato chutney, moms style.
First we need to blanch the tomatoes. Boil hot water in a pan and drop in the tomatoes when the water is boiling. Let it cook for a couple of minutes. Drain the water and let it cool slightly. Peel the skin and set aside. No need to remove the seeds. Just removing the skin will do.
Puree the peeled tomatoes in a blender and set aside.
Heat oil in a kadai and add in the mustard seeds. Let it splutter. Add in the dried red chillies and the curry leaves. Let the curry leaves cook for 10 seconds.
Add in the finely chopped onions and fry for 3-4 minutes until soft. Add in the tomato puree and a cup of water. Add in the salt and half a teaspoon of jaggery.
Cover the kadai with a lid and let it simmer in medium flame for about 15 minutes.
Tamilnadu Coimbatore style Easy tomato chutney for idli and dosa recipe. Thakkali chutney. “தக்காளி சட்னி”
Author: Kannamma – Suguna Vinodh
Recipe type: Chutney
Cuisine: South Indian
Serves: 3
Ingredients
2 Tablespoon peanut oil
½ teaspoon mustard seeds
2 sprigs curry leaves
2-3 dried red chillies
1 Big onion, chopped fine
5-6 Tomatoes
¾ teaspoon salt
½ teaspoon jaggery
Instructions
First we need to blanch the tomatoes. Boil hot water in a pan and drop in the tomatoes when the water is boiling. Let it cook for a couple of minutes. Drain the water and let it cool slightly. Peel the skin and set aside. No need to remove the seeds. Just removing the skin will do.
Puree the peeled tomatoes in a blender and set aside.
Heat oil in a kadai and add in the mustard seeds. Let it splutter. Add in the dried red chillies and the curry leaves. Let the curry leaves cook for 10 seconds.
Add in the finely chopped onions and fry for 3-4 minutes until soft. Add in the tomato puree and a cup of water. Add in the salt and half a teaspoon of jaggery.
Cover the kadai with a lid and let it simmer in medium flame for about 15 minutes.
Remove off heat and serve hot with idli or dosa.
Notes
Break the dried red chillies into two if you want it more spicy. You can add more red chillies too. Use Indian Naati tomatoes – Naatu Thakkali for traditional taste.
South Indian Tamilnadu Style Carrot Poriyal stir-fry makes a perfect side dish for lunch. Its a very simple recipe that’s very delicious and its super packed with nutrition. Its very tasty. Carrots are steamed and a tempering added to it for the finish. We add fresh shredded coconut at the end. It is optional. If you do not want to add coconut, you can leave it. Here is how to do an awesome South Indian Tamilnadu Style Carrot Poriyal.
I do not like boiling the veggies in water and later draining the water. Here is a better way. Place the chopped carrots in a bowl. Place the bowl inside a pressure cooker that’s been already filled with about an inch of water. No need to add water to the carrots. Cook the carrots in the pressure cooker for 5-6 minutes until fork tender. About 4 whistles. It will cook to perfection and no tension of excess water.
Here is the cooked tender carrots. I do not add salt while cooking carrots. Set aside.
Heat oil in a kadai and add in the mustard seeds, cumin seeds, dried red chillies and curry leaves. Let it splutter. If you want it spicy, use a couple of chopped green chillies.
Add in one medium finely chopped onion and fry till soft. Add in the salt and a big pinch of asafoetida also called as hing.
Add in the boiled carrots and the fresh shredded coconut. The coconut is optional. Briefly saute for a minute and remove off heat.
Tamilnadu Style Carrot Poriyal recipe with coconut . With step by step pictures.
Author: Kannamma – Suguna Vinodh
Recipe type: Stir-Fry
Cuisine: South Indian
Serves: 3
Ingredients
400 grams Carrots, finely chopped
1 tablespoon peanut oil
¼ teaspoon mustard seeds
¼ teaspoon cumin seeds
2 dried red chillies
2 sprigs curry leaves
1 medium onion, chopped fine
½ teaspoon salt
1 big pinch asafoetida (hing)
¼ cup shredded coconut (optional)
Instructions
Boil the carrots until fork tender. Set aside.
Heat oil in a kadai and add in the mustard seeds, cumin seeds, dried red chillies and curry leaves. Let it splutter. If you want it spicy, use a couple of chopped green chillies.
Add in one medium finely chopped onion and fry till soft. Add in the salt and a big pinch of asafoetida also called as hing.
Add in the boiled carrots and the fresh shredded coconut. The coconut is optional. Briefly saute for a minute and remove off heat.
Serve hot with rice.
Notes
Add green chillies if you want a spicier stir-fry / poriyal.
Hot Cross Bun is a very traditional bun eaten during Easter. Its a sweet spiced bun that’s studded with dry fruits like raisins and currants. A cross is marked on the bun. The cross can either be a piped sweet icing marked after the bun is baked or a cross that’s drawn on the bun before it goes into the oven using a simple flour water mixture.
My Husband loves sweet buns. I have been making hot cross buns every year for sometime now. We used to get these buns at a nearby local bakery during Easter time when we lived in the USA. I would just go to the bakery and stand there looking at them shaping Challah loaves or load the bread dough in the oven. The smell of fresh baked bread would waft in the air. It was a traditional Jewish bakery but they made amazing hot cross buns. They etched the cross on the buns with a flour mixture that would bake into this nice white lines on the bun. They were soft, moist and loaded with fruits. Here is the recipe for awesome Hot Cross Buns.
Dissolve the yeast in 1/4 cup of warm water and a pinch of sugar. Set aside for 5 minutes. Let it foam. If it doesn’t foam, discard and start again.
In the mean time, measure and add all the ingredients listed under main ingredients to a bowl. Both wet and dry. Add in the yeast mixture. Knead the dough for 10 minutes. If using a stand mixer, knead for 5 minutes on medium speed. Don’t add additional flour while kneading. The dough will be slightly sticky. Knead for a GOOD 10 minutes by hand. Scrape the dough from the bench with a help of a metal scraper and continue kneading. Scraper is a very essential tool for kneading sticky dough. Repeat till completely kneaded. The dough will slowly come together. Remember NOT to add extra flour while kneading.
After kneading, when the dough feels smooth, just tuck the dough tight and place it on a lightly oiled bowl. Cover with a plastic wrap or a shower cap (cool idea) and leave to rise until at least doubled in size . About 1.5 to 2 hours.
Remove the dough onto a flat surface and mix in the dry fruits. Knead it gently until evenly incorporated.
Cover and leave to rise for one more hour.
After the rise, remove the dough and fold it twice or thrice gently to release the air bubbles.
Roll the dough into a log, divide the dough into 12 pieces and roll into round balls. Place them fairly close together on an oiled sheet pan. Cover the pan with a plastic sheet or a tea towel and let it rise for another hour or until doubled in size. Preheat the oven to 200°C
For the cross
Mix the flour and water to a paste. Fill up a piping bag with the paste. Make a cross on the buns and bake for 18-20 minutes, or until golden brown.
For the glaze
Mix the apricot jam and water and microwave for 15 seconds. Brush over the top of the buns when still warm. Cool the buns on a wire rack.
Best Ever Easy UK Hot Cross Buns Recipe with yeast. Part Wholemeal. For Easter Good Friday.
Author: Kannamma – Suguna Vinodh
Recipe type: Bread
Cuisine: English
Serves: 12
Ingredients
For the yeast mixture
2 teaspoon Active dry yeast
¼ cup Water
a pinch of Sugar
Main Ingredients
500 grams All purpose flour – Maida
100 grams Whole wheat flour – Atta
50 grams Sugar
25 grams Butter
1 teaspoon Salt
2 teaspoon Cinnamon
160 ml Milk (2/3 cup)
160 ml water (2/3 cup)
Other Ingredients
50 grams Sultanas
50 grams Raisins
50 grams Currants
For the Cross
80 grams Flour
80 grams Water (1/3 cup)
For the glaze
3 tablespoon Apricot Jam
2 tablespoon Water
Instructions
Dissolve the yeast in ¼ cup of warm water and a pinch of sugar. Set aside for 5 minutes.
In the mean time, measure and add all the ingredients listed under main ingredients to a bowl. Add the yeast mixture. Knead the dough for 10 minutes. If using a stand mixer, knead for 5 minutes on medium speed. Don’t add additional flour while kneading. The dough will be slightly sticky.
Just tuck the dough tight and place it on a lightly oiled bowl. Cover with a plastic wrap or a shower cap (cool idea) and leave to rise until at least doubled in size . About 1.5 to 2 hours.
Remove the dough onto a flat surface and mix in the dry fruits. Knead in until evenly incorporated.
Cover and leave to rise for one more hour.
After the rise, remove the dough and fold it twice or thrice gently to release the air bubbles.
Roll the dough into a log, divide the dough into 12 pieces and roll into round balls. Place them fairly close together on an oiled sheet pan. Cover the pan with a plastic sheet or a tea towel and let it rise for another hour or until doubled in size. Preheat the oven to 200°C
For the cross – Mix the flour and water to a paste. Fill up a piping bag with the paste. Make a cross on the buns and bake for 18-20 minutes, or until golden brown.
For the glaze – Mix the apricot jam and water and microwave for 15 seconds. Brush over the top of the buns when still warm. Cool the buns on a wire rack.


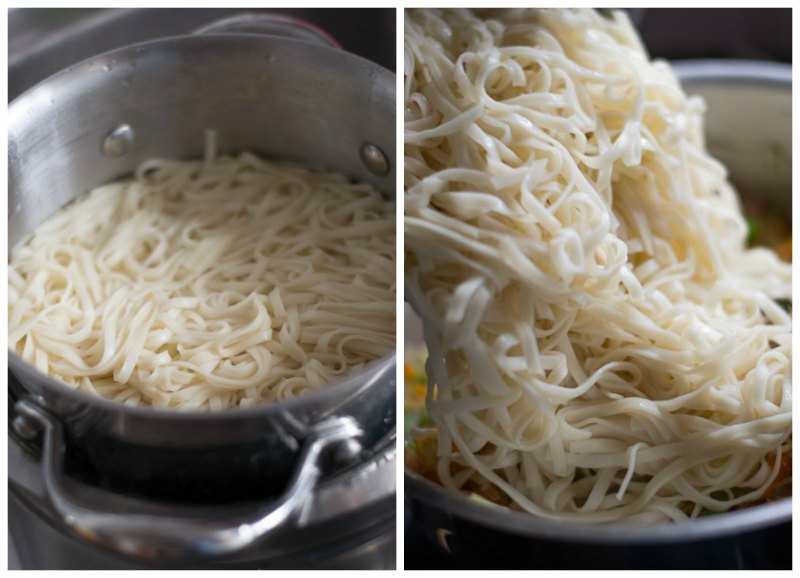


 All our friends love this and whenever we meet, we still ask Hema to bring thepla for us. And she is ever so happy to oblige.


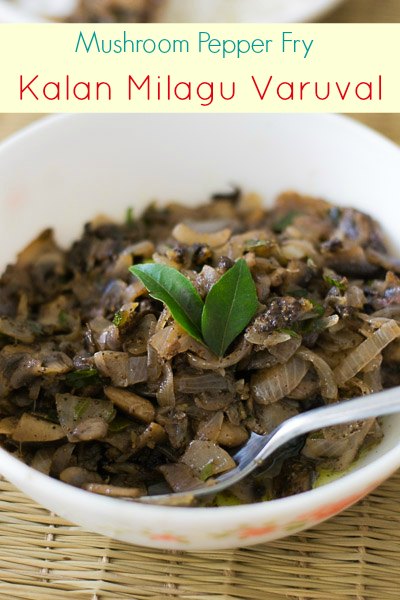


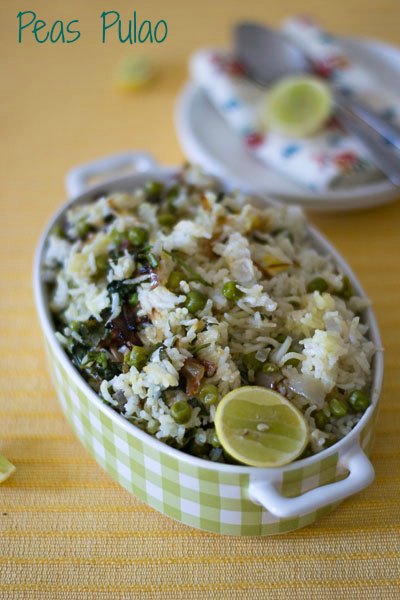
 STEP 2
 STEP 3
 STEP 4
 STEP 5
 STEP 6 – Onion and Peas Saute

 FINAL STEP


 Fermented Ragi Dosa


 For the topping
 Final Rise of Dough and Baking


 Tamilnadu Style Muslim Chicken Biriyani – தமிழ் பாய் வீட்டு கோழி பிரியாணி


 For the cross
 For the glaze
