We have a rule in the house. Deep fried something once a month on a sunday. Its been extremely cold this year in Bangalore. Deep fried anything is welcome. Mangalore bonda on a lazy sunday evening. Bring it on. Mangalore bonda is crispy on the outside, soft on the inside and perfect for a cold winter evening. This is a very easy to make recipe and its a winner. Here is how to do this yummy Mangalore Bonda. We call this as Maida Bonda too.
Measure 1.5 cups of all purpose flour / maida and 1/4 cup of rice flour. This little amount of rice flour helps in crisping. Add in the salt, asafoetida and crushed pepper.
Add in very finely minced ginger, finely chopped curry leaves, finely chopped coriander leaves and finely minced green chillies. I also add a tablespoon of sugar. This small addition of sugar helps in browning of the bondas. Add in 1.5 cups of yogurt / curd and beat well to form a smooth batter.
Add more yogurt if necessary to form a thick batter. If the batter is very watery, add little more maida and rice flour. Keep beating for couple of minutes until a very smooth, thick batter is formed. Rest the batter for 30 minutes up to an hour.
Once the batter has been rested, add in 1/4 teaspoon of baking soda and mix thoroughly. It should be a thick batter.
Heat oil in a kadai until medium hot. Add a small piece of the batter to check if the oil is ready. The oil is ready if the batter floats immediately to the top. If not wait for a minute more. Add in small scoops of the batter to the oil when the oil is ready.
Keep turning the batter balls so the batter cooks evenly on both sides. I use a fork to turn the batter. It works so well. Deep fry until its golden. Remove and drain on paper towels.
This Mangalore Bonda has to be served hot. It loses its crispness when it cools.
Recipe for crispy deep fried South Indian Karnataka Mangalore Bonda / Goli Baje – Bajji. This Maida bonda made with curd can be put together in minutes. With step by step pictures. Measurements Used – 1 CUP = 250 ML
Author: Kannamma – Suguna Vinodh
Recipe type: Tea Time Snacks
Cuisine: South Indian
Serves: 5
Ingredients
1½ cups All purpose flour / Maida
¼ cup Rice flour
1 teaspoon Salt
¼ teaspoon Asafoetida
1 teaspoon Crushed Pepper
1 tablespoon finely minced Ginger (1 inch piece)
2 sprigs Curry leaves, finely chopped
¼ cup chopped Coriander leaves (about 10 stalks)
2 Green Chillies, finely minced
1 tablespoon Sugar
1.5 – 2 cups Yogurt
¼ teaspoon Baking Soda
Oil for deep frying
Instructions
Measure 1.5 cups of all purpose flour / maida and ¼ cup of rice flour. This little amount of rice flour helps in crisping. Add in the salt, asafoetida and crushed pepper.
Add in very finely minced ginger, finely chopped curry leaves, finely chopped coriander leaves and finely minced green chillies. I also add a tablespoon of sugar. This small addition of sugar helps in browning of the bondas. Add in 1.5 cups of yogurt / curd and beat well to form a smooth batter. Add more yogurt if necessary to form a thick batter. Keep beating for couple of minutes until a very smooth, thick batter is formed. Rest the batter for 30 minutes up to an hour.
Once the batter has been rested, add in ¼ teaspoon of baking soda and mix thoroughly. It should be a thick batter.
Heat oil in a kadai until medium hot. Add a small piece of the batter to check if the oil is ready. The oil is ready if the batter floats immediately to the top. If not wait for a minute more. Add in small scoops of the batter to the oil when the oil is ready.
Keep turning the batter balls so the batter cooks evenly on both sides. I use a fork to turn the batter. It works so well. Deep fry until its golden. Remove and drain on paper towels.
This Mangalore Bonda has to be served hot. It loses its crispness when it cools.
I am a Tom Hanks fan. I love drama. I love dialogue. I love Mr.Gump.
Forrest Gump: Jenny and me was like peas and carrots. Forrest Gump: Jenny and me was like peas and carrots paneer.
Paneer and Peas are so so together. Matar paneer is a classic north indian side dish for roti / chapati. This is an easy gravy that can be put together in 30-40 minutes. So lets go make some match between matar and paneer. Mind you, its gonna be hot!
Shell about 500 grams of peas. I use fresh peas for this gravy. 500 grams of peas will yield about 1.5 cups of shelled peas. Wash and drain. Boil the peas with one cup of water until al dente. Set aside.
Take a deep bottomed pan and add in the roughly chopped tomatoes, cashew-nuts, salt, sugar, chilli powder, turmeric and cumin powder. Add in 2 cups of water to the pan. Cover the pan with a lid. Boil the mixture for 15 minutes in medium flame. Remove off heat.
Drain the excess water from the pan. Reserve the water for later use. Grind the drained tomato mixture to a smooth paste. Set aside.
We need to make another paste too. Grind together garlic, ginger and onion. Add little water while grinding to help make a smooth paste. Set aside.
Heat oil in a pan and add in cumin seeds, cinnamon and cardamom. Add in the ginger-garlic-onion paste and fry till the oil oozes out of the mixture. It will take about 3 minutes in medium flame.
Add in the ground tomato paste and the reserved tomato water. Check for seasoning. Add in more salt or chilli powder if you want it more spicy at this stage if necessary. Let it simmer on low flame for 5 minutes. Add in the boiled peas and cubed paneer. Simmer for a minute more.
Remove off heat. Grate some paneer for garnish. Serve hot with Roti , Chapati or any other Indian bread.
Easy and quick recipe for Matar Paneer. Green Peas – Paneer Masala. Classic North Indian gravy / kurma for chapati / roti.
Author: Kannamma – Suguna Vinodh
Recipe type: Gravy / Side Dish
Cuisine: North Indian
Serves: 4
Ingredients
1.5 cups Peas, shelled
2 cups Paneer, cubed
For the first paste
5 Tomatoes, roughly chopped
¼ cup Cashewnuts (50 grams)
1 teaspoon Salt
1 teaspoon Sugar
2 teaspoon Chilli powder
1 teaspoon Turmeric
1½ teaspoon cumin powder
For the second paste
1 medium sized Onion
2 inch piece Ginger
1 pod garlic – 8-10 cloves
For the tempering
2 tablespoon Oil
1 teaspoon Cumin seeds
2 inch piece Cinnamon
2 Cardamom pods
Instructions
Shell about 500 grams of peas. I use fresh peas for this gravy. 500 grams of peas will yield about 1.5 cups of shelled peas. Wash and drain. Boil the peas with one cup of water until al dente. Set aside.
Take a deep bottomed pan and add in the roughly chopped tomatoes, cashew-nuts, salt, sugar, chilli powder, turmeric and cumin powder. Add in 2 cups of water to the pan. Cover the pan with a lid. Boil the mixture for 15 minutes in medium flame. Remove off heat. Drain the excess water from the pan. Reserve the water for later use. Grind the drained tomato mixture to a smooth paste. Set aside.
We need to make another paste too. Grind together garlic, ginger and onion. Add little water while grinding to help make a smooth paste. Set aside.
Heat oil in a pan and add in cumin seeds, cinnamon and cardamom. Add in the ginger-garlic-onion paste and fry till the oil oozes out of the mixture. It will take about 3 minutes in medium flame.
Add in the ground tomato paste and the reserved tomato water. Check for seasoning. Add in more salt or chilli powder if you want it more spicy at this stage if necessary. Let it simmer on low flame for 5 minutes. Add in the boiled peas and cubed paneer. Simmer for a minute more.
Remove off heat. Grate some paneer for garnish. Serve hot with Roti , Chapati or any other Indian bread.
This is our family’s favorite Sunday dish. Just chop all the ingredients finely before you start. Its very easy to make and can be put together in less than 10 minutes. I like to add asafoetida / hing to my eggs. Renowned Indian cookbook author Madhur Jaffrey says that asafoetida is kind of like truffles. It has a truffle like aroma. If you do not like the flavor of asafoetida, you can leave it from the recipe. This recipe is an eggs-cellent way to start the day! ‘Love and eggs are best when they are fresh’. So lets get started with Scrambled eggs Super-dee-Dooper-dee-Booper Special de luxe a-la-Peter T. Hooper.
Chop ginger, green chillies and curry leaves very finely. Set aside. Heat couple of tablespoons of oil in a pan and add in the cumin seeds and fennel seeds. Let it pop. Add in the chopped ginger, green chillies and curry leaves and fry for 10 seconds.
Add in a finely chopped onion and fry in medium flame for a couple of minutes until soft. Add in the asafoetida (optional) , salt, pepper powder and turmeric. Turmeric gives the scrambled eggs a bright yellow color. Saute for a minute more. Add in the eggs all at once.
Add in the spring onions and coriander leaves. Stir to mix and scramble the eggs to the doneness you like. Remove off heat and serve.
¼ inch ginger, finely minced, about half a teaspoon
1 sprig curry leaves, finely chopped
2 green chillies, chopped
1 medium onion, finely chopped
⅛ teaspoon asafoetida
½ teaspoon salt
½ teaspoon turmeric
½ teaspoon pepper powder
2 stalks spring onion, chopped
4 stalks coriander leaves, finely chopped
Instructions
Chop ginger, green chillies and curry leaves very finely. Set aside. Heat couple of tablespoons of oil in a pan and add in the cumin seeds and fennel seeds. Let it pop. Add in the chopped ginger, green chillies and curry leaves and fry for 10 seconds.
Add in a finely chopped onion and fry in medium flame for a couple of minutes until soft. Add in the asafoetida (optional) , salt, pepper powder and turmeric. Turmeric gives the scrambled eggs a bright yellow color. Saute for a minute more. Add in the eggs all at once.
Add in the spring onions and coriander leaves. Stir to mix and scramble the eggs to the doneness you like. Remove off heat and serve.
Potatoes have to be the ultimate comfort food. I have not come across someone who does not like potatoes. This potato poriyal is a south indian comfort food. I can eat it everyday. My family loves it. “My idea of heaven is a great big baked potato fry and someone to share it with.” -Oprah. This dish is the simplest but bursting with flavor. Potatoes are sauteed and roasted on a low flame for a long period of time so it roasts and caramelizes and transforms into an excellent side dish. I make this fry in a nonstick pan. Here is how I do it.
Heat oil in a pan until hot. Add in the mustard seeds, urad dal, cumin seeds, dried red chilli and curry leaves. Let the mustard seeds splutter. Add in the finely chopped garlic and onions. Fry till soft and translucent. Add in the washed, peeled and diced potatoes. Add in the salt, sambar powder, asafoetida and turmeric. Stir well to combine.
Add in half a cup of water, cover the pan with a lid and simmer for 10 minutes on low flame. After 10 minutes, remove the cover and saute the potatoes for 15-20 minutes until nicely brown and roasted. Keep tossing every couple of minutes. Let the flame be low at all times. After 20 minutes, the potatoes should be nicely roasted and brown. Remove off heat and serve with rice.
South Indian Tamilnadu style potato poriyal fry recipe. Nicely roasted and spicy. Perfect potato for rasam, sambar or curd rice.
Author: Kannamma – Suguna Vinodh
Recipe type: Side Dish
Cuisine: South Indian
Serves: 4
Ingredients
6 medium size Potatoes
3 tablespoon Oil
¼ teaspoon mustard seeds
½ teaspoon Urad dal
½ teaspoon Cumin seeds
2 Dried red chilli
2 sprigs Curry leaves
5 cloves Garlic, minced
2 medium sized Onions, chopped
1 teaspoon Salt
2 teaspoon Sambar powder
1 teaspoon Turmeric
¼ teaspoon Asafoetida
Instructions
Heat oil in a pan until hot. Add in the mustard seeds, urad dal, cumin seeds, dried red chilli and curry leaves. Let the mustard seeds splutter. Add in the finely chopped garlic and onions. Fry till soft and translucent. Add in the washed, peeled and diced potatoes. Add in the salt, sambar powder, asafoetida and turmeric. Stir well to combine.
Add in half a cup of water, cover the pan with a lid and simmer for 10 minutes on low flame. After 10 minutes, remove the cover and saute the potatoes for 15-20 minutes until nicely brown and roasted. Keep tossing every couple of minutes. Let the flame be low at all times. After 20 minutes, the potatoes should be nicely roasted and brown. Remove off heat and serve with rice.
This is an excellent curry that goes well with roti or chapati. Mushrooms adds that earthiness to the gravy. Its lite, filling and dum-da-dum-dee-delicious. I use fresh peas in this recipe.
Here is how I do it.
Heat oil in a pan and add a heaping teaspoon of kasuri methi and finely minced ginger. Saute for a minute. Add in the chopped onions and fry for a minute to combine.
Add in the washed, cleaned and diced mushrooms. Saute on medium flame for a good 10 minutes. The water from the mushrooms should get juiced down, mushrooms reduced to half the size and the mixture nice and brown.
Add in the peas, tomato puree, turmeric, pepper, cumin and salt. Mix everything to combine.
Cover the pan with a lid and simmer on a low flame for 15-20 minutes until the mixture is semi dry. Saute once in 5 minutes so the mixture doesn’t scorch at the bottom. Repeat with me. Consistency should be semi-dry.
Once the mixture is well cooked and semi dry, remove the lid and add in half a cup of milk. Let it simmer on medium flame for 5 minutes. Remove from heat and garnish with green chillies and coriander leaves. Serve hot with roti / chapati.
Makes an excellent side dish for roti and chapati. This recipe for peas and mushroom curry is sure a winner.
Author: Kannamma – Suguna Vinodh
Recipe type: Side dish
Cuisine: North Indian
Serves: 4
Ingredients
200 grams Mushrooms
200 grams fresh Peas
3 tablespoon Oil
1 heaping teaspoon kasuri methi
1 inch piece ginger, finely minced
2 medium onion, finely chopped
4 tomatoes
1 teaspoon turmeric powder
2 teaspoon pepper powder
1 teaspoon cumin powder
1 teaspoon salt
½ cup milk
Instructions
Heat oil in a pan and add a heaping teaspoon of kasuri methi and finely minced ginger. Saute for a minute. Add in the chopped onions and fry for a minute to combine.
Add in the washed, cleaned and diced mushrooms. Saute on medium flame for a good 10 minutes. The water from the mushrooms should get juiced down, reduced to half the size and the mixture nice and brown.
Add in the peas, tomato puree, turmeric, pepper, cumin and salt. Mix everything to combine.
Cover the pan with a lid and simmer on a low flame for 15-20 minutes until the mixture is semi dry. Saute once in 5 minutes so the mixture doesn’t scorch at the bottom.
Once the mixture is well cooked and semi dry, remove the lid and add in half a cup of milk. Let it simmer on medium flame for 5 minutes. Remove from heat and garnish with green chillies and coriander leaves.
“Life is great. Cheese makes it better.” Paneer Bhurji – Indian scrambled cheese is such a clever idea stolen from scrambled eggs. It makes a great breakfast, a perfect accompaniment and its the easiest to put together. There is a saying, “Age is something that doesn’t matter, unless you are a cheese.” Indeed!…but with one exception and that’s paneer. Indian Paneer is a fresh cheese like Ricotta. Its very easy to make at home. But today I am using store bought paneer for the sake of convenience. Indian Paneer does not melt like traditional cheese. The texture can be compared to that of halloumi cheese.
The best thing about this recipe is that it can be put together in under 20 minutes with the basic of ingredients. So what are you waiting for. Come with me. I will show you how to make a great paneer Bhurji.
Take a pan and heat some oil in it until hot. Add in the cumin seeds and let it splutter. Once the cumin seeds pop, add in the finely chopped onions and the green chillies. If you want it spicy add more green chillies and you can cut it finely and add if you like to eat chillies. Let it cook for 3-4 minutes on medium flame until the onions are soft and tender.
Add in the finely chopped tomatoes, chopped capsicum and the salt. Cook for another 3-4 minutes in medium flame until the tomatoes are lightly cooked and the capsicum is soft.
In the mean time, shred the paneer. Once the tomato capsicum mixture is cooked, add in the paneer and saute to combine. Add in the coriander leaves and mix well to combine. Immediately remove from heat.
Easiest and most flavorful Paneer Bhurji recipe. Can be made in under 20 minutes. Indian scrambled cheese recipe. Perfect for breakfast or as a side dish for roti / chapati.
Author: Kannamma – Suguna Vinodh
Recipe type: Side dish
Cuisine: North Indian
Serves: 3
Ingredients
Oil
¼ teaspoon Cumin Seeds
2 medium sized Onions, finely chopped
2 Green Chillies
1 medium Tomato, finely chopped
½ teaspoon Salt
1 medium Capsicum, finely chopped
200 grams Paneer, shredded
5-6 stalks Coriander Leaves, chopped
Instructions
Take a pan and heat some oil in it until hot. Add in the cumin seeds and let it splutter. Once the cumin seeds pop, add in the finely chopped onions and the green chillies. If you want it spicy add more green chillies and you can cut it finely and add if you like to eat chillies. Let it cook for 3-4 minutes on medium flame until the onions are soft and tender.
Add in the finely chopped tomatoes, chopped capsicum and the salt. Cook for another 3-4 minutes in medium flame until the tomatoes are lightly cooked and the capsicum is soft.
In the mean time, shred the paneer. Once the tomato capsicum mixture is cooked, add in the paneer and saute to combine. Add in the coriander leaves and mix well to combine. Immediately remove from heat.
Every food has a story somewhere. Whenever I speak to my good friend Sunitha, I ask what did you make today? Peanut chutney would feature in the answer very regularly. She has told me many times that her mother would make tubs of this chutney for their big family when she was young and how much ever she would make, the chutney would be polished off. She doesn’t know of a single time when there was a leftover. She would make this almost everyday. She grew up eating this chutney. After hearing such a story, I wanted to make it too. Its easy to make, healthy and can feed a crowd. No problem. After hearing that story, I was eager to try it out. Here is the recipe that I adapted from Sunitha. Its a very nice chutney that goes well with Idli, Dosa and the other south indian breakfast varieties. This recipe has very few ingredients and the peanuts shine. This has now become a regular fare with my family and my little one cant get enough of it. Its really nutty and tasty and very creamy.
Here is how I do it.
We need to first roast the peanuts. Roasting peanuts makes them crisp and brings out the flavor by activating their essential oils. You need to roast the peanuts on a very low flame. Heat a pan with a cup and a half of peanuts and dry roast them until the skin is dark and the aroma is nutty. It will take a good 10 minutes. Roasting on a low flame is important else the nuts might burn on the outside. So take it low and slow. Good things take time. Once roasted, just smash the peanuts with a cup so its easier to de-skin. You can omit this step if you want to keep the skin on for your chutney. But I like it without the skins.
Just blow air on the peanuts. Do this at an open space outside or you will end up with peanut skin all over your kitchen. Just keep tossing and blowing the peanuts until majority of the peanut skins have been blown away. Set this aside.
Heat oil in a pan and add in 2-3 cloves of garlic. I added more as my garlic cloves were unbelievably small. Add in the dried red chillies and onions, saute on medium flame for 3-4 minutes until soft. No need to brown. Add in the salt, tamarind and the jaggery. There is an untold rule. Wherever tamarind goes, jaggery also goes. That little addition of jaggery rounds out the flavor and makes it very delicious. Briefly saute for a few seconds and remove off heat. Grind this mixture along with the peanuts to a smooth paste. Add upto 1 cup of water while grinding.
You can serve as is or do a simple tadka/tempering the following way.
Heat oil in a pan and add couple of dried red chillies and a sprig of curry leaves. When the curry leaves turn crisp (usually 30-40 seconds in medium flame), remove off heat and add it to the chutney.
Best recipe for South Indian Tamilnadu style Groundnut Chutney that can be served with idli and dosa varieties. Tangy, spicy and creamy.
Author: Kannamma – Suguna Vinodh
Recipe type: Chutney
Cuisine: South Indian
Serves: 6
Ingredients
For the Chutney
1½ cup peanuts
1 teaspoon Oil
3 cloves Garlic
2 dried Red chillies
2 medium sized Onions, chopped
½ lime size tamarind
½ lime size jaggery
½ teaspoon salt
For the Tempering
2 teaspoon Oil
2 dried Red Chilli
1 sprig Curry leaves
Instructions
Heat a pan with a cup and a half of peanuts and dry roast them until the skin is dark and the aroma is nutty. It will take a good 10 minutes.
Just blow air on the peanuts. Do this at an open space outside or you will end up with peanut skin all over your kitchen. Just keep tossing and blowing the peanuts until majority of the peanut skins have been blown away. Set this aside.
Heat oil in a pan and add in 2-3 cloves of garlic. I added more as my garlic cloves were unbelievably small. Add in the dried red chillies and onions, saute on medium flame for 3-4 minutes until soft. No need to brown. Add in the salt, tamarind and the jaggery. There is an untold rule. Wherever tamarind goes, jaggery also goes. That little addition of jaggery rounds out the flavor and makes it very delicious. Briefly saute for a few seconds and remove off heat. Grind this mixture along with the peanuts to a smooth paste. Add upto 1 cup of water while grinding.
You can serve as is or do a simple tadka/tempering the following way.
Heat oil in a pan and add couple of dried red chillies and a sprig of curry leaves. When the curry leaves turn crisp (usually 30-40 seconds in medium flame), remove off heat and add it to the chutney.
This is the perfect recipe for that dessert fix or a midnight craving. This recipe is moist, easy and eggless too. This recipe is no way dry like other mug cakes. It has an amazing texture to it. This is the best chocolate mug cake I have ever tasted. I am sure you will gobble this one up. You got to try this to believe it. Chocolate is the answer to everything. “If there’s no chocolate in Heaven, I’m not going.”
Let’s get the dry ingredients mixed first. Measure 1/4 cup (4 tablespoons) of All purpose flour (maida) in a small bowl. Add 1/4 teaspoon of baking powder, a pinch of salt, and 2 tablespoons of granulated sugar. Whisk to combine. Set aside.
Take a mug and add 1/4 cup milk, 2 tablespoon oil, 2 tablespoon cocoa powder and a pinch of instant coffee.
Mix everything well to combine. Add the flour mixture to the cocoa mixture and mix well. Once thoroughly mixed, microwave the mug for a minute.
Each and every microwave is different. It might take less time or more time depending on each machine. Roughly it will take anywhere between 50 seconds to 90 seconds. So if it looks underdone after 60 seconds, microwave it for 15 seconds more. Repeat if necessary.
Let’s get the dry ingredients mixed first. Measure All purpose flour (maida) in a small bowl. Add baking powder, a pinch of salt, and granulated sugar. Whisk to combine. Set aside.
Take a mug and add the milk, oil, cocoa powder and a pinch of instant coffee.
Mix everything well to combine. Add the flour mixture to the cocoa mixture and mix well. Once thoroughly mixed, microwave the mug for a minute.
Notes
Each and every microwave is different. It might take less time or more time depending on each machine. Roughly it will take anywhere between 50 seconds to 90 seconds. So if it looks underdone after 60 seconds, microwave it for 15 seconds more. Repeat if necessary.
February is the month of love. There are verses that belong to Vaaranamaiyiram in Nalayira Divya Prabandham. The songs are the most romantic ever! like ever! The songs were sung by Andal. Andal is the only female Alvar among the 12 Alvar saints of South India. If you want to read the verses and fall in love, Click Here. Paruppu urundai kuzhmabu / Lentil dumplings curry is a very very traditional Tamilnadu dish served for lunch in the weddings, during celebration times and festival days. Here is how I do it.
Soak half a cup of chana dal (kadalai paruppu) with 2 cups of water for 2 hours. Strain the water and grind the lentils to a coarse paste. Do not add water while grinding. There might be one or two lentil grains that might be left whole while grinding. That is perfectly fine.
Add the following to the ground lentil. Fennel seeds, finely minced garlic, finely chopped onions, turmeric, finely minced green chilli, finely chopped coriander leaves, fresh shredded coconut and salt. Mix everything well to combine. Make little dumpling balls from the mixture and set aside.
We will need to use a flat pan for this recipe. Kadai may not work as this may make the dumpling to break when added to the curry. So a flat pan is recommended. Heat 2 tablespoon of oil in a pan and add in the cloves, cinnamon, fennel seeds, 1 sprig curry leaf and crushed Garlic. Saute until the garlic starts to brown and the curry leaves turn crisp. Add in the chopped onions. Saute until the onions are soft.
Now puree 2-3 very ripe tomatoes in a mixie. Add it to the pan.
Add in the salt, turmeric and the sambar powder. Fry until the tomatoes are cooked well and streaks of oil appear on top. About 4-5 minutes on medium flame.
Grind half a cup of fresh shredded coconut with half a cup of water to a smooth paste. Add it to the pan.
Add in 2 cups of water and let it simmer to a full boil. Check for seasoning at this stage. Add in more salt if necessary. Once the curry comes to a full boil, add the dumplings one by one carefully. DO NOT stir for the first 5 minutes as the dumplings might break. Let the flame be at medium when the dumplings are boiling.
After 5 minutes, turn the dumplings if necessary. Let it simmer for 10-12 more minutes. Remove off heat.
Delicious Paruppu Urundai Kuzhambu. Lentil dumplings simmered in curry.
Author: Kannamma – Suguna Vinodh
Recipe type: Curry
Cuisine: South Indian
Serves: 3
Ingredients
For the dumplings
½ cup Channa dal
¼ tsp Fennel seeds
2 cloves minced Garlic
½ Onion, finely chopped
¼ teaspoon Turmeric
½ green chilli finely minced
5-6 stalks Coriander leaves, chopped
¼ cup fresh Shredded coconut
¼ teaspoon Salt
For the curry
2 tablespoon Oil
2 Cloves
1 small piece Cinnamon
½ teaspoon Fennel seeds
1 sprig curry leaf
1 medium size onion
4 cloves minced Garlic
3 Tomatoes pureed
½ teaspoon Turmeric
1 teaspoon Sambar powder
1 teaspoon salt
¼ cup coconut
Instructions
Soak half a cup of chana dal (kadalai paruppu) with 2 cups of water for 2 hours. Strain the water and grind the lentils to a coarse paste. Do not add water while grinding. There might be one or two lentil grains that might be left whole while grinding. That is perfectly fine.
Add the following to the ground lentil. Fennel seeds, finely minced garlic, finely chopped onions, turmeric, finely minced green chilli, finely chopped coriander leaves, fresh shredded coconut and salt. Mix everything well to combine. Make little dumpling balls from the mixture and set aside.
We will need to use a flat pan for this recipe. Kadai may not work as this may make the dumpling to break when added to the curry. So a flat pan is recommended. Heat 2 tablespoon of oil in a pan and add in the cloves, cinnamon, fennel seeds, 1 sprig curry leaf and crushed Garlic. Saute until the garlic starts to brown and the curry leaves turn crisp. Add in the chopped onions. Saute until the onions are soft.
Now puree 2-3 very ripe tomatoes in a mixie. Add it to the pan.
Add in the salt, turmeric and the sambar powder. Fry until the tomatoes are cooked well and streaks of oil appear on top. About 4-5 minutes on medium flame.
Grind half a cup of fresh shredded coconut with half a cup of water to a smooth paste. Add it to the pan.
Add in 2 cups of water and let it simmer to a full boil. Check for seasoning at this stage. Add in more salt if necessary. Once the curry comes to a full boil, add the dumplings one by one carefully. DO NOT stir for the first 5 minutes as the dumplings might break. Let the flame be at medium when the dumplings are boiling.
After 5 minutes, turn the dumplings if necessary. Let it simmer for 10-12 more minutes. Remove off heat.
My mom gave this recipe cut out that was published in a magazine years ago. She likes to save recipes from magazines that she finds interesting and keeps it for me. This is one such gem. She takes a lot of joy in sharing these things with me. She had brought this recipe with her on her trip to California when she had come for helping with my first pregnancy. This recipe comes from a chef called Nagendran of Thalapakatti hotel in Dindigul. I had to try this recipe as the content looked authentic. I would say this recipe is the closest thing to the real one. I kind of adapted this recipe and scaled down the recipe a bit. It has a very nice flavor that is so different from all the other biriyani. Seeraga Samba biriyani has to be the pride of Tamilnadu. Seeraga samba is a very aromatic rice. The grain of the rice is very tiny and it gets its name for its resemblance to Cumin seeds, also called as Seeragam/Jeera in Tamil. It has a very distinct taste, fluffs up well when cooked and south Indian biriyani’s are made with this rice. Samba rice is grown for a longer duration than other types of rice. Here is how I do it. Heads up – There is a lot of peeling and grinding involved. So plan accordingly.
We need garlic. Like lots of garlic. Indian garlic is ridiculously small. Peel the garlic. Crush the garlic in a mixie without adding any water. Set aside.
Peel shallots. We call it as chinna vengayam – small onions. Crush the shallots in a mixie without adding any water. Set aside.
The Masala
I think this is what makes this biriyani very unique. The original recipe says to use 8 green chillies . I used only 2 as my little one loves this biriyani and I do not want him to scream for water while eating. You can use green chillies according to your taste. Grind all the below ingredients to a very fine smooth paste. Add 1/4 cup of water while grinding. Chop the ginger into small pieces and break the cinnamon into bits before grinding.
Soak the rice in water now. The rice needs to soak for half an hour.
Heat Oil and ghee in a heavy pan and add in the Masala paste, crushed garlic and crushed shallots-small onions. Fry on medium flame for a good 10 minutes until the oil separates from the mixture.
Add in the chicken. Add in the chilli powder. The ratio of rice to chicken should be 1 rice to 1.5 meat. Saute the chicken so the masala coats evenly. Reduce the flame to simmer and cover it with a lid and let it cook. Don’t add any water. The chicken will cook in its own juices. Just saute once in 5 minutes so the chicken doesn’t scorch in the bottom. After 15 minutes, the chicken should be done and there should be some gravy too.
Add in the yogurt/curd. Cook with the lid open for 5 minutes.
Remove the cooked meat to a bowl and roughly measure how much liquid is left behind. Mine had about 1.5 cups of liquid. Just measure roughly. It need not be accurate.
Measurements used – 1 cup rice = 250 ml
We are using 2 cups rice and 750 grams meat. We require 2 times water to the quantity of rice. So we need to add 4 cups water. There was already 1.5 cups gravy that we measured before. So I added 2.5 cups water to the mixture. Add salt. Add in the chopped coriander leaves and the mint leaves. Let the mixture come to a boil.
Add back the meat and let it come to a boil again. Check for seasoning. Add more salt if necessary.
Drain the soaked rice and add it to the pan. Wait for it to boil. Add in the lemon juice.
Cover the pan with a lid and let it cook for the first four minutes on medium flame. Open the lid. Gently mix once from the bottom, cover the lid again and simmer for 10 minutes on very low flame.
After that time, open the lid and see if the rice has been cooked. Cook for a couple of minutes more if necessary. Switch off the flame and close the pan with a lid. Do not disturb for the next 20 minutes. The rice will get swollen and absorb all the left out moisture. This time is very important. Do not rush.
Dindigul Thalappakattu Biriyani Recipe. Authentic South Indian Tamilnadu Biryani. Adapted from Chef Nagendran of Thalapakatti Hotel. Measurements used – 1 cup rice = 250 ml
Author: Kannamma – Suguna Vinodh
Recipe type: Main course
Cuisine: South Indian
Serves: 4
Ingredients
For the Masala
5 Green Chillies
3 small two inch cinnamon sticks
3 cardamom
3 cloves
⅛th of a nutmeg (Jaadhikai)
1 small piece Mace (Jaadhi Pathiri)
50 grams ginger
Main Ingredients
500 ml Seeraga Samba Rice
750 grams Chicken with bone
Meat to Rice Ratio – 1 Rice 1.5 Meat
Other Ingredients
25 grams Ghee
75 grams Sunflower Oil
50 grams crushed Garlic
50 grams crushed shallots (small onions)
½ teaspoon Red Chilli Powder
½ cup curd
11/2 teaspoon salt
1 hand full Mint Leaves
2 hand full Coriander Leaves
Juice of half a lime
Instructions
Peel the garlic. Crush the garlic in a mixie without adding any water. Set aside. Crush the shallots in a mixie without adding any water. Set aside.
Grind all the masala ingredients to a very fine smooth paste. Add ¼ cup of water while grinding. Chop the ginger into small pieces and break the cinnamon into bits before grinding.
Soak the rice in water now. The rice needs to soak for half an hour.
Heat Oil and ghee in a heavy pan and add in the Masala paste, crushed garlic and crushed shallots-small onions. Fry on medium flame for a good 10 minutes until the oil separates from the mixture.
Add in the chicken. Add in the chilli powder. The ratio of rice to chicken should be 1 rice to 1.5 meat. Saute the chicken so the masala coats evenly. Reduce the flame to simmer and cover it with a lid and let it cook. Don’t add any water. The chicken will cook in its own juices. Just saute once in 5 minutes so the chicken doesn’t scorch in the bottom. After 15 minutes, the chicken should be done and there should be some gravy too.
Add in the yogurt/curd. Cook with the lid open for 5 minutes.
Remove the cooked meat to a bowl and roughly measure how much liquid is left behind. Mine had about 1.5 cups of liquid. Just measure roughly. It need not be accurate.
We are using 2 cups rice and 750 grams meat. We require 2 times water to the quantity of rice. So we need to add 4 cups water. There was already 1.5 cups gravy that we measured before. So I added 2.5 cups water to the mixture. Add salt. Add in the chopped coriander leaves and the mint leaves. Let the mixture come to a boil.
Add back the meat and let it come to a boil again. Check for seasoning. Add more salt if necessary.
Drain the soaked rice and add it to the pan. Wait for it to boil. Add in the lemon juice.
Cover the pan with a lid and let it cook for the first four minutes on medium flame. Open the lid. Gently mix once from the bottom, cover the lid again and simmer for 10 minutes on very low flame.
After that time, open the lid and see if the rice has been cooked. Cook for a couple of minutes more if necessary. Switch off the flame and close the pan with a lid. Do not disturb for the next 20 minutes. The rice will get swollen and absorb all the left out moisture. This time is very important. Do not rush.
There is this cute little thing that happens when buying bhindi in the Indian market. You can spot all the ladies trying to break the tip of each and every bhindi before putting it in their basket. The theory being that if the tip breaks, its a good one. If it doesn’t, its not. To break the tip of a bhindi in front of a shop keeper – its pretty liberating I say. If properly prepared, bhindi should never be slimy. This is a very simple recipe made with bhindi – vendakkai. This okra gravy is a semi-dry preparation and tastes very well with roti or chapati.
Heat oil in a pan and add in the cut bhindi and salt. Fry on a very low flame till the bhindi is roasted and no more slimy. It will take a good 12-14 minutes on a low flame. Set aside.
In the mean time crush the ginger and garlic in a mortar and pestle or in a mixie. If grinding in a mixie, do not add any water. We just want it crushed. Not a paste. Set aside.
Heat oil in a pan, add in the curry leaves and cumin seeds. Let the cumin seeds splutter. Add in the crushed ginger and garlic and saute for a couple of minutes.
Add in the onions and fry on a low flame until the onions are nice and golden. It will take a good 10 minutes.
Once the onions are golden, add in the very finely chopped RIPE tomatoes. Add in the salt, turmeric, sambar powder, jaggery and asafoetida. Add in a few cashewnuts. Fry till the tomatoes are well cooked and streaks of oil start to appear on the top.
In the mean time when the tomatoes are cooking, take another pan and
dry roast the sesame seeds and peanuts on a low flame. Dry roast briefly until the sesame seeds start to pop. Do not roast for a long time as the sesame seeds may turn bitter. Grind in a mixie to a fine powder. Set aside.
Now back to the main pan. Add in a cup of water to the onion and tomato mixture. Add in the bhindi and the sesame-peanut powder. Saute for a minute to combine. Remove off heat.
Bhindi Masala – This is a very simple recipe made with bhendi – vendakkai. This okra gravy is a semi-dry preparation and tastes well for roti / chapati.
Author: Kannamma – Suguna Vinodh
Recipe type: Side Dish
Cuisine: Indian
Serves: 4
Ingredients
For frying Bhindi
250 grams Bhindi – okra
2 tablespoon oil
¼ teaspoon salt
For the powder
½ cup peanuts
3 tablespoon white sesame seeds
Other Ingredients
1 tablespoon Oil
1 sprig curry leaves
1 teaspoon curry leaves
1 pod garlic
2 inch piece ginger
2 medium onions, finely chopped
3 medium ripe tomatoes, finely chopped
1 teaspoon salt
½ teaspoon turmeric
½ teaspoon jaggery
⅛ teaspoon asafoetida
1 teaspoon sambar powder
6-7 cashew-nuts, broken
Instructions
Heat oil in a pan and add in the cut bhindi and salt. Fry on a very low flame till the bhindi is roasted and no more slimy. It will take a good 12-14 minutes on a low flame. Set aside.
In the mean time crush the ginger and garlic in a mortar and pestle or in a mixie. If grinding in a mixie, do not add any water. We just want it crushed. Not a paste. Set aside.
Heat oil in a pan, add in the curry leaves and cumin seeds. Let the cumin seeds splutter. Add in the crushed ginger and garlic and saute for a couple of minutes.
Add in the onions and fry on a low flame until the onions are nice and golden. It will take a good 10 minutes.
Once the onions are golden, add in the very finely chopped RIPE tomatoes. Add in the salt, turmeric, sambar powder, jaggery and asafoetida. Add in a few cashewnuts. Fry till the tomatoes are well cooked and streaks of oil start to appear on the top.
In the mean time when the tomatoes are cooking, take another pan and
dry roast the sesame seeds and peanuts on a low flame. Dry roast briefly until the sesame seeds starts to pop. Do not roast for a long time as the sesame seeds may turn bitter. Grind in a mixie to a fine powder. Set aside.
Now back to the main pan. Add in a cup of water to the onion and tomato mixture. Add in the bhindi and the sesame-peanut powder. Saute for a minute to combine. Remove off heat. Serve hot.
“As long as there’s pasta and Chinese food in the world, I’m okay.” If I really like you, this is what I would make for you when you are at home with me. This is a veggie pasta full of flavor and it is hearty, rich and will definitely make you feel very satisfied. A lot of my friends make note of this recipe once I have cooked this for them. I am sharing it here for the love of good pasta. A french mirepoix is a mixture of chopped celery, onions, and carrots. Its called as the holy trinity of veggies. The Italian version of mirepoix is called soffritto. It is the foundation for many Tuscan sauces. An Italian soffritto is made with olive oil, especially in Southern Italy, rather than butter, as in France and may also contain garlic, and herbs. It is also called as “false ragout”, because soffritto is thought to vaguely recall the flavor of meat sauce. So what are we waiting for. Lets go and mangia mangia baby
For the soffritto mixture
Chop the onions and celery very finely. I like to keep the sauce thick. So I run my carrots in a food processor / mixie instead of chopping it. Get these ready. Set aside.
Heat a heavy bottomed pan and add in the olive oil and garlic. I run the garlic through the garlic press. Add in a teaspoon of store bought dry Italian herb mixture. (Any store bought kind will do. Mine had oregano,thyme,dried garlic and basil). I learned a great tip from Chef Suvir Saran. He once told that waking up the spices and herbs in oil is the best method to bring them alive. Its the greatest indian technique of tempering spices called the tadka that not only works wonders on Indian cooking but to any cooking. It works every single time. I do it for all my cooking. Not just Indian.
Add in the soffritto mixture and salt and fry well until cooked down by half. Usually soffritto is not browned. But for this recipe, we want the veggies to nicely cook down and caramelize. It adds a very nice flavor. Cook for 10-15 minutes on medium flame sauteing constantly so the mixture does not stick to the bottom of the pan.
Add in the pureed skinned, de-seeded tomatoes. I just run the tomatoes in the food processor / mixie and strain. That’s my easy route to skinned de-seeded tomatoes. I just strain the tomatoes right over the pan.
Add in a teaspoon of apple cider vinegar and a big pinch of sugar. Sugar rounds out the flavor of the tomatoes and the vinegar tangs it up.
Add in fresh ground pepper and let the sauce simmer in low flame for 5 minutes. Check for seasoning. Add more salt if necessary.
Add in the cooked and drained pasta. Add in half a cup of cream and freshly chopped basil. Basil is what gives this dish that unique taste. Do not skip Basil. Remove off heat.
Italian Tuscan Pasta Soffritto in tomato sauce and Basil. Easy and quick recipe.
Author: Kannamma – Suguna Vinodh
Recipe type: Pasta
Cuisine: Italian
Serves: 3
Ingredients
For the soffritto mixture
2 medium sized onions
3 carrots
6-7 stalks celery
Other Ingredients
150 grams pasta, cooked and drained
2 tablespoon olive oil
1 teaspoon dried italian herb
4-5 cloves garlic
1 teaspoon salt
8 very ripe tomatoes
1 teaspoon apple cider vinegar
1 teaspoon sugar
freshly ground pepper to taste
½ cup cream
7-8 leaves fresh basil
Instructions
Chop the onions and celery very finely. I like to keep the sauce thick. So I run my carrots in a food processor / mixie instead of chopping it. Get these ready. Set aside.
Heat a heavy bottomed pan and add in the olive oil and garlic. I run the garlic through the garlic press. Add in a teaspoon of store bought dry Italian herb mixture. (Any store bought kind will do. Mine had oregano,thyme,dried garlic and basil). I learned a great tip from Chef Suvir Saran. He once told that waking up the spices and herbs in oil is the best method to bring them alive. Its the greatest indian technique of tempering spices called the tadka that not only works wonders on Indian cooking but to any cooking. It works every single time. I do it for all my cooking. Not just Indian.
Add in the soffritto mixture and salt and fry well until cooked down by half. Usually soffritto is not browned. But for this recipe, we want the veggies to nicely cook down and caramelize. It adds a very nice flavor. Cook for 10-15 minutes on medium flame sauteing constantly so the mixture does not stick to the bottom of the pan.
Add in the pureed skinned, de-seeded tomatoes. I just run the tomatoes in the food processor / mixie and strain. That’s my easy route to skinned de-seeded tomatoes. I just strain the tomatoes right over the pan.
Add in a teaspoon of apple cider vinegar and a big pinch of sugar. Sugar rounds out the flavor of the tomatoes and the vinegar tangs it up.
Add in fresh ground pepper and let the sauce simmer in low flame for 5 minutes. Check for seasoning. Add more salt if necessary.
Add in the cooked and drained pasta. Add in half a cup of cream and freshly chopped basil. Basil is what gives this dish that unique taste. Do not skip Basil. Remove off heat.
If you are french, you would call it Crème caramel. If your mother-in-law is Spanish, she would call it a flan. The rest of the world simply calls it a caramel custard. We are great fans of Rafael Nadal in the house. So I am going to call it a flan too. That great Spaniard I say. This is an easy dessert you can put together in no time and everyone will be happy. This would easily be my favorite dessert.
There are a few points that make a good flan. The dish is very delicate to handle. The flan is cooked in a water bath. The key to a good flan is that it should be cooked in a water bath that should not boil at any time. If it boils, then it will cook very quickly, and when it is unmolded, the exterior or the outside of the custard will look like a cake sponge, with tiny holes all over it. The key to a smooth custard without any holes on the outside is to make sure that the water in the water bath does not boil and the flan cooks in moderate heat. Another important thing to note is that, not to mix the eggs too much while mixing. Too much mixing will incorporate air and air is good for cakes. Not for custards. The custard should be smooth. Not rubbery. Here is how I do it.
For the Caramel
Add sugar to a small sauce pan. Add water from the sides. Combine the water and sugar. Gently stir to moisten the sugar thoroughly.
Bring the mixture to a boil until the sugar is completely dissolved and the liquid is clear. ( Do not stir at this stage. Stirring will cause the sugar to crystallize)
Continue to cook stirring occasionally until the caramel darkens into a light brown color.
Cook until the color of the caramel becomes amber. Do not leave it for too long as the caramel might burn and turn bitter.
Remove the pan immediately from the heat and pour a portion of the caramel into each of the four 6-ounce ramekins. Do not touch the caramel as it will be super hot and can even burn your hands. Allow the caramel to harden. It will take about 3-4 minutes.
For the Custard
Adjust an oven rack to the middle. Preheat the oven to 350 degrees F / 180 degrees C.
Zest an orange and add it to the milk. Zest only the skin. The skin has all the essential oils and aroma. Not the pith. Pith is very bitter. Make sure you do not zest the pith. Heat the milk and orange zest in a saucepan over medium heat until it boils. Remove from the heat. Set aside.
In the mean time whisk the whole eggs, egg yolks, and sugar slowly in a large bowl until just combined.
Add in the milk mixture into the eggs until just combined. Do not keep whisking. You do not want to incorporate air. The mixture should not be extremely foamy. Little foam is OK. Strain the mixture into a large bowl.
Divide and pour the mixture in the ramekins. Arrange the ramekins on a large baking dish. Place the baking dish on the rack of the oven.
Water Bath
Bring a kettle of water to a boil. Pour the boiling water into the baking dish. The water should be half way up the sides of the ramekins.
Bake until a paring knife inserted halfway between the center comes out clean, it can take between 40 – 50 minutes. Transfer the custards to a wire rack and cool to room temperature. Refrigerate for 6 hours or overnight.
To unmold, slide a paring knife around the sides of the ramekin. Hold a serving plate over the top of the ramekin and invert. Shake the ramekin gently to release the custard. Repeat with the remaining ramekins and serve.
A good flan should be delicate, smooth and melt in your mouth.!
Orange Flan / creme caramel – Fool proof easy recipe for orange caramel custard. Includes step by step pictures.
Author: Kannamma – Suguna Vinodh
Recipe type: Dessert
Cuisine: French
Serves: 4
Ingredients
For the Caramel
¼ cup water
½ cup sugar
For the Custard
1½ cups whole milk
2 Eggs
1 Egg yolk
6 tablespoons Sugar
Zest from an Orange
Instructions
For the Caramel
Add sugar to a small sauce pan. Add water from the sides. Combine the water and sugar. Gently stir to moisten the sugar thoroughly.
Bring the mixture to a boil until the sugar is completely dissolved and the liquid is clear. ( Do not stir at this stage. Stirring will cause the sugar to crystallize)
Continue to cook stirring occasionally until the caramel darkens into a light brown color.
Cook until the color of the caramel becomes amber. Do not leave it for too long as the caramel might burn and turn bitter.
Remove the pan immediately from the heat and pour a portion of the caramel into each of the four 6-ounce ramekins. Do not touch the caramel as it will be super hot and can even burn your hands. Allow the caramel to harden. It will take about 3-4 minutes.
For the Custard
Adjust an oven rack to the middle. Preheat the oven to 350 degrees F / 180 degrees C.
Zest an orange and add it to the milk. Zest only the skin. The skin has all the essential oils and aroma. Not the pith. Pith is very bitter. Make sure you do not zest the pith. Heat the milk and orange zest in a saucepan over medium heat until it boils. Remove from the heat. Set aside.
In the mean time whisk the whole eggs, egg yolks, and sugar slowly in a large bowl until just combined.
Add in the milk mixture into the eggs until just combined. Do not keep whisking. You do not want to incorporate air. The mixture should not be extremely foamy. Little foam is OK. Strain the mixture into a large bowl.
Divide and pour the mixture in the ramekins. Arrange the ramekins on a large baking dish. Place the baking dish on the rack of the oven.
Water Bath
Bring a kettle of water to a boil. Pour the boiling water into the baking dish. The water should be half way up the sides of the ramekins.
Bake and Serve
Bake until a paring knife inserted halfway between the center comes out clean, it can take between 40 – 50 minutes. Transfer the custards to a wire rack and cool to room temperature. Refrigerate for 6 hours or overnight.
To unmold, slide a paring knife around the sides of the ramekin. Hold a serving plate over the top of the ramekin and invert. Shake the ramekin gently to release the custard. Repeat with the remaining ramekins and serve.
This is a recipe to do if you have very little regular dosa batter and you are breaking your head for choices in the kitchen. I learnt this recipe from Vinodh’s aunt Prema Amma long time back when she visited us in California. She would do these kind of jiffy recipes which would turn out to be super hit. I like her recipes as they are super tasty and can be made very quickly. More over this recipe uses almost 90 percent cracked wheat – samba godhumai ravai. Its super healthy and super delicious. I do it almost every week. Don’t fret when you have very little dosa batter. Make this and your entire family will love you for this.
If you want to learn more about samba godhumai go here.
Here is how to do the batter.
Soak samba godhumai (cracked emmer wheat), onions, cumin seeds, ginger, curry leaves, dried red chillies and salt. Add more red chillies if you want it more spicy. I used 1 cup-250 ml of wheat. So I soaked in 2 cups – 500 ml water. So the water ratio is 1 cup wheat : 2 cups water. Soak it for 20 minutes. Upto 30 minutes is fine.
After soaking, grind it into a smooth paste. Do not use any additional water while grinding. The soaked water will be sufficient. Add water only if you think its really necessary. We are looking at a consistency of dosa batter.
Add in 2 cups of regular dosa batter. Old dosa batter works best. Mix everything well. Add little water if the batter is too thick. It should be to the consistency of regular dosa batter.
Heat a dosa pan / skillet until hot. Let the flame be at medium. Pour a ladle of batter onto the skillet. You can gauge the consistency of the batter from the below picture.
Using the back of the ladle spread batter into a round.
Sprinkle 1/8 teaspoon of oil onto the pan. Let it cook for 30 seconds until the sides are brown and little brown spots start to appear.
Flip carefully with a thin metal spatula, and cook until browned. Upto 30 seconds more. Transfer to a plate. Continue with the remaining batter. Serve warm, with chutney.
Healthy and easy to make recipe for South Indian Tamilnadu Samba Godhumai ravai / Cracked Emmer Wheat Dosai.
Author: Kannamma – Suguna Vinodh
Recipe type: Crepes, pancakes
Cuisine: South Indian
Serves: 20
Ingredients
2 cups regular dosa batter
1 cup broken wheat – samba godhumai
2 cups water
1 medium onion, chopped
1 inch piece ginger
2 sprigs curry leaves
2 teaspoon cumin seeds
2 dried red chillies
1 teaspoon salt
Oil for cooking
Instructions
Soak samba godhumai (cracked emmer wheat), onions, cumin seeds, ginger, curry leaves, dried red chillies and salt. I used 1 cup-250 ml of wheat. So I soaked in 2 cups – 500 ml water. So the water ratio is 1 cup wheat : 2 cups water. Soak it for 20 minutes. Up to 30 minutes is fine.
After soaking, grind it into a smooth paste. Do not use any additional water while grinding. The soaked water will be sufficient. Add water only if you think its really necessary. We are looking at a consistency of dosa batter.
Add in 2 cups of regular dosa batter. Old dosa batter works best. Mix everything well. Add little water if the batter is too thick. It should be to the consistency of regular dosa batter.
Heat a dosa pan / skillet until hot. Let the flame be at medium. Pour a ladle of batter onto the skillet. You can gauge the consistency of the batter from the below picture.
Using the back of the ladle spread batter into a round.
Sprinkle ⅛ teaspoon of oil onto the pan. Let it cook for 30 seconds until the sides are brown and little brown spots start to appear.
Flip carefully with a thin metal spatula, and cook until browned. Upto 30 seconds more. Transfer to a plate. Continue with the remaining batter. Serve warm, with chutney.
There is this little thing that happens every time at my place. My husband usually picks up bananas from the grocery store on his way back from office and he always picks up more bananas than we can eat. There will be no takers in the house after the bananas have become overly ripe. So what do we do with the ripe bananas? I do what I do best with ripe bananas. Banana nut bread or Banana muffins. Last week, he confessed to the crime that he intentionally picks up extra bananas so he can have a good slice of his favorite banana bread often.
Come with me. Let me show you how to do the best American bakery style banana nut bread. This is the only banana bread recipe you will ever need. I adapted this recipe very minimally from Chef Joanne Chang’s Flour cookbook. I like her method of beating eggs and sugar until fluffy and then adding it to the batter. It creates a great texture to the finished bread. I add a small tablespoon of cocoa to enhance that dramatic color of the bread. This is one nice spiced up banana bread.
“You can’t teach calculus to a chimpanzee. So just share your banana banana bread. OK”
Overly ripe bananas are the secret to a good banana bread.
Preheat the oven to 180 C / 350 F.
Peel four medium sized bananas and mash them with a back of a fork. Set aside.
Butter and flour a bread loaf tin. Preferably a 9 by 5 inch loaf pan. I also line it with parchment paper so the baked bread releases smoothly in one piece. Its not necessary but I do it. Its just me. I cannot take in tensions. The baked bread stuck on the bottom of the pan is the last thing I wanna see. I am sorry I have issues. Thanks for listening. I am happy I shared it with you.
Measure and add all the dry ingredients to a bowl. I measure the flour alone by weight as its accurate. Lets sift the dry ingredients. Sift the flour, salt, cardamom powder, cinnamon powder and the cocoa powder. Most of the time, baking soda and other leaveners might lump up. Sifting helps in eliminating this. Just use your hands to break the lumps while sifting. Sifting also helps in even mixing of the ingredients. Once sifted, set aside.
In a bowl, add in the eggs and the granulated sugar.
Beat together the eggs and sugar in a mixer until light and fluffy. It will take about 5 minutes.
Slowly drizzle in the oil. Slow is the key. You want to create an emulsion. Dumping all the oil at once will create the egg mixture to break. Drizzle the oil slowly so everything becomes one homogenous mixture. Once the oil has been added, add in the vanilla and the yogurt.
Add the sifted flour mixture and the nuts to the batter. Chop the nuts coarsely. Walnuts or pecans work well.
Fold the mixture until roughly mixed. Add in the mashed bananas to the batter.
Fold the mixture until everything is combined well. No specks of flour should remain visible. Make sure the nuts are evenly distributed. Transfer it to a loaf tin and bake for 60 – 80 minutes until the center springs back when lightly pressed. Do not open the oven door for the first 45 minutes. Moving the pan while baking might cause the middle of the batter to deflate. So no moving or opening the oven door unnecessarily.
Let the bread cool on a wire rack completely.
Store it in an airtight container for up to 2 days.
Fool proof recipe for the tastiest American Bakery Style Banana Nut Bread. Baked in a loaf pan. With step by step pictures.
Author: Kannamma – Suguna Vinodh
Recipe type: Dessert
Cuisine: American
Serves: 12
Ingredients
Dry Ingredients
1⅔ cups-200 grams all-purpose flour
1 teaspoon baking soda
½ teaspoon ground cinnamon
½ teaspoon cardamom powder
1 tablespoon cocoa powder
½ teaspoon salt
Other Ingredients
1 cup sugar
2 eggs
½ cup oil
¼ cup yogurt
1 teaspoon vanilla extract
4 very ripe bananas
¾ cup walnuts or pecans
Instructions
Preheat the oven to 180 C / 350 F.
Peel bananas and mash them with a back of a fork. Set aside. Butter and flour a bread loaf tin. Preferably a 9 by 5 inch loaf pan.
Measure and add all the dry ingredients to a bowl. Sift the dry ingredients. Sift the flour, salt, cardamom powder, cinnamon powder and the cocoa powder. Set aside.
In a bowl, add in the eggs and the granulated sugar. Beat together the eggs and sugar in a mixer until light and fluffy. It will take about 5 minutes.
Slowly drizzle in the oil. Slow is the key. You want to create an emulsion. Dumping all the oil at once will create the egg mixture to break. Drizzle the oil slowly so everything becomes one homogenous mixture. Once the oil has been added, add in the vanilla and the yogurt.
Add the sifted flour mixture and the nuts to the batter. Chop the nuts coarsely. Walnuts or pecans work well.
Fold the mixture until roughly mixed. Add in the mashed bananas to the batter.
Fold the mixture well until everything is combined well. No specks of flour should remain visible. Make sure the nuts are evenly distributed. Transfer it to a loaf tin and bake for 60 – 80 minutes until the center springs back when lightly pressed.
Let the bread cool on a wire rack completely.
Store it in an airtight container for up to 2 days.
My husband Vinodh’s grand mother – Sinthayamma paati was 94 when she left us. Paati had a cook called Naacha. Naacha came to paati as a 10 year old. She never married and was 78 years old when paati died. She retired after paati left us. My son was 6 months old then and paati’s health was slowly going downhill. She had this habit of chewing tobacco called as pogailai in Tamil. Vinodh’s father had stopped the supply of tobacco due to her deteriorating health. We visited her when my son was 6 months old and Vinodh’s parents had to travel at that time. So it was me, my son, paati and Naacha in the house for a week. Naacha would hide the tobacco in her saree and sneak it in paati’s hands and make sure that no one was watching. It was a cute little scene. I did not tell about this to anyone as I felt that it was the very few little pleasures of life that was remaining for paati. She could barely walk. She would sit all day long in the portico watching people come and go at the farm. She was very old, ate very less and I thought the tobacco kept her going. I told this to my father in law after paati died and he laughed. He too knew what was going on. Even he chose to remain silent as he felt it was the little pleasures of life. Naacha left us once grand mom died. She still comes to the farm and I get very happy when I see her. She is so caring, an awesome cook and I love her food. This is her recipe. Its my favorite. Everytime I make this at home, I remember paati and Naacha and their cute little bonding. Below is a picture, the only picture of Naacha that I have.
Here it is, Naacha’s awesome poondu kuzhambu.
Heat oil in a pan and add in the sesame oil. Sesame oil is important and its the preferred oil in Tamilnadu cuisine. When the oil is hot, add in 3-4 methi-fenugreek seeds. Its called as vendhayam in Tamil. Do not add a lot as the curry will turn very bitter. 3-4 seeds are good enough. Add in the cumin and the black pepper too. Let it splutter. The oil will foam a little. That’s fine. Add in 10 cloves of garlic and saute briefly.
Add in one sprig of curry leaves and roughly chopped onions. Saute for 2-3 minutes until the onions turn soft. Add in the tomatoes and fry for a minute.
When the tomatoes are briefly sauteed, add in the kuzhambu milagai thool / kuzhambu masala powder. If you cannot source kuzhambu milagai thool, you can substitute sambar powder. If you want it spicy add in a tablespoon more of kuzhambu milagai thool. Saute to combine. Add in the fresh shredded coconut and remove off heat.
Let the masala mixture cool a bit.
Grind the masala to a very smooth paste. Add a cup and a half of water while grinding. Set aside.
Soak a big lime size tamarind in 2 cups of hot water for 15 minutes. Crush between your fingers and make a pulp. Strain the liquid and set aside.
Heat oil in a kadai and add in the mustard seeds and urad dal. Let it splutter. Add in two whole pods of peeled garlic. Fry for a minute.
Add in a lot of curry leaves. About 3 sprigs. Curry leaves are an important flavor component. So do not skip. Add in the onions too and saute for 2-3 minutes.
Add in the tamarind pulp/juice, salt, asafoetida, turmeric and coriander powder.
Add in the ground masala. Stir well and let it simmer covered with a lid on a very low flame for 30-40 minutes. Stir once in 10 minutes so it does not scorch at the bottom.
Add in the jaggery. This is the SECRET to a good poondu kuzhambu. It brings all the flavors alive. The spicy, tangy, oh so yumm……. Add in a good 2 tablespoons. It wont be sweet. It just brings all the flavors alive.
Let it simmer for 5 minutes more. Remove off heat and serve with rice or idli. It tastes awesome with idli and dosa. It tastes double awesome the next day.
Heat oil in a pan and add in the sesame oil. When the oil is hot, add in 3-4 methi-fenugreek seeds. Add in the cumin and the black pepper too. Let it splutter. The oil will foam a little. That’s fine. Add in 10 cloves of garlic and saute briefly.
Add in one sprig of curry leaves and roughly chopped onions. Saute for 2-3 minutes until the onions turn soft. Add in the tomatoes and fry for a minute.
When the tomatoes are briefly sauteed, add in the kuzhambu milagai thool / kuzhambu masala powder. Add in the fresh shredded coconut and remove off heat.
Grind the masala to a very smooth paste. Add a cup and a half of water while grinding. Set aside.
Soak a big lime size tamarind in 2 cups of hot water for 15 minutes. Crush between your fingers and make a pulp. Strain the liquid and set aside.
Heat oil in a kadai and add in the mustard seeds and urad dal. Let it splutter. Add in two whole pods of peeled garlic. Fry for a minute.
Add in a lot of curry leaves. About 3 sprigs. Curry leaves are an important flavor component. So do not skip. Add in the onions too and saute for 2-3 minutes.
Add in the tamarind pulp/juice, salt, asafoetida, turmeric and coriander powder.
Add in the ground masala. Stir well and let it simmer covered with a lid on a very low flame for 30-40 minutes. Stir once in 10 minutes so it does not scorch at the bottom.
Add in the jaggery. This is the SECRET to a good poondu kuzhambu.Add in a good 2 tablespoons. It wont be sweet. It just brings all the flavors alive.
Let it simmer for 5 minutes more. Remove off heat and serve with rice or idli. It tastes awesome with idli and dosa. It tastes double awesome the next day.
Notes
If you cannot source kuzhambu milagai thool, you can substitute sambar powder.
Idli has to be the top most comfort food for all South Indians. The texture of the idli is what makes it sublime. This recipe is a very basic recipe which uses only four ingredients namely Urad dal, Idly rice, fenugreek seeds and Salt. Its the technique that makes this the best batter ever. I use a wet grinder for grinding the batter. The stones in the grinder fluffs up the urad dal without making it hot. And the wet grinder method cannot be beat. A mixie or a food processor can be used but it wont be near close to the wet grinder. Each and every ingredient is ground separately. All the ingredients are soaked for a minimum of 3-4 hours and then ground. Wash all the ingredients in the beginning and then soak it in water. Wash the rice 3-4 times so the idli will be really white later.
The Ratio. This is the ratio that works for me. It is fool proof and works every single time.
Measurements used
1 cup = 250 ml
1 tablespoon = 15 ml
Here is how to do an awesome idli batter. Soak Fenugreek Seeds, Urad Dal and Idly Rice for a minimum of 3-4 hours. Soak everything separately in lots of water.
Lets start with grinding of the fenugreek seeds.
Usually people soak fenugreek seeds and urad dal together. I picked up this trick from my friend Neeraja in California that grinding fenugreek seeds separately contributed for a lot of fluffiness. I was excited the first time when I saw the fenugreek seeds fluff up so much when ground. Grind the soaked fenugreek seeds in a cup of water for 3-4 minutes until they are finely ground and have fluffed up.
Now is the time for lentils.
There are a lot of variety of urad dal available that people use for idli batter. Whole White Urad Dal – This is what I use. I use unpolished whole white Urad Dal. I prefer this dal for the sake of convenience. Split Black Urad Dal – People used this as the primary dal for idly batter till 20 years back and many people use it today too. Purists will use this dal only. Black urad dal still has the skin intact and that means less processing during manufacture. The theory for not using white urad dal being that some heat is generated in the process of removing the skin during manufacture which might kill some of the good bacteria. I buy the theory. But black dal – its a lot of work. The soaked dal needs to be rubbed between hands and washed 8-10 times to remove the skin. If you have the time, go for it. Its more healthier too.
So if you have the time, use this dal. Its the best dal for idly batter. Split White Urad Dal – I do not use this and will not recommend this.
Add the soaked and drained urad dal to the wet grinder. Remember the ground fenugreek is still lying in the grinder. Just dump the dal on top of it and add half a cup of water. The tip in grinding urad dal is to add the water slowly. If you add all of the water at once, it wont fluff up well. Add half a cup of water in intervals of 10 minutes for two to three times.
The dal should fluff up and fill the grinder. It should have increased about 8-10 times of its original volume. Grind for atleast 30 minutes. After 30 minutes, transfer the dal mixture into a bowl and set aside.
Now comes the rice.
We use Idly Rice for making idly batter. Its a short grain fat rice. Its also called as Salem Rice in Tamilnadu. Its an unique short fat grained rice. I have seen many people using Idly Rava. I personally do not use Idly rava. Most of the households in Tamilnadu use Idly Rice only. So its got to be idly rice for me. Grind the soaked and drained rice for 30 minutes until smooth. Add just enough water while grinding. Not more than half a litre. Once ground, transfer the batter to the dal mixture bowl and mix well. Let there be lot of space for the batter to expand while fermenting. Do not fill up to the brim.
SALT
When to add salt? There are two schools of thought. Whether to add salt while fermenting or to add it later. There is no right or wrong thing when it comes to adding salt. Its just a matter of choice. Salt inhibits fermentation and interferes with good bacteria to a certain extent. So one might want to add the salt after fermentation. At the same time, if you live in a hot and humid place then salt might be your friend because your batter will not be over fermented and will not turn sour soon. So when do I add salt? I add salt to the batter before fermenting in summers and add it after fermenting in winters. Hope this information was helpful.
I added salt to the batter before fermenting this time as we are seeing more sunnier days here. If you live in a very cold place leave your batter in some place warm. Leaving your batter inside your oven with the pilot light on works great if you live abroad and your place is cold.
Usually the batter needs to ferment for 8-12 hours.
Once the time is up, the batter should have increased in volume. Take a ladle and mix it well. Your batter is ready.
If you did not add salt before, now is the right time.
Lets make idli.
Put some water in an idly vessel and put it on medium flame. Oil the idli plate and gently fill the rounds with the batter. Put it inside the idly vessel and let it steam for 6-7 minutes.
The key to good idlis – Do not allow it to over cook. It might become hard and dry. Just keep an eye and remove the idlis after 6-7 minutes. Do not remove the idlis immediately. It might stick. Leave it undisturbed for 4-5 minutes and then spoon it out. Serve hot with your favorite chutney and sambar.
Fool proof recipe for making batter from scratch that will produce the softest idlis. Recipe for idly dosa batter.
Author: Kannamma – Suguna Vinodh
Recipe type: Basics
Cuisine: South Indian
Serves: 40
Ingredients
1 Cup Urad Dal
4 Cups Idly Rice
2 tablespoon Fenugreek seeds (Vendhayam)
2 tablespoon Salt
Instructions
All the ingredients are soaked for a minimum of 3-4 hours and then ground. Wash all the ingredients in the beginning and then soak it in water. Wash the rice 3-4 times so the idli will be really white later.
Grind the soaked fenugreek seeds in a cup of water for 3-4 minutes until the are finely ground and have fluffed up.
Add the soaked and drained urad dal to the wet grinder. Remember the ground fenugreek is still lying in the grinder. Just dump the dal on top of it and add half a cup of water. The tip in grinding urad dal is to add the water slowly. If you add all of the water at once, it wont fluff up well. Add half a cup of water in intervals of 10 minutes for two to three times. The dal should fluff up and fill the grinder. It should have increased about 8-10 times of its original volume. Grind for atleast 30 minutes. After 30 minutes, transfer the dal mixture into a bowl and set aside.
Grind the soaked and drained rice for 30 minutes until smooth. Add just enough water while grinding. Not more than half a litre. Once ground, transfer the batter to the dal mixture bowl and mix well.
I add salt to the batter before fermenting in summers and add it after fermenting in winters.
Usually the batter needs to ferment for 8-12 hours.
Once the time is up, the batter should have increased in volume. Take a ladle and mix it well. Your batter is ready.
For the idlies : Put some water in an idly vessel and put it on medium flame. Oil the idli plate and gently fill the rounds with the batter. Put it inside the idly vessel and let it steam for 6-7 minutes. The key to good idlis – Do not allow it to over cook. It might become hard and dry. Just keep an eye and remove the idlis after 6-7 minutes. Do not remove the idlis immediately. It might stick. Leave it undisturbed for 4-5 minutes and then spoon it out. Serve hot with your favorite chutney or sambar.
The coconut tree is called the ‘Kalpavriksh’, or the tree of life. 50 percent of the fat content in coconut is a fat rarely found in nature called lauric acid. Breast milk is the only other natural source that contains such a high concentration of lauric acid. So next time someone says coconut is bad for you, throw a coconut on them. Will you? Everything in this chutney is almost raw. The only cooked thing in this chutney is the tempering. Coconut chutney got to be the universally liked chutney for idli and dosas. Coconut chutney for breakfast can be the most amazing way to start your day. Here is how to do a super quick and easy coconut chutney.
Take equal quantities of fresh shredded coconut and fried gram (pottu kadalai). I took a cup each today. Add in 2 cloves of garlic, a small 1/2 inch piece of ginger, tamarind, asafoetida, salt and jaggery. Jaggery will not make the chutney sweet but will round out all the flavors. Remember the rule – Wherever tamarind goes, jaggery also goes. Add in the green chillies according to your taste. If you want it spicy add more. Add in 6-7 stalks of coriander leaves. Just grind all the chutney ingredients with 1.5 to 2 cups of water to a smooth paste. Set aside. Its that simple. The chutney is almost ready. Check for seasoning.
For the tempering.
Heat oil in a pan until hot. Add in the mustard seeds. Let it splutter. Add in the urad dal, curry leaves and dried red chillies. Saute until the dal turns golden. Remove and pour the tempering on top of the chutney.
Easy and quick recipe for South Indian Tamilnadu Hotel Style Green Coconut Chutney with step by step pictures.
Author: Kannamma – Suguna Vinodh
Serves: 4
Ingredients
For the chutney
1 cup Fresh shredded coconut
1 cup fried gram (pottu kadalai)
1 teaspoon salt
¼ teaspoon asafoetida
2 cloves garlic
½ inch piece ginger
½ inch piece tamarind
1 teaspoon jaggery
6-7 stalks coriander leaves
2 green chillies
For the tempering
1 tablespoon oil
1 teaspoon urad dal
½ teaspoon mustard seeds
1 sprig curry leaves
2 dried red chillies
Instructions
Take equal quantities of fresh shredded coconut and fried gram (pottu kadalai). I took a cup each today. Add in 2 cloves of garlic, a small ½ inch piece of ginger, tamarind, asafoetida, salt and jaggery. Add in the green chillies according to your taste. If you want it spicy add more. Add in 6-7 stalks of coriander leaves.
Just grind all the chutney ingredients with 1.5 to 2 cups of water to a smooth paste. Set aside. Its that simple. The chutney is almost ready. Check for seasoning.
For the tempering.
Heat oil in a pan until hot. Add in the mustard seeds. Let it splutter. Add in the urad dal, curry leaves and dried red chillies. Saute until the dal turns golden. Remove and pour the tempering on top of the chutney.
Indian wheat is high in protein and belongs to the aestivum variety used by everyone in the world for making great bread. So whole wheat bread loaves in India should work right? Why my atta bread just doesn’t work the way I want it to? Why is it dense and crumbly? I used to bake good soft and fluffy 100% percent whole wheat breads when I was abroad and suddenly after moving back to India, the same recipe would give me horrified loaves. I wanted to know why. After a lot of research I am posting this article so it might be helpful to all bread bakers in India. The culprit to bad loaves is the flour. It is all about the unique milling process in India that is different from the rest of the world. So lets first try to understand how Indian milling is done.
The milling process:
Indian wheat flour is mostly ground in stone mills popularly called as chakkis. Chakki is nothing but a pair of stones, of which, one is stationery and other is a rotating stone. Stone mills generate considerable heat due to friction. The heat causes what is called as STARCH DAMAGE. It also results in considerable damage to the protein in comparison to other milling techniques. The chakki atta is preferred more than the roller mill atta for the texture and taste of the Chapati/Roti (flat bread of India). Indian atta is a very very finely milled wheat flour. It works wonderfully well for making Indian flat breads and chakki is the most preferred milling process for indian breads. Stone grinding breaks the starch sufficiently to release extra sweetness while burning it slightly to give added flavor to Indian flat breads. Both methods of milling generate heat. Roller mills generate more heat than chakki and thereby some nutrition and vitamins are lost. But it has less damage to the starch and protein in the flour as it cuts the flour into small particles. But Chakki alters the starch (the force is intense) which is not good for western bread making but great for indian bread chapati/roti.
So what happens in chakki milling?
Roller milling results in 5% to 6% starch damage whereas chakki milling results in 11% to 13% starch damage. Let’s say protein in the flour on an average accounts for 10% of flour weight. But 70% is starch. Its equally important like the protein. Its important to understand that they make up for more than 50% of the dough volume. Its important that it works with the gluten chain when formed to tenderize it. When baked, the starch absorbs the water and gets fat or swollen. The moisture absorption is more in chakki flour than in normal whole wheat flour. So what? It means that you need to alter the liquid ingredients of the recipe as almost all the recipes for whole wheat bread uses traditional wheat flour. Because of this starch damage and protein loss, breads made out of 100% chakki atta is dense and dry like the picture below.
Also Indian wheat is light in color! Why?
India produces mostly 3 kinds of wheat.
95% “triticum aestivum” or the common bread wheat
4% “triticum durum” or the pasta wheat
1% “triticum dicoccum” or the emmer wheat (also known as khapli,samba godumai,diabetic wheat) – India is the largest cultivator of emmer wheat in the world.
Indian Gov portal says, Indian wheat is largely medium hard, medium protein wheat which is similar to the USA Hard white wheat. So what is whole hard white wheat? Its the same like any other wheat but has no major genes for bran color. For example Hard red winter wheat has upto 3 bran genes. That is the reason why indian atta is lighter in color and milder in flavor. Experts are of the opinion that the two kinds of wheat are the same nutritionally. Most of the nutrition differences among wheat varieties are driven by environmental conditions, such as weather, soil composition, drought etc..
The famous and unique Indian Sharbati wheat
The protein in wheat will be higher when there is drought and thats where our Indian sharbati atta rocks!
What is Indian Sharbati Atta? Sharbati atta comes exclusively from the state of Madhya Pradesh. Note that all wheat coming from MP is NOT Sharbati. The Sharbati is a rain-fed phenomenon where there’s no organized, large-scale irrigation. The high potash content in the soil, low humidity and rain irrigation results in wheat that is naturally 1-2 per cent higher in protein content than the normal 10-12 percent elsewhere. Sharbati belongs to the aestivum genre of wheat, the common bread wheat.
So how do we get a decent whole wheat bread loaf out of atta?
Grinding your own wheat flour can help make decent wheat loaves. You can grind your wheat berries in a regular roller mill. It was an epiphany when I held a good whole wheat sandwich loaf that was not dense. I have a toddler son who will refuse to eat bread if its not fluffy. So I add a little bit of vital wheat gluten to make it “wonder bread” fluffy.
References:
On food and cooking – Harold McGee,Peter Reinhart – whole grain baking, Larousse gastronomique, Bread Bible – Rose Levy beranbaum, farmer.gov.in/cropstaticswheat.html, www.google.com/patents/us6098905, india2012.icc.or.at/webfm_send/29 www.aaccnet.org/publications/cc/backissues/1962/documents/chem39_155.pdf, indiatoday.intoday.in/story/grains+of+gold/1/1561.html, www.apeda.gov.in, www.muehlenchemie.de, wholegrainscouncil.org, king arthur flour.
People are crazy behind baguettes, crusty breads, french loaves etc…but what gives me a lot of joy is a good old soft sandwich loaf with a lot of flavor. I belong to the soft fluffy kind when it comes to bread loaves. “Good bread is the most fundamentally satisfying of all foods, and good bread with fresh butter, the greatest of feasts.” Here is that one 100% whole wheat loaf you were looking for. Lets jump into making a great sandwich loaf. If you are going to be baking with atta please read this before you continue ! I am sorry. I am a little bossy. Thank you for understanding.
First lets get the yeast working. Add quarter cup of warm water plus a pinch of sugar to the yeast and leave it aside for 5 minutes so it becomes foamy. If it doesn’t foam, discard and start again with a fresh batch of yeast. Indian yeast is temperamental. so do not skip this step if you are in India.
Measure all the dry ingredients in a bowl. Do not pack the flour while measuring. Use the “scoop and sweep” method. Add in the vital wheat gluten and the salt. Set aside.
Measure 1 1/3 cups of warm water in a bowl. Add in quarter cup of olive oil. Add in quarter cup of honey. There is a neat little trick I learned a long time back. By measuring oil first and measuring honey next, the honey will just slide into the bowl without sticking because of the coating of the grease. Neat trick.
Now add in the water mixture and the yeast mixture.
Mix until roughly combined. We are not trying to knead anything yet. Once combined, let it rest for 20 minutes. Letting it rest will hydrate the dough well and activate the gluten. This resting period is called as Autolyse. Autolyse was invented by the great french acclaimed baker Raymond Calvel in the 1950’s. I once saw a TV show on PBS where Julia Child baked a baguette with Raymond Calvel and he was so passionate about his craft. The new age greats like Peter Reinhart are students of this great guy. Autolyse is genius.
So back in business. Once the rest has been completed, lets knead. I used a kitchen-aid to knead my dough. Its very easy to over knead in a stand mixer. Knead for 4 minutes on medium speed. Finish kneading on the table by hand. Shape the loaf and let it rise in a bowl until nearly doubled.
Why only nearly doubled ? Rose Levy Beranbaum writes about her whole wheat epiphany loaf and she says “I discovered that the secret to lightness of the crumb was not only the freshness of the flour but also not allowing the dough to double during rising which tears the more fragile gluten.” So the first rise – Do not allow it to over proof. Gotcha?
After the first rise, gently deflate the dough and shape it into a log.
Place it in a 9 inch by 5 inch loaf pan and cover the pan with a lightly greased plastic wrap. Allow it to rise for 1 to 2 hours, till it’s crowned about 1 or 2 inches over the rim of the pan.
My pan is tall. so it did not rise above the rim. The below picture shows the difference between the traditional 9 inch by 5 inch pan and my tall pan. I just showed this picture so no confusion.
Preheat the oven to 180 C for 20 minutes. Bake the bread for 45-50 minutes. Remove from the oven and after 5 minutes turn it out of the pan to cool.
Moist, soft, fluffy sandwich bread loaf recipe which is 100 percent whole grain. Made with Indian atta.
Author: Kannamma – Suguna Vinodh
Recipe type: Bread
Cuisine: American
Serves: 4
Ingredients
Main Ingredients
1⅓ cups lukewarm water
¼ cup extra virgin olive oil
¼ cup honey
4 cups Whole Wheat Flour
2 tablespoon Vital wheat Gluten
1½ teaspoons salt
For the yeast mixture
1 tablespoon Active dry yeast
pinch of sugar
¼ cup warm water
Instructions
First lets get the yeast working. Add quarter cup of warm water plus a pinch of sugar to the yeast and leave it aside for 5 minutes so it becomes foamy. If it doesn’t foam, discard and start again with a fresh batch of yeast.
Measure all the dry ingredients in a bowl. Do not pack the flour while measuring. Use the “scoop and sweep” method. Add in the vital wheat gluten and the salt. Set aside.
Measure 1⅓ cups of warm water in a bowl. Add in quarter cup of olive oil. Add in quarter cup of honey. There is a neat little trick I learned a long time back. By measuring oil first and measuring honey next, the honey will just slide into the bowl without sticking because of the coating of the grease.
Now add in the water mixture and the yeast mixture.
Mix until roughly combined. We are not trying to knead anything yet. Once combined, let it rest for 20 minutes. Letting it rest will hydrate the dough well and activate the gluten. This resting period is called as Autolyse.
Once the rest has been completed, knead for 4 minutes on medium speed. Finish kneading on the table by hand. Shape the loaf and let it rise in a bowl until nearly doubled.
After the first rise, gently deflate the dough and shape it into a log.
Place it in a 9 inch by 5 inch loaf pan and cover the pan with a lightly greased plastic wrap. Allow it to rise for 1 to 2 hours, till it’s crowned about 1 or 2 inches over the rim of the pan.
Preheat the oven to 180 C for 20 minutes. Bake the bread for 45-50 minutes. Remove from the oven and after 5 minutes turn it out of the pan to cool.


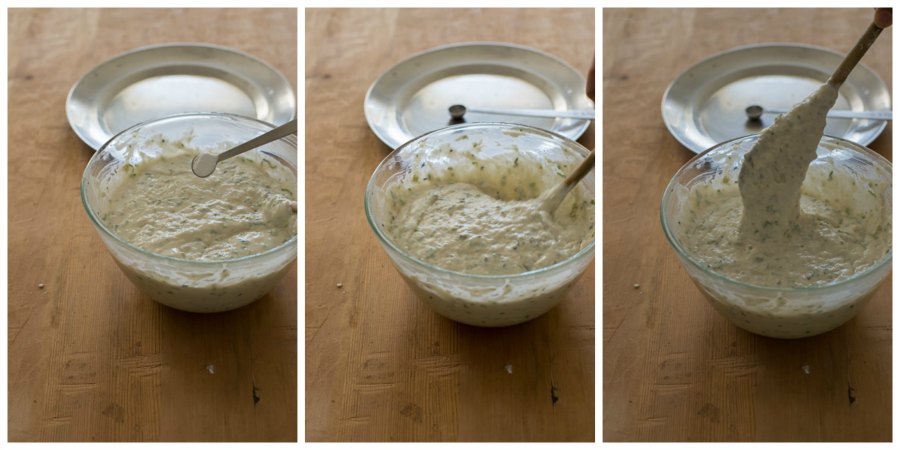
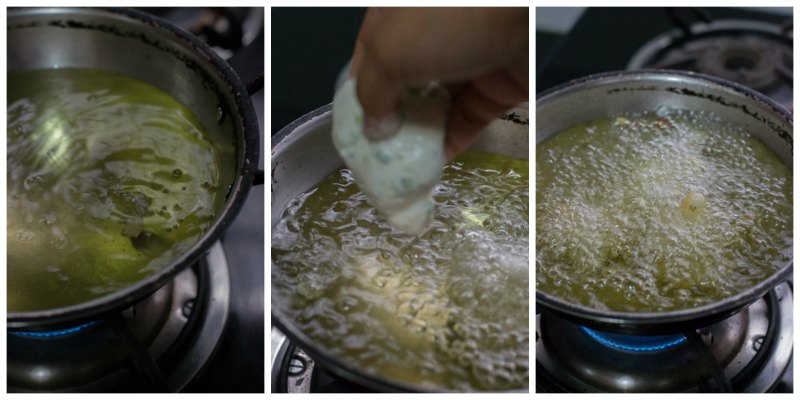
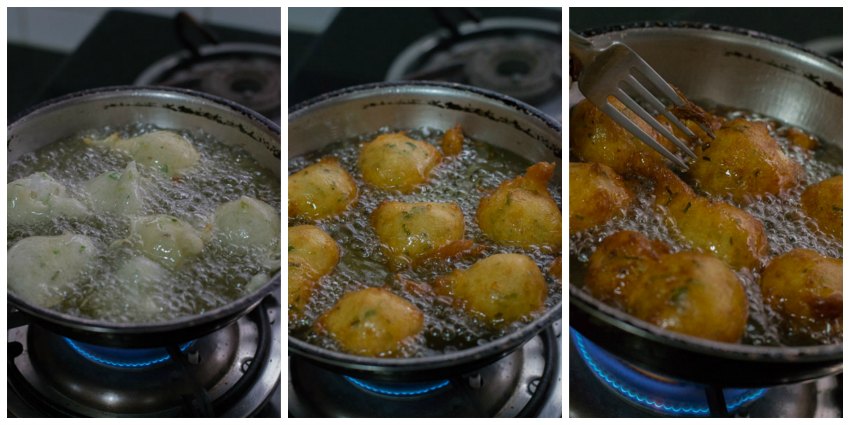
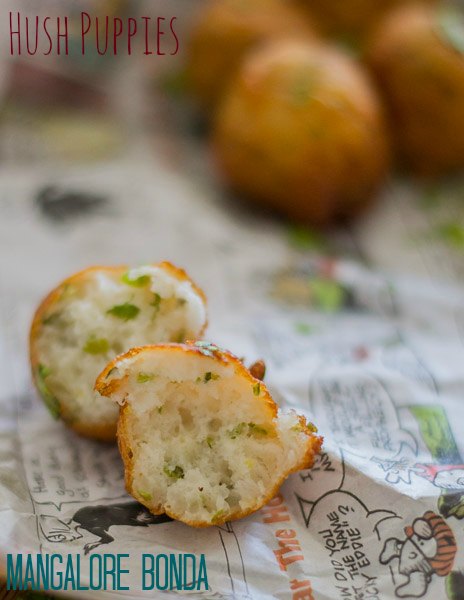

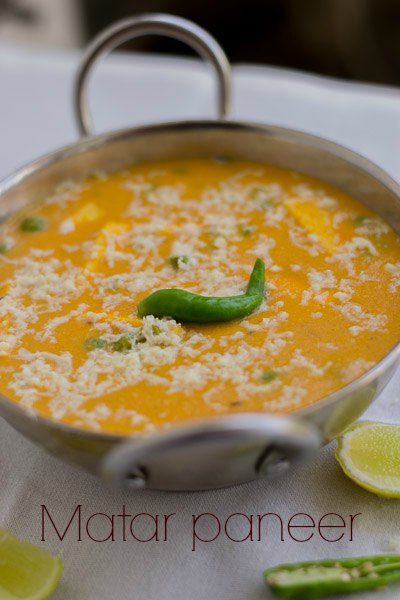


 The Masala
 Soak the rice in water now. The rice needs to soak for half an hour.


 For the soffritto mixture


 For the Caramel


 For the Custard


 Water Bath


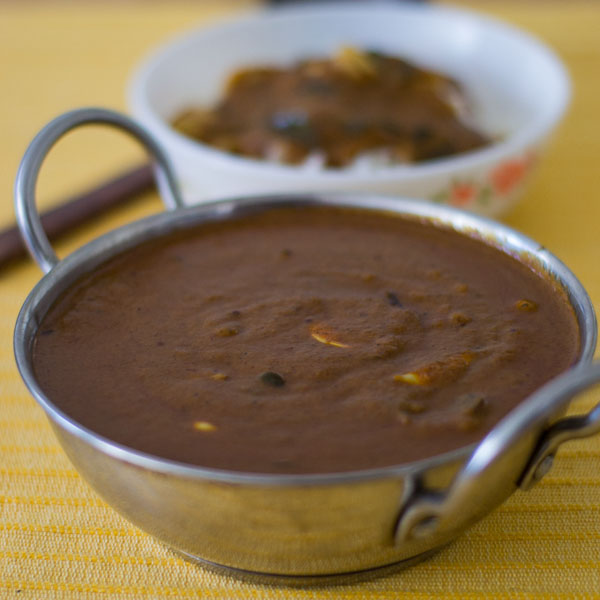


 SALT
SALT


