“Tomatoes and oregano make it Italian, wine and tarragon make it French, Sour cream makes it Russian, lemon and cinnamon make it Greek, Soy sauce makes it Chinese but garlic makes it good.” – How true. I have a big big addiction for roasted garlic. At least, at least something that is good for you surprisingly can taste good too. Garlic tops that list for me.
This is an everyday pasta recipe that can be put together in under 30 minutes which works for me. You will need the following. Along with other ingredients, Basil finally makes it Italian. Basil gives a nice finishing fresh flavor and taste. So do not skip Basil. This recipe uses very simple everyday pantry ingredients. I used Amul Cream for this recipe.
You will need pureed tomatoes for this recipe. You can use canned tomatoes if you want. I have an easy way to skin and de-seed fresh tomatoes. I just run the tomatoes in the food processor and strain. That’s my easy route to skinned De-seeded tomatoes.
Heat a heavy pan and add a couple of tablespoons of olive oil and set it on a very very very very low heat. Garlic burns fast. So use caution. Add in a whole pod of finely chopped garlic and saute till nice and light brown. It can take up to 3 minutes. We are still working on low flame. The line between brown and burnt garlic is very thin. so your eyes on the pan please….
Once the garlic is brown, add in the chopped onions and saute for a couple of minutes until the onions are soft. Add in the tomato puree. Add the salt and freshly ground pepper. My heart is with pepper and soul still with garlic. Whenever I make tomato based sauce, I add a teaspoon of sugar to cut the acidity. It rounds the taste. That is a little Nonna trick.
Let it simmer on medium flame for 5 minutes. Add in half a cup of cream and combine well. Let it simmer for a couple of minutes more. Add in the pasta and mix well to coat. Remove off heat. Add in the basil and serve hot!
Add oil to a wide skillet set over very low heat. Add in the minced garlic.Saute till light brown and roasted. Add in the chopped onions and briefly saute for a couple of minutes until soft.
Add in the pureed tomatoes and reduce the flame to low. Add in the sugar, pepper and salt.
Check for seasoning. Let it simmer for 10 minutes. Add in the cream and mix well to combine and let it simmer for couple of minutes more.
Meanwhile, bring a large pot of water to a boil. Add pasta and cook until al dente. Drain the pasta and add to the pot and let it cook in the sauce for a couple of minutes.
Remove from heat. Add the fresh basil and serve hot.
Horsegram lentil curry/kollu pappu quintessentially belongs to the Kongunad region of Tamilnadu. Its a staple in everybody’s home. Its called horsegram as its a staple fodder for the horses. There is a saying in tamil இளைத்தவனுக்கு எள்ளு, கொழுத்தவனுக்கு கொள்ளு which means sesame seed for the lean guys and horsegram for the fat guys. Horse gram aids in weight reduction. Horsegram lentil has a lot of medicinal properties. Its been used extensively in Indian alternative medicine.
First, we need to boil the lentils. Horsegram/kollu needs to be cleaned first. It almost always has some small stones and sand particles. Just take half a cup of lentils and spread it on a plate and slowly remove the stones and sand. Wash thoroughly for 2-3 times in running water. Pressure cook half a cup of lentils in 3 cups of water for 15 minutes. About 10-12 whistles. While pressure cooking, if you face the problem of water from inside the cooker leaking out of the whistle opening, check this post to know how you can avoid it. Cook the lentils and drain off the excess water. Reserve the water for later use. We will use some of the water for grinding the lentils. The rest of the lentil water can be used for making kollu rasam.
Its a fairly simple recipe. The lentils are boiled and tempered with a dry roasted spice powder. A teaspoon each of cumin, pepper and coriander seeds are dry roasted with 2 sprigs of curry leaves, 1 dried red chilli (optional) and ground to a smooth powder. Dry roast these spices on a low flame until one can smell the aroma of the seeds and the curry leaves are dry. Allow it to cool in the pan before grinding. Grind the spices and set aside.
Now, take a pan and add a teaspoon of sesame oil. When the oil is hot, add in a chopped onion, 5 cloves garlic and saute briefly for a minute until the onions are soft. Add in the salt and tomatoes and saute for a minute more. If you do not like garlic, omit it or just add a clove.
Add in the ground masala and saute to combine. Add in the lentils and half a cup of reserved water. Remove off heat and let the mixture cool a bit. Grind the lentils to a coarse paste.
Serve the lentils hot with rice. If you are feeling fancy, add a tempering to the lentils. Heat a teaspoon of oil in a pan and add a couple of dry red chillies and curry leaves and fry till the curry leaves are crisp. Just pour the tempered mixture on top of the lentils. Serve hot with rice.
For the Dry Roast Masala Powder - Dry roast the spices on a low flame until one can smell the aroma of the seeds and the curry leaves have become dry. Allow it to cool in the pan before grinding. Grind the spices and set aside.
Clean the lentils and wash them thoroughly. Pressure cook the lentils for 15 minutes or 10-12 whistles. Drain the water. Set aside.
Take a pan and add a teaspoon of sesame oil. When the oil is hot, add in a chopped onion, 5 cloves garlic and saute briefly for a minute until the onions are soft. Add in the salt and tomatoes and saute for a minute more. If you do not like garlic, omit it or just add a clove.
Add in the ground masala and saute to combine. Add in the lentils and half a cup of reserved water. Remove off heat and let the mixture cool a bit. Grind the lentils to a coarse paste.
Add a tempering to the lentils - Heat a teaspoon of oil in a pan and add a couple of dry red chillies and curry leaves and fry till the curry leaves are crisp. Just pour the tempered mixture on top of the lentils.
This is an everyday lentil recipe. A very simple and quick recipe for chow-chow with lentils. I make this with split moong dal (paasi paruppu ). Lentils are cooked and simmered in a coconut paste and a tempering added in the end. Here is how I do it.
Wash and peel the chow-chow/chayote. Cut into half and remove the seed in the middle. Dice them and keep aside.
Wash half a cup of split moong dal / paasi paruppu and cook it along with the chow-chow in a pressure cooker for 5 minutes or 4 whistles. For every half cup of dal, I add 2 cups of water. I have a neat tip for cooking dal in a pressure cooker. I always had a problem with Indian pressure cookers. The water from inside the cooker will leak out of the whistle opening while cooking and make a whole mess on the gas stove. By placing the dal and water in a bowl and keeping the bowl in the pressure cooker filled with water easily solved the problem. No more mess.
Cook the dal and keep aside.
Make a paste out of a teaspoon of cumin seeds, couple of tablespoons of fresh shredded coconut and couple of dried red chilli. I take out the seeds from the chillies. Add up to half a cup of water while grinding. Set aside
Now combine the coconut paste with the cooked lentil mixture in a pan and bring it to a boil on low flame. Add the salt. Remove off heat when it barely comes to a simmer. You do not want to boil it too much.
The tempering: Add a teaspoon of oil to a small pan on low flame. When the oil is hot, add in the mustard seeds and let it splutter. Then add urad dal, curry leaves and hing. Fry till the curry leaves are crisp and the dal is brown. Pour it over the dal.
Serve hot with rice.
Chow Chow Kootu with Moong Dal – Chayote Squash Lentil Stew
Wash and peel the chow-chow/chayote. Cut into half and remove the seed in the middle. Dice them and keep aside. Wash half a cup of split moong dal / paasi paruppu and cook it along with the chow-chow in a pressure cooker for 5 minutes or 4 whistles.
Make a paste out of a teaspoon of cumin seeds, couple of tablespoons of fresh shredded coconut and couple of dried red chilli. I take out the seeds from the chillies. Add up to half a cup of water while grinding.
Now combine the coconut paste with the cooked lentil mixture in a pan and bring it to a boil on low flame. Add the salt. Remove off heat when it barely comes to a simmer. You do not want to boil it too much.
The tempering: Add a teaspoon of oil to a small pan on low flame. When the oil is hot, add in the mustard seeds and let it splutter. Then add urad dal, curry leaves and hing. Fry till the curry leaves are crisp and the dal is brown. Pour it over the dal.
Getting the children early in the kitchen is the only way to get them interested in food. My father made my son sit on the kitchen counter and gave him a real knife when he was four. I was scared but he just asked me to let it go. He told he would take care. He did. My father would say, you got to believe the kids. We actually do not know what they are capable of doing because we are scared and over protective and never willing to give them a chance. Starting them early is very very essential.
We had a lot of fun making this pizza from scratch with the children. This is a very very forgiving pizza dough recipe which can be made the same day. No overnight resting is needed. I have made it several times with the kids and they all love to get their hands doughy and saucy and would lick the plates clean. Lets get some flour love. Shall we?
First step, weigh and measure all the ingredients. In a big bowl, add in 420 grams – 3 cups all purpose flour and 1 1/2 teaspoon salt. In a separate bowl mix a tablespoon of olive oil , 1/4 cup water and 3/4 cup milk.
Second step, lets get the yeast working. Take a small bowl and add 1/4 teaspoon of sugar and 2 teaspoon Active dry yeast. Add in 1/4 cup tepid water. Mix well and leave it aside for 5 minutes so it becomes foamy. Indian yeast is temperamental. If it doesn’t foam, discard and start again with a fresh batch of yeast.
Combine all the ingredients (flour mixture, milk mixture and yeast mixture ) together and form a dough. The dough will be very soft. We are not trying to knead yet. We are just combining everything together. Once its mixed, move away for 10 minutes. Don’t do anything. This process is called as autolyse. It hydrates the dough and it becomes a lot easier later to knead. Now start kneading. I did it by hand for a good 5 minutes. The trick in kneading is to avoid the temptation of adding flour. Too much flour alters the moisture content and will result in a dry dough. So do not add too much flour while kneading. Knead well until the dough becomes one soft ball. Take a lot of help from the little master kneaders.
First Rise : Once kneading is done, shape the dough into a nice smooth ball and transfer the dough to a well oiled bowl and let the dough rise until doubled. Mine took two hours.
Second Rise : Check every half hour with your little one to see how the dough is getting fat. You will be impressed. Once the dough is doubled, transfer the dough to a work surface. punch the dough down, make a ball and let it rise again until doubled. Another 2 hours. It can be faster or slower depending upon where you live.
Third rise : Turn the risen dough to your work surface and cut the dough into 8 equal pieces. Flatten the dough and start crimping the dough as shown in the picture below to form 8 nice smooth balls.
Lightly oil all the balls and let it rise for half hour before baking. If you are not going to use it right away, refrigerate for up to 6 hours. Let it come to room temperature before proceeding.
Baking
Preheat the oven to 400 degrees F. Flatten each ball to disks on a parchment paper. Press it in shape as necessary with your fingers. Top it with tomato sauce and toppings of your choice and place it on a sheet pan. Bake for 10-15 minutes.
For a children’s party, hand over a parchment paper and a dough ball to each kid and let them flatten and put the toppings of their choice. Mark a small initial on the corner of the parchment for identification. Have a great party with loads of fun.
Mini Pizza Party for children with DIY Dough from Scratch
In a big bowl add in the all purpose flour and salt. In a seperate bowl mix a tablespoon of olive oil , 1/4 cup water and 3/4 cup milk.
Take a small bowl and add 1/4 teaspoon of sugar and 2 teaspoon Active dry yeast. Add in 1/4 cup tepid water. Mix well and leave it aside for 5 minutes so it becomes foamy.
Combine all the ingredients together and form a dough. Once combined rest for 10 minutes (Autolyse). Knead well for 5 minutes until the dough becomes one soft ball.
First Rise : Once kneading is done, shape the dough into a nice smooth ball and transfer the dough to a well oiled bowl and let the dough rise until doubled. Mine took two hours.
Second Rise : Once the dough is doubled, transfer the dough to a work surface. punch the dough down, make a ball and let it rise again until doubled. Another 2 hours. It can be faster or slower depending on where you live.
Third rise: Turn the dough to your work surface and cut the dough into 8 equal pieces. Flatten the dough and start crimping the dough to form a nice smooth ball. Lightly oil all the balls and let it rise for half hour before baking. If you are not going to use it right away, refrigerate for upto 6 hours. Let it come to room temperature before proceeding.
Baking: Preheat the oven to 400 degrees F. Flatten each ball to disks. Press it in shape as necessary with your fingers. Top it with tomato sauce and toppings of your choice and bake for 10-15 minutes.
I learnt this recipe after marriage from my mother in law. She is an awesome cook. My father in law is a foodie. This is his favorite curry to have with chapati. In my early years of marriage, whenever my in-laws used to visit us, I would just help around in the kitchen. The true cooking was done by my MIL. She used to make this as a side dish for chapati. Its a very easy recipe and comes out very well every single time.
Usually in Indian curries, the spices are dry roasted and then ground. But for this vegetable kurma, the spices are ground raw. Grind all the ingredients listed below with about 1-2 cups of water to a smooth paste.
Boil about 4 cups of mixed vegetables until al-dente and keep aside. Do not use a lot of vegetables. 4-5 different vegetables should do fine. Adding potato gives the gravy some body. So don’t miss the potato.
Heat the oil in a saute pan. Add in a teaspoon each of cumin seeds, fennel seeds and 2 sprigs of curry leaves. Let it splutter. Add in the chopped onions and salt. Saute till slightly brown. Add in the ground masala paste and let it simmer in low flame for about 5 minutes.
Once the raw smell goes, after 5 minutes add the boiled vegetables. Take a small cup and add a tablespoon of cornstarch or maida (All purpose flour). Add 1/2 cup water to it and make a slurry. Add the slurry to the gravy. The slurry helps in thickening the gravy. Do not add the corn starch or maida directly as it may lump up. Simmer for couple of minutes more.
Serve hot with roti or chapati.
Vellai Kurma – Restaurant Style South Indian White Vegetable Korma
Raw ground paste: Grind all the ingredients with about 1-2 cups of water to a smooth paste.
Boil about 4 cups of mixed vegetables until al-dente and keep aside.
Heat the oil in a saute pan. Add in a teaspoon each of cumin seeds, fennel seeds and 2 sprigs of curry leaves. Let it splutter. Add in the chopped onions and salt. Saute till slightly brown. Add in the ground masala paste and let it simmer in low flame for about 5 minutes.
Once the raw smell goes, after 5 minutes add the boiled vegetables. Take a small cup and add a tablespoon of cornstarch or maida (All purpose flour). Add 1/2 cup water to it and make a slurry. Add the slurry to the gravy. The slurry helps in thickening the gravy. Do not add the corn starch or maida directly as it may lump up. Simmer for couple of minutes more.
If you are down with severe cold, then this is what you need to be eating. It is so warm and comforting. It clears the throat and the sinus. Its really very refreshing. Horsegram also aids in weight loss. I have already shared the recipe for kollu pappu/horsegram lentil. You can know more about the amazing lentil there. This dish is a specialty of the kongunad region of Tamilnadu. I am from Coimbatore and I learnt this recipe from my aunt.
Usually we make the rasam with the cooked water (broth) that’s left over after cooking the lentil when we make kollu pappu/dal. If you want to make this rasam alone, Boil 1/4 cup of horsegram with 2 cups of water in a pressure cooker for 10 minutes. Drain the water and set aside.
Soak half a lime size tamarind in water for 15 minutes and make a puree out of it and set aside. Tamarind water gives the rasam that tang.
Heat sesame oil in a pan and add pepper, cumin and garlic and saute till it starts to pop.
Add in one medium chopped tomato. Add in the salt. Cook the tomatoes till they start to become semi dry. Add in 3-4 tablespoons of cooked horse gram and remove off heat. Don’t add more lentils or else the rasam might become very thick.
Let this mixture cool and then grind to a smooth paste. Heat oil in a pan and add mustard seeds, urad dal, fenugreek seeds and cumin. Let it pop. Add in the tamarind juice, the ground paste and the curry leaves. Let it simmer on low flame for 10 minutes.
Add in the kollu/horsegram leftover lentil water. Cook for a couple of minutes more. Add in a small piece of jaggery and coriander leaves. Remove off heat.
Serve hot with rice. If there is leftover rasam, strain it the next day in a mesh strainer and slightly heat it and serve as a nice warm broth. It tastes so yum the next day.
Kollu Rasam Recipe / Horsegram Soup / Ulavalu Rasam
Boil 1/4 cup of horsegram with 2 cups of water in a pressure cooker for 10 minutes. Drain the water and set aside.
Soak half a lime size tamarind in water for 15 minutes and make a puree out of it and set aside. Tamarind water gives the rasam that tang.
Heat sesame oil in a pan and add pepper, cumin and garlic and saute till it starts to pop.
Add in one medium chopped tomato. Add in the salt. Cook the tomatoes till they start to become semi dry. Add in 3-4 tablespoons of cooked horsegram and remove off heat.
Let this mixture cool and then grind to a smooth paste. Heat oil in a pan and add mustard seeds, urad dal, fenugreek seeds and cumin. Let it pop. Add in the tamarind juice, the ground paste and the curry leaves. Let it simmer on low flame for 10 minutes.
Add in the kollu/horsegram leftover lentil water. Cook for a couple of minutes more. Add in a small piece of jaggery and coriander leaves. Remove off heat.
Serve hot with rice. If there is leftover rasam, strain it next day in a mesh strainer and slightly heat it and serve as a nice warm broth.
This is an everyday poriyal/stir-fry recipe. The vegetable is first steamed and then tempered the Indian way. It makes for a quick, easy side-dish and can be served with roti or rice. It makes for a very healthy meal too. And to top it, its Vegan. Here is how to do the stir-fry. First clean the Chayote squash and peel them. Cut them into half and take out the seed from the middle with a help of a spoon.
After peeling and de-seeding, dice them and steam them. I steam them in a pressure cooker for 2 whistles or roughly about 3 minutes on medium flame. Do not cook for more time as it might turn into mush. I place some water in the cooker and place the veggies in a bowl inside them like shown below. By this way there is no need to add extra water to the veggies and it retains the vitamins. Its quick too. I steam all my veggies this way.
Once the steaming is done, a little tempering is added. Chop an onion, couple of green chillies, curry leaves and some coriander leaves. For the tadka, we will use mustard seeds, urad dal, cumin and dried red chilli.
Heat some oil in a pan and add in the mustard seeds, urad dal, cumin and dried red chilli and wait till the dal turns into brown and the mustard seeds splutter. Add in the curry leaves and onions. Saute till the onions are soft and translucent.
Add in the green chillies and the salt. Saute for a minute. Add in the steamed vegetable and coriander leaves and stir everything to combine. Remove off heat.
Clean the Chow Chow, peel, dice and steam them. Set aside.
Heat some oil in a pan and add in the mustard seeds, urad dal, cumin and dried red chilli and wait till the dal turns brown and the mustard seeds splutter. Add in the curry leaves and onions. Saute till the onions are soft and translucent.
Add in the green chillies and the salt. Add in the steamed vegetable and coriander leaves and stir everything to combine.
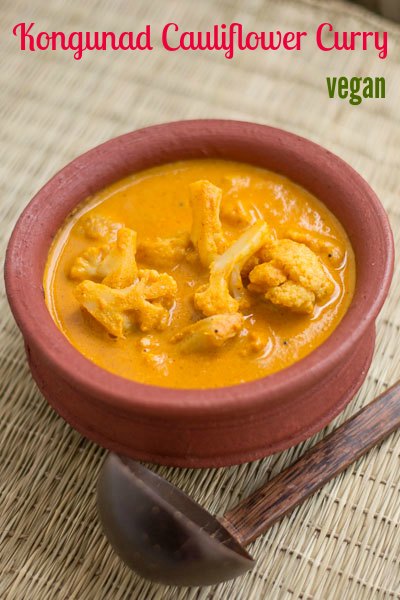
This recipe from the kongunad region uses the simplest of the ingredients and spices. “Once you get a spice in your home, you have it forever. Women never throw out spices. The Egyptians were buried with their spices. I know which one I’m taking with me when I go.” This curry brings back memories every single time. My grand mother made this, my mom made this, my in laws made this, I make this and now you will make it too. This is a fantastic awesomatic south indian curry which goes so well with Idly, Dosa or Roti.
“Cauliflower is nothing but cabbage with a college education” – Mark Twain. Its an elegant, sophisticated, festive most sought after vegetable from the Victorian times. For this recipe, we need to cook the Cauliflower first. Boil the Cauliflower in water until its fork tender and set aside.
Now its masala time….Get your food processor out. You will need the following ingredients for “get away mascara, lets bring in the masala”
Heat oil in a pan and add in the cumin, roasted gram (pottu kadalai as called in tamil) and the dried red chilli. Let it roast for 15-20 seconds. Add in the curry leaves, onions and salt. Saute in medium flame for a good 7-8 minutes until the onions are slightly brown.
Once the onions are brown, dump all the other ingredients at once. Tomatoes, coconut, tamarind, turmeric and coriander powder. Saute in medium flame for a good 6-7 minutes until the tomatoes are cooked and juiced down. Remove off heat and let it cool slightly.
Grind the mixture to a very very smooth paste…Did you hear that???? I am sorry that I am bossy. We need a fine paste. OK. “Oui, Chef”. You can add some water, up to a cup while grinding.
Now its tempering time. Take a deep pan and heat a tablespoon of oil until hot. Add in the mustard seeds, cumin seeds and the curry leaves. Let it pop. Now add the ground masala paste. Add up to 2 cups water to thin the gravy. Let it simmer for a couple of minutes.
Add in the cooked Cauliflower and let it simmer for a couple of minutes more. Remove off heat.
Boil the Cauliflower in water until its fork tender and set aside.
Heat oil in a pan and add in the cumin, roasted gram (pottu kadalai as called in tamil) and the dried red chilli. Let it roast for 15-20 seconds. Add in the curry leaves, onions and salt. Saute in medium flame for a good 7-8 minutes until the onions are slightly brown.
Once the onions are brown, dump all the other ingredients at once. Tomatoes, coconut, tamarind, turmeric and coriander powder. Saute in medium flame for a good 6-7 minutes until the tomatoes are cooked and juiced down. Remove off heat and let it cool slightly.
Grind the mixture to a very very smooth paste.
Take a deep pan and heat a tablespoon of oil until hot. Add in the mustard seeds, cumin seeds and the curry leaves. Let it pop. Now add the ground masala paste. Add upto 2 cups water to thin the gravy. Let it simmer for a couple of minutes.
Add in the cooked Cauliflower and let it simmer for a couple of minutes more.
I was never a Pongal fan until I became pregnant with my first born. I used to crave for a few things and Pongal was high on that list. Not just any Pongal. But Pongal from a small little restaurant in San Jose called Komala Vilas. My husbands friend, whom we called Thambi used to come and stay with us over the weekends. Thambi is a foodie. He loved to eat out. So every Saturday, we would get up late, get ready and drive straight to Komala Vilas and have piping hot Pongal. Their Pongal was different. Pepper and Cumin was never whole in their Pongal. It was crushed, fried and then added. This little step took their dish to another different level. ‘What nicer thing can you do for somebody than make them breakfast?’ – Anthony Bourdain.
So lets make some awesome Pongal. Come with me.
Soak half a cup of rice in water. Preferably raw rice. I used Sona Masuri rice. Once we have done that, lets roast some lentils. Take half a cup of split moong dal and dry roast it on a very low flame until you can smell the roasted dal. It would take approximately 3 minutes. Don’t roast for long. Cook the dal and rice together in a pressure cooker with 4 cups of water for a good 15 minutes or 10-12 whistles. We need to cook it until well done. I dont add the rice and dal directly in the cooker. I place some water in the cooker and place a bowl inside and add the rice, dal and water to the bowl. This way the rice mixture does not scorch in the bottom.
Coarsely grind pepper and cumin with the help of a mortar and pestle. Set aside. Mince a teaspoon of ginger very finely. You will need some green chillies and curry leaves too.
Heat some ghee and oil in a pan. I used 2 tablespoons of ghee and a tablespoon of oil. Add in the broken cashew nut, ginger, curry leaves and green chillies. Roast on a low flame. Once the nuts are roasted add in the pepper-cumin mixture. Roast briefly for 20 seconds.
Add in the cooked rice-dal mixture and salt. Mix everything to combine. Saute briefly for a minute or two. Remove off heat.
Soak half a cup of rice in water. Take half a cup of split moong dal and dry roast it on a very low flame until you can smell the roasted dal. It would take approximately 3 minutes. Don’t roast for long. Cook the dal and rice together in a pressure cooker with 4 cups of water for a good 15 minutes or 10-12 whistles.
Coarsely grind pepper and cumin with the help of a mortar and pestle. Set aside.
Heat some ghee and oil in a pan. I used 2 tablespoons of ghee and a tablespoon of oil. Add in the broken cashew nut, ginger, curry leaves and green chillies. Roast on a low flame. Once the nuts are roasted add in the pepper-cumin mixture. Roast briefly for 20 seconds.
Add in the cooked rice-dal mixture and salt. Mix everything to combine. Saute briefly for a minute or two.
The first time I ate chicken as a kid was at my aunt/my dad’s sisters place as my parents are vegetarian. We would visit my aunt once a month usually on Sundays. Sundays meant meat for lunch. Those days, in most of the homes in South India, meat was consumed only on Sundays. The men folk of the house would generally go and get the meat in the morning. The ladies of the house would start the ritual of grinding the masalas on the stone mortar just after breakfast. I would eagerly wait for lunch time as the whole house would start smelling like flavor town. This curry takes me back to my childhood. Food is nothing but memories. This is my Aunt Sarasu Athamas Kozhi Kuzhambu recipe.
In the below picture, Sarasu athama can be seen decorating snack boxes for the grooms folks during my wedding at mid night. She was so tired that she could no longer sit that day. She is now 80. I pray to god to keep her in good health. Come with me and I will show you how to go to flavor town.
This recipe has one raw masala paste and one fried masala paste. So lets make them. Shall we?
Raw Masala Paste
You will need the following things for the raw masala paste. Grind everything as smooth as possible. You can add enough water while grinding to get the desired texture.
Fried Masala Paste
Heat oil in a pan and add in pepper, cumin seeds, curry leaves, coriander seeds and dry red chillies. Briefly roast for a minute in medium flame. Add in the onions and saute until the onions are slightly brown. Remove off heat. Empty the mixture in the pan to a bowl and let it cool slightly.
Take the empty pan and set on heat again. Do you see those brown bits sticking to the pan? Those are flavor bombs. De-glaze the pan by adding 1/2 cup of water and allowing it to boil for a couple of minutes. Scrape the pan while boiling to remove off all the caramelized bits. Add it to the fried mixture.
Grind the mixture to a very smooth paste. Add enough water while grinding to get a smooth paste.
Now lets start building the flavors. We need to peel and finely chop about half a cup of shallots. Heat oil in a pan and add in 3 sprigs of curry leaves and the shallots. Fry till nice and translucent.
Add in the chopped tomatoes and turmeric and fry till the tomatoes are nicely cooked and juiced down.
Once the tomatoes are cooked, add in both the ground masala paste (raw and fried). Add 2 cups of water or as necessary. Add in the chicken pieces with the bone. Reduce the flame to low and let it simmer on a low flame for 40 minutes. Oh yes. 40 minutes. Stir the curry every 10 minutes once so it doesn’t scorch at the bottom of the pan. Finally add in the salt. My aunt almost always added the salt only at the end for this curry. So I do the same. Now, don’t ask me why?
After 40 minutes, Remove the pan from the heat and serve hot with rice.
Grind everything as smooth as possible. You can add enough water while grinding to get the desired texture.
Fried Masala Paste
Heat oil in a pan and add in pepper, cumin seeds, curry leaves, coriander seeds and dry red chillies. Briefly roast for a minute in medium flame. Add in the onions and saute until the onions are slightly brown. Remove off heat.
Take the empty pan and set on heat again. De-glaze the pan by adding ½ cup of water and allowing it to boil for couple of minutes. Scrape the pan while boiling to remove off all the caramelized bits. Add it to the fried mixture.
Grind the mixture to a very smooth paste. Add enough water while grinding to get a smooth paste.
For the gravy
Heat oil in a pan and add in 3 sprigs of curry leaves and the shallots. Fry till nice and translucent.
Add in the chopped tomatoes and turmeric and fry till the tomatoes are nicely cooked and juiced down.
Once the tomatoes are cooked, add in both the ground masala paste. Add 2 cups of water or as necessary. Add in the chicken pieces with the bone. Reduce the flame to low and let it simmer on a low flame for 40 minutes. Oh yes. 40 minutes. Stir the curry every 10 minutes once so it doesn’t scorch at the bottom of the pan. Finally add in the salt.
After 40 minutes, Remove the pan from the heat and serve hot with rice.
This cake is very close to my heart. This is my mums favorite cake. She calls it tea cake. She would have a piece of this cake with coffee in the evening. This cake is the lightest, fluffiest and tastiest simple plain vanilla cake ever. It is called as the hot milk cake. This old-fashioned cake has been around for a very long time. It’s a very delicate and moist cake.
“If you look over the years, the styles have changed – the clothes, the hair, the production, the approach to the songs. The icing to the cake has changed flavors. But if you really look at the cake itself, it’s really the same.” -John Oates.
Preheat the oven to 350F. Line and grease two 8 inch round pans and keep them ready. Take a large mixing bowl and add the eggs, sugar and vanilla in it.
Set the bowl over a pan of simmering water. Heat the eggs,sugar and vanilla until slightly hot, stirring constantly to prevent curdling. Don’t move away. Constant stirring is the key..Else you will end up with sweet curdled eggs. Agh….I have done that before and you cannot do anything about it. So all eyes on the bowl. OK.
Keep stirring until all the sugar is completely dissolved. Run your fingers in the batter and feel the batter. It should be smooth. If its grainy, stir for some more time. This whole process can take between 3-5 minutes.
Now, lets start whisking. Using the whisk beater, beat the mixture on high speed for 5 minutes or until triple in volume. If you are using a hand beater you might need to beat for at least 10 minutes. Its important that you beat for the above said time. Do not stop after 3-4 minutes even if it looks done. Trust me, the eggs are doing their work. It should form a light ribbon when the whisk is pulled up.
Combine flour and baking powder and sift. Add it to the batter. Whisk until smooth.
In a small saucepan, heat milk and the melted butter just until the mixture is slightly hot. Add the hot milk mixture to the batter. Gently whisk to fold in the batter.
The batter will not be thick. Pour the batter in two 8 inch pans and bake for 40 minutes or until a toothpick inserted in the center comes out clean. Do not open the oven for the first 20 minutes of baking. Cool on a wire rack.
Line and grease two 8 inch round pans and keep them ready.
Take a large mixing bowl and add the eggs,sugar and vanilla in it. Set the bowl over a pan of simmering water. Heat the eggs,sugar and vanilla until slightly hot, stirring constantly to prevent curdling. Keep stirring untill all the sugar is completely dissolved. Run your fingers in the batter and feel the batter. It should be smooth. If its grainy, stir for some more time. This whole process can take between 3-5 minutes.
Using the whisk beater, beat the mixture on high speed for 5 minutes or until triple in volume. If you are using a hand beater you might need to beat for at least 10 minutes.
Combine flour and baking powder and sift. Add it to the batter. Whisk until smooth.
In a small saucepan, heat milk and melted butter just until the mixture is slightly hot. Add hot milk mixture to the batter. Gently whisk to fold in the batter.
The batter will not be thick. Pour the batter in two 8 inch pans and bake for 40 minutes or until a toothpick inserted in the center comes out clean. Cool on a wire rack.
Food is memories. I never forget good food that I had somewhere. I had this egg masala at my friend Jenela’s place decades back when I was in school. She was my school mate. Life moved on but the memory of this egg masala stuck on to me forever. I still remember her mother serving seconds and thirds to everyone at that farewell party. She just stood next to us and made sure that everyone was stuffed. In India, food is love. “In the childhood memories of every good cook , there’s a large kitchen, a warm stove, a simmering pot and a mom.” This recipe is one of Jenis mom, Bagya auntie’s masterpiece. This egg masala needs to be there in everyone’s repertoire. Its simple, its easy and its finger licking good. Below is a pic of Bagya auntie and her husband. Those hands cook magic.
Now lets dive into the recipe.
Boil five eggs, peel and halve them and set aside. Here is the recipe for perfect hard boiled eggs.
Slice 3 onions and dice 3 tomatoes. Set aside. You want the onions nice and thin and long.
Heat a pan with 4 tablespoons of oil. Be generous with the oil. Its very important to add enough oil to get the ingredients nice and roasted. Once the oil is hot, add in the mustard seeds and 4 sprigs curry leaves. Let it pop.
Add in the sliced onions and fry till light brown. It will take about 10 minutes.
Add in the tomatoes, salt, cumin powder and pepper powder. Add in some chopped coriander leaves. Fry till the tomatoes are nicely cooked and juiced down. It will take about 10 minutes.
After 10 minutes add half cup of water to deglaze the pan and make it a little saucy.
Finally add in the boiled eggs and saute briefly to combine. Remove off heat and serve.
Slice 3 onions and dice 3 tomatoes. Set aside.You want the onions nice and thin and long.
Heat a pan with Oil. Once the oil is hot, add in the mustard seeds and curry leaves. Let it pop.
Add in the sliced onions and fry till light brown. It will take about 10 minutes.
Add in the tomatoes, salt, cumin powder and pepper powder. Add in some chopped coriander leaves. Fry till the tomatoes are nicely cooked and juiced down. It will take about 10 minutes.
After 10 minutes add half cup of water to deglaze the pan and make it a little saucy.
Finally add in the boiled eggs and saute briefly to combine. Remove off heat and serve.
Pongal has to be the king of desserts for Tamil people all around the world. It is also considered as prasaadam, a religious offering to god. The word Pongal means “overflowing” which signifies prosperity. Pongal is a major festival in Taminadu. The word “pon” in Tamil means Gold. The color of yellow, the color of sun. Pongal is celebrated to give thankfulness to the Sun God. In the medieval Chola empire days Pongal was celebrated as “puthiyeedu”. Puthiyeedu meant the first harvest of the year. Pongal is traditionally made on clay pots set on wood fire. Its still made the same way in the country side of Tamilnadu. Here are some pictures from our Pongal celebrations at my husbands place in the village.
Pongal is the simplest of desserts. Lets make some awesome sweet pongal. We need some good quality raw rice and split moong dal.
Take quarter cup each of rice and split moong dal and soak it in 1 1/2 cups of water for 15 minutes. Cook the dal and rice together in a pressure cooker for a good 10 minutes on medium flame (8-10 whistles). Remove off heat and allow the pressure to release naturally. Set this aside. I don’t add the rice and dal directly in the cooker. I place some water in the cooker and place a bowl inside and add the rice, dal and water to the bowl. This way the rice mixture does not scorch in the bottom.
Take half a cup of jaggery and boil it with half a cup of water until all the jaggery is melted. Remove off heat. Jaggery almost always has some sand residue. So strain the boiled jaggery water on a muslin cloth. Set aside.
Next, we need to roast the dry fruits in ghee and add it to our pongal. We would need ghee, cashew nuts and raisins.
Take a small pan and set it on low. Add in the ghee and the cashew nuts. Roast on low flame until lightly brown. Low flame is the key to good roasted nuts. Add in the raisins and wait for it to plump. Once its plumped up, remove off heat and transfer to a small bowl. Set aside.
Its time to add some spice magic. We will need 1/4 teaspoon of cardamom powder and a pinch of nutmeg. Mortar and pestle is the best way to grind cardamom. I use a micro-plane zester to zest nutmeg.
Mix the jaggery water and the cooked rice and dal mixture and set it on a stove on low flame. Keep stirring constantly. Let it simmer for 2-3 minutes. Add in the cardamom and nutmeg powder. Add in a couple of pinches of SALT. Salt rounds the flavor. Now add in the ghee and nut mixture and stir until all the ghee is absorbed into the pongal.
Take quarter cup each of rice and split moong dal and soak it in 1½ cups of water for 15 minutes. Cook the dal and rice together in a pressure cooker for a good 10 minutes on low flame. Remove off heat and allow the pressure to release naturally. Set this aside.
Take half a cup of jaggery and boil it with half a cup of water until all the jaggery is melted. Remove off heat. Jaggery almost always has some sand residue. So strain the boiled jaggery water on a muslin cloth. Set aside.
Take a small pan and set it on low. Add in the ghee and the cashewnuts. Roast on low flame until lightly brown. Add in the raisins and wait for it to plump. Once its plumped up, remove off heat and transfer to a small bowl. Set aside.
Mix the jaggery water and the cooked rice and dal mixture and set it on a stove on low flame. Keep stirring constantly. Let it simmer for 2-3 minutes. Add in the cardamom and nutmeg powder. Add in a couple of pinches of SALT. Salt rounds the flavor. Now add in the ghee and nut mixture and stir until all the ghee is absorbed into the pongal.
Remove off heat and serve hot or at room temperature.
This is a very simple and delicious recipe for basic egg-less Vanilla sponge cake. Egg-less cakes can be tricky as they usually turn out dry and dense and crumble easily. But this one is a winner. This cake is very soft, moist, tender and fluffy. It makes an absolutely nice base cake that one can use for layer cakes. My mom had given me a small and tiny recipe snippet book on baking years back. I found this gem of a recipe in that book. Many of you have requested that I post a good egg-less cake recipe. I am happy to oblige. Lets jump straight into the recipe. Here you go!
Preheat the oven to 350 degrees F / 180 degrees Celsius. Line an 8 inch square pan with butter paper or parchment. Grease and flour the pan. Set aside.
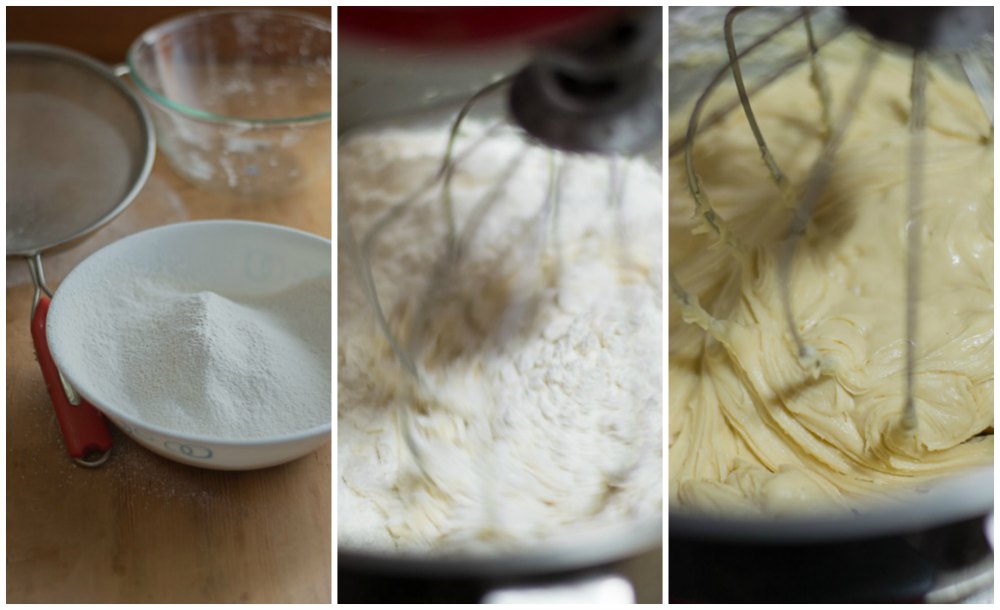
We need to cream butter and sugar. Sift 60 grams of confectioners sugar and set aside. We need to sift the sugar to get rid of any lumps. Let the butter be at room temperature.
Cream the butter and sugar until light and fluffy.
Its time for that delicious ingredient called milkmaid. I lick the can almost every single time I use it. I know you do it too.
Add in a teaspoon of real vanilla extract and one whole can/tin of milkmaid to the creamed butter sugar mixture. Beat well for a couple of minutes.
Lets now measure the flour and the rising agents. We will need one level teaspoon of baking soda and two level teaspoon of baking powder.
Sift the ingredients to remove any lumps in the flour and to distribute the rising agents uniformly in the mixture. Add in the sifted flour mixture slowly until a thick batter is formed.
Measure 1.5 cups of milk. Heat the milk until its hot but not boiling.
Add the hot milk to the batter and mix well to combine.
Pour it in a 8 by 8 square pan. Bake it immediately in a preheated 350 degree F oven for about 50-60 minutes or until a toothpick inserted in the middle comes clean. Do not open the oven for the first 30 minutes of baking.
Cool on a wire rack for 10 minutes. Run a knife on the edges of the pan to ensure smooth release.
Turn the pan upside down and gently release the pan. Remove the butter paper/parchment. Invert the cake and cool the cake completely.
Store in an airtight container in the refrigerator for up-to two days.
Simple Eggless Vanilla Sponge Cake Recipe – Very Soft and Moist
Preheat the oven to 350 degrees F / 180 degrees Celsius. Line an 8 inch square pan with butter paper or parchment. Grease and flour the pan. Set aside.
Cream the butter and sugar until light and fluffy.
Add in a teaspoon of real vanilla extract and one whole can/tin of milkmaid to the creamed butter sugar mixture. Beat well for a couple of minutes.
Sift the dry ingredients to remove any lumps in the flour and to distribute the rising agents uniformly in the mixture. Add in the sifted flour mixture slowly until a thick batter is formed.
Measure 1.5 cups of milk. Heat the milk until its hot but not boiling. Add the hot milk to the batter and mix well to combine.
Pour it in a 8 by 8 square pan and bake it immediately in a preheated 350 degree F oven for about 50-60 minutes or until a toothpick inserted in the middle comes clean. Do not open the oven for the first 30 minutes of baking.
Cool on a wire rack for 10 minutes. Run a knife on the edges of the pan to ensure smooth release.
Turn the pan upside down and gently release the pan. Remove the butter paper/parchment. Invert the cake and cool the cake completely.
Store in an airtight container in the refrigerator for up-to two days.
This is what I will make for you if you come home and I need to fix you dinner in under 30 minutes. I am always looking for ways to make quick dinners so I have my own couple of hours to relax and do the things I wanna do. My son loves this rice. Its kid friendly, its colorful, its healthy and its easy. It makes for a very good lunch box too. Remember all those crazy mornings where you run around like a mad woman fixing breakfast, packing lunch…This recipe will be a sure winner. I use dry Italian herb seasoning in this recipe for flavoring. The addition of this seasoning adds a fantastic flavor. I learnt this tip and this recipe from a good friend of mine called Sunita. This recipe rocks. Lets make it.
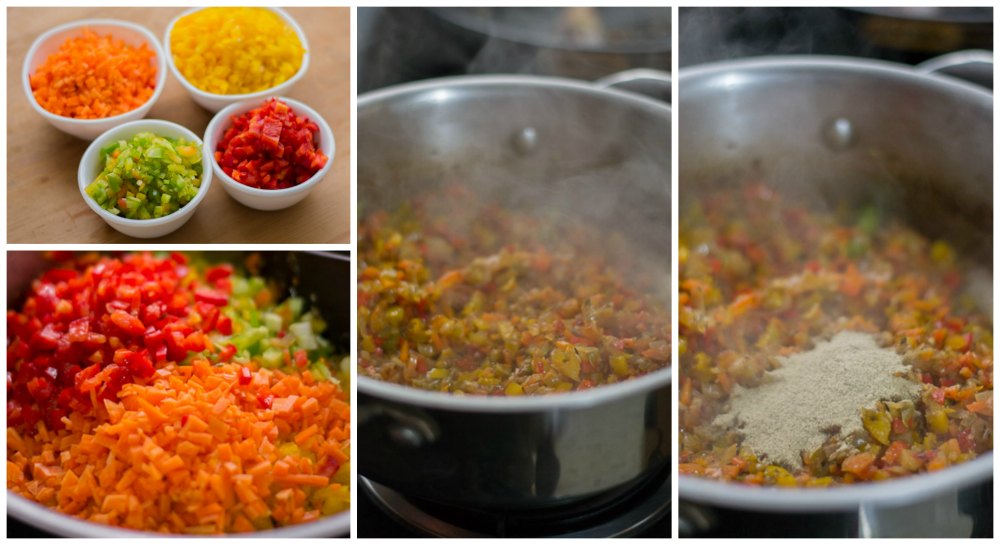
Heat couple of tablespoons of oil in a pan and add in a heaping teaspoon of dry Italian herb seasoning. Add in 2 tablespoons of minced garlic. Saute briefly until you can smell the aromatics. Add in 2 cups of onions, slit green chillies (use less if you want it to be kid friendly) and the salt. Saute till the onions are cooked and slightly brown. It will take 5-8 minutes in medium flame.
Add in the veggie works namely carrots and bell peppers. I used a cup of carrot and 3 cups of bell peppers. Saute till the bell peppers have reduced to half. It will take 10 minutes in medium flame. Keep sauteing every couple of minutes so the bottom doesn’t scorch. Add in a teaspoon of black pepper powder and saute for a minute more.
Add in the cooked rice. I used Basmati rice. Any leftover rice can also be used for making this. Do not use hot rice. Rice should be cold or at room temperature. Mix well to combine. Finally add in some coriander leaves and remove off from heat. Serve.
5.0 from 1 reviews
Easy Capsicum Fried Rice / Bell Pepper Rice Recipe
Heat couple of tablespoons of oil in a pan and add in a heaping teaspoon of dry Italian herb seasoning. Add in 2 tablespoons of minced garlic. Saute briefly until you can smell the aromatics. Add in 2 cups of onions, slit green chillies and the salt. Saute till the onions are cooked and slightly brown. It will take 5-8 minutes in medium flame.
Add in the vegetables. Saute till the bell peppers have reduced to half. It will take 10 minutes in medium flame. Add in a teaspoon of black pepper powder and saute for a minute more.
Add in the cooked rice.Mix well to combine. Finally add in some coriander leaves and remove off from heat. Serve.
I had already posted the recipe for beetroot poriyal made with coconut. This beetroot poriyal recipe does not use coconut. This recipe has the addition of almond meal/powder. Almond meal adds a very nice richness to the stir-fry without being too heavy. This recipe makes for an everyday vegetable stir-fry. My young son loves beets. I think its the color. Its an easy, healthy and a quick recipe. First the beetroot is steamed and then its tempered the indian way.
First lets make some coarse raw almond meal. Its very simple. Take 20 almonds and pulse it for 5-6 times in the mixie. You are done. Transfer the meal to a small bowl and set aside.
Heat oil in a saute pan and add in the urad dal, mustard seeds, cumin seeds, curry leaves and dry red chillies. Let it splutter. Fry for a minute until the urad dal is lightly brown. Then add in the onions, asafoetida and salt and fry till soft and tender. About 3-4 minutes.
I have a trick for quick steaming the veggies. I put the cut veggies in a bowl and place the bowl in a pressure cooker filled with 1 inch of water. Pressure cook it for 5 minutes in medium flame and that gives perfect steamed vegetable every single time. Reduce the time if you want it a little al-dente. Also no need to drain any water from the cooked vegetable as there will not be any. Its a very neat technique. OK. Now back to the pan.
Add in the steamed beets and saute for a minute more. Add the almond meal and toss until combined. Switch off the flame and remove it from heat. Serve with rice.
Beetroot Poriyal Stir-fry with Badam/Almond Powder
Take almonds and pulse it for 5-6 times in the mixie. You are done. Set aside.
Heat oil in a saute pan and add in the Urad dal, mustard seeds, cumin, curry leaves and dry red chillies. and let it splutter. Fry for a minute until the urad dal is lightly brown. Then add in the onions, asafoetida and salt and fry till soft and tender. About 3-4 minutes.
Add in the steamed beets and saute for a minute more. Add the almond meal and toss until combined. Switch off the flame and remove it from heat. Serve with rice.
Mushroom Biriyani is my dad’s trademark recipe. Everyone loves it. This is a party favorite. The whole house starts smelling festive when you start making this Biriyani. Its a very flavorful dish. I used seeraga samba rice for this recipe. Basmati rice can be substituted if you cannot source seeraga samba rice. Seeraga samba is a very aromatic rice. The grain of the rice is very tiny and it gets its name for its resemblance to Cumin seeds, also called as Seeragam/Jeera in Tamil. I have written more about seeraga samba rice here.
Prep work:
We need to make three pastes. Ginger garlic ( 1 pod garlic and 2 inch ginger piece) , 1 medium size Onion and 4 Tomatoes. Grind everything separately in a mixie and set aside.
Here are the aromatics you will need for the magic.
Heat oil and ghee in a pan on low flame. Add in all of the aromatics at once. Saute till the cashew-nuts are nice and golden.
Once the cashew-nuts are nice and golden, Add in 2 cups of onions. Saute in low flame for 10 minutes. Low and slow is the key here. Onions should have gotten roasted and brown by this time.
Once the onions are roasted, add in the onion paste. Fry in medium flame for 3-4 minutes until the oil starts separating from the mixture. Then add the ginger garlic paste. Fry in medium flame for 3-4 minutes until the oil starts separating from the mixture. Do not rush. The raw smell of ginger and garlic should completely go away. Keep frying so it does not scorch at the bottom.
Add in the tomato paste, green chillies (use more if you want it spicy) , and the salt. Cook the tomatoes until they are juiced down and dry. Little streaks of oil will start coming out from the tomato mixture. Keep frying until u see the oil. It will take about a good 10 minutes. Again, do not rush.
Coarsely chop quarter cup each of coriander leaves and mint leaves. Add it to the pan.
Add the washed, cleaned and diced mushrooms. Mix everything to combine. Cover the pan with a lid and let the mushrooms cook in low flame for 5 minutes. Stir every couple of minutes so the mixture does not scorch at the bottom.
Wash and soak 1 cup-250 ml rice for 20-30 minutes in water. Drain. Soaking rice helps in even cooking and to hold the rice separately when cooking without becoming mushy. Add in the soaked rice to the mushroom mixture. Saute for a couple of minutes so the masala coats to the rice.
Add in 2 cups of water. Let it come to a roaring boil. Once it boils, cover it with a lid and let it cook in low flame for 10-12 minutes. Stir once in between. After 10 minutes, remove off heat and let it sit on the counter for 20 minutes for the rice to get swollen. After 20 minutes, gently fluff and serve hot.
South Indian Tamilnadu style Spicy Mushroom biriyani / Kalan masala biryani recipe. Made with seeraga samba rice.
Author: Kannamma – Suguna Vinodh
Recipe type: Biriyani / Rice Dishes
Cuisine: South Indian
Serves: 3
Ingredients
Prep work:
First Paste – 1 pod Garlic and 2 inch Ginger piece
Second Paste – 1 medium size Onion
Third Paste – 4 Tomatoes
The Aromatics
3 tablespoon Cashewnut
2 sticks Cinnamon
2 teaspoon Fennel Seeds
1 teaspoon Cumin Seeds
2 Cardamom
1 small piece Mace
2 Cloves
1 Star Anise
Other Ingredients
2 tablespoon Oil
2 tablespoon Ghee
2 Onions, sliced
1½ teaspoon salt
3-4 green chillies
¼ cup coriander leaves
¼ cup mint leaves
1 cup -250 ml Seeraga Samba Rice or Basmati Rice
2 cups Mushrooms
2 cups Water
Instructions
We need to make three pastes. Ginger garlic ( 1 pod garlic and 2 inch ginger piece) , 1 medium size Onion and 4 Tomatoes. Grind everything separately in a mixie and set aside.
Heat oil and ghee in a pan on low flame. Add in all of the ingredients labeled under aromatics at once. Saute till the cashew-nuts are nice and golden.
Once the cashew-nuts are nice and golden, Add in 2 cups of onions. Saute in low flame for 10 minutes. Low and slow is the key here.
Once the onions are roasted, add in the onion paste. Fry in medium flame for 3-4 minutes until the oil starts separating from the mixture. Then add the ginger garlic paste. Fry in medium flame for 3-4 minutes until the oil starts separating from the mixture. Do not rush. The raw smell of ginger and garlic should completely go away. Keep frying so it does not scorch at the bottom.
Add in the tomato paste, green chillies (use more if you want it spicy) , and the salt. Cook the tomatoes until they are juiced down and dry. Little streaks of oil will start coming out from the tomato mixture. Keep frying until u see the oil. It will take about a good 10 minutes. Again, do not rush.
Coarsely chop quarter cup each of coriander leaves and mint leaves. Add it to the pan.
Add the washed, cleaned and diced mushrooms. Mix everything to combine. Cover the pan with a lid and let the mushrooms cook in low flame for 5 minutes. Stir every couple of minutes so the mixture does not scorch at the bottom.
Wash and soak 1 cup-250 ml rice for 20 minutes in water. Drain. Add in the soaked rice to the mushroom mixture. Saute for a couple of minutes so the masala coats to the rice.
Add in 2 cups of water. Let it come to a roaring boil. Once it boils, cover it with a lid and let it cook in low flame for 10-12 minutes. Stir once in between. After 10 minutes, remove off heat and let it sit on the counter for 20 minutes for the rice to get swollen. After 20 minutes, gently fluff and serve hot.
There is a small little, little charming town an hour away from San Diego called Julian. We used to do day trips to this place. Just take a long walk in the vintage streets, stroll along with people waiting in long lines for Julian’s famous Apple pies, or for a cup of fresh pressed cider. There is a lot of cuteness in this unbelievably small town. We had this soup in a small mom and pop restaurant in Julian on a very cold afternoon. It was so warming and thank goodness slurping was allowed. The owner came to check on us and I told him that I was a fan of his soup. I asked him what went into it and instantly he winked ……You really want to know ? Basil….lots of basil…a good mirepoix ( you know what’s a mirepoix? – I nod my head ), roux and cream, lots of cream….and a little bit of this and a little bit of that which I cannot tell you honey!… We thanked him and left the place with a happy belly. I came back home and put his words to work. Mirepoix is a french word for trinity of veggies namely onions, carrots and celery. After lot of tries, I decided to keep the celery away from the soup. Presenting to you , my version of Julian’s Bistro Style Tomato Soup.
Take a heavy bottomed pan and add in a couple of teaspoons of good olive oil. Add in the onions, carrots, garlic and red bell peppers. Let it sweat for a couple of minutes. Add in the tomatoes and fresh basil. Basil gives the soup that warmth. Don’t skip on basil.
Add 2 cups-500 ml of water to the pan and pressure cook all the veggies for 5 minutes or for 3 whistles if it’s an indian cooker. Remove off heat. Wait for the pressure to release naturally.
Strain the water and set aside. Grind the veggies in a food processor/mixie and strain. Don’t strain too much. Add back the water to the strained puree. Set aside.
Take a heavy bottomed pan and add in 2 tablespoons of clarified butter or ghee. I used ghee. Add in a tablespoon of all purpose flour/maida and saute on a low flame until the flour is cooked and it turns lightly brown. This we call as the good brown roux.
Add in the strained vegetable puree to the roux. Mix vigorously to avoid lumps from the roux. Add in the salt, sugar and lots of pepper. Let it come to a simmer. Add in 1/2 cup of cream and gently bring it to a boil. Let it simmer for a couple of minutes. Remove off heat and serve hot with bread. Garnish with basil and croutons.
Old fashioned easy to make California Bistro Style Cream of Tomato Soup that will warm your soul.
Author: Kannamma – Suguna Vinodh
Recipe type: Soup
Cuisine: American
Serves: 4
Ingredients
2 teaspoon Olive oil
1 medium sized Onion, diced
5 cloves Garlic
1 Red Bell pepper, diced
1 Carrot, diced
8 very ripe Tomatoes
¼ cup Basil
2 tablespoon Butter
1 tablespoon All purpose flour / Maida
1 teaspoon Salt
1 tablespoon Sugar
2 teaspoon Pepper powder
½ cup cream
Croutons for garnish
Instructions
Take a heavy bottomed pan and add in a couple of teaspoons of good olive oil. Add in the onions, carrots, garlic and red bell peppers. Let it sweat for a couple of minutes. Add in the tomatoes and fresh basil. Basil gives the soup that warmth. Don’t skip on basil.
Add 2 cups-500 ml of water and pressure cook all the veggies for 5 minutes or 3 whistles if its an indian cooker. Remove off heat. Wait for the pressure to release naturally. Strain the water and set aside. Grind the veggies in a food processor/mixie and strain. Don’t strain too much. Add back the water. Set aside.
Take a heavy bottomed pan and add in 2 tablespoons of clarified butter or ghee. I used ghee. Add in a tablespoon of all purpose flour/maida and saute on a low flame until the flour is cooked and it turns lightly brown. This we call as the good brown roux.
Add in the strained vegetable puree to the roux. Mix vigorously to avoid lumps from the roux. Add in the salt, sugar and lots of pepper. Let it come to a simmer. Add in ½ cup of cream and gently bring it to a boil. Let it simmer for a couple of minutes. Remove off heat and serve hot with bread. Garnish with basil and croutons.
I had this dish for the first time during my college days from a friends lunch box. It was during my post graduation and my class mate Krishnan offered me a bite from his lunch box. It looked like spinach rice. It was nutty, coconut-ty, comforting bite. I asked him what it was and he told me it was Molagootal. That was the first time I heard that word. I loved that dish. I kind of finished half of his lunch box that day. It was a fantastic meal. Simple, comforting everyday meal. He took me to his home that day evening and I thanked his mother for the Molagootal. I got the recipe too. Here is the recipe for Krishnan’s Molagootal.
Boil about 2 cups of spinach in 1 cup of water for 10 minutes in medium flame. Remove off heat. Grind the cooked spinach to a coarse paste. Set aside.
Boil half a cup of toor-dal with 2 cups of water in a pressure cooker for 10 minutes or 4 whistles. Remove off heat. Let the pressure release naturally from the cooker. Set aside.
Take a pan / kadai and heat 2 teaspoons of oil in it. Add in the urad dal, cumin seeds and pepper. Saute in very low flame until the urad dal is nice and brown. Getting the urad dal nice and brown is the key. It should smell nutty when the dal turns brown. Add in half a cup of shredded coconut. Briefly saute everything to combine. Remove off heat. Add enough water to the mixture and grind to a smooth paste. Set aside.
The Final Tempering:
Take a deep pan and add a teaspoon of oil. When the oil is hot, add in the mustard seeds, curry leaves, asafoetida and the turmeric. Let the mustard seeds splutter.
Add in the spinach paste, coconut mixture paste and the cooked toor dal. Add in the salt. Let it simmer for 3-4 minutes. Remove off heat.
South Indian Keerai Molagootal. Lentils cooked in a spinach gravy and tempered with a pepper-cumin-coconut mixture.
Author: Kannamma – Suguna Vinodh
Recipe type: Dal / Lentil recipes
Cuisine: South Indian
Serves: 4
Ingredients
2 Cups Spinach
½ cup Toor dal
For the coconut mixture
2 teaspoon Oil
2 tablespoon Urad dal
1 teaspoon Cumin seeds
2 teaspoon Peppercorn
½ cup fresh shredded Coconut
For the tempering
1 teaspoon Oil
¼ teaspoon Mustard seeds
½ teaspoon Turmeric powder
¼ teaspoon Asafoetida
1 sprig Curry leaves
1 teaspoon salt
Instructions
Boil about 2 cups of spinach in 1 cup of water for 10 minutes in medium flame. Remove off heat. Grind the cooked spinach to a coarse paste. Set aside.
Boil half a cup of toor-dal with 2 cups of water in a pressure cooker for 10 minutes or 4 whistles. Remove off heat. Let the pressure release naturally from the cooker. Set aside.
Take a pan / kadai and heat 2 teaspoons of oil in it. Add in the urad dal, cumin seeds and pepper. Saute in very low flame until the urad dal is nice and brown. Getting the urad dal nice and brown is the key. It should smell nutty when the dal turns brown. Add in half a cup of shredded coconut. Briefly saute everything to combine. Remove off heat. Add enough water to the mixture and grind to a smooth paste. Set aside.
The Final Tempering: Take a deep pan and add a teaspoon of oil. When the oil is hot, add in the mustard seeds, curry leaves, asafoetida and the turmeric. Let the mustard seeds splutter.
Add in the spinach paste, coconut mixture paste and the cooked toor dal. Add in the salt. Let it simmer for 3-4 minutes. Remove off heat.
This is an everyday stir-fry. Vendakkai Poriyal is a great side dish for lunch. Ladies finger / Okra done the right way can be delicious. This is a simple South Indian preparation where the Vendakkai is roasted with onions on a low flame until its brown, nutty and caramelized. Here is how to do it.
Wash and clean the Vendakkai / Ladies finger. Cut off the corners and chop into small pieces. Set aside.
Heat oil in a pan until its hot. Add in the urad dal, mustard seeds and the curry leaves. Wait for the mustrad seeds to splutter and the dal to turn slightly brown. Add in the chopped onions and saute the onions in medium flame till the onions are soft and translucent. It will take about 2-3 minutes.
Add in the Vendakkai / Ladies finger. Add in the salt, turmeric and sambar powder. To know more about sambar powder visit here. Reduce the flame to low. Sauteing in low flame will avoid the mixture from scorching on the bottom of the pan. Saute once in a while every 3-4 minutes and let the mixture cook for 15-20 minutes until the onions and ladies finger are nicely roasted and they are completely dry.
South Indian style Vendakkai Poriyal – Bhindi Fry recipe. Ladies finger / Okra roasted until brown. Dry preparation. Served for lunch.
Author: Kannamma – Suguna Vinodh
Recipe type: Stir-fry
Cuisine: South Indian
Serves: 3
Ingredients
250 grams Vendakkai / Ladies Finger
2 tablespoon Oil
1 teaspoon Urad dal
½ teaspoon Mustard seeds
1 sprig Curry leaves
2 medium sized Onions
1 teaspoon Salt
1 teaspoon Turmeric powder
1 teaspoon Sambar Powder
Instructions
Wash and clean the Vendakkai / Ladies finger. Cut off the corners and chop into small pieces. Set aside.
Heat oil in a pan until its hot. Add in the urad dal, mustard seeds and the curry leaves. Wait for the mustrad seeds to splutter and the dal to turn slightly brown. Add in the chopped onions and saute the onions in medium flame till the onions are soft and translucent. It will take about 2-3 minutes.
Add in the Vendakkai / Ladies finger. Add in the salt, turmeric and sambar powder. To know more about sambar powder visit here. Reduce the flame to low. Sauteing in low flame will avoid the mixture from scorching on the bottom of the pan. Saute once in a while every 3-4 minutes and let the mixture cook for 15-20 minutes until the onions and ladies finger are nicely roasted and they are completely dry.


 Fried Masala Paste


 The Final Tempering:


