Quantcast
Channel: Kannamma Cooks
Viewing all 1080 articles
Browse latest View live

Chettinad Urlai Roast – Potato Roast

$
0
0

South-indian-style-chettinad-urlai-roast-potato-roast-recipe |kannammacooks.com #potatoes #chettinad #tamilnadu #side-dish #recipe #baby-potatoes

This recipe came into being because of my mom. My mom has a habit. She would cut out a printed recipe or a food tip from a magazine she comes across and would save it and give it to me when I go home for vacation. She would be so happy seeing me go through them. There are these little things that takes everything. So this recipe is from one such paper given long time back to me. This is a recipe for Chettinad Urlai/Baby potato Roast. From what I have learned in these years, Chettinad recipes are mostly based on freshly ground masala powders. Getting the masala is the key to their cooking. This one ain’t different. The various spices are dry roasted in a low flame (low flame is key. your patience will be rewarded) and let to cool in a pan. Once cooled they are ground to a fine powder and added to the dish later on. Lets go and roast some spices.

South-indian-style-chettinad-urlai-roast-potato-roast-recipe |kannammacooks.com #potatoes #chettinad #tamilnadu #side-dish #recipe #baby-potatoes

Dry roasting brings out the essential oils in the spices which otherwise would be dormant. Dry roast all the ingredients on a very low flame except coconut. Add in the shredded coconut at last. Cool the spices and grind to a fine powder in a chutney jar of a mixie or a spice grinder.

South-indian-style-chettinad-urlai-roast-potato-roast-recipe |kannammacooks.com #potatoes #chettinad #tamilnadu #side-dish #recipe #baby-potatoes
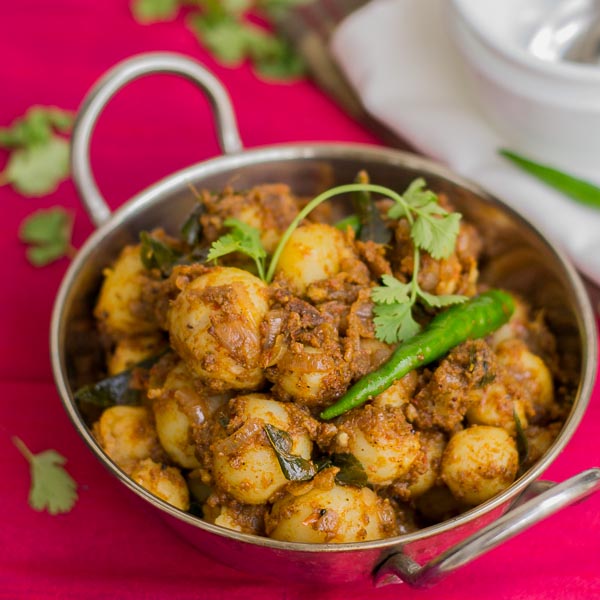
These baby potato roast makes an awesome side dish for rasam saadam/rice.

South-indian-style-chettinad-urlai-roast-potato-roast-recipe |kannammacooks.com #potatoes #chettinad #tamilnadu #side-dish #recipe #baby-potatoes

Chettinad Urlai Roast - Baby Potato Roast
Serves 6
Write a review
Print
Prep Time
30 min
Cook Time
30 min
Total Time
1 hr
Prep Time
30 min
Cook Time
30 min
Total Time
1 hr
135 calories
15 g
0 g
8 g
3 g
2 g
128 g
614 g
5 g
0 g
5 g
Nutrition Facts
Serving Size
128g
Servings
6
Amount Per Serving
Calories 135
Calories from Fat 71
% Daily Value *
Total Fat 8g
13%
Saturated Fat 2g
10%
Trans Fat 0g
Polyunsaturated Fat 2g
Monounsaturated Fat 3g
Cholesterol 0mg
0%
Sodium 614mg
26%
Total Carbohydrates 15g
5%
Dietary Fiber 3g
12%
Sugars 5g
Protein 3g
Vitamin A
16%
Vitamin C
77%
Calcium
4%
Iron
8%
* Percent Daily Values are based on a 2,000 calorie diet. Your Daily Values may be higher or lower depending on your calorie needs.
For the chettinad masala
  1. 4 dried red chillies
  2. 2 teaspoon coriander seeds
  3. 5 cm cinnamon stick
  4. 2 cardamom
  5. 2 cloves
  6. 2 teaspoon fennel seeds
  7. 1 teaspoon cumin seeds
  8. 1 teaspoon black pepper
  9. 3 tablespoon shredded coconut
  10. 2 sprigs curry leaves
Other Ingredients
  1. 3 tablespoon peanut oil (vegetable,canola or sunflower is fine)
  2. 1/2 teaspoon mustard seeds
  3. 1/2 teaspoon urad dal
  4. 2 sprigs curry leaves
  5. 2 onions, sliced fine
  6. 2 green chillies, cut into 2-3 pieces each
  7. 2 tablespoon ginger garlic paste
  8. 2 tomatoes, diced
  9. 1/2 teaspoon turmeric
  10. 1 teaspoon chilli powder
  11. 1 1/2 teaspoon coriander powder
  12. 1 1/2 teaspoon salt
  13. 1/2 kilo baby potatoes, boiled and peeled
  14. coriander leaves for garnish
Instructions
  1. Dry roast all the chettinad masala ingredients and grind to a fine powder.
  2. Heat oil in a pan/kadai and when the oil is shimmering add in the mustard seeds. Then add in the urad dal and the curry leaves. Let the mustard splutter.
  3. Add the onions and fry till golden brown.
  4. Toss in the green chillies and the ginger garlic paste.
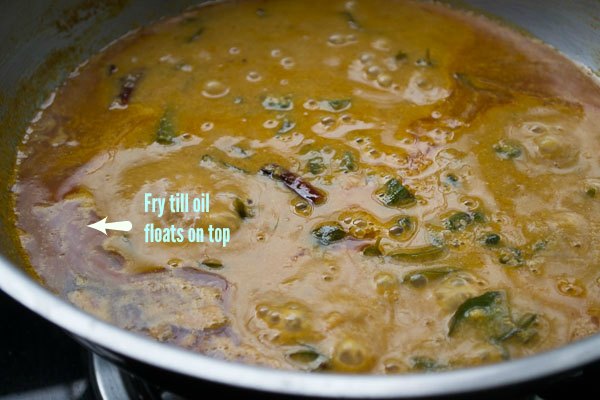
  5. Add the tomatoes and stir-fry on a low heat for about 5 minutes. continue to cook until streaks of oil is released in the pan.
  6. Add in the ground masala, turmeric, chilli powder, coriander powder and salt.
  7. Add quarter to half a cup of water and cook in low flame until the raw smell disappears and the masala becomes thick.
  8. Add in the potatoes and fry until almost dry.
  9. Remove from heat and serve hot, garnished with chopped coriander leaves.
Notes
  1. This dish can be made with regular russet potatoes too.
beta
calories
135
fat
8g
protein
3g
carbs
15g
more
kannamma cooks http://kannammacooks.com/

Tamilnadu Style Vendakkai puli kuzhambu – Vegan Okra in tamarind curry

$
0
0

This curry is for the love of tamarind. Every Tamilian house would have a version of this curry. Its really hard to qualify a recipe as authentic. To me, if the recipe was passed on from a grand mother, its as authentic as it can get. This curry paired with rice makes a very satisfying meal. This is a lunch time curry. They make this at home usually for lunch as it goes well with rice. First the vendakkai/okra is fried in oil and salt. The little addition of salt crisps the skin and cooks faster.

Vendakkai-puli-kozhambu-kulambu-okra-tamarind-curry-south-indian-style-fried-okra |kannammacooks.com #ladies-finger #okra #puli-kulambu #vendakkai #curry #vegan-recipe

Now lets rock the kitchen by making the masala for the curry. I use the same pan that I used for frying vendakkai/okra. We do not want to waste the super flavor packed brown bits that is stuck to the bottom of the pan. Heat oil in the same pan and add cumin seeds, curry leaves and garlic. Then add the onions. Saute briefly for a couple of minutes until the onions are soft. Then add the tomatoes and the shredded coconut. Saute for another couple of minutes. Remove the pan off heat and grind the mixture to a smooth paste.

Vendakkai-puli-kozhambu-kulambu-okra-tamarind-curry-south-indian-style-Masala-one |kannammacooks.com #ladies-finger #okra #puli-kulambu #vendakkai #curry #vegan-recipe

Heat oil in a seperate kadai/pan and add in the fenugreek seeds, urad dal, mustard, dried red chilles and curry leaves. Add in the ground masala, tamarind juice, coriander powder, turmeric, chilli powder, sambar powder, salt and a little bit of jaggery all at once. Add a cup or more of water.

Vendakkai-puli-kozhambu-kulambu-okra-tamarind-curry-south-indian-style-Masala-two |kannammacooks.com #ladies-finger #okra #puli-kulambu #vendakkai #curry #vegan-recipe

Close the pan with a lid and let it simmer for 30-40 minutes on low flame. Add in the cooked vendakkai/okra and let it simmer for another 5 more minutes. The oil should float on top of the curry. That is the true indication that the curry is done.

Vendakkai-puli-kozhambu-kulambu-okra-tamarind-curry-south-indian-style-oil-floats-on-top |kannammacooks.com #ladies-finger #okra #puli-kulambu #vendakkai #curry #vegan-recipe

Remove the pan off heat and serve hot with rice.

Vendakkai-puli-kozhambu-kulambu-okra-tamarind-curry-south-indian-style |kannammacooks.com #ladies-finger #okra #puli-kulambu #vendakkai #curry #vegan-recipe
South-indian-style-chettinad-urlai-roast-potato-roast-recipe-1

Tamilnadu style vendakkai puli kulambu
Serves 6
Write a review
Print
Prep Time
30 min
Cook Time
45 min
Total Time
1 hr 15 min
Prep Time
30 min
Cook Time
45 min
Total Time
1 hr 15 min
146 calories
13 g
0 g
10 g
2 g
2 g
149 g
615 g
5 g
0 g
8 g
Nutrition Facts
Serving Size
149g
Servings
6
Amount Per Serving
Calories 146
Calories from Fat 92
% Daily Value *
Total Fat 10g
16%
Saturated Fat 2g
12%
Trans Fat 0g
Polyunsaturated Fat 4g
Monounsaturated Fat 4g
Cholesterol 0mg
0%
Sodium 615mg
26%
Total Carbohydrates 13g
4%
Dietary Fiber 4g
14%
Sugars 5g
Protein 2g
Vitamin A
14%
Vitamin C
36%
Calcium
6%
Iron
6%
* Percent Daily Values are based on a 2,000 calorie diet. Your Daily Values may be higher or lower depending on your calorie needs.
For frying the vegetable
  1. 250 grams okra/vendakkai
  2. 1 tablespoon peanut oil
  3. 1/2 teaspoon salt
For the Masala
  1. 1 tablespoon sesame oil
  2. 1/2 teaspoon cumin seeds
  3. 1 sprig curry leaves
  4. 5 cloves garlic
  5. 2 onions, chopped
  6. 2 tomatoes, chopped
  7. 4 tablespoon shredded coconut
Other Ingredients
  1. 2 tablespoon sesame oil
  2. 1/2 teaspoon mustard seeds
  3. 1/2 teaspoon urad dal
  4. 1/4 teaspoon fenugreek seeds
  5. 2 dried red chillies
  6. 2 sprigs curry leaves
  7. lime size tamarind soaked in 2 cups of water
  8. 1/2 teaspoon turmeric
  9. 1 teaspoon chilli powder
  10. 1 1/2 teaspoon coriander powder
  11. 1 teaspoon sambar powder
  12. 1 teaspoon jaggery
  13. 1 teaspoon salt
Instructions
  1. For frying the vegetable: Heat a pan and add oil and the vendakkai/okra. Add in the salt. Fry on a low flame for 6-8 minutes until its not sticky. Remove off heat and set aside.
  2. For the Masala: In the same pan add more oil,cumin seeds,curry leaves and garlic. Then add the onions. Saute briefly for a couple of minutes until the onions are soft.
  3. Then add the tomatoes and the shredded coconut. Saute for another couple of minutes. Remove the pan off heat and grind the mixture to a very smooth paste.
  4. Heat oil in a seperate kadai/pan and add in the fenugreek seeds, urad dal, mustard, dried red chillies and curry leaves. Let the mustard seeds splutter. Then add in the ground masala, tamarind juice, coriander powder, turmeric, chilli powder, sambar powder, salt, jaggery all at once. Add a cup or more of water.
  5. Close the pan with a lid and let it simmer for 30-40 minutes on low flame. Add in the cooked vendakkai/okra and let it simmer for another 5 more minutes. The oil should float on top of the curry. That is the true indication that the curry is done.
  6. Remove the pan off heat and serve hot with rice.
Notes
  1. This curry will stay good for upto 2 days.
beta
calories
146
fat
10g
protein
2g
carbs
13g
more
kannamma cooks http://kannammacooks.com/

Ammas Kongunad Egg Pepper Kuruma

$
0
0

Muttai-kuruma-egg-curry-mutta-kuzhambu-south-indian-tamilnadu-style-recipe-pic |kannammacooks.com #muttai #egg # curry #kongunad #coimbatore #south-indian #pepper-masala
Muttai-kuruma-egg-curry-mutta-kuzhambu-south-indian-tamilnadu-style-recipe-with-rice |kannammacooks.com #muttai #egg # curry #kongunad #coimbatore #south-indian #pepper-masala

This is my mothers signature dish. She would make this for Sunday lunch when we were young. It has also featured on all our birthdays. I like it so much that I ask her to do this for me whenever she visits Bangalore. Egg curry and rice is all you need after a long day. Boiled fried eggs are added to a coconut pepper masala. This particular recipe is very famous in Coimbatore – kongunad region which is where I am from. There is no ginger or garlic in this curry and that makes this unique.

Muttai-kuruma-egg-curry-mutta-kuzhambu-south-indian-tamilnadu-style-recipe-fried-eggs |kannammacooks.com #muttai #egg # curry #kongunad #coimbatore #south-indian #pepper-masala

Get the eggs boiled and peeled. If you want to know more about boiling eggs, Read Here. In a pan, add a teaspoon of oil and when the oil is hot, add in the curry leaves and boiled eggs. Fry till the eggs get browned a little. The curry leaves will become crisp and will scream south india. Transfer to a plate and set aside.

Heat oil in a saute pan and add the spices (cumin, lots of pepper, cinnamon, coriander seeds, khus-khus (white poppy seeds) and curry leaves). In this recipe we do not dry roast the spices. We temper it in oil on a very low flame. Once the spices are roasted, add in the onions and saute until brown. Add the shredded coconut and tamarind and fry briefly for a couple of minutes. Remove from heat and set aside. In the same pan fry the tomatoes with salt and a cup of water until soft. Combine the tomatoes with the onion-coconut mixture and grind to a smooth paste. You can add up to 2 cups of water while grinding. The roasted spices in the masala might take some time to become a smooth paste. About 3-4 minutes in a mixie/food processor. Make sure to grind till its a very smooth paste.

Muttai-kuruma-egg-curry-mutta-kuzhambu-south-indian-tamilnadu-style-recipe-with-rice-masala |kannammacooks.com #muttai #egg # curry #kongunad #coimbatore #south-indian #pepper-masalaMuttai-kuruma-egg-curry-mutta-kuzhambu-south-indian-tamilnadu-style-recipe-with-rice-masala 1 |kannammacooks.com #muttai #egg # curry #kongunad #coimbatore #south-indian #pepper-masala

Now lets temper the curry. Heat oil in a kadai/pan. When its shimmering, add in the curry leaves and onion and fry till the onions are soft. Add in the turmeric and saute for 15 seconds. Add the ground masala. Add in about a cup of water and let it simmer on a low flame for 5 minutes.
Muttai-kuruma-egg-curry-mutta-kuzhambu-south-indian-tamilnadu-style-recipe-simmer |kannammacooks.com #muttai #egg # curry #kongunad #coimbatore #south-indian #pepper-masala

Remove from heat. Add in the fried eggs with curry leaf crisps and serve hot with rice.

Muttai-kuruma-egg-curry-mutta-kuzhambu-south-indian-tamilnadu-style-recipe-dish |kannammacooks.com #muttai #egg # curry #kongunad #coimbatore #south-indian #pepper-masala

Muttai-kuruma-egg-curry-mutta-kuzhambu-south-indian-tamilnadu-style-recipe |kannammacooks.com #muttai #egg # curry #kongunad #coimbatore #south-indian #pepper-masala

Ammas Kongunad egg pepper kuruma - South Indian egg curry
Serves 4
Write a review
Print
Prep Time
30 min
Cook Time
30 min
Total Time
1 hr
Prep Time
30 min
Cook Time
30 min
Total Time
1 hr
289 calories
21 g
187 g
20 g
9 g
6 g
228 g
690 g
10 g
0 g
13 g
Nutrition Facts
Serving Size
228g
Servings
4
Amount Per Serving
Calories 289
Calories from Fat 176
% Daily Value *
Total Fat 20g
31%
Saturated Fat 6g
31%
Trans Fat 0g
Polyunsaturated Fat 6g
Monounsaturated Fat 7g
Cholesterol 187mg
62%
Sodium 690mg
29%
Total Carbohydrates 21g
7%
Dietary Fiber 5g
22%
Sugars 10g
Protein 9g
Vitamin A
16%
Vitamin C
25%
Calcium
11%
Iron
12%
* Percent Daily Values are based on a 2,000 calorie diet. Your Daily Values may be higher or lower depending on your calorie needs.
For fried eggs
  1. 2 teaspoon peanut oil
  2. 4 eggs, boiled and peeled
  3. 1 sprig curry leaves
For the masala
  1. 2 tablespoon sesame oil
  2. 2 1/2 tablespoon black peppercorn
  3. 3 inch cinnamon stick
  4. 2 teaspoon cumin
  5. 1 tablespoon coriander seeds
  6. 1 tablespoon khuskhus-white poppy seeds
  7. 2 sprigs curry leaves
  8. 2 onions sliced
  9. 1/2 cup fresh shredded coconut
  10. a small 1 inch round tamarind
  11. 2 tomatoes rough chopped
  12. 1 teaspoon sea salt
For the tempering
  1. 1 teaspoon sesame oil
  2. 1 onion sliced
  3. 1 teaspoon turmeric
Instructions
  1. For fried eggs: Boil and peel the eggs. Heat oil in a pan and add the curry leaves and the eggs. Fry till the eggs get browned a little. The curry leaves will become crisp. Set aside.
  2. For the masala: Heat oil in a saute pan and add the spices all at once. (cumin, pepper, cinnamon, coriander seeds, poppy seeds and curry leaves). Roast on a very very low flame.
  3. Once the spices are roasted, add in the onions and saute until brown. Add the shredded coconut and tamarind and fry briefly for a couple of minutes. Remove from heat and set aside.
  4. In the same pan fry the tomatoes with salt and a cup of water until soft.
  5. Combine the tomatoes with the onion-coconut mixture and grind to a smooth paste.Add upto 2 cups of water while grinding.
  6. For the tempering: Heat oil in a kadai/pan. When its shimmering, add in the curry leaves and onion and fry till the onions are soft. Add in the turmeric and saute for 15 seconds. Add the ground masala. Add in about a cup of water and let it simmer on a low flame for 5 minutes.
  7. Remove from heat. Add in the fried eggs with curry leaf crisps and serve hot with rice.
beta
calories
289
fat
20g
protein
9g
carbs
21g
more
kannamma cooks http://kannammacooks.com/

No Butter Nutty Cinnamon Streusel Coffee Cake

$
0
0

No-butter-easy-pecan-cinnamon-streusel-coffee-cake-recipe |kannammacooks.com #pecan #streusel #healthy #coffee #cake #easy #recipe #thanksgiving
I love love anything streusel. Coffee cakes are so warm and comforting. This is a very very tender cake with a crunchy topping. Cinnamon topping adds a great depth of flavor to this cake. This is so easy to make that you can put everything together in less than 30 minutes.
This cake has a pecan cinnamon topping. Walnuts can be substituted for pecans. Mix all of the streusel topping ingredients except pecans by hand in a medium bowl until the mixture resembles wet sand. Stir in the chopped pecans and set aside.

No-butter-easy-pecan-cinnamon-streusel-coffee-cake-recipe-topping-ingredients |kannammacooks.com #pecan #streusel #healthy #coffee #cake #easy #recipe #thanksgiving
Now for the Cake:
The Dry Ingredients: Whisk Flour, baking powder, baking soda, cinnamon, both the sugars and salt in a medium bowl. Set aside.
Wet Ingredients: Whisk yogurt, egg and oil in a bowl until smooth and combined. Gently fold the egg mixture into the flour mixture until combined.
No-butter-easy-pecan-cinnamon-streusel-coffee-cake-recipe-batter-ingredients |kannammacooks.com #pecan #streusel #healthy #coffee #cake #easy #recipe #thanksgiving
No-butter-easy-pecan-cinnamon-streusel-coffee-cake-recipe-combine |kannammacooks.com #pecan #streusel #healthy #coffee #cake #easy #recipe #thanksgiving
The important thing about the cake batter is to mix ingredients only until just combined. Over mixing the batter can result in a very dense cake.

No-butter-easy-pecan-cinnamon-streusel-coffee-cake-recipe |kannammacooks.com #pecan #streusel #healthy #coffee #cake #easy #recipe #thanksgiving
Butter and flour a 6 inch round pan. Scrape the batter into the pan and smooth the top. Sprinkle topping evenly on top of the batter.

No-butter-easy-pecan-cinnamon-streusel-coffee-cake-recipe-batter |kannammacooks.com #pecan #streusel #healthy #coffee #cake #easy #recipe #thanksgiving
Bake in a preheated 350F/180C oven until the top is golden and a toothpick inserted comes clean. Roughly about 30 minutes. Cool the cake on a wire rack for 15 minutes and serve warm or at room temperature.

No-butter-easy-pecan-cinnamon-streusel-coffee-cake-recipe |kannammacooks.com #pecan #streusel #healthy #coffee #cake #easy #recipe #thanksgiving

No Butter Nutty Cinnamon Streusel Coffee Cake
Serves 8
Write a review
Print
Prep Time
15 min
Cook Time
30 min
Total Time
45 min
Prep Time
15 min
Cook Time
30 min
Total Time
45 min
215 calories
31 g
24 g
9 g
3 g
1 g
57 g
73 g
20 g
0 g
8 g
Nutrition Facts
Serving Size
57g
Servings
8
Amount Per Serving
Calories 215
Calories from Fat 80
% Daily Value *
Total Fat 9g
14%
Saturated Fat 1g
5%
Trans Fat 0g
Polyunsaturated Fat 2g
Monounsaturated Fat 6g
Cholesterol 24mg
8%
Sodium 73mg
3%
Total Carbohydrates 31g
10%
Dietary Fiber 1g
4%
Sugars 20g
Protein 3g
Vitamin A
1%
Vitamin C
0%
Calcium
4%
Iron
3%
* Percent Daily Values are based on a 2,000 calorie diet. Your Daily Values may be higher or lower depending on your calorie needs.
For the Streusel topping
  1. 2 tablespoon All purpose flour
  2. 2 tablespoon granulated sugar
  3. 2 tablespoon brown sugar
  4. 1 teaspoon ground cinnamon
  5. 1/3 cup pecans/walnuts chopped
  6. 1 tablespoon vegetable oil
For the Cake
  1. 3/4 cup All purpose flour
  2. 1/4 teaspoon baking powder
  3. 1/4 teaspoon baking soda
  4. 1/4 teaspoon cinnamon powder
  5. 1/4 cup granulated sugar
  6. 1/4 cup brown sugar
  7. pinch of salt
  8. 1/4 cup yogurt
  9. 1 egg
  10. 2 tablespoon vegetable oil
Instructions
  1. Preheat the oven to 350F/180C
  2. Mix all of the streusel topping ingredients except pecans by hand in a medium bowl until the mixture resembles wet sand. Stir in the chopped pecans and set aside.
  3. For the cake: The Dry Ingredients: Whisk Flour, baking powder, baking soda, cinnamon, both the sugars and salt in a medium bowl.
  4. Wet Ingredients: Whisk yogurt, egg and oil in a bowl until smooth and combined. Gently fold the egg mixture into the flour mixture until combined.
  5. Butter and flour a 6 inch round pan. Scrape the batter into the pan and smooth the top. Sprinkle topping evenly on top of the batter.
  6. Bake in a 350F/180C oven until the top is golden and a toothpick inserted comes clean. Roughly about 30 minutes. Cool the cake on a wire rack for 15 minutes and serve warm or at room temperature.
beta
calories
215
fat
9g
protein
3g
carbs
31g
more
kannamma cooks http://kannammacooks.com/

Samba Godhumai Payasam – Cracked Emmer Wheat pudding

$
0
0

Samba-godhumai-khapli-payasam-pradhaman-cracked-emmer-wheat-pudding

We love cracked samba godhumai/Emmer wheat in our house. You all know I am from Coimbatore. All households in Coimbatore invariably make upma out of this cracked emmer wheat atleast once a week. They make it all the time y’all. Whenever I visit my in-laws place, upma is there for dinner every damn alternative day. My husband, my father, my mom, my in-laws, everyone except me loves it. I am not a great fan of upma. I am glad I told you I don’t like upma. But Samba godhumai/emmer wheat payasam – Now we are talking baby. Its to die for. Its my favorite. I made this for my wedding anniversary today as samba godhumai is my husband Vinodh’s favorite.

Samba-godhumai-khapli-payasam-pradhaman-cracked-emmer-wheat-pudding-groats

This is for my American readers – This is not bulghur wheat. This is cracked wheat. So whats the difference?
What is Bulghur – Whole wheat kernels are steamed, dried and then ground coarsely to make bulghur. This makes bulghur ready to eat with minimal cooking which involves soaking it in hot water or a flavored broth. What is Cracked wheat – Its what it says. Its just whole wheat that’s cracked.

Lets go make some awesome dawsome godhumai payasam. Come with me.
Add half a cup of cracked wheat, 3.5 cups water and pressure cook the wheat in water for 4 whistles/10 minutes.
Samba-godhumai-khapli-payasam-pradhaman-cracked-emmer-wheat-pudding-cook

Strain the water from the wheat after its cooked. Add the jaggery to the strained water and bring the mixture to a boil. Let it boil for 3-4 minutes.
Samba-godhumai-khapli-payasam-pradhaman-cracked-emmer-wheat-pudding-jaggery-boiling
Add in the strained cooked wheat, a cup of coconut milk, 1/4 teaspoon of cardamom and a pinch of salt and let it simmer in very low flame for 3-4 minutes.
Samba-godhumai-khapli-payasam-pradhaman-cracked-emmer-wheat-pudding-coconut-milk

When the payasam is simmering, take a small pan/kadai and heat ghee. Add the raisins and the cashews and fry till golden brown.
Samba-godhumai-khapli-payasam-pradhaman-cracked-emmer-wheat-pudding-ghee

Once the cashews are brown, add the hot ghee mixture to the payasam. Remove off heat.
Samba-godhumai-khapli-payasam-pradhaman-cracked-emmer-wheat-pudding
Serve hot or chilled.
Samba-godhumai-khapli-payasam-pradhaman-cracked-emmer-wheat-pudding

Cracked wheat / Samba godhumai payasam
Serves 6
Write a review
Print
Prep Time
10 min
Cook Time
30 min
Total Time
40 min
Prep Time
10 min
Cook Time
30 min
Total Time
40 min
276 calories
38 g
11 g
14 g
2 g
10 g
84 g
31 g
27 g
0 g
3 g
Nutrition Facts
Serving Size
84g
Servings
6
Amount Per Serving
Calories 276
Calories from Fat 117
% Daily Value *
Total Fat 14g
21%
Saturated Fat 10g
50%
Trans Fat 0g
Polyunsaturated Fat 1g
Monounsaturated Fat 2g
Cholesterol 11mg
4%
Sodium 31mg
1%
Total Carbohydrates 38g
13%
Dietary Fiber 1g
2%
Sugars 27g
Protein 2g
Vitamin A
3%
Vitamin C
1%
Calcium
1%
Iron
9%
* Percent Daily Values are based on a 2,000 calorie diet. Your Daily Values may be higher or lower depending on your calorie needs.
Ingredients
  1. 1/2 cup cracked samba wheat/emmer wheat (not bulghur)
  2. 3/4 cup jaggery
  3. 1 cup coconut milk
  4. 1/4 teaspoon cardamom
  5. pinch of salt
  6. For tempering
  7. 2 tablespoon Ghee
  8. 2 tablespoon golden raisin
  9. 2 tablespoon cashewnuts, broken
Instructions
  1. Add cracked wheat and 3.5 cups water and pressure cook the wheat in water for 4 whistles/10 minutes.
  2. Strain the water from the wheat after its cooked. Add the jaggery to the strained water Bring this mixture to a boil. Let it boil for 3-4 minutes. Add in the coconut milk, cardamom and a pinch of salt. Let it simmer in very low flame for 3-4 minutes.
  3. Take a small pan/kadai and heat ghee. When its shimmering add in the raisins and the cashews and fry till golden brown.
  4. Once the cashews are brown, add the hot ghee mixture to the payasam. Remove off heat.
  5. Serve hot or chilled
beta
calories
276
fat
14g
protein
2g
carbs
38g
more
kannamma cooks http://kannammacooks.com/

Shallow Fried Fish Croquettes

$
0
0

Fish-croquettes-cutlet-recipe-appetizer-julia-child |kannammacooks.com #fish #cutlet #croquette #juliachild #recipe #shallow #fry #creamy #appetizer
If you like fried fish like me, you are in the right place. I adapted this recipe based on the classic croquettes recipe from Julia Child’s Mastering the art of french cooking. Everyone in my family and friends love this recipe and I have made it countless number of times. The addition of white sauce (bechamel) gives it a nice rich creamy interior that’s velvety smooth. The advantage of bechamel is its creamy richness over other binders like potato or corn flour which can make the cutlet pretty dry and dense.
Come with me, lets make some awesome fish croquettes.
First pan fry or steam any fish fillet and shred it into small pieces. Keep aside. Add a tablespoon of oil to a pan and add in a teaspoon of dried Italian herb mixture. (Any store bought kind will do. Mine had oregano,thyme,dried garlic and basil). I learned a great tip from Chef Suvir Saran. He once told that waking up the spices and herbs in oil is the best method to bring them alive. Its the greatest indian technique of tempering spices called the tadka that not only works wonders on Indian cooking but to any cooking. It works every single time. I do it for all my cooking. Not just Indian. OK. Back to the pan. Add in the chopped onions,salt and fry till slightly brown.
Fish-croquettes-cutlet-recipe-appetizer-julia-child-fry |kannammacooks.com #fish #cutlet #croquette #juliachild #recipe #shallow #fry #creamy #appetizer
Once the onions are slightly brown, add in the spring onions (scallions), minced green chillies (if using) and saute briefly until the spring onions wilt. Add it to the bowl along with the cooked shredded fish. Set aside.
Fish-croquettes-cutlet-recipe-appetizer-julia-child-fry2 |kannammacooks.com #fish #cutlet #croquette #juliachild #recipe #shallow #fry #creamy #appetizer
Place 1/4 cup of flour in the same pan and gradually blend in 3/4 cup of milk with a whisk. Stir this mixture over low flame until mixture begins to lump.
Fish-croquettes-cutlet-recipe-appetizer-julia-child-bechamel |kannammacooks.com #fish #cutlet #croquette #juliachild #recipe #shallow #fry #creamy #appetizer
Remove from heat and vigorously blend in one egg yolk. When smooth, beat over heat for 2 minutes to thicken the sauce. Remove from heat and add it to the fish mixture.
Fish-croquettes-cutlet-recipe-appetizer-julia-child-bechamel-add-yolk |kannammacooks.com #fish #cutlet #croquette #juliachild #recipe #shallow #fry #creamy #appetizer
Add in a teaspoon of pepper flakes and mix well to combine. Add up to 1 cup of fresh bread crumbs (just pulse bread slices in a food processor until fine) and mix well to combine. Refrigerate the mixture at this stage for at-least 30 minutes. Make cutlets and dredge them with bread crumbs and shape into patties with fingers. Pat crumbs evenly on entire surface. Refrigerate the patties for 15 minutes (up to a day) before frying. If you wont be using the patties immediately, you can freeze them at this stage and use it for later use. Just thaw them and proceed.
Fish-croquettes-cutlet-recipe-appetizer-julia-child-bread-crumbs |kannammacooks.com #fish #cutlet #croquette #juliachild #recipe #shallow #fry #creamy #appetizer
Add a table spoon of oil to a pan and set on to medium flame. Add in the patties and fry for a minute on each side. Drain on paper towels.
Fish-croquettes-cutlet-recipe-appetizer-julia-child-shallow-fry |kannammacooks.com #fish #cutlet #croquette #juliachild #recipe #shallow #fry #creamy #appetizer
Serve hot.
Fish-croquettes-cutlet-recipe-appetizer-julia-child-inner|kannammacooks.com #fish #cutlet #croquette #juliachild #recipe #shallow #fry #creamy #appetizer

Shallow Fried Fish Croquettes / Fish Cutlets
Serves 5
Write a review
Print
Prep Time
1 hr
Cook Time
45 min
Total Time
1 hr 45 min
Prep Time
1 hr
Cook Time
45 min
Total Time
1 hr 45 min
405 calories
33 g
79 g
22 g
19 g
3 g
171 g
761 g
5 g
0 g
17 g
Nutrition Facts
Serving Size
171g
Servings
5
Amount Per Serving
Calories 405
Calories from Fat 192
% Daily Value *
Total Fat 22g
33%
Saturated Fat 3g
16%
Trans Fat 0g
Polyunsaturated Fat 5g
Monounsaturated Fat 12g
Cholesterol 79mg
26%
Sodium 761mg
32%
Total Carbohydrates 33g
11%
Dietary Fiber 2g
9%
Sugars 5g
Protein 19g
Vitamin A
8%
Vitamin C
7%
Calcium
14%
Iron
14%
* Percent Daily Values are based on a 2,000 calorie diet. Your Daily Values may be higher or lower depending on your calorie needs.
Ingredients
  1. 250 grams Fish fillet (Like Basa,Tilapia)
  2. 1 tablespoon Olive oil
  3. 1 teaspoon Italian herb mixture (any store bought variety)
  4. 1 medium red onion, chopped fine
  5. 3 tablespoons chopped spring onion (scallions)
  6. 1 teaspoon minced green chilli (optional)
  7. 1 teaspoon salt
  8. 1 teaspoon pepper flakes
  9. 1 cup fresh bread crumbs
For the bechamel
  1. 1/4 cup All purpose flour
  2. 3/4 cup whole milk
  3. 1 egg yolk
Other ingredients
  1. 1/2 cup Bread crumbs for dredging
  2. 1/4 cup Oil for shallow frying
Instructions
  1. Pan fry or steam the fish fillet and shred it into small pieces. Keep aside.
  2. Add Olive oil (sunflower, canola will work too) to a pan and add in a teaspoon of dried Italian herb mixture. Add in the chopped onions, salt and fry till slightly brown.
  3. Once the onions are nice and brown, add in the spring onions (scallions), minced green chillies (if using) and saute briefly until the spring onions wilt. Add it to the bowl along with the shredded fish. Set aside.
  4. Place 1/4 cup of flour in the same pan and gradually blend in 3/4 cup of milk with a whisk. Stir this mixture over low flame until mixture begins to lump.
  5. Remove from heat and vigorously blend in one egg yolk. When smooth, beat over heat for 2 minutes to thicken the sauce. Remove from heat and add it to the fish mixture.
  6. Add in a teaspoon of pepper flakes and mix well to combine.
  7. Add up to 1 cup of fresh bread crumbs (just pulse bread slices in a food processor until fine) and mix well to combine. Refrigerate the mixture at this stage for at-least 30 minutes.
  8. Make cutlets and dredge them with bread crumbs and shape into a round with fingers. Pat crumbs evenly on entire surface.
  9. Refrigerate the patties for 15 minutes (up to a day) before frying.
  10. Add a table spoon of oil to a pan and set on to medium flame. Add in the patties and fry for a minute on each side. Drain on paper towels. Serve hot.
Adapted from Mastering the art of french cooking
beta
calories
405
fat
22g
protein
19g
carbs
33g
more
Adapted from Mastering the art of french cooking
kannamma cooks http://kannammacooks.com/

Fish-croquettes-cutlet-recipe-appetizer-julia-child-fried |kannammacooks.com #fish #cutlet #croquette #juliachild #recipe #shallow #fry #creamy #appetizer

How to Make Homemade Crème Fraîche

$
0
0

Home-made-creme-fraiche-from-scratch-recipe-using-cream  | kannammacooks.com #creme #fraiche #cultured #cream #french #scratch #recipe #easy
I do not get Crème fraîche in Bangalore, India. So I have to make it from scratch like I do many other things. But making Crème fraîche from scratch is one of the easiest things to do. Crème fraîche is fancy, hip, oh so french cream but there isn’t anything that’s complicated in it. Its nothing but cultured cream. yeah we broke the secret. Crème fraîche is pronounced as ‘Krem freshh’. crème fraîche is used in dips and sauces, in baking (I use it a lot), or as a nice topping for fruit desserts, soups etc… The advantage of crème fraîche is that it will not curdle over high heat or separate when mixed with vinegar or lemon juice. Now, lets make some creamy dreamy Crème fraîche.

Home-made-creme-fraiche-from-scratch-recipe | kannammacooks.com #creme #fraiche #cultured #cream #french #scratch #recipe #easy
This recipe roughly makes about a cup of crème fraîche.
You need 2 basic ingredients – cream and yogurt. Here we go
1 cup heavy cream (pasteurized, not ultra pasteurized). I used Amul cream as that’s what we get here. Amul is a low fat cream but that’s OK.
starter culture – A tablespoon of plain yogurt.
Heat the cream in a pan until tepid, luke warm. Remove off heat and transfer to a clean jar. Add in the yogurt and stir well. Cover the jar. Keep it in a warm draft free place for about 8 to 12 hours. If the place where you live is cold, leave the jar inside the oven with the pilot on. After 8 hours the cream would have thickened. Store it in the refrigerator for up to a week.

How to make Homemade Creme Fraiche
Serves 4
Write a review
Print
Prep Time
5 min
Cook Time
5 min
Total Time
10 min
Prep Time
5 min
Cook Time
5 min
Total Time
10 min
208 calories
2 g
82 g
22 g
1 g
14 g
63 g
24 g
0 g
0 g
7 g
Nutrition Facts
Serving Size
63g
Servings
4
Amount Per Serving
Calories 208
Calories from Fat 195
% Daily Value *
Total Fat 22g
34%
Saturated Fat 14g
69%
Trans Fat 0g
Polyunsaturated Fat 1g
Monounsaturated Fat 6g
Cholesterol 82mg
27%
Sodium 24mg
1%
Total Carbohydrates 2g
1%
Dietary Fiber 0g
0%
Sugars 0g
Protein 1g
Vitamin A
18%
Vitamin C
1%
Calcium
4%
Iron
0%
* Percent Daily Values are based on a 2,000 calorie diet. Your Daily Values may be higher or lower depending on your calorie needs.
Ingredients
  1. 1 cup heavy cream (pasteurized, not ultra pasteurized).
  2. 1 tablespoon of plain yogurt.
Instructions
  1. Heat the cream in a pan until tepid, luke warm.
  2. Remove off heat and transfer to a clean jar. Add in the yogurt and stir well.
  3. Cover the jar. Keep it in a warm draft free place for about 8 to 12 hours.
  4. After 8 hours the cream would have thickened.
  5. Store it in the refrigerator for up to a week.
beta
calories
208
fat
22g
protein
1g
carbs
2g
more
kannamma cooks http://kannammacooks.com/

100% Wholegrain Oat Muffins

$
0
0

Healthy-No-Butter-Whole-Grain-Oat-Muffins-recipe-Joanne-chang-flour-bakery-1  |kannammacooks.com #wholegrain #oats #brownsugar #nobutter #joanne #chang #flour #bakery
I get requests from my friends for whole grain muffins/bakes all the time. I adapted this recipe from Chef Joanne Chang’s cookbook Flour. Joanne is an honors graduate from Harvard with a degree in applied mathematics and economics. Now she runs a bakery for a living. That’s some resume for a baker. she knows her pi π, also bakes amazing pies and cracks one egg at a time. She inspires me a lot. And all her recipes knocks my socks off!

Flour, Too: Indispensable Recipes for the Cafe’s Most Loved Sweets & Savories

This recipe is quite simple and straight forward. The only exotic thing you will need for this recipe is Crème Fraîche /cultured cream. I make my own creme fraiche. So plan ahead. The original recipe uses old fashioned rolled oats. In India, we only get quick cooking oats. I know how sad that makes me. I promise it does work well with quick cooking oats too. OK. Lets start rolling.

In a small bowl, sift the wholewheat flour, baking powder, baking soda, and salt and stir until well mixed. Set aside.
sift-flour-Healthy-No-Butter-Whole-Grain-Oat-Muffins-recipe  |kannammacooks.com #wholegrain #oats #brownsugar #nobutter #joanne #chang #flour #bakery

In a medium bowl, stir together crème fraîche, milk, egg and vegetable oil with a whisk until combined.Add in the granulated sugar and brown sugar and stir well.
wet-ingredients-Healthy-No-Butter-Whole-Grain-Oat-Muffins-recipe  |kannammacooks.com #wholegrain #oats #brownsugar #nobutter #joanne #chang #flour #bakery

Add in the oats and continue to stir until well combined.Gently fold the dry ingredients (sifted flour mixture) into the wet oat mixture. The batter will be gloppy. cover the batter bowl with a lid and place in the fridge. Let the batter sit for at least 1 hour or up to overnight in the refrigerator.
step-3-Healthy-No-Butter-Whole-Grain-Oat-Muffins-recipe  |kannammacooks.com #wholegrain #oats #brownsugar #nobutter #joanne #chang #flour #bakery

When ready to bake, preheat the oven to 400°F/200°C, and place a rack in the center of the oven. Line the cups of the muffin tin with paper liners. Spoon about 1/2 a cup of the batter into each muffin cup, filling it all the way to the brim. It will seem like there’s too much batter for the tins, but if you want the characteristic muffin top you need to overfill them.
step-5-Healthy-No-Butter-Whole-Grain-Oat-Muffins-recipe  |kannammacooks.com #wholegrain #oats #brownsugar #nobutter #joanne #chang #flour #bakery
TO MAKE THE TOPPING: In a small bowl, stir together the oats, brown sugar, and cinnamon. Sprinkle the topping evenly over the muffins. Bake for 30-40 minutes, or until the muffins are golden brown on top and spring back when pressed in the middle with a fingertip. Let cool in the tin on a wire rack for 20 minutes and then remove the muffins from the pan.
step-4-Healthy-No-Butter-Whole-Grain-Oat-Muffins-recipe  |kannammacooks.com #wholegrain #oats #brownsugar #nobutter #joanne #chang #flour #bakery

Serve warm or at room temperature.

Healthy-No-Butter-Whole-Grain-Oat-Muffins-recipe-3 |kannammacooks.com #wholegrain #oats #brownsugar #nobutter #joanne #chang #flour #bakery

100% Wholegrain Brown Sugar Oat Muffins
Serves 8
Write a review
Print
Prep Time
15 min
Cook Time
30 min
Total Time
45 min
Prep Time
15 min
Cook Time
30 min
Total Time
45 min
270 calories
42 g
26 g
10 g
5 g
1 g
93 g
225 g
25 g
0 g
8 g
Nutrition Facts
Serving Size
93g
Servings
8
Amount Per Serving
Calories 270
Calories from Fat 84
% Daily Value *
Total Fat 10g
15%
Saturated Fat 1g
7%
Trans Fat 0g
Polyunsaturated Fat 2g
Monounsaturated Fat 6g
Cholesterol 26mg
9%
Sodium 225mg
9%
Total Carbohydrates 42g
14%
Dietary Fiber 2g
8%
Sugars 25g
Protein 5g
Vitamin A
1%
Vitamin C
0%
Calcium
9%
Iron
6%
* Percent Daily Values are based on a 2,000 calorie diet. Your Daily Values may be higher or lower depending on your calorie needs.
For the muffin Batter
  1. 1 1/2 cups rolled oats or quick cooking oats
  2. 1/2 cup crème fraîche
  3. 1/2 cup whole milk, at room temperature
  4. 1/4 cup vegetable oil
  5. 1 egg
  6. 1/4 cup granulated sugar
  7. 1/2 cup packed brown sugar
  8. 1/2 cup whole-wheat flour
  9. 1 tsp baking powder
  10. 1/4 tsp baking soda
  11. 1/2 tsp salt
Brown sugar Oat Topping
  1. 2 tablespoon rolled oats or quick cooking oats
  2. 2 tablespoon packed brown sugar
  3. 1/4 teaspoon ground cinnamon
Instructions
  1. In a medium bowl, stir together crème fraîche, milk, egg and vegetable oil with a whisk until combined.Add in the granulated sugar and brown sugar and stir well. Add in the oats and continue to stir until well combined.
  2. In a separate small bowl, sift the wholewheat flour, baking powder, baking soda, and salt and stir until well mixed. Gently fold the dry ingredients into the wet oat mixture. The batter will be gloppy. Transfer the batter to an airtight container and place in the fridge. Let the batter sit for at least 1 hour or up to overnight in the refrigerator.
  3. When ready to bake, preheat the oven to 400°F/200°C, and place a rack in the center of the oven. Line the cups of the muffin tin with paper liners. Spoon about 1/2 a cup of the batter into each muffin cup. It will seem like there’s too much batter for the tins, but if you want the characteristic muffin top you need to overfill them.
  4. TO MAKE THE TOPPING: In a small bowl, stir together the oats, brown sugar, and cinnamon. Sprinkle the topping evenly over the muffins. Bake for 30-40 minutes, or until the muffins are golden brown on top and spring back when pressed in the middle with a fingertip. Let cool in the tin on a wire rack for 20 minutes and then remove the muffins from the pan.
Notes
  1. These muffins taste best the day they are made, but you can store them in an airtight container at room temperature for up to 2 days. If you keep them for longer than a day, refresh them in a 300°F/150°C oven for 5 to 6 minutes. Or, you can freeze them, well wrapped in plastic wrap, for up to 1 week. Reheat directly from the freezer in a 300°F/150°C oven for about 10 minutes.
Adapted from Flour cookbook
beta
calories
270
fat
10g
protein
5g
carbs
42g
more
Adapted from Flour cookbook
kannamma cooks http://kannammacooks.com/

Sweet and Sour Fish

$
0
0

Martin-yan-chinese-style-sweet-and-sour-fish-fry-in-sauce-recipe-from-yan-can-cook-sweet-and-sour |kannammacooks.com #martin #yan #can #cook #wok #chinese #fish #fry # sweet #sour #chinese #style #fried

Lets do some Chinese take out dinner. Who doesn’t love fish, fried and tossed in sauce. Come with me…I will give you a piggyback to flavor town. I adapted this recipe from Martin Yan’s cooking show, Yan can cook. I love all things Martin Yan. He is cute, he makes me laugh and he makes good food. The fish turned out awesome. Today was good. Today was fun. Tomorrow is another one.

So here is the route to flavor town.
Martin-yan-chinese-style-sweet-and-sour-fish-fry-in-sauce-recipe-from-yan-can-cook |kannammacooks.com #martin #yan #can #cook #wok #chinese #fish #fry # sweet #sour #chinese #style #fried

First lets make the batter to fry the fish.
Crack one egg in a bowl. You are doing it right if your egg has an yellow yolk. To the egg add half a teaspoon each of salt and pepper powder. Add in 1/4 cup of corn starch and half a teaspoon of soy sauce. Stir well.
Martin-yan-chinese-style-sweet-and-sour-fish-fry-in-sauce-recipe-from-yan-can-cook-batter |kannammacooks.com #martin #yan #can #cook #wok #chinese #fish #fry # sweet #sour #chinese #style #fried

Add in the cut fish fillet and mix well to combine.
Martin-yan-chinese-style-sweet-and-sour-fish-fry-in-sauce-recipe-from-yan-can-cook-fish-batter |kannammacooks.com #martin #yan #can #cook #wok #chinese #fish #fry # sweet #sour #chinese #style #fried

Let the batter marinate for 15-20 minutes. Add oil to a pan for frying the fish. When the oil is hot,add the fish to the pan and cook till they are lightly browned.About 2 minutes. Lift out and drain on paper towels. Set aside. In the mean time, if you are like me, nibble on the fried fish. Promise me you wont be like me.
Martin-yan-chinese-style-sweet-and-sour-fish-fry-in-sauce-recipe-from-yan-can-cook-fried-fish |kannammacooks.com #martin #yan #can #cook #wok #chinese #fish #fry # sweet #sour #chinese #style #fried

Now for the stir-fry and the sauce
Make a corn starch slurry by adding a tablespoon of cornstarch to 1/4 cup of water. set aside.
Martin-yan-chinese-style-sweet-and-sour-fish-fry-in-sauce-recipe-from-yan-can-cook-corn-starch-slurry |kannammacooks.com #martin #yan #can #cook #wok #chinese #fish #fry # sweet #sour #chinese #style #fried
Martin-yan-chinese-style-sweet-and-sour-fish-fry-in-sauce-recipe-from-yan-can-cook-aromatics |kannammacooks.com #martin #yan #can #cook #wok #chinese #fish #fry # sweet #sour #chinese #style #fried
Heat a table spoon of oil in a skillet. When shimmering add in the chopped garlic and fry till they start to brown. Add in the chopped onion and the sliced red peppers/capsicum. Briefly fry for a minute. Now add in the sauce mixture (honey,soy and vinegar). I used apple cider vinegar as that’s what I had. If you have rice vinegar use it dearies. Simmer for a minute. Now is the time to thicken the sauce. Add the corn starch slurry to the pan and saute for 10 seconds.
Martin-yan-chinese-style-sweet-and-sour-fish-fry-in-sauce-recipe-from-yan-can-cook-stir-fry-fish |kannammacooks.com #martin #yan #can #cook #wok #chinese #fish #fry # sweet #sour #chinese #style #fried
The sauce will become thick in an instant. Add in the fried fish and toss slightly to coat. Add the spring onions/scallions. Toss it around so the fish gets evenly coated with the sauce. Remove off heat.
Martin-yan-chinese-style-sweet-and-sour-fish-fry-in-sauce-recipe-from-yan-can-cook-finish |kannammacooks.com #martin #yan #can #cook #wok #chinese #fish #fry # sweet #sour #chinese #style #fried
Serve hot with rice or noodles.
Martin-yan-chinese-style-sweet-and-sour-fish-fry-in-sauce-recipe-from-yan-can-cook-fried |kannammacooks.com #martin #yan #can #cook #wok #chinese #fish #fry # sweet #sour #chinese #style #fried

Chinese Style Sweet and Sour Fish
Serves 4
Write a review
Print
Prep Time
30 min
Cook Time
30 min
Total Time
1 hr
Prep Time
30 min
Cook Time
30 min
Total Time
1 hr
237 calories
14 g
104 g
10 g
21 g
2 g
159 g
478 g
3 g
0 g
7 g
Nutrition Facts
Serving Size
159g
Servings
4
Amount Per Serving
Calories 237
Calories from Fat 92
% Daily Value *
Total Fat 10g
16%
Saturated Fat 2g
9%
Trans Fat 0g
Polyunsaturated Fat 3g
Monounsaturated Fat 4g
Cholesterol 104mg
35%
Sodium 478mg
20%
Total Carbohydrates 14g
5%
Dietary Fiber 1g
3%
Sugars 3g
Protein 21g
Vitamin A
10%
Vitamin C
25%
Calcium
5%
Iron
5%
* Percent Daily Values are based on a 2,000 calorie diet. Your Daily Values may be higher or lower depending on your calorie needs.
For the Batter
  1. 1 egg
  2. 1/2 teaspoon ground pepper powder
  3. 1/2 teaspoon salt
  4. 1/2 teaspoon soy sauce
  5. 1/4 cup corn starch
  6. 300 grams white fish fillet (you can use cod, snapper, tilapia, basa or any mild fish)
  7. Vegetable/ Refined Peanut Oil to Deep fry
For the corn starch slurry
  1. 1 tablespoon corn starch
  2. 1/4 cup water
For the sauce
  1. 1 teaspoon honey
  2. 1 teaspoon soy sauce
  3. 1 teaspoon rice vinegar (I used apple cider)
  4. 2 tablespoon water to dilute the sauce
For the stir fry
  1. 1 tablespoon Peanut Oil
  2. 2 tablespoon minced garlic
  3. 1/4 cup chopped onions
  4. 1/4 cup sliced red peppers/capsicum
  5. 1/4 cup spring onion/scallion
Instructions
  1. Crack an egg in a bowl. To the egg add half a teaspoon each of salt and pepper powder. Add in 1/4 cup of corn starch and half a teaspoon of soy sauce. Stir well. Add in the cut fish fillet and mix well to combine.
  2. Let the batter marinate for 15-20 minutes. Add oil to a pan for frying the fish. When the oil is hot,add the fish to the pan and cook till they are lightly browned.About 2 minutes. Lift out and drain on paper towels. Set aside.
  3. Make a corn starch slurry by adding a tablespoon of cornstarch to 1/4 cup of water. set aside.
  4. Heat a table spoon of oil in a skillet. When shimmering add in the chopped garlic and fry till they start to brown. Add in the chopped onion and the sliced red peppers/capsicum. Briefly fry for a minute. Now add in sauce mixture(honey,soy and vinegar).Simmer for a minute. Now is the time to thicken the sauce. Add the corn starch slurry to the pan and saute for 10 seconds.
  5. The sauce will become thick in an instant. Add in the fried fish and the spring onions/scallions. Toss it around so the fish gets evenly coated with the sauce. Remove off heat.
  6. Serve hot with rice or noodles.
Notes
  1. If you would like more heat add in some hot sauce or pepper flakes to your liking.
Adapted from Martin Yan - Yan Can Cook
beta
calories
237
fat
10g
protein
21g
carbs
14g
more
Adapted from Martin Yan - Yan Can Cook
kannamma cooks http://kannammacooks.com/

Manju Aunties Thenga Paal Saadam / Coconut Milk Rice Pilaf

$
0
0

manju-aunties-thenga-paal-saadam-coconut-milk-rice-kuska-recipe-garnish |kannammacooks.com #kuska #coconut #milk #gluten #free #vegan #pilaf #seeraga #samba #rice

I used to stay in Manju Auntie’s (not a relative) house when I was studying/working. That was roughly a decade plus years ago. I was as any normal teen and I used to get up very late in the morning, miss my breakfast and rush to office. Auntie, will prepare this pilaf and bring it for me as I missed breakfast. She would get herself dropped on the way from her husband on his way to office. She would come to my office and give the lunch box and say “nalla saapudu enna” – “eat well. ok” and go back home in an auto rickshaw. All this so I will have lunch early. I do not know how many mothers will do something like this for their own children. I entered their house as a paying guest (she never took a single penny till date) and ended up as one of their own daughters. Uncle proudly calls me his eldest. She would do all my laundry and even iron all my clothes. I am eternally grateful to her. She would treat me like a queen when I was sick. I really did not realize a lot of things until my son was born. The perspective of everything changes when u become a parent. It stuck me hard as I don’t remember saying thank you often to her. I always call her whenever I am down and she makes me feel better in an instant. Those couple of years in her house are the best days of my life. Thank you Amma for being there. She is the best person in the whole world. I do not know if she will ever read this but she knows I am there for her. She is an amazing cook and this is one of her signature recipes. This is Manju auntie. The one near her is her equally adorable husband, Babu uncle.

manju-aunties-thenga-paal-saadam-coconut-milk-rice-kuska-recipe-adding-seeraga-samba-rice-kuska-auntie pic |kannammacooks.com #kuska #coconut #milk #gluten #free #vegan #pilaf #seeraga #samba #rice

Lets start with the recipe. I used seeraga samba rice for this recipe. Basmati rice can be substituted if you cannot source seeraga samba rice. Seeraga samba is a very aromatic rice. The grain of the rice is very tiny and it gets its name for its resemblance to Cumin seeds, also called as Seeragam/Jeera in Tamil. It has a very distinct taste, fluffs up well when cooked and south indian biriyani’s are made with this rice. Samba rice is grown for a longer duration than other types of rice. manju-aunties-thenga-paal-saadam-coconut-milk-rice-kuska-recipe-seeraga-samba-tamilnadu |kannammacooks.com #kuska #coconut #milk #gluten #free #vegan #pilaf #seeraga #samba #rice

The Recipe
So if u have never made coconut milk pilaf, you should. These things are fun, and fun is good.
Lets make coconut milk. You can easily substitute store bought coconut milk if you cannot find fresh ones in your part of the world or you are in a hurry. I used one half coconut for 1 cup (240 ml) of rice. Take out the coconut meat from the coconut and run it in a blender/mixie adding 1 cup of water. Strain. The strained milk is what we call as the first milk or thick milk. Run the strained coconut bits again in the blender with 1 cup of water for a minute. strain. The strained milk is called second milk or thin milk.
manju-aunties-thenga-paal-saadam-coconut-milk-rice-kuska-recipe-making-coconut-milk-from-scratch |kannammacooks.com #kuska #coconut #milk #gluten #free #vegan #pilaf #seeraga #samba #rice

Once you are ready to start the stove, soak the rice in lots of water. In a heavy deep pan, Heat ghee if using and oil until shimmering. Add in the cardamom,cloves and cinnamon. Add in the sliced onions, chopped garlic and green chillies all at once. Add in the salt. Saute till the onions are slightly brown.
manju-aunties-thenga-paal-saadam-coconut-milk-rice-kuska-recipe-frying-onions |kannammacooks.com #kuska #coconut #milk #gluten #free #vegan #pilaf #seeraga #samba #rice

Once the onions and garlic start browning, add in the strained soaked rice and saute briefly for a minute. Add in 2 cups of coconut milk (1 cup thick milk and 1 cup thin milk). If you are using basmati rice add 2 cups liquid for every cup of rice. If using seeraga samba rice, use 2 1/4 – 2 1/2 cups liquid for every cup of rice. Let it come to a boil. Reduce the flame to low low low, cover the pan with a lid and let it simmer for 10 minutes. Do not peek when its simmering. After 10 minutes, remove off heat and let it sit on the counter for 20 minutes for the rice to get swollen. After 20 minutes, gently fluff and serve hot.
manju-aunties-thenga-paal-saadam-coconut-milk-rice-kuska-recipe-adding-seeraga-samba-rice-kuska |kannammacooks.com #kuska #coconut #milk #gluten #free #vegan #pilaf #seeraga #samba #rice

manju-aunties-thenga-paal-saadam-coconut-milk-rice-kuska-recipe-tasty |kannammacooks.com #kuska #coconut #milk #gluten #free #vegan #pilaf #seeraga #samba #rice

Manju Aunties Thenga Paal Saadam / Coconut Milk Rice Pilaf
Serves 3
Write a review
Print
Prep Time
20 min
Cook Time
25 min
Total Time
45 min
Prep Time
20 min
Cook Time
25 min
Total Time
45 min
410 calories
65 g
11 g
14 g
7 g
4 g
366 g
1193 g
5 g
0 g
9 g
Nutrition Facts
Serving Size
366g
Servings
3
Amount Per Serving
Calories 410
Calories from Fat 122
% Daily Value *
Total Fat 14g
21%
Saturated Fat 4g
22%
Trans Fat 0g
Polyunsaturated Fat 3g
Monounsaturated Fat 6g
Cholesterol 11mg
4%
Sodium 1193mg
50%
Total Carbohydrates 65g
22%
Dietary Fiber 2g
8%
Sugars 5g
Protein 7g
Vitamin A
13%
Vitamin C
195%
Calcium
5%
Iron
8%
* Percent Daily Values are based on a 2,000 calorie diet. Your Daily Values may be higher or lower depending on your calorie needs.
For the coconut milk
  1. coconut meat from half a medium coconut
  2. 2 cups water
Other ingredients
  1. 1 cup seeraga samba rice / basmati rice
  2. 2 tablespoon peanut oil
  3. 1 tablespoon ghee (optional)
  4. 2 inch stick cinnamon
  5. 3 cardamom
  6. 3 cloves
  7. 2 medium onions, sliced
  8. 8 cloves garlic, minced
  9. 3 green chillies, cut into 3
  10. 1 1/2 teaspoon salt
Instructions
  1. Make coconut milk: Take out the coconut meat from the coconut and run in a blender/mixie adding 1 cup of water. Strain. The strained milk is what we call as the first milk or thick milk. Run the strained coconut bits again in the blender with 1 cup of water for a minute. strain. The strained milk is called second milk or thin milk. Set aside.
  2. Soak the rice in 3 cups of water.
  3. In a heavy deep pan, Heat ghee if using and oil until shimmering. Add in the cardamom,cloves and cinnamon.
  4. Add in the sliced onions, chopped garlic and green chillies all at once. Add in the salt. Saute till the onions are slightly brown.
  5. Once the onions and garlic start browning, add in the strained soaked rice and saute briefly for a minute.
  6. Add in 2 cups of coconut milk (1 cup thick milk and 1 cup thin milk). If you are using basmati rice add 2 cups liquid for every cup of rice. If using seeraga samba rice, use 2 1/4 cups liquid for every cup of rice. Let it come to a boil.
  7. Reduce the flame to low, cover the pan with a lid and let it simmer for 10 minutes. Do not peek when its simmering. After 10 minutes, remove off heat and let it sit on the counter for 20 minutes for the rice to get swollen. After 20 minutes, gently fluff and serve hot.
beta
calories
410
fat
14g
protein
7g
carbs
65g
more
kannamma cooks http://kannammacooks.com/
manju-aunties-thenga-paal-saadam-coconut-milk-rice-kuska-recipe |kannammacooks.com #kuska #coconut #milk #gluten #free #vegan #pilaf #seeraga #samba #rice

Brown Butter Nutella Crepes

$
0
0

quick-and-easy-Brown-butter-hazelnut-chocolate-nutella-crepes-recipe |kannammacooks.com #brown #butter #crepe #dessert #breakfast #yummy
When I first saw Nutella on a shelf in a grocery store in Bangalore, I literally jumped. It is now available in most super markets. They are true little things of joy! Crepes makes for an easy snack, dessert, breakfast – the options are endless. Traditionally in french crepe stands, the crepe batter is poured onto a griddle and spread with a wooden stick kind of a tool called a râteau. The Nutella hazelnut and chocolate spread is slathered on the crepe and served hot with a sprnkling of powdered sugar.
Come, Lets do it!
In a bowl, crack an egg, 1/4 cup of water and 1/2 cup of milk.
quick-and-easy-Brown-butter-hazelnut-chocolate-nutella-crepes-recipe-batter |kannammacooks.com #brown #butter #crepe #dessert #breakfast #yummy
Add in 1/4 teaspoon of salt and whisk until combined. Add in half cup of flour and whisk until smooth.
quick-and-easy-Brown-butter-hazelnut-chocolate-nutella-crepes-recipe-batter-1 |kannammacooks.com #brown #butter #crepe #dessert #breakfast #yummy
Set a smallest pan you have on medium heat and melt 3 tablespoon of butter. Once the butter is melted, continue cooking until the butter is golden brown. Remove from the heat and set aside. Add the browned butter into the flour mixture and whisk till its completely combined. Set aside
quick-and-easy-Brown-butter-hazelnut-chocolate-nutella-crepes-recipe-make-brown-butter-from-scratch |kannammacooks.com #brown #butter #crepe #dessert #breakfast #yummy
Set a pan over medium heat. Cast iron or non-stick works well. Using a 1/4 – 1/3 cup measure (depending on how big you want the crepes), scoop the batter and pour it into the center of the pan. Using a rotating motion with your wrist, swirl the batter around and out to the edges of the pan. Cook for a minute. Flip the crepe over. Cook on the other side for 15-30 seconds. Slide the crepe on a plate and set aside.
quick-and-easy-Brown-butter-hazelnut-chocolate-nutella-crepes-recipe-cooking-crepe |kannammacooks.com #brown #butter #crepe #dessert #breakfast #yummy
Spread with 1/2 tablespoon of the Nutella on one half of each crepe and just roll it up or fold into triangles. Garnish with fruits and a sprinkling of powdered sugar.
quick-and-easy-Brown-butter-hazelnut-chocolate-nutella-crepes-recipe-plating |kannammacooks.com #brown #butter #crepe #dessert #breakfast #yummy
quick-and-easy-Brown-butter-hazelnut-chocolate-nutella-crepes-recipe-with-dusted-sugar |kannammacooks.com #brown #butter #crepe #dessert #breakfast #yummy

Brown Butter Nutella Crepes
Serves 3
Write a review
Print
Prep Time
20 min
Cook Time
20 min
Total Time
40 min
Prep Time
20 min
Cook Time
20 min
Total Time
40 min
361 calories
39 g
96 g
20 g
7 g
14 g
141 g
250 g
22 g
1 g
5 g
Nutrition Facts
Serving Size
141g
Servings
3
Amount Per Serving
Calories 361
Calories from Fat 174
% Daily Value *
Total Fat 20g
30%
Saturated Fat 14g
68%
Trans Fat 1g
Polyunsaturated Fat 1g
Monounsaturated Fat 4g
Cholesterol 96mg
32%
Sodium 250mg
10%
Total Carbohydrates 39g
13%
Dietary Fiber 2g
6%
Sugars 22g
Protein 7g
Vitamin A
10%
Vitamin C
0%
Calcium
9%
Iron
8%
* Percent Daily Values are based on a 2,000 calorie diet. Your Daily Values may be higher or lower depending on your calorie needs.
Ingredients
  1. 3 tablespoons unsalted butter
  2. 1 large egg
  3. 1/4 cup water
  4. 1/2 cup milk
  5. 1/4 teaspoon kosher salt
  6. 1/2 cup all-purpose flour
  7. 3 tablespoon Nutella
  8. Fruits of your choice for garnish
  9. Confectioners sugar for dusting
Instructions
  1. In a bowl, crack an egg, add 1/4 cup water and 1/2 cup milk.
  2. Add in the salt and whisk until combined. Add the flour and whisk until smooth.
  3. Set a heavy pan on medium heat and melt the butter. Once the butter is melted, continue cooking until the butter is golden brown. Remove from the heat and set aside. Add the browned butter into the mixture and whisk till its completely combined. Set aside
  4. Set a pan over medium heat. Cast iron or non-stick works well. Using a 1/4 – 1/3 cup measure (depending on how big you want the crepes), scoop the batter and pour it into the center of the pan. Using a rotating motion with your wrist, swirl the batter around and out to the edges of the pan. Cook for a minute. Flip the crepe over. Cook on the other side for 15-30 seconds. Slide the crepe on a plate and set aside.
  5. Spread with 1/2 tablespoon of the Nutella on one half of each crepe and just roll it up or fold into triangles. Garnish with fruits and a sprinkling of powdered sugar.
beta
calories
361
fat
20g
protein
7g
carbs
39g
more
kannamma cooks http://kannammacooks.com/

I minimally adapted this recipe from Jeffrey Saad’s cookbook.

Jeffrey Saad’s Global Kitchen: Recipes Without Borders

Six Ingredient Palak Paneer

$
0
0

Indian-palak-paneer-recipe-spinach-curry-with-cheese |kannammacooks.com #palak #spinach #six #ingredient #easy #healthy #quick #cheese #curry #everyday #lunch #indian

I adapted this recipe from my moms basic spinach mash recipe. As any daughter would say, my mom makes the best spinach. Okie doke. This whole dish can be put together in less than 30 minutes and has the simplest of the ingredients. All you need is 6 ingredients. That is all. So what are we waiting for. Lets count to 6 y’all. Look at me! Look at me! Look at me NOW! It is fun to have fun, But you have to know how.

Indian-palak-paneer-recipe-spinach-curry-with-cheese-6-ingredients |kannammacooks.com #palak #spinach #six #ingredient #easy #healthy #quick #cheese #curry #everyday #lunch #indian

Heat 2 tablespoon of oil in a pan in medium flame and add in lots of garlic (I used 2 pods), lots of onions (3 medium onions), green chillies and salt. Saute till the onions start to brown. About 10 minutes. Sauteing the onions and garlic in salt for a long time is very important. Let the onions get reduced to half.
Indian-palak-paneer-recipe-spinach-curry-with-cheese-saute-onions |kannammacooks.com #palak #spinach #six #ingredient #easy #healthy #quick #cheese #curry #everyday #lunch #indian

Add in the washed and drained spinach leaves. Let it wilt. Cook for 5 minutes. Remove off heat and let it cool a bit. Grind to a smooth paste. Add in the paneer and serve with roti/rice.
Indian-palak-paneer-recipe-spinach-curry-with-cheese-cook-spinach |kannammacooks.com #palak #spinach #six #ingredient #easy #healthy #quick #cheese #curry #everyday #lunch #indian
Indian-palak-paneer-recipe-spinach-curry-with-cheese-1 |kannammacooks.com #palak #spinach #six #ingredient #easy #healthy #quick #cheese #curry #everyday #lunch #indian

Easy and Quick 6 Ingredient Palak Paneer
Serves 3
Write a review
Print
Prep Time
10 min
Cook Time
20 min
Total Time
30 min
Prep Time
10 min
Cook Time
20 min
Total Time
30 min
233 calories
24 g
3 g
10 g
14 g
2 g
306 g
853 g
9 g
0 g
7 g
Nutrition Facts
Serving Size
306g
Servings
3
Amount Per Serving
Calories 233
Calories from Fat 91
% Daily Value *
Total Fat 10g
16%
Saturated Fat 2g
11%
Trans Fat 0g
Polyunsaturated Fat 3g
Monounsaturated Fat 4g
Cholesterol 3mg
1%
Sodium 853mg
36%
Total Carbohydrates 24g
8%
Dietary Fiber 4g
16%
Sugars 9g
Protein 14g
Vitamin A
120%
Vitamin C
173%
Calcium
17%
Iron
15%
* Percent Daily Values are based on a 2,000 calorie diet. Your Daily Values may be higher or lower depending on your calorie needs.
Ingredients
  1. 2 tablespoons peanut oil
  2. 2 green chillies
  3. 20 cloves garlic
  4. 3 medium onions, sliced
  5. 6 cups Spinach leaves, washed and drained
  6. 1 cup diced Paneer
  7. 1 teaspoon sea salt
Instructions
  1. Heat 2 tablespoon of oil in a pan and add in the garlic, onions, green chillies and the salt. Saute till the onions start to brown. About 10 minutes. Sauteing the onions and garlic in salt for a long time is very important.
  2. Add in the washed and drained spinach leaves. Let it wilt. Cook for 5 minutes. Remove off heat and let it cool a bit.
  3. Grind to a smooth paste. Add in the paneer and mix well.
  4. serve with roti/rice.
Notes
  1. You can fry the paneer if you want before adding to the gravy.
  2. Adjust the green chillies according to taste.
beta
calories
233
fat
10g
protein
14g
carbs
24g
more
kannamma cooks http://kannammacooks.com/

Indian-palak-paneer-recipe-spinach-curry-with-cheese-6-ingredients-pin |kannammacooks.com #palak #spinach #six #ingredient #easy #healthy #quick #cheese #curry #everyday #lunch #indian

Vegan Pasta Verdure

$
0
0
Vegan-Pasta-Verdure-In-Cauliflower-Cream-Sauce

Vegan-Pasta-Verdure-In-Cauliflower-Cream-Sauce-Recipe

My earlier recipe for Vegan Penne Rigate Mushroom Bolognese was pinned more than 800 plus times and still running strong. After that recipe post, I have been getting a lot of mails for more lite pasta recipes. I am happy to oblige. This pasta verdure uses cauliflower cream sauce instead of cheese. The sauce is so creamy and smooth and delicious. I promise, you wont miss the cheese. Come with me. Lets make another lite dinner. Lets jump in. “Think left and think right and think low and think high. Oh, the things you can think up if only you try!”

Lets make the cauliflower puree for the sauce.
Boil about 8-10 florets of cauliflower in water until fork tender. Drain the water. Puree the cauliflower in a blender. Add in up to a cup of water while pureeing. Make a fine paste. Set aside.
Vegan-Pasta-Verdure-In-Cauliflower-Cream-Sauce-Recipe-making-the-sauce

In a wide skillet, add couple of tablespoons of olive oil, chopped garlic and a teaspoon of dried Italian herb mixture. (Any store bought kind will do. Mine had oregano,thyme,dried garlic and basil). Waking up the spices and herbs in oil is the best method to bring them alive. Its the indian technique of tempering spices called the tadka that not only works wonders on Indian cooking but to any cooking. It works every single time. I do it for all my cooking. Not just Indian.
Vegan-Pasta-Verdure-In-Cauliflower-Cream-Sauce-Recipe-tempering

Once the garlic starts to brown, add in the onions and the veggies. I used peeled and diced zucchini, carrots and peas. Add in a teaspoon each of salt, pepper, soy sauce and sugar. The sugar helps in caramelizing the veggies. Soy sauce gives it a nice umami as we are not adding any cheese in this recipe. Saute until the vegetables are AL-dente.
Vegan-Pasta-Verdure-In-Cauliflower-Cream-Sauce-Recipe-saute-veggies

Once the veggies are cooked, add in the cauliflower puree, red bell peppers, pasta and the juice of a lemon. Stir well for a minute. Remove from heat.
Vegan-Pasta-Verdure-In-Cauliflower-Cream-Sauce-Recipe-finishing

For the garnish:
Heat a teaspoon of olive oil in a pan and add in fresh coarse bread crumbs and saute till brown. Sprinkle on the pasta and serve hot.
Vegan-Pasta-Verdure-In-Cauliflower-Cream-Sauce-Recipe-roasted-bread-crumbs

Vegan-Pasta-Verdure-In-Cauliflower-Cream-Sauce

Vegan Pasta Verdure in Cauliflower Cream Sauce
Serves 4
Write a review
Print
Prep Time
15 min
Cook Time
45 min
Total Time
1 hr
Prep Time
15 min
Cook Time
45 min
Total Time
1 hr
414 calories
69 g
0 g
10 g
13 g
2 g
315 g
769 g
11 g
0 g
8 g
Nutrition Facts
Serving Size
315g
Servings
4
Amount Per Serving
Calories 414
Calories from Fat 87
% Daily Value *
Total Fat 10g
15%
Saturated Fat 2g
8%
Trans Fat 0g
Polyunsaturated Fat 2g
Monounsaturated Fat 6g
Cholesterol 0mg
0%
Sodium 769mg
32%
Total Carbohydrates 69g
23%
Dietary Fiber 7g
30%
Sugars 11g
Protein 13g
Vitamin A
129%
Vitamin C
159%
Calcium
9%
Iron
15%
* Percent Daily Values are based on a 2,000 calorie diet. Your Daily Values may be higher or lower depending on your calorie needs.
Ingredients
  1. 250 grams Penne Pasta
  2. 300 grams cauliflower
  3. 2 tablespoon Extra Virgin Olive oil
  4. 1 teaspoon dried Italian herb mixture (Any store-bought variety is fine)
  5. 4 cloves garlic chopped fine
  6. 1 medium onion sliced
  7. 1/2 cup peas
  8. 2 carrots, diced
  9. 1 medium zucchini peeled and diced
  10. 1 teaspoon salt
  11. 1 teaspoon pepper powder
  12. 1 teaspoon sugar
  13. 1 teaspoon soy sauce
  14. 1 medium red bell pepper, sliced
For the Garnish
  1. 1/4 cup fresh coarse bread crumbs
  2. 1 teaspoon olive oil
Instructions
  1. Cook the pasta in a large pot of boiling salted water until al dente, tender but still firm to the bite, about 10 minutes. Drain and set aside.
  2. Boil about 8-10 florets of cauliflower in water until fork tender. Drain the water. Puree the cauliflower in a blender. Add in up to a cup of water while pureeing. Make a fine paste. Set aside.
  3. In a wide skillet, Add in couple of tablespoons of olive oil to a pan, Add the chopped garlic and a teaspoon of dried Italian herb mixture.
  4. Once the garlic starts to brown, Add in the onions and the veggies. I used zucchini, carrots and peas. Add in a teaspoon each of salt, pepper, soy sauce and sugar. Saute until the vegetables are AL-dente.
  5. Once the veggies are cooked, add in the cauliflower puree, red bell peppers, pasta and the juice of a lemon. Stir well for a minute. Remove from heat.
For the garnish
  1. Heat a teaspoon of olive oil in a pan and add in fresh coarse bread crumbs and saute till brown. Sprinkle on the pasta and serve hot.
beta
calories
414
fat
10g
protein
13g
carbs
69g
more
kannamma cooks http://kannammacooks.com/

Baked Samosas

$
0
0
Healthy-Lite-Aarti-sequeira-Baked-Samosa-indian-starter-recipe |kannammacooks.com #lite #recipe #classic #samosa #indian #style #potato #peas #filling #baked #version

Healthy-Lite-Aarti-sequeira-Baked-Samosa-indian |kannammacooks.com #lite #recipe #classic #samosa #indian #style #potato #peas #filling #baked #version
If there is something I really miss in India, it got to be the food network. I watched the whole sixth season of the next food network star for one cute contestant called Aarti Sequeira. It was 5 years back. I would record it in my DVR and see it at night after putting my toddler to sleep. It was my way to relax. She was just so humble and cute and cooked great food. I was so happy for her when she went on to win that season. This recipe is from her new cookbook which rocks.

Aarti Paarti: An American Kitchen with an Indian Soul

Healthy-Lite-Aarti-sequeira-Baked-Samosa-indian-starter-recipe |kannammacooks.com #lite #recipe #classic #samosa #indian #style #potato #peas #filling #baked #version
The Filling:
The original recipe uses a meat filling but I did a veggie filling. This is how I do the filling. In a saute pan, add a tablespoon of oil. When the oil is shimmering add in the mustard seeds, cumin seeds and minced ginger. When the seeds splutter, add the onions and saute till soft and translucent. When the onions are cooked, add in half a teaspoon each of salt, turmeric and garam masala. Add in the green chillies if using. Saute briefly for half a minute. Add in the boiled potatoes and peas and mix well. Add the chopped coriander leaves/cilantro. Remove from heat and when the mixture is cool enough to handle, make 8 balls. Set aside.
Healthy-Lite-Aarti-sequeira-Baked-Samosa-indian-recipe-filling |kannammacooks.com #lite #recipe #classic #samosa #indian #style #potato #peas #filling #baked #version
Healthy-Lite-Aarti-sequeira-Baked-Samosa-indian-recipe-filling-potato |kannammacooks.com #lite #recipe #classic #samosa #indian #style #potato #peas #filling #baked #version
For the Dough:
In a large bowl, combine the flour, yogurt, oil, salt and ajwain seeds. Bring the ingredients together until a dough forms. Knead until it has softened a bit, about 5 minutes. Allow to rest, at room temperature, for 15 minutes.
Healthy-Lite-Aarti-sequeira-Baked-Samosa-indian-recipe-dough |kannammacooks.com #lite #recipe #classic #samosa #indian #style #potato #peas #filling #baked #version
Roll the dough into a short cylinder. Slice in half, then slice each half into 2 pieces, so you have 4 bits. Roll each bit into a ball.
Healthy-Lite-Aarti-sequeira-Baked-Samosa-indian-recipe-portion-dough |kannammacooks.com #lite #recipe #classic #samosa #indian #style #potato #peas #filling #baked #version
Flatten the balls into discs then, on a floured surface, roll them into a 1/8-inch thick, 7-inch wide circles. Cut in half to form 2 semicircles.Put the filling in the center of a semicircle. Have a small bowl of water handy. Dip your finger in the water and run it along the edges of the semicircle. Arrange the samosas so the flat side is facing away from you. Grab the right corner and fold it over the dough in a triangular motion, so that this corner lands on the bottom left side of the filling. Do the same with the other corner. Squeeze bottom shut, and fold over, sealing with water. If you like, seal using a fork. Repeat with remaining dough and filling. Arrange the 8 samosas on a lightly greased baking sheet.
Healthy-Lite-Aarti-sequeira-Baked-Samosa-indian-recipe-form-dough |kannammacooks.com #lite #recipe #classic #samosa #indian #style #potato #peas #filling #baked #version

Bake for 15 minutes at 425 degrees F, then turn heat down to 375 degrees F and bake for 10 more minutes.
Healthy-Lite-Aarti-sequeira-Baked-Samosa-indian-recipe |kannammacooks.com #lite #recipe #classic #samosa #indian #style #potato #peas #filling #baked #version

Baked Samosas
Serves 8
Write a review
Print
Prep Time
15 min
Cook Time
45 min
Total Time
1 hr
Prep Time
15 min
Cook Time
45 min
Total Time
1 hr
174 calories
20 g
1 g
9 g
3 g
1 g
83 g
172 g
2 g
0 g
9 g
Nutrition Facts
Serving Size
83g
Servings
8
Amount Per Serving
Calories 174
Calories from Fat 81
% Daily Value *
Total Fat 9g
14%
Saturated Fat 1g
4%
Trans Fat 0g
Polyunsaturated Fat 3g
Monounsaturated Fat 6g
Cholesterol 1mg
0%
Sodium 172mg
7%
Total Carbohydrates 20g
7%
Dietary Fiber 2g
6%
Sugars 2g
Protein 3g
Vitamin A
2%
Vitamin C
11%
Calcium
2%
Iron
4%
* Percent Daily Values are based on a 2,000 calorie diet. Your Daily Values may be higher or lower depending on your calorie needs.
For the filling
  1. 1 tablespoon vegetable/ canola oil
  2. 1/2 teaspoon mustard seeds
  3. 1/2 teaspoon cumin seeds
  4. 1/2 teaspoon minced ginger
  5. 1 medium onion, chopped
  6. 1 Russet potato - Boiled and coarsely mashed
  7. 1/2 cup peas - Boiled
  8. 1/2 teaspoon salt
  9. 1/2 teaspoon turmeric
  10. 1/2 teaspoon garam masala
  11. 1/2 teaspoon green chillies, minced (optional)
  12. 1 tablespoon chopped coriander leaves
Homemade Samosa Pastry
  1. 1 cup all-purpose flour
  2. 1/4 cup yogurt
  3. 1/4 cup vegetable/ canola oil
  4. Big pinch salt
  5. 1/2 teaspoon ajwain seeds, optional
For the filling
  1. In a saute pan add a tablespoon of oil. When the oil is shimmering add in the mustard seeds, cumin seeds and ginger.
  2. When the seeds splutter, add the onions and saute till soft and translucent. When the onions are cooked add in half a teaspoon each of salt,turmeric and garam masala. Add in the green chillies if using. Saute briefly for half a minute.
  3. Add in the boiled potatoes and peas and mix well.
  4. Add the chopped coriander leaves/cilantro. Remove from heat and when the mixture is cool enough to handle, make 8 balls. Set aside.
Homemade Samosa Pastry
  1. In large bowl, combine the flour, yogurt, oil, salt and ajwain seeds. Bring the ingredients together until a dough forms. Knead until it has softened a bit, about 5 minutes. Allow to rest, at room temperature, for 15 minutes.
  2. Roll the dough into a short cylinder. Slice in half, then slice each half into 2 pieces, so you have 4 bits. Roll each bit into a ball. Flatten the balls into discs then, on a floured surface, roll them into a 1/8-inch thick, 7-inch wide circles. Cut in half to form 2 semicircles.
  3. Put a tablespoon or so of the filling in the center of a semicircle. Have a small bowl of water handy. Dip your finger in the water and run it along the edges of the semicircle. Arrange the samosas so the flat side is facing away from you. Grab the left corner and fold it over the dough in a triangular motion, so that this corner lands on the bottom right side of the filling. Do the same with the other corner.
  4. Squeeze bottom shut, and fold over, sealing with water. If you like, seal using a fork. Repeat with remaining dough and filling. Arrange the 8 samosas on a lightly greased baking sheet.
  5. Bake for 15 minutes at 425 degrees F, then turn heat down to 375 degrees F and bake for 10 more minutes.
Freezing samosas for baking later
  1. After filling the dough with the potato mixture and sealing it, place it on a plate and keep in the freezer for 30 minutes.
  2. Then transfer the raw samosas to zip tote bags and freeze them for up to a month.
  3. Thaw them and bake as mentioned above.
Adapted from Aarti Paarti: An American Kitchen with an Indian Soul
beta
calories
174
fat
9g
protein
3g
carbs
20g
more
Adapted from Aarti Paarti: An American Kitchen with an Indian Soul
kannamma cooks http://kannammacooks.com/

Tomato Dal / Tomato Pappu

$
0
0
Indian-Tomato-pappu-dal-andhra-style-masoor-dal-in-tomato-recipe |kannammacooks.com #andhra #telugu #style #tomato #pappu #ghee #rice #dal #lunch #dal #soup #comfort

Indian-Tomato-pappu-dal-andhra-style-masoor-dal-in-tomatoes-recipe |kannammacooks.com #andhra #telugu #style #tomato #pappu #ghee #rice #dal #lunch #dal #soup #comfort
I am a lentils and rice girl. This is one of my go to everyday lentil. I make this at least once a week.I used masoor dal/red split lentil today. You can use toor dal or moong dal too. Tomato pappu is red lentils that is cooked until fall apart tender and simmered with a ginger, tomato and spice sauce. Its to die for. It has that much protein to compete heavily against a steak. Rice topped with dal and a teaspoon of Ghee – I can have it everyday. If you are vegan, omit the ghee.
The red lentil/masoor dal when cooked, turns into yellow. I use this as a magic tool with my son still today. Abracadabra – make the orange lentil turn into yellow! It works. Try it at home.
Indian-Tomato-pappu-dal-andhra-style-masoor-dal-in-tomatoes-recipe-masoor-dal |kannammacooks.com #andhra #telugu #style #tomato #pappu #ghee #rice #dal #lunch #dal #soup #comfort

I have a neat tip for cooking dal in a pressure cooker. I always had a problem with Indian pressure cookers. The water from inside the cooker will leak out of the whistle opening while cooking and make a whole mess on the gas stove. By placing the dal and water in a bowl and keeping the bowl in the pressure cooker filled with water easily solved the problem. No more mess.

Indian-Tomato-pappu-dal-andhra-style-masoor-dal-in-tomatoes-recipe-cooker-tip |kannammacooks.com #andhra #telugu #style #tomato #pappu #ghee #rice #dal #lunch #dal #soup #comfort

Boil the dal in a pressure cooker for 10 minutes until fall apart tender. For every half cup of dal use 1.5 cups water if you are cooking in a pressure cooker. If you are going to be cooking dal in a pan, soak the dal for an hour and boil it with 2.5 cups of water for every half cup of dal for 1 hour in low flame. Soaking the dal will help in cooking faster. Do not add salt while cooking lentils. They tend to cook faster without the salt.

Heat oil in a skillet and add cumin seeds, minced ginger, curry leaves and a dried red chilli. Once the curry leaves are dry and crisp, add asafoetida/hing. If you do not like the flavor of asafoetida, omit it. Asafoetida aids in digestion. Add in the onions and salt, cook until soft and translucent.
Indian-Tomato-pappu-dal-andhra-style-masoor-dal-in-tomatoes-recipe-saute-onion |kannammacooks.com #andhra #telugu #style #tomato #pappu #ghee #rice #dal #lunch #dal #soup #comfort

Once the onions are cooked, roughly puree the tomatoes in a food processor/blender and add it to the pan. Add in the turmeric and chilli powder to the tomato mixture. Add in a teaspoon of jaggery. Jaggery helps in rounding out the flavor. If you do not have jaggery, use brown sugar. Cover the pan with a lid and let it simmer in low flame for 20 minutes. Saute in between so the masala doesn’t burn. Once the tomato mixture is cooked and dry, Add in the dal and briefly simmer for a minute. Remove from heat. Garnish with coriander leaves.
Indian-Tomato-pappu-dal-andhra-style-masoor-dal-in-tomatoes-recipe-tadka |kannammacooks.com #andhra #telugu #style #tomato #pappu #ghee #rice #dal #lunch #dal #soup #comfort

Serve hot with rice. Don’t forget the ghee. If you are vegan, omit the ghee.
Indian-Tomato-pappu-dal-andhra-style-masoor-dal-in-tomatoes-tangy-recipe |kannammacooks.com #andhra #telugu #style #tomato #pappu #ghee #rice #dal #lunch #dal #soup #comfort

Tomato Dal / Tomato Pappu
Serves 3
Write a review
Print
Prep Time
15 min
Cook Time
45 min
Total Time
1 hr
Prep Time
15 min
Cook Time
45 min
Total Time
1 hr
198 calories
29 g
0 g
6 g
10 g
1 g
203 g
804 g
6 g
0 g
4 g
Nutrition Facts
Serving Size
203g
Servings
3
Amount Per Serving
Calories 198
Calories from Fat 49
% Daily Value *
Total Fat 6g
9%
Saturated Fat 1g
4%
Trans Fat 0g
Polyunsaturated Fat 2g
Monounsaturated Fat 2g
Cholesterol 0mg
0%
Sodium 804mg
33%
Total Carbohydrates 29g
10%
Dietary Fiber 6g
24%
Sugars 6g
Protein 10g
Vitamin A
25%
Vitamin C
34%
Calcium
4%
Iron
17%
* Percent Daily Values are based on a 2,000 calorie diet. Your Daily Values may be higher or lower depending on your calorie needs.
Ingredients
  1. 1/2 cup masoor dal/red lentil
  2. 1 tablespoon sesame oil
  3. 1/2 teaspoon minced ginger
  4. 1/2 teaspoon cumin
  5. 2 sprigs curry leaves
  6. 1 dried red chilli
  7. 1/4 teaspoon asafoetida/hing (optional)
  8. 1 medium onion,chopped
  9. 3 tomatoes, pureed in a food processor
  10. 1/2 teaspoon turmeric
  11. 1/2 teaspoon chilli powder
  12. 1 teaspoon jaggery or brown sugar
  13. 1 teaspoon salt or more to taste
  14. 1 tablespoon chopped coriander leaves
Instructions
  1. Boil the dal in a pressure cooker for 10 minutes with 1.5 cups water until fall apart tender.
  2. Heat oil in a skillet and add cumin seeds, minced ginger, curry leaves and a dried red chilli. Once the curry leaves are dry and crisp, add asafoetida. If you do not like the flavor of asafoetida, omit it.
  3. Add in the onions and salt, cook until soft and translucent.
  4. Once the onions are cooked, roughly puree the tomatoes in a food processor/blender and add it to the pan. Add in the turmeric and chilli powder to the tomato mixture. Add in a teaspoon of jaggery.
  5. Cover the pan with a lid and let it simmer in low flame for 20 minutes. Saute in between so the masala doesnt burn.
  6. Once the tomato mixture is cooked and dry, Add in the dal and briefly simmer for a minute.
  7. Remove from heat. Garnish with coriander leaves.
beta
calories
198
fat
6g
protein
10g
carbs
29g
more
kannamma cooks http://kannammacooks.com/
Indian-Tomato-pappu-dal-andhra-style-masoor-dal-in-tomato-recipe |kannammacooks.com #andhra #telugu #style #tomato #pappu #ghee #rice #dal #lunch #dal #soup #comfort

Toasted Nuts

$
0
0
How-to-toast-nuts-in-the-oven-and-the-stove-top-walnut |kannammacooks.com #walnut #toast #roast #essential #oils #crisp #nuts #nutty

How-to-toast-nuts-in-the-oven-and-the-stove-top-walnut |kannammacooks.com #walnut #toast #roast #essential #oils #crisp #nuts #nutty

Toasting Nuts brings out their full flavor and gives them a more pronounced taste, since it releases their natural oils.

Oven Method
Place a rack in the center of the oven and preheat to 350 degrees Fahrenheit.
Spread the nuts in a single layer on a baking sheet, and place them in the oven for 10-12 minutes, depending on the type of nuts. Shake the pan a couple of times during the process, and watch the nuts carefully so they do not burn. Remove the nuts from the oven as soon as you start to smell them and they start to turn light brown. Transfer to a plate to cool. The nuts can be kept in an airtight container for upto a day. It can be frozen for upto a month.

Stove Top Method
Take a heavy bottomed pan and dry roast the nuts on a very low flame for 5-6 minutes and they start to turn light brown. Remove off heat. Transfer to a plate to cool. The nuts can be kept in an airtight container for upto a day. It can be frozen for upto a month.
How-to-toast-nuts-in-the-oven-and-the-stove |kannammacooks.com #walnut #toast #roast #essential #oils #crisp #nuts #nutty

Gluten Free Chocolate Nut Cookies

$
0
0
Francois-payard-patisserie-flour-less-glutenfree-passover-cookie-no-butter-chocolate-walnut-recipe-bite |kannammacooks.com #glutenfree #zero #butter #zero #oil #flourless #passover #one #bowl #chocolate #walnut #cookie #five #ingredients #last #minute #entertaining #francois #payard #patisserie #new-york #france

Francois-payard-patisserie-flour-less-glutenfree-passover-cookie-no-butter-chocolate-walnut-recipe |kannammacooks.com #glutenfree #zero #butter #zero #oil #flourless #passover #one #bowl #chocolate #walnut #cookie #five #ingredients #last #minute #entertaining #francois #payard #patisserie #new-york #france
I once had a chewy sophisticated cookie at Payard patisserie in New York. It was then called as passover cookie. It was a chewy, chocolaty and a oh so good cookie. Sometime later I spotted the same recipe in his cookbook Chocolate Epiphany: Exceptional Cookies, Cakes, and Confections for Everyone. What surprised me was that it was such a simple recipe. The biggest surprise was that there is no added fat. No butter, No oil. The only fat that comes is from the added nuts. A one bowl recipe which takes only 5 minutes to put together.The cookie is so chewy that you feel like you are eating a toffee. The goopy batter which doesn’t look very promising turns out into a super shiny crackled cookie. Its an incredible incredible recipe. Long live Francois Payard! You are the cutest french chef I have ever known and please bless the world with more recipes like this. This makes for a really splendid sweet chocolaty treat. Lets make this cookie and feel the epiphany.
Francois-payard-patisserie-flour-less-glutenfree-passover-cookie-no-butter-chocolate-walnut-recipe-chocolate-epiphany-book.jpg
He writes in his book, “These beautiful flourless cookies are particularly in high demand at Payard during passover, but they have become so popular that we sell them year-round. Their crackled surfaces gives them an elegant look, and because they are so easy and take barely any time to make, they are great for last-minute entertaining. They have a slightly crunchy exterior and a soft, almost brownie-like interior.”

In this recipe, payard uses dutch process cocoa powder. Normal cocoa powder works too. Dutch-process cocoa powder is made from cocoa beans that have been washed with a potassium solution, to neutralize their acidity. Natural cocoa powder is made from cocoa beans that are simply roasted, then pulverized into a fine powder. Dutching makes it darker and can help mellow the flavor of the beans.
Francois-payard-patisserie-flour-less-glutenfree-passover-cookie-no-butter-chocolate-walnut-recipe-natural-vs-dutched |kannammacooks.com #glutenfree #zero #butter #zero #oil #flourless #passover #one #bowl #chocolate #walnut #cookie #five #ingredients #last #minute #entertaining #francois #payard #patisserie #new-york #france

Lets go and make my apartment smell like a chocolate factory! Ready one, two, three – Go!

Time to toast – Toasting nuts brings out their full flavor and gives them a more pronounced taste, since it releases their natural oils. Click Here to know how to toast nuts the easy way. Toast the walnuts and coarsely chop them and set aside.

Preheat the oven to 350 degree F. Line a baking sheet with parchment paper. This is a very goopy and sticky batter and using parchment paper is absolutely necessary. Please don’t dump the batter right on the cookie pan. Use parchment or a silicone baking mat. Please please use parchment if you want to remove the cookies after baking from the pan.

Sift the cocoa, salt and the confectioners sugar. Also sifting is important to remove the little lumps in cocoa and sugar which otherwise can never be incorporated uniformly in the batter.
Francois-payard-patisserie-flour-less-glutenfree-passover-cookie-no-butter-chocolate-walnut-recipe-sifting |kannammacooks.com #glutenfree #zero #butter #zero #oil #flourless #passover #one #bowl #chocolate #walnut #cookie #five #ingredients #last #minute #entertaining #francois #payard #patisserie #new-york #france

Add in the egg whites, vanilla and the walnuts. Just dump them all. Mix with a wooden spoon till there is no more dry specks of sugar and cocoa. It will be very dry in the beginning but will all come together into a dark thick batter.
Francois-payard-patisserie-flour-less-glutenfree-passover-cookie-no-butter-chocolate-walnut-recipe-mixing |kannammacooks.com #glutenfree #zero #butter #zero #oil #flourless #passover #one #bowl #chocolate #walnut #cookie #five #ingredients #last #minute #entertaining #francois #payard #patisserie #new-york #france

With an ice-cream scoop or a generous tablespoon, scoop the batter onto the prepared baking sheet. Give space between the cookies so that they do not stick when they spread in the oven. If you have extra batter, wait until the first batch of cookies is baked before scooping the next batch.

put the cookies in the oven, and immediately lower the temperature to 320 degree F. Bake for 20 minutes, or until small thin cracks appear on the surface of the cookies. Remove the cookie sheet and let it cool completely before removing the cookies from the parchment paper. It might break if you try to remove them while warm.
Francois-payard-patisserie-flour-less-glutenfree-passover-cookie-no-butter-chocolate-walnut-recipe-baked |kannammacooks.com #glutenfree #zero #butter #zero #oil #flourless #passover #one #bowl #chocolate #walnut #cookie #five #ingredients #last #minute #entertaining #francois #payard #patisserie #new-york #france
Store in an airtight container for up to two days.
Francois-payard-patisserie-flour-less-glutenfree-passover-cookie-no-butter-chocolate-walnut-recipe-bite |kannammacooks.com #glutenfree #zero #butter #zero #oil #flourless #passover #one #bowl #chocolate #walnut #cookie #five #ingredients #last #minute #entertaining #francois #payard #patisserie #new-york #france

Gluten Free, Zero Butter Chocolate Nut Cookies
Serves 12
Write a review
Print
Prep Time
10 min
Cook Time
20 min
Total Time
30 min
Prep Time
10 min
Cook Time
20 min
Total Time
30 min
142 calories
18 g
0 g
8 g
3 g
1 g
35 g
22 g
15 g
0 g
6 g
Nutrition Facts
Serving Size
35g
Servings
12
Amount Per Serving
Calories 142
Calories from Fat 65
% Daily Value *
Total Fat 8g
12%
Saturated Fat 1g
5%
Trans Fat 0g
Polyunsaturated Fat 5g
Monounsaturated Fat 1g
Cholesterol 0mg
0%
Sodium 22mg
1%
Total Carbohydrates 18g
6%
Dietary Fiber 2g
7%
Sugars 15g
Protein 3g
Vitamin A
0%
Vitamin C
0%
Calcium
2%
Iron
4%
* Percent Daily Values are based on a 2,000 calorie diet. Your Daily Values may be higher or lower depending on your calorie needs.
Ingredients
  1. 1/4 cup plus two tablespoon (35 grams) Dutch processed cocoa powder
  2. 1.5 cups (175 grams) confectioners sugar
  3. pinch of salt
  4. 1 cup plus 6 tablespoon (135grams) walnuts, toasted and coarsely chopped
  5. 2 large egg whites, at room temperature
  6. 2 teaspoon pure vanilla extract (use the real kind)
Instructions
  1. Preheat the oven to 350 degree F. Line a baking sheet with parchment paper.
  2. Sift the cocoa, salt and the confectioners sugar.
  3. Add in the egg whites, vanilla and the walnuts. Just dump them all. Mix with a wooden spoon till there is no more dry specks of sugar and cocoa. It will be very dry in the beginning but will all come together into a dark thick batter.
  4. With a ice-cream scoop or a generous tablespoon, scoop the batter onto the prepared baking sheet. give space between the cookies so that they do not stick when they spread in the oven.
  5. put the cookies in the oven, and immediately lower the temperature to 320 degree F. Bake for 20 minutes, or until small thin cracks appear on the surface of the cookies. Remove the cookie sheet and let it cool completely before removing the cookies from the parchment paper.
  6. Store in an airtight container for up to two days.
Adapted from Chocolate Epiphany - Francois Payard
beta
calories
142
fat
8g
protein
3g
carbs
18g
more
Adapted from Chocolate Epiphany - Francois Payard
kannamma cooks http://kannammacooks.com/

Murungai Keerai Poriyal | Drumstick Leaves Stir-fry (Vegan)

$
0
0
Vegan-south-indian-murungai-keerai-drumstick-leaves-poriyal-moringa-recipe |kannammacooks.com #murungai #moringa #stir-fry #iron #minerals #vitamin # rich #south #indian

Vegan-south-indian-murungai-keerai-drumstick-leaves-poriyal-moringa-recipe  |kannammacooks.com #murungai #moringa #stir-fry #iron #minerals #vitamin # rich #south #indian
Drumstick leaves or Moringa as its called in the western world has been used for centuries as folk medicine in India. In Ayurvedic traditional medicine, the leaves are believed to affect blood pressure and glucose levels. Drumstick leaves are given to nursing mothers in the belief that they increase lactation. The leaves are the most nutritious part of the plant, being a significant source of B vitamins, vitamin C, provitamin A as beta-carotene, vitamin K, manganese, and protein, among other essential nutrients. We consume a lot of drumstick and its leaves in South India. Today I made a poriyal / stir-fry with the drumstick leaves.

Here is how to do it. Clean and wash the leaves and set aside.
Vegan-south-indian-murungai-keerai-drumstick-leaves-poriyal-moringa-recipe-drumstick-leaves  |kannammacooks.com #murungai #moringa #stir-fry #iron #minerals #vitamin # rich #south #indian
Heat a tablespoon of oil in a pan and when the oil is shimmering, add in the mustard seeds, dry red chillies and urad dal. Let it splutter and wait till the dal turns golden brown. Add in the finely chopped onions and the salt. Saute till the onions are soft and slightly brown.
Vegan-south-indian-murungai-keerai-drumstick-leaves-poriyal-moringa-recipe-tempering  |kannammacooks.com #murungai #moringa #stir-fry #iron #minerals #vitamin # rich #south #indian

Once the onions are soft and slightly brown, add in the cleaned, washed and dried drumstick leaves. Saute in medium flame until all the moisture has escaped and the mixture is completely dry. Add in the shredded coconut and saute briefly for a minute. Remove off heat.

Vegan-south-indian-murungai-keerai-drumstick-leaves-poriyal-moringa-recipe-wilted-greens  |kannammacooks.com #murungai #moringa #stir-fry #iron #minerals #vitamin # rich #south #indian

Serve hot with rice or roti.

Vegan-south-indian-murungai-keerai-drumstick-leaves-poriyal-moringa-recipe |kannammacooks.com #murungai #moringa #stir-fry #iron #minerals #vitamin # rich #south #indian

Murungai keerai poriyal | Drumstick Leaves Stir-fry (Vegan)
Serves 3
Write a review
Print
Prep Time
20 min
Cook Time
20 min
Total Time
40 min
Prep Time
20 min
Cook Time
20 min
Total Time
40 min
210 calories
9 g
84 g
12 g
16 g
3 g
148 g
480 g
5 g
0 g
8 g
Nutrition Facts
Serving Size
148g
Servings
3
Amount Per Serving
Calories 210
Calories from Fat 109
% Daily Value *
Total Fat 12g
19%
Saturated Fat 3g
17%
Trans Fat 0g
Polyunsaturated Fat 3g
Monounsaturated Fat 5g
Cholesterol 84mg
28%
Sodium 480mg
20%
Total Carbohydrates 9g
3%
Dietary Fiber 2g
7%
Sugars 5g
Protein 16g
Vitamin A
2%
Vitamin C
9%
Calcium
3%
Iron
5%
* Percent Daily Values are based on a 2,000 calorie diet. Your Daily Values may be higher or lower depending on your calorie needs.
Ingredients
  1. 1 tablespoon peanut oil
  2. 1 teaspoon mustard seeds
  3. 1 tablespoon urad dal
  4. 2 dried red chillies
  5. 2 medium onions, chopped
  6. 2 cups moringa leaves (drumstick leaves)
  7. 1/2 teaspoon salt
  8. 2 heaped tablespoon shredded coconut
Instructions
  1. Heat a tablespoon of oil in a pan and when the oil is shimmering, add in the mustard seeds, dry red chillies and urad dal. Let it splutter and wait till the dal turns golden brown.
  2. Add in the finely chopped onions and the salt. Saute till the onions are soft and slightly brown.
  3. Add in the cleaned, washed and dried drumstick leaves. Saute in medium flame until all the moisture has escaped and the mixture is completely dry.
  4. Add in the shredded coconut and saute briefly for a minute. Remove off heat.
  5. Serve hot with rice or roti.
beta
calories
210
fat
12g
protein
16g
carbs
9g
more
kannamma cooks http://kannammacooks.com/

கம்பு தோசை-Kambu (Bajra) Dosai |Fermented Pearl Millet Crepe-Gluten free and Vegan

$
0
0
kambu-bajra-sajje-pear-millet-dosa-dosai-crepe-recipe-fermented-version |kannammacooks.com #gluten-free #vegan #healthy #millets #lost #grains #breakfast #fermented #dosa #crepe

kambu-bajra-sajje-pear-millet-dosa-dosai-crepe-recipe-fermented-version |kannammacooks.com #gluten-free #vegan #healthy #millets #lost #grains #breakfast #fermented #dosa #crepe

Millets have been around 2000 BC. Millets are a great source of starch, making it a high-energy food. It is also an excellent source of protein and fiber. It is said that the amino acids in the pearl millet are more easily digestible than the ones found in wheat. Pearl millets are known to increase insulin sensitivity and lower the level of triglycerides.

kambu-bajra-sajje-pear-millet-dosa-dosai-crepe-recipe-fermented-version-names |kannammacooks.com #gluten-free #vegan #healthy #millets #lost #grains #breakfast #fermented #dosa #crepe

I am always looking for ways to include whole grains. I make this kambu/millet dosai which tastes so great and its healthy too. This is how I make the dosa batter.

Wash all the ingredients in tap water 3-4 times draining water every time. Soak all the ingredients in water for a minimum of 2 hours up to 4 hours.

kambu-bajra-sajje-pear-millet-dosa-dosai-crepe-recipe-fermented-version-ingredients |kannammacooks.com #gluten-free #vegan #healthy #millets #lost #grains #breakfast #fermented #dosa #crepe

Soak all the ingredients separately. I used white idly rice. You can use brown rice or red rice also. Using tapioca pearls/sabudana/javvarisi results in a very soft idly and a crispy dosa as millets alone can become very heavy and dense otherwise.

kambu-bajra-sajje-pear-millet-dosa-dosai-crepe-recipe-fermented-version-measurements |kannammacooks.com #gluten-free #vegan #healthy #millets #lost #grains #breakfast #fermented #dosa #crepe

After soaking for 2 hours, we need to grind the ingredients in the following manner. Lets first grind the urad dal. I use a wet grinder to grind. You can use a food processor or mixie too. Urad dal when ground, triples in volume in a stone wet grinder. Be alerted that the urad dal wont increase in volume if ground in a mixie or a food processor. That’s fine. Grind until the dal turns into an incredibly smooth batter. Add water in regular intervals while grinding. Add up to 2 cups of water. It took 30 minutes in the traditional stone grinder. It might take upto 5 minutes in the food processor/mixie. Transfer the batter to a big bowl and set aside.
kambu-bajra-sajje-pear-millet-dosa-dosai-crepe-recipe-fermented-version-urad-dal |kannammacooks.com #gluten-free #vegan #healthy #millets #lost #grains #breakfast #fermented #dosa #crepe

Now add the fenugreek seeds and tapioca pearls/sabudana and grind for a couple of minutes before adding rice and the millet. Slowly start grinding and add up to 2 cups of water in intervals while grinding. Grind until the batter is smooth. It took 40 minutes in the grinder. If using food processor/mixie, grind in 2-3 batches for 3 minutes each batch or until the required texture is reached. Transfer the batter and add it to the urad dal batter and mix well. My mom swears that all idly/dosa batters be mixed by hand. Mixing by hand ensures that the batter is homogenous and whom am I to question the queen of idlies. So mix by hand folks.
kambu-bajra-sajje-pear-millet-dosa-dosai-crepe-recipe-fermented-version-grinding |kannammacooks.com #gluten-free #vegan #healthy #millets #lost #grains #breakfast #fermented #dosa #crepe

Salt
I have two theories about when to add salt. My mom adds salt along with the batter and lets the batter ferment. There are people who add salt after its fermented. So which one is better? This is purely my theory. Add salt along with the batter if you live in a hot place where the batter will be fermented in 6-8 hours and adding salt upfront helps in avoiding over fermentation of batter. If you live in a cold place wait for the batter to ferment and later add the salt. Also if you live in a very cold place, ferment the batter inside the oven with the pilot light on. It will keep the place warm there by aiding in fermentation.
Hot place – Ferment for 6 to 8 hours.
Cold place – Can take up to 12 hours.

Once the batter is fermented, mix well and store in the refrigerator and use it within 3-4 days.

When ready for dosa, heat a lightly oiled griddle over medium high heat. Ladle half a cup of batter and spread on the pan.Cook the crepe for about half a minute on each side, until the bottom is light brown.

kambu-bajra-sajje-pear-millet-dosa-dosai-crepe-recipe-fermented-version |kannammacooks.com #gluten-free #vegan #healthy #millets #lost #grains #breakfast #fermented #dosa #crepe

கம்பு தோசை-Kambu (Bajra) Dosai |Fermented Pearl Millet Crepe
Yields 50
Write a review
Print
Prep Time
8 hr
Cook Time
5 min
Prep Time
8 hr
Cook Time
5 min
64 calories
13 g
0 g
0 g
1 g
0 g
18 g
213 g
0 g
0 g
0 g
Nutrition Facts
Serving Size
18g
Yields
50
Amount Per Serving
Calories 64
Calories from Fat 3
% Daily Value *
Total Fat 0g
1%
Saturated Fat 0g
0%
Trans Fat 0g
Polyunsaturated Fat 0g
Monounsaturated Fat 0g
Cholesterol 0mg
0%
Sodium 213mg
9%
Total Carbohydrates 13g
4%
Dietary Fiber 1g
3%
Sugars 0g
Protein 1g
Vitamin A
0%
Vitamin C
0%
Calcium
0%
Iron
2%
* Percent Daily Values are based on a 2,000 calorie diet. Your Daily Values may be higher or lower depending on your calorie needs.
Ingredients
  1. 1 tablespoon fenugreek seeds
  2. 1/2 cup tapioca pearls
  3. 1.5 cups urad dal
  4. 2 cups rice
  5. 2 cups millet
  6. 1.5 tablespoon sea salt
Instructions
  1. Wash all the ingredients in tap water 3-4 times draining water every time. Soak all the ingredients in water for a minimum of 2 hours upto 4 hours.
  2. After soaking for 2 hours, grind the ingredients in the following manner. First grind the urad dal. I use a wet grinder to grind. You can use a food processor or mixie too. Urad dal when ground, triples in volume. Be alerted that the urad dal wont increase in volume if ground in a mixie or a food processor. That’s fine. Grind until the dal turns into an incredibly smooth batter. Add water in regular interval while grinding. Add up to 2 cups of water. It took 30 minutes in the traditional stone grinder. It might take upto 5 minutes in the food processor/mixie. Transfer the batter to a big bowl and set aside.
  3. Now add the fenugreek seeds and tapioca pearls/sabudana and grind for a couple of minutes before adding rice and the millet. Slowly start grinding and add up to 2 cups of water in intervals while grinding. Grind until the batter is smooth like mud. It took 40 minutes in the grinder. If using food processor/mixie, grind in 2-3 batches for 3 minutes each batch or until the required texture is reached. Transfer the batter and add it to the dal batter and mix well.
  4. Add salt along with the batter if you live in a hot place where the batter will be fermented in 4-5 hours and adding salt upfront helps in avoiding over fermentation of batter. If you live in a cold place wait for the batter to ferment and later add the salt. Also if you live in a very cold place, ferment the batter inside the oven with the pilot light on. It will keep the place warm there by aiding in fermentation. Hot place – Ferment for 6 to 8 hours. Cold place – Can take upto 12 hours.
  5. Once the batter is fermented, mix well and store in the refrigerator and use it within 3-4 days.
  6. When ready for dosa, heat a lightly oiled griddle over medium high heat. Ladle half a cup of batter and spread on the pan.Cook the crepe for about half a minute on each side, until the bottom is light brown.
beta
calories
64
fat
0g
protein
1g
carbs
13g
more
kannamma cooks http://kannammacooks.com/

Gluten Free and Vegan Tomato Omelette

$
0
0
Glutenfree-vegan-besan-tomato-omelette-indian-breakfast-recipes |kannammacooks.com #glutenfree #vegan #omelette #indian #chickpea #flour #pancake #yummy #breakfast #fluffy #recipe #indian

Glutenfree-vegan-besan-tomato-omelette-indian-breakfast-recipe  |kannammacooks.com #glutenfree #vegan #omelette #indian #chickpea #flour #pancake #yummy #breakfast #fluffy #recipe #indian
I love lazy easy weekend breakfast. This is a one bowl, make in ten minutes, my kind of breakfast. Don’t forget its gluten free and vegan too. That’s a really nice way to start my day. Here is how to whip up a quick breakfast.

The aromatics you will need.
Glutenfree-vegan-besan-tomato-omelette-indian-breakfast-recipe-ingredients  |kannammacooks.com #glutenfree #vegan #omelette #indian #chickpea #flour #pancake #yummy #breakfast #fluffy #recipe #indian

Sieve the chickpea flour. Its an important step to get rid of the lumps. Dont skip. Add in the veggies and the spices. Dump them all. Add in 2/3 cups water and mix well with a wooden spoon until a smooth batter forms.
Glutenfree-vegan-besan-tomato-omelette-indian-breakfast-recipe-mix  |kannammacooks.com #glutenfree #vegan #omelette #indian #chickpea #flour #pancake #yummy #breakfast #fluffy #recipe #indian

Ladle 1/3 cup of batter and pour on a lightly oiled preheated griddle and cook for 2 minutes each side until lightly brown on low flame. Serve hot.
Glutenfree-vegan-besan-tomato-omelette-indian-breakfast-recipe-cook  |kannammacooks.com #glutenfree #vegan #omelette #indian #chickpea #flour #pancake #yummy #breakfast #fluffy #recipe #indian

Glutenfree-vegan-besan-tomato-omelette-indian-breakfast-recipes |kannammacooks.com #glutenfree #vegan #omelette #indian #chickpea #flour #pancake #yummy #breakfast #fluffy #recipe #indian

Gluten Free and Vegan Tomato Omelette
Serves 5
Write a review
Print
Prep Time
10 min
Cook Time
10 min
Total Time
20 min
Prep Time
10 min
Cook Time
10 min
Total Time
20 min
95 calories
16 g
0 g
1 g
5 g
0 g
134 g
318 g
5 g
0 g
1 g
Nutrition Facts
Serving Size
134g
Servings
5
Amount Per Serving
Calories 95
Calories from Fat 12
% Daily Value *
Total Fat 1g
2%
Saturated Fat 0g
1%
Trans Fat 0g
Polyunsaturated Fat 1g
Monounsaturated Fat 0g
Cholesterol 0mg
0%
Sodium 318mg
13%
Total Carbohydrates 16g
5%
Dietary Fiber 3g
13%
Sugars 5g
Protein 5g
Vitamin A
12%
Vitamin C
51%
Calcium
2%
Iron
7%
* Percent Daily Values are based on a 2,000 calorie diet. Your Daily Values may be higher or lower depending on your calorie needs.
Ingredients
  1. 1 cup besan, chickpea flour
  2. 1 onion, finely chopped
  3. 2 medium tomato, finely diced
  4. 1 green chilli, finely chopped
  5. 1 tablespoon finely chopped scallions, spring onion
  6. 1/2 teaspoon salt
  7. 1/4 teaspoon red chilli powder
  8. 1/2 teaspoon turmeric
  9. 1/4 teaspoon baking soda
  10. 1/4 teaspoon asafoetida (Hing), Optional
  11. 2/3 cup water
Instructions
  1. Sieve the chickpea flour. Its an important step to get rid of the lumps. Dont skip. Add in the veggies and the spices. Dump them all. Add in 2/3 cups water and mix well with a wooden spoon until a smooth batter forms.
  2. Ladle 1/3 cup of batter and pour on a lightly oiled preheated griddle and cook for 2 minutes each side until lightly brown on low flame. Serve hot.
beta
calories
95
fat
1g
protein
5g
carbs
16g
more
kannamma cooks http://kannammacooks.com/
Viewing all 1080 articles
Browse latest View live


Latest Images