Quantcast
Channel: Kannamma Cooks
Viewing all 1065 articles
Browse latest View live

Whole wheat burger buns

$
0
0

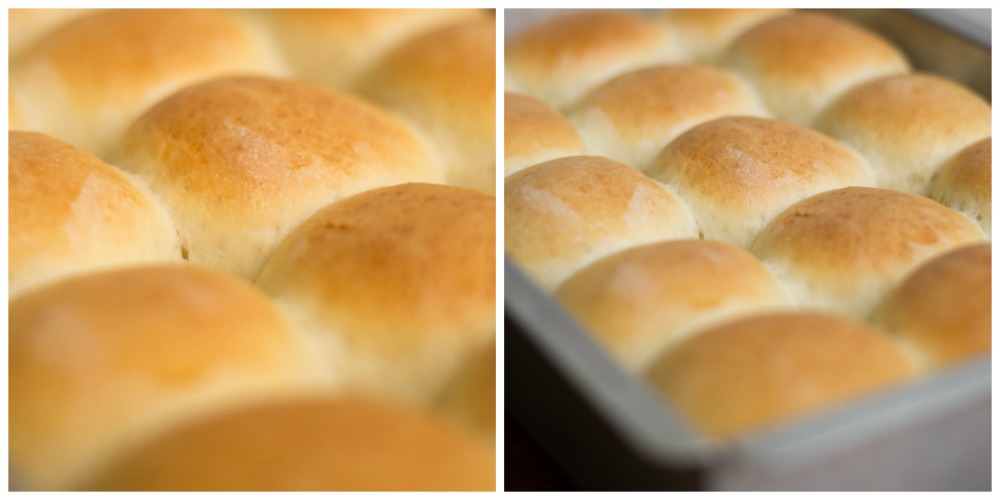
This is an ideal recipe which makes that rustic soft bun that toasts well, takes in all the juices without becoming mushy.

To me an ideal burger bun is

Soft but not a foamy pillow
Holds up to the juices
It needs to be a little sweet. Hell yeah! Good Balance….
Should be hearty, has some character
Absolutely no dry buns

This recipe is all that. Now lets get to work. Here are the things you will need

Board

First lets get the yeast working.
Add quarter cup of warm water plus a pinch of sugar to the yeast and leave it aside for 5 minutes so it becomes foamy. If it doesn’t foam, discard and start again with a fresh batch of yeast.
PicMonkey Collage

I store my yeast in the freezer at all times and it stays for a long period.

Once the yeast has proved that its kicking and alive, dump all the ingredients – the proved yeast mixture, water, sugar, butter, all purpose flour, whole wheat flour mixed with salt into a bowl and mix with a wooden spoon. We are not trying to knead yet. We are just combining everything together. Once its kinda looks mixed, move away for 15 minutes. Don’t do anything. This process is called as autolyse. It hydrates the dough and it becomes a lot easier later to knead.
autolyse

Now start kneading. I did it by hand for a good 5 minutes. The trick in kneading is to avoid the temptation of adding flour. Too much flour alters the moisture content and will result in a dry burger. Dry bread is a sin. so do not add too much flour while kneading. Promise me you wont!.

BENCH SCRAPER is my best friend. I use it all the time to get the dough off the surface while kneading. It will stick to your hands like mad. After 5 minutes, it will still be very very tacky and that’s how it should be.

kneading process

Transfer it to a clean bowl and cover and keep it in a warm place for about an hour. It should have doubled in volume.Take the dough and gently deflate. Divide into 6 equal balls.Shape it into a very smooth ball using the cup of your hands. Any imperfection at this stage is going to be reflected in the final bun. so take your time. Place it in an oiled sheet pan and gently press the tops and brush the tops with butter and sprinkle the seeds generously.

Now let them rise again for about an hour. In the mean time preheat the oven to 400°F/200°C. Bake the buns for about 15-18 minutes, turning the pans once to help aid even baking. Cool the buns in a rack for 30 minutes.
two
Now, Here is the recipe !


Whole wheat burger buns
Serves 6
Write a review
Print
Prep Time
30 min
Cook Time
20 min
Total Time
3 hr
Prep Time
30 min
Cook Time
20 min
Total Time
3 hr
175 calories
31 g
7 g
4 g
4 g
2 g
74 g
298 g
4 g
0 g
2 g
Nutrition Facts
Serving Size
74g
Servings
6
Amount Per Serving
Calories 175
Calories from Fat 32
% Daily Value *
Total Fat 4g
6%
Saturated Fat 2g
9%
Trans Fat 0g
Polyunsaturated Fat 1g
Monounsaturated Fat 1g
Cholesterol 7mg
2%
Sodium 298mg
12%
Total Carbohydrates 31g
10%
Dietary Fiber 1g
6%
Sugars 4g
Protein 4g
Vitamin A
2%
Vitamin C
0%
Calcium
2%
Iron
4%
* Percent Daily Values are based on a 2,000 calorie diet. Your Daily Values may be higher or lower depending on your calorie needs.
Ingredients
  1. 1/2 cup water plus 1/4 cup barely warm water
  2. 1 tablespoon butter
  3. 3/4 cup whole wheat flour
  4. 3/4 cup all purpose flour
  5. 3/4 teaspoon salt
  6. 2 tablespoon sugar
  7. 2 teaspoon yeast
  8. 1 tablespoon sesame seeds
  9. 1 teaspoon melted butter to brush the buns
  10. 2 tablespoon all purpose flour for kneading- Bench flour
Method
Prove the yeast
  1. Mix in the yeast, warm water and a pinch of sugar and set aside for 5 minutes to foam
Flour mixture
  1. Mix salt, whole wheat flour and all purpose flour with a whisk to combine
Kneading and baking
  1. In a big bowl combine the yeast mixture, water, sugar, butter and the flour mixture briefly and set aside for 15 minutes to hydrate the dough.
  2. Now knead the dough for a good 5 minutes by hand until the dough comes together and forms a rough ball. It will still be very very tacky.
  3. Place the dough in a clean bowl ,cover it and let it rise in a warm place for one hour until doubled.
  4. After risen, deflate the dough gently and divide it into 6 equal parts.
  5. Shape it into 6 smooth balls using the cup of your hands.
  6. Place it in an oiled sheet pan, gently press the tops, brush the tops with butter and sprinkle the seeds generously.
  7. Now let them rise again for about an hour. In the mean time preheat the oven to 400°F/200°C. Bake the buns for about 15-18 minutes, turning the pans once to help in even baking. Once out of the oven cool the buns on a rack.
beta
calories
175
fat
4g
protein
4g
carbs
31g
more
kannamma cooks http://kannammacooks.com/

Pudina chutney / Mint chutney (South Indian Style)

$
0
0


pudina chutney

I always have mint leaves in the refrigerator as this chutney is so quick to make and so finger licking yummilicious good. Also mint is anti-inflammatory, anti-bacterial and even Fizza-Ma-Wizza-Ma-Dill might love it.

So lets go and get some green on the plate. Shall we ?
Here are the things you will need.

Pudina board

The trick to all south Indian chutneys that involve spices and lentils is to cook it low and slow. Roasting it in a low flame brings out all the flavors and aids in even cooking.

browned lentil

Lentils can go from brown and golden to burnt very fast. so eyes on the pan people.

Here is the recipe!


Pudina Chutney / Mint Chutney South Indian Style
Serves 3
South indian style pudina chutney that's so rocking good with Idly and Dosa.
Write a review
Print
Prep Time
10 min
Cook Time
10 min
Prep Time
10 min
Cook Time
10 min
134 calories
18 g
0 g
7 g
3 g
2 g
216 g
445 g
9 g
0 g
4 g
Nutrition Facts
Serving Size
216g
Servings
3
Amount Per Serving
Calories 134
Calories from Fat 59
% Daily Value *
Total Fat 7g
10%
Saturated Fat 2g
12%
Trans Fat 0g
Polyunsaturated Fat 2g
Monounsaturated Fat 2g
Cholesterol 0mg
0%
Sodium 445mg
19%
Total Carbohydrates 18g
6%
Dietary Fiber 6g
23%
Sugars 9g
Protein 3g
Vitamin A
61%
Vitamin C
157%
Calcium
14%
Iron
45%
* Percent Daily Values are based on a 2,000 calorie diet. Your Daily Values may be higher or lower depending on your calorie needs.
Ingredients
  1. 1 tbs peanut oil
  2. 1/2 tsp mustard
  3. 10 curry leaves
  4. 2 tbs urad dal
  5. 2 tbs toor dal
  6. 3-5 red chillies
  7. 2 cups washed mint leaves
  8. 3 tbs grated coconut
  9. 1 rupee coin size tamarind
  10. 1 tbs jaggery
  11. 1/2 tsp salt
  12. Water to grind
Instructions
  1. Heat oil in a saute pan on low flame. Add the mustard seeds and curry leaves and let the mustard splutter.
  2. Then add the toor dal,the urad dal and red chillies and keep sauteing until they turn golden.
  3. Now add the mint leaves and the salt. Adding salt with the mint leaves will help the leaves wilt faster and retain the colour.
  4. Take the pan off heat after 3-4 minutes. By this time the mint would have wilted and let out its juices.
  5. Now add the tamarind, grated coconut and jaggery to the pan.
  6. Once the mixture cools down, grind to a smooth paste.
  7. Serve with idly or dosa.
Notes
  1. Jaggery along with tamarind gives a nice balance to the chutney. It wont make the chutney sweet. So do not skip the jaggery. If you want a more spicy chutney, go ahead and add on more chillies.
beta
calories
134
fat
7g
protein
3g
carbs
18g
more
kannamma cooks http://kannammacooks.com/


How to season your iron dosa pan

$
0
0

cast iron dosa pan |kannammacooks.com #castiron #seasoning #dosa #nonstick #

My ultimate comfort food has to be dosa. To me, nothing like a dosa from an iron pan. But many times iron pans just doesn’t work. Every household will have that worn out rusty dosa pans that they don’t use anymore. Its time to dust them as we are going to learn how to season them. Properly seasoned iron pan lasts a lifetime. Its durable. The older the pan gets with usage, better the pan gets. The surface of the pan becomes as good as no stick Teflon pans sans the toxins.
Now lets get into business. Shall we?

COLD WATER SOAK
Old rusty dosa pan |kannammacooks.com First step in seasoning a pan is a good cold water soak. All dosa pans need this as there can be a lot of accumulated dried gunk. When you look closely at a used dosa pan, you can notice a lot of scales around the rim. We will be talking in detail about this. So hang in there. The goal of soaking is to try and soften the gunk. Crew, batten down the hatches as we are going to start seasoning Mr.Rusty.

Cast iron pan seasoning soak.
Fill a wide bucket with cold water. Soak the iron pan in it. Make sure that its fully immersed. Leave it there for a good two hours. See, I told you it was easy. Easy peasy chuck-e-cheesy lemon squeezy… Some of the gunk would have softened by this time. You know now is the perfect time for? oh yes…Scrubbing…Soaking makes removing the dried up gunk easier. lets move on! Shall we?

SCRUBBING
dosa pan seasoning -scrub |kannammacooks.com You will need a metal dish scrubber, dish soap and the soaked pan. Start scrubbing….Try to get rid of as much gunk as possible. Some of the scales might not go. Its ok. Its not going to do any harm. Wash and dry thoroughly. Give it two hours to dry. That is it. Stage two over. You did it again. You are my hero.
Lets move on again! Shall we?

HOT OIL SOAK
This stage is where the magic happens. Lets talk about oil. When oil is heated to high temperatures on a metal surface, it polymerizes. What? what did you say? Oh common y’all, when you heat oil on a metal surface for a long time, it breaks down. It becomes like goo. This is polymeriwhatever. So the point is more the goo, better the surface becomes. Most of the times the rim of the dosa pan will be scaly. It is because the rim never comes in contact with food (dosa batter in this case) and over the long run, the oil on the rim polymerizes, then dries into large flakes. Good to know.
Now, back in business. Apply oil generously to your pan and heat it on medium for a good ten minutes. It will smoke. So crank up that chimney. After 10 minutes switch off and rest the pan for one hour. Clean the oil which has now become goo with a paper napkin. Lets repeat again! Apply oil generously to your pan and heat it on medium for a good ten minutes. After 10 minutes, switch off and rest the pan for one hour. Clean the oil which has now become goo with a paper napkin. Lets repeat for one last time! Apply oil generously to your pan and heat it on medium for a good ten minutes. After 10 minutes switch off and rest the pan for one hour. Clean the oil which has now become goo with a paper napkin. Wash the pan with warm water. Your pan is seasoned and ready to rock.

Here are the rules after seasoning:
Use only a sharp steel spatula to turn your dosa. No you wont harm the seasoned pan. Wooden spatulas do not work. I have my trusty fish turner which is my default dosa spatula. You need not wash your pan with soap after use everyday. Just a rinse with water and you are good to go. Go have fun! Thanks a ton. Amen

Dosa pan after seasoning |kannammacooks.com
THE BEST GRIDDLE FOR DOSA

When it comes to cast iron skillets, it has to be Lodge.I love love LODGE cast iron pans for many reasons. Lodge has been there for “100 years and still cooking . . .”. Its extremely durable and gets better with age. Lodge cast iron is easy to season and stays seasoned for a long long time if used regularly. The quality of dosas from an iron pan cannot be beat. I have the Lodge L9OG3 Pre-Seasoned Cast-Iron Round Griddle, 10.5-inch and couldn’t be more happier. I have had it for more than 5+ years now and its still running strong thousands of dosas later.
HERE IS WHERE YOU CAN BUY THIS PAN
Winner winner dosa dinner!

favorite lodge cast iron dosa pan |kannammacooks.com

The perfectly boiled egg

$
0
0

immerse eggs in hot water |kannammacooks.com #boil #eggs

The perfect egg has a tender white, fully set yolk, easily peel-able shell and most importantly no green tinged yolk. We all have had eggs that have a yolk tinged with greenness like the one on the picture below. cooking the eggs the proper way prevents the dark green sulfur lining from forming around the yolk. The unappetizing chemical reaction that causes the green tinge around the yolk is because of too much heat.
julia child perfect eggs |kannammacooks.com #juliachild #eggs #boiledPicture from Julia Child’s Way to cook.
Lets boil some eggs now! The perfect boiled egg |kannammacooks.com #Eggs #boiledeggsTo me the perfect egg is a 10 minute egg. Here’s how. Boil water in a pan until simmer. How much water? So how much water do we need to add to the pan. To put it simply, the water should cover the eggs by 1 inch, So use a tall pan. If you want exact measurements, 5 eggs would need about a liter of water. Immerse the eggs gently in the pan. Eggs put in hot water in the beginning are easy to peel later. So always let the water boil before adding the eggs.The water should boil gently. NEVER a roaring boil. Eggs cooked in fiercely boiling water results in rubbery egg whites. Too much heat toughens the albumen and makes the inside yolk green and rubbery. Boil for 10 minutes. Yes. Exact 10 minutes.take out the eggs and put it in cold water for 5 minutes. This will allow the eggs to cool and the the stinky sulfur inside the eggs to dissipate in the water. Resting the eggs in cold water can also prevent the dark green line from forming and they become easier to peel and handle too.

Peeling:
Crack an egg all over gently. Then peel. It should peel off easily. If it doesn’t peel easily, peeling under a thin stream of cold water in the sink usually helps.
Easy to peel eggs |kannammacooks.com #peel #eggs #easy #nomess

Eggs are so versatile. Boiled,steamed,stuffed,poached,scrambled ….Go have fun!

Eggless Banana Muffins with Cinnamon Streusel topping

$
0
0

Bakery style eggless banana nut muffins

We are a muffin family. A banana muffin family. They make an awesome breakfast, a neat brunch, an after school snack – its just oh so perfect that I make it all the time. I have made hundreds of THIS banana muffins and they are the best. I mean you are just looking at the worlds best banana muffin recipe. Period. Its melt in your mouth fluffy and moist and the crumb is to die for. Don’t ya foggget -this is without eggs Banana muffin. The buttery cinnamon warmth that spreads into your house while baking – Bring em baby.

Do you feel bad when you see those brown spotty over ripe bananas that are lying in your dining table like forever??? and you are ready to trash it…Wait…you have found the best bananas for the muffins. Overly ripe bananas make the best banana muffins ever. I also have a neat idea for storing bananas. Whenever my bananas go over ripe ( which is like almost all the time ), I stash them in my freezer for later banana muffin use. cool! So that way I always have ripe bananas for the muffins. Just thaw them and you are good to GO!

Bakery style eggless banana crumb muffins

This is one of the easiest banana muffin recipe. It uses the standard method of mixing the wet ingredients with the dry ingredients. The crumb adds a nice crunch to the muffins which makes them to die for. I promise you wont settle down for one.

Did you know that most of the cinnamon we eat is not cinnamon but cassia????? True cinnamon is very expensive and comes from Srilanka. Most of the cinnamon we use in India and the USA is Cassia.

So no more stories. Lets get to bake some oh so good easy egg less banana crumb nut muffins.

Eggless Banana Muffins with Cinnamon Streusel topping
Serves 18
Easy and delicious eggless banana muffins with a crumb streusel topping.
Write a review
Print
Prep Time
1 hr
Cook Time
30 min
Total Time
1 hr 30 min
Prep Time
1 hr
Cook Time
30 min
Total Time
1 hr 30 min
214 calories
31 g
24 g
9 g
2 g
6 g
60 g
74 g
16 g
0 g
2 g
Nutrition Facts
Serving Size
60g
Servings
18
Amount Per Serving
Calories 214
Calories from Fat 82
% Daily Value *
Total Fat 9g
14%
Saturated Fat 6g
29%
Trans Fat 0g
Polyunsaturated Fat 0g
Monounsaturated Fat 2g
Cholesterol 24mg
8%
Sodium 74mg
3%
Total Carbohydrates 31g
10%
Dietary Fiber 1g
3%
Sugars 16g
Protein 2g
Vitamin A
6%
Vitamin C
1%
Calcium
3%
Iron
2%
* Percent Daily Values are based on a 2,000 calorie diet. Your Daily Values may be higher or lower depending on your calorie needs.
For the crumb topping
  1. 1 cup all-purpose flour
  2. 1/4 teaspoon baking powder
  3. 1/2 teaspoon ground cinnamon
  4. 6 tablespoon unsalted butter
  5. 1/3 cup light brown sugar
For the muffins
  1. 1.5 cups all-purpose flour
  2. 1 cup sugar
  3. 1 teaspoon baking powder
  4. 1/2 teaspoon baking soda
  5. 1/4 teaspoon salt
  6. 1/2 cup unsalted butter, melted and cooled
  7. 1/2 cup whole milk
  8. 1 teaspoon pure vanilla extract
  9. 1 cup mashed ripe bananas
  10. 1/4 cup small-diced cashew-nut
Prepare the crumb topping
  1. combine the flour, baking powder and cinnamon in a medium mixing bowl and stir well to mix.
  2. Melt the butter in a small pan.Remove from heat and add the brown sugar to the pan of melted butter and stir well.
  3. Add the butter mixture to the flour mixture.
  4. Set aside in the refrigerator for at least 30 minutes while preparing the muffin batter.
The muffins
  1. Preheat the oven to 350 degrees F/180 degrees C.
  2. Line 12 muffin cups with paper liners.
  3. The dry ingredients - Sift the flour, baking powder, baking soda and salt into the bowl. Add the diced cashew-nuts and stir well.
  4. The wet ingredients - Combine the sugar,milk, vanilla, and mashed bananas. Add the melted butter and blend.
  5. Add the wet ingredients to the dry ingredients. Scrape the bowl and blend well. Don’t over-mix.
  6. Spoon the batter into the paper liners, filling each one to the top.
  7. Top each muffin with the crumb topping. Approximately 2 tablespoon each for a muffin.
  8. Bake for 25 to 30 minutes, or until the tops are brown and a toothpick comes out clean.
  9. Cool slightly, remove from the pan, and serve.
Notes
  1. The muffin batter and the crumb topping can be made the night before and stored in the refrigerator and baked fresh in the morning.
Adapted from The Barefoot Contessa Cookbook by Ina Garten. The Modern Baker by Nick Malgieri.
beta
calories
214
fat
9g
protein
2g
carbs
31g
more
Adapted from The Barefoot Contessa Cookbook by Ina Garten. The Modern Baker by Nick Malgieri.
kannamma cooks http://kannammacooks.com/

Pachai payaru Masiyal / Moong dal – Green gram curry

$
0
0

Pachai-payaru-moong-dal-curry-recipe

Lentils and rice make perfect lunches. There is nothing more comforting than a good lentil curry with rice. This is such an easy recipe for the busy mornings where I need to pack lunches for the family. Lentils and rice make a simple everyday Indian meal. The creamy texture of the dal makes it so rich yet so healthy. We call it as pachai payaru masiyal in tamil. Serve it hot with rice and drizzle a teaspoon of ghee over. Yum… Somethings in life are so simple and yet so immensely satisfying. Moong dal curry sure belongs there. I call it my everyday lentil.

pachai-payaru-masiyal-moong-dal-curry-mung-bean-curry
moong-dal-pachai-payaru-mung-bean

Pachai payaru Masiyal / Moong dal curry / Green gram curry
Serves 3
Easy and healthy moong dal curry recipe. We call it as pachai payaru masiyal in tamil.
Write a review
Print
Prep Time
10 min
Cook Time
30 min
Total Time
40 min
Prep Time
10 min
Cook Time
30 min
Total Time
40 min
101 calories
15 g
0 g
3 g
4 g
0 g
327 g
476 g
4 g
0 g
2 g
Nutrition Facts
Serving Size
327g
Servings
3
Amount Per Serving
Calories 101
Calories from Fat 30
% Daily Value *
Total Fat 3g
5%
Saturated Fat 0g
2%
Trans Fat 0g
Polyunsaturated Fat 1g
Monounsaturated Fat 1g
Cholesterol 0mg
0%
Sodium 476mg
20%
Total Carbohydrates 15g
5%
Dietary Fiber 4g
16%
Sugars 4g
Protein 4g
Vitamin A
7%
Vitamin C
125%
Calcium
4%
Iron
9%
* Percent Daily Values are based on a 2,000 calorie diet. Your Daily Values may be higher or lower depending on your calorie needs.
Ingredients
  1. 2 teaspoon Sesame/Gingely oil
  2. 1/2 teaspoon Cumin seeds
  3. 6-7 curry leaves
  4. 1/2 cup shallots or 1 red onion chopped
  5. 2 green chillies (I use the thai chillies or the serrano variety)
  6. 1/2 cup whole moong dal (mung bean)
  7. 1/2 teaspoon salt
  8. 3 cups water
Instructions
  1. Pressure cook the moong dal with the water for a good 10 minutes or 5-6 whistles. If not using pressure cooker, soak the dal for an hour and boil it in water until soft.
  2. Heat oil in a saute pan, add the cumin and curry leaves. Let it splutter.
  3. When the cumin splutters, add the shallots or onions, green chillies and salt.
  4. Saute for a good 5 minutes in low flame until the onions are translucent and starting to brown.
  5. Remove from heat and mix in the cooked dal and grind it in a mixie/food processor until smooth.
  6. Serve hot with rice and ghee
Notes
  1. You can add or omit the green chillies according to your spice levels.
beta
calories
101
fat
3g
protein
4g
carbs
15g
more
kannamma cooks http://kannammacooks.com/

Indian Tea shop Butter Biscuits |டீ கடை பட்டர் பிஸ்கட்

$
0
0

Bakery-butter-biscuits |kannammacooks.com #bakery#cookies#teashop#biscuits#recipe

I can say a few things about most of the south Indian men and women. They love bakery butter biscuits. Some might not eat a cake but will never say no to a cookie. Trust me on this. Especially if its butter biscuits. These cookies are the real deal. These are the cookies that we love to eat all the time. These cookies are the true spirit of the French Normandy Sable cookies. They are so good and elegant with crispy exterior, tender interior and a bite full of buttery goodness. One bite and its so nostalgic. During college days in Chennai, I have had these cookies with my friends almost everyday. We used to gather around the tea shop during break hours, have a tea and share the cookies and chat for hours. Tea shops were the places where best of the ideas were born.

Lets crank up the mixer and make some greatest butter cookies. Shall we?
Sift half a cup (65 grams) of confectioners sugar over half a cup (110 grams) of butter.

Creaming-butter-and-sugar |kannammacooks.com #bakery#cookies#teashop#biscuits#recipe

Cream the butter and sugar mixture until light and fluffy. Oh yes. Good things take time. I promise your patience shall be rewarded. Scrape the bowl once to make sure the butter and sugar is properly combined. Scraping is good.

scrape-the-bowl-inbetween |kannammacooks.com #bakery#cookies#teashop#biscuits#recipe

Add 1 cup (130 grams) of flour, 1/8 teaspoon of salt and 1/2 teaspoon pure vanilla extract at once and mix for 15 seconds on low.

Add-Flour-to-butter-and-sugar |kannammacooks.com #bakery#cookies#teashop#biscuits#recipe

Scrape the bowl again! Mix for a minute and we are done!

creaming the dough |kannammacooks.com #bakery#cookies#teashop#biscuits#recipe

Transfer the dough to a plastic cling wrapped surface and make a log. cover it with cling wrap.
preparing-dough-collage |kannammacooks.com #bakery#cookies#teashop#biscuits#recipe

Refrigerate the dough for an hour. Even over-nite is fine.

refrigerate-the-dough |kannammacooks.com #bakery#cookies#teashop#biscuits#recipe

Cut the dough into half inch thick cookies.

cut-the-refrigerated-dough |kannammacooks.com #bakery#cookies#teashop#biscuits#recipe

Bake in a preheated 350F/180C oven for 22-25 minutes, rotating the pans halfway through. When they start to brown, they are done. Have an eye as they can go from brown to burnt very fast!

Transfer-to-wire-rack-to-cool |kannammacooks.com #bakery#cookies#teashop#biscuits#recipe

Transfer to a cooling rack for 15-20 minutes.

wire-rack-cooling-cutout-cookies |kannammacooks.com #bakery#cookies#teashop#biscuits#recipe

And Voila! The best cookies of my lifetime!

bakery-biscuits-yummy-bite |kannammacooks.com #bakery#cookies#teashop#biscuits#recipe

Long live the tea shops. Amen.

Bakery-biscuits-stacked |kannammacooks.com #bakery#cookies#teashop#biscuits#recipe

Indian tea shop butter biscuits/cookies
Yields 40
Write a review
Print
Prep Time
1 hr 30 min
Cook Time
30 min
Total Time
2 hr
Prep Time
1 hr 30 min
Cook Time
30 min
Total Time
2 hr
38 calories
4 g
6 g
2 g
0 g
1 g
8 g
8 g
2 g
0 g
1 g
Nutrition Facts
Serving Size
8g
Yields
40
Amount Per Serving
Calories 38
Calories from Fat 20
% Daily Value *
Total Fat 2g
3%
Saturated Fat 1g
7%
Trans Fat 0g
Polyunsaturated Fat 0g
Monounsaturated Fat 1g
Cholesterol 6mg
2%
Sodium 8mg
0%
Total Carbohydrates 4g
1%
Dietary Fiber 0g
0%
Sugars 2g
Protein 0g
Vitamin A
1%
Vitamin C
0%
Calcium
0%
Iron
0%
* Percent Daily Values are based on a 2,000 calorie diet. Your Daily Values may be higher or lower depending on your calorie needs.
Ingredients
  1. 1/2 Cup (110 grams) Butter at room temperature
  2. 1/2 Cup (65 grams) Confectioners Sugar
  3. 1 Cup (130 grams) All purpose flour
  4. 1/8 teaspoon Salt
  5. 1/2 teaspoonPure Vanilla Extract
Instructions
  1. Sift sugar over butter and cream until light and fluffy.
  2. Add the flour, salt and vanilla at once and mix until combined.
  3. Transfer the dough to a cling wrapped surface and make a log. cover it with cling wrap.
  4. Refrigerate the dough for an hour.
  5. In the mean time Preheat the oven to 350F/180C
  6. Cut the dough into half inch thick cookies.
  7. Bake in a preheated 350F/180C oven for 22-25 minutes, rotating the pans halfway through. When they start to brown, they are done. Have an eye as they can go from brown to burnt very fast!
  8. Transfer to a cooling rack for 15-20 minutes.
Notes
  1. Store in an airtight container for up to a week.
beta
calories
38
fat
2g
protein
0g
carbs
4g
more
kannamma cooks http://kannammacooks.com/

Healthy Low-Fat Fudge Brownies

$
0
0

Easy-from-scratch-Healthy-low-fat-fudge-brownie-Recipe |kannammacooks.com #Healthy#baking#fudge#brownie#chocolate#yummy

Its Brownie time. The legendary American Brownie made lighter. I have a rule that I follow when I bake. If I have to label something as healthy, Vegan or gluten-free, then it needs to be as delicious as the regular one. This low-fat brownie is very moist, fudgy and chocolaty. It combines both chocolate and cocoa powder for a deep chocolate flavor. The traditional brownie can pack in nearly 200 calories whereas this one has just about 100.

Easy-from-scratch-Healthy-low-fat-fudge-brownie-Recipe |kannammacooks.com #Healthy#baking#fudge#brownie#chocolate#yummy

Healthy Low Fat Fudge Brownie
Serves 16
Easy to make healthy low-fat fudge brownies
Write a review
Print
Prep Time
20 min
Cook Time
25 min
Total Time
45 min
Prep Time
20 min
Cook Time
25 min
Total Time
45 min
122 calories
20 g
20 g
4 g
2 g
3 g
34 g
47 g
14 g
0 g
1 g
Nutrition Facts
Serving Size
34g
Servings
16
Amount Per Serving
Calories 122
Calories from Fat 39
% Daily Value *
Total Fat 4g
7%
Saturated Fat 3g
13%
Trans Fat 0g
Polyunsaturated Fat 0g
Monounsaturated Fat 1g
Cholesterol 20mg
7%
Sodium 47mg
2%
Total Carbohydrates 20g
7%
Dietary Fiber 1g
4%
Sugars 14g
Protein 2g
Vitamin A
2%
Vitamin C
0%
Calcium
2%
Iron
3%
* Percent Daily Values are based on a 2,000 calorie diet. Your Daily Values may be higher or lower depending on your calorie needs.
Ingredients
  1. 3/4 cup All-purpose flour
  2. 1/3 cup cocoa powder
  3. 1/2 teaspoon baking powder
  4. 1/4 teaspoon salt
  5. 50 grams dark chocolate, chopped
  6. 2 tablespoon unsalted butter
  7. 1 cup sugar
  8. 1/4 cup low-fat cream
  9. 1 teaspoon vanilla
  10. 1 egg
  11. 1 egg white
Instructions
  1. Preheat the oven to 350F/180C. Line and butter an eight inch square baking pan with parchment paper. Let the paper be overflowing the edges of the pan so removing the brownies later will be easier.
  2. Sift the flour,cocoa, baking powder and salt over a medium bowl.
  3. Melt butter and chocolate in a bowl set over a pan of barely simmering water.
  4. Add sugar,cream,vanilla, egg and egg white to the chocolate-butter mixture. Whisk until combined.
  5. Fold the dry ingredients into the chocolate mixture until combined.
  6. Transfer the mixture to the prepared baking pan. Using a spatula spread and smooth the mixture in the pan.
  7. Bake until a toothpick inserted in the center of the pan comes out with a few moist crumbs attached. Roughly about 20-25 minutes.
  8. Cool the brownies on a wire rack for about an hour. Then cool in the refrigerator for 30 minutes. Cooling in the refrigerator helps in cutting the brownies.
  9. Cut the brownies into 2 inch pieces and serve
Notes
  1. I used Hersheys natural cocoa powder and Amul low-fat cream.
  2. Store in the refrigerator for upto 3 days.
Adapted from Americas Test Kitchen
beta
calories
122
fat
4g
protein
2g
carbs
20g
more
Adapted from Americas Test Kitchen
kannamma cooks http://kannammacooks.com/


Healthy Vegan Fenugreek stir-fry | Vendhaya keerai poriyal

$
0
0

south-indian-style-fenugreek-methi-stir-fry-vendhaya-keerai-poriyal

Vendhaya keerai poriyal with rice makes a perfect lunch. This recipe is very basic and quite straight forward and screams SOUTH. My mom cooks this every week as its a good source of iron. The only thing about fenugreek is that it can consume a good half hour to be cleaned. But good things take time. Dont they! What are we waiting for? Lets pump some iron. Shall we.

south-indian-style-fenugreek-methi-stir-fry-vendhaya-keerai-poriyal |kannammacooks.com #iron #healthy # easy #vendhayam #keerai #methi #fenugreek #stirfry #greens

Vendhaya keerai / fenugreek stir-fry
Serves 3
Easy and Healthy Vendhaya keerai poriyal.
Write a review
Print
Prep Time
40 min
Cook Time
20 min
Total Time
1 hr
Prep Time
40 min
Cook Time
20 min
Total Time
1 hr
261 calories
45 g
0 g
7 g
11 g
3 g
162 g
450 g
11 g
0 g
2 g
Nutrition Facts
Serving Size
162g
Servings
3
Amount Per Serving
Calories 261
Calories from Fat 64
% Daily Value *
Total Fat 7g
11%
Saturated Fat 3g
14%
Trans Fat 0g
Polyunsaturated Fat 1g
Monounsaturated Fat 1g
Cholesterol 0mg
0%
Sodium 450mg
19%
Total Carbohydrates 45g
15%
Dietary Fiber 13g
51%
Sugars 11g
Protein 11g
Vitamin A
2%
Vitamin C
21%
Calcium
12%
Iron
71%
* Percent Daily Values are based on a 2,000 calorie diet. Your Daily Values may be higher or lower depending on your calorie needs.
Ingredients
  1. 2 teaspoon sesame oil
  2. 1/2 teaspoon mustard seeds
  3. 1 teaspoon whole urad dhal
  4. 1 sprig curry leaves
  5. 2 dried red chillies
  6. 10 cloves Garlic diced
  7. 2 cups shallots or 2 red onions , chopped fine
  8. 1/2 teaspoon salt
  9. 100 grams cleaned fenugreek leaves
  10. 4 tablespoon shredded coconut
Instructions
  1. Clean and wash the fenugreek in water to remove dirt and sand.
  2. Heat oil in a saute pan and add mustard seeds and urad dhal. Let it pop.
  3. Once the mustard pops, add the curry leaves and red chillies and saute briefly for a few seconds.
  4. Add in the chopped garlic, salt, shallots/red onions and fry in a low flame for a good ten minutes until they are slightly brown.
  5. Add in the fenugreek leaves and fry till they are wilted and completely dry.
  6. Add the coconut and briefly saute for a minute and remove from heat.
  7. Serve hot with rice.
beta
calories
261
fat
7g
protein
11g
carbs
45g
more
kannamma cooks http://kannammacooks.com/

Bombay Bataka | Vegan Tamarind, tomato and potato curry

$
0
0

Bombay-Bataka-potato-Hotel-prashad-recipe-kaushy-patel |kannammacooks.com #potato #curry#Prashad #kaushy-patel #Bradford#Restaurant-recipe#curry

There are some staples in every Indian kitchen and Potatoes got to be there along with the Onion boy and the Tomato girl. I haven’t come across a potato dish that I did not like.  Its been raining everyday here in Bangalore and this dish made a perfect Sunday lunch. Ever since I saw Prashad restaurant in Gordon Ramsays show, I was thrilled about an all vegetarian restaurant doing so well in the UK. I got this recipe from their Prashad cookbook.  Its a wonderful book with really fantastic recipes. The author Kaushy Patel writes about the recipe which reads like this. “This dish featured on Prashad’s very first menu and is our take on traditional Bombay potatoes. One of my regular customers at the restaurant ordered a portion of this every week for over a year, declaring it to be the best curry she had ever had!”  It indeed was the best potato curry.

Bombay Bataka – Tamarind, tomato and potato curry
Serves 4
Write a review
Print
Prep Time
15 min
Cook Time
30 min
Total Time
45 min
Prep Time
15 min
Cook Time
30 min
Total Time
45 min
253 calories
38 g
0 g
10 g
5 g
1 g
319 g
770 g
12 g
0 g
8 g
Nutrition Facts
Serving Size
319g
Servings
4
Amount Per Serving
Calories 253
Calories from Fat 90
% Daily Value *
Total Fat 10g
16%
Saturated Fat 1g
5%
Trans Fat 0g
Polyunsaturated Fat 6g
Monounsaturated Fat 2g
Cholesterol 0mg
0%
Sodium 770mg
32%
Total Carbohydrates 38g
13%
Dietary Fiber 5g
18%
Sugars 12g
Protein 5g
Vitamin A
46%
Vitamin C
57%
Calcium
6%
Iron
16%
* Percent Daily Values are based on a 2,000 calorie diet. Your Daily Values may be higher or lower depending on your calorie needs.
Ingredients
  1. 4 medium red-skinned or 1/2kg baby potatoes
  2. 25g dried tamarind (from a block)
  3. 3cm root ginger, peeled and roughly chopped
  4. 40ml sunflower oil
  5. 2–4 dried red chillies
  6. 1 teaspoon cumin seeds
  7. 1 teaspoon brown mustard seeds
  8. ¼ teaspoon asafetida
  9. 5 tomatoes, finely chopped or blended
  10. 25g jaggery, cut into thin flakes (or demerara/soft brown sugar)
  11. 1 teaspoon medium red chilli powder
  12. 1 tablespoon ground coriander
  13. 1½ teaspoons turmeric
  14. 1¼ teaspoons salt
  15. 2 handfuls of fresh coriander, finely chopped
  16. ¾ teaspoon garam masala
Instructions
  1. Boil the potatoes in their skins for 40 minutes or so, until a knife tip will slide in easily, then peel and cut into 2cm cubes.
  2. Soak the dried tamarind in 200ml of boiling water for 10 minutes, then pulp with your fingers and sieve into a small bowl.
  3. Crush the ginger using a pestle and mortar (or a blender), to make a fine pulp.
  4. Heat the oil in a large pan for a minute over a medium heat and add the dried red chillies, cumin seeds and mustard seeds.
  5. When the mustard seeds start to pop, reduce the heat to low and stir in the asafetida, tomatoes and jaggery.
  6. Increase the heat to high and stir in the tamarind water, crushed ginger, chilli powder, ground coriander, turmeric, salt, half the fresh coriander. Cover and cook for 10 minutes to bring the spices together and intensify the flavours. Make sure there is very less moisture left in the sauce.
  7. Add the garam masala and stir well.
  8. Stir in the potatoes gently to avoid breaking them up, then remove the pan from the heat,sprinkle with the remaining chopped coriander.
  9. Serve hot with roti or rice.
Adapted from Prashad Cookbook by Kaushy Patel
beta
calories
253
fat
10g
protein
5g
carbs
38g
more
Adapted from Prashad Cookbook by Kaushy Patel
kannamma cooks http://kannammacooks.com/

Vegan Penne Rigate Mushroom Bolognese

$
0
0

 Healthy_Vegan_Rigatoni_Mushroom_Bolognese |kannammacooks.com #healthy #recipe #ragu #bolognese #mushroom #rich #soffrito #pasta #rigatoni #lite #dinner #mushroom-bolognese #easy-to-make

Its getting cold and rainy here in Bangalore. Pasta dinners are the perfect answer for rainy days. We love pasta dinners at home.  This is the vegan makeover that is as rich and warm as the meaty classic bolognese.  I wanted to make our pasta dinners healthy and I ended up with this  no meat, no cheese, no cream version so one can go for guilt free seconds.  This recipe is all about bringing in the various textures and aromatics. Meaty mushrooms add a rich and hearty taste to this dish.  So lets go and do a “I cant believe its not meat” Ragu Bolognese.

Like Julia Child says always take a bigger pan than you think is necessary. It works like a charm every single time. You will be happy you did. Heat the pan and add in the olive oil and garlic. I run the garlic through the garlic press. Add in the finely chopped onions and salt and fry till translucent and starting to brown. I almost always add the salt with the onions.

Healthy_Vegan_Rigatoni_Mushroom_Bolognese |kannammacooks.com #healthy #recipe #ragu #bolognese #mushroom #rich #soffrito #pasta #rigatoni #lite #dinner #mushroom-bolognese #easy-to-make

Once the onions are done add in the meaty finely chopped mushrooms and the carrots.You can also place mushrooms and carrots in the bowl of a food processor and process until finely chopped. Let it cook for a good 10-15 minutes in medium flame until all the juices have evaporated and the mushrooms are starting to caramelize. The mushrooms should reduce down to about a quarter of its starting volume. Add in half a teaspoon each of sugar, soy sauce , pepper, chilli flakes and apple cider vinegar. Soy sauce adds that certain Je ne sais quoi. Add in the pureed skinned, De-seeded tomatoes. I just run the tomatoes in the food processor and strain. That’s my easy route to skinned De-seeded tomatoes. I just strain the tomatoes right over the pan.

Healthy_Vegan_Rigatoni_Mushroom_Bolognese |kannammacooks.com #healthy #recipe #ragu #bolognese #mushroom #rich #soffrito #pasta #rigatoni #lite #dinner #mushroom-bolognese #easy-to-make

Reduce the flame to low and let it simmer for a good 20 minutes. Add in the cooked Penne Rigate or any other pasta of your choice and let it finish cooking in the sauce for another couple of minutes. Remove from heat. Add in the fresh basil and serve hot. Truly delicious, healthy and awesome Meatless Mondays.

Healthy_Vegan_Rigatoni_Mushroom_Bolognese |kannammacooks.com #healthy #recipe #ragu #bolognese #mushroom #rich #soffrito #pasta #rigatoni #lite #dinner #mushroom-bolognese #easy-to-make

Vegan Penne Rigate Mushroom Bolognese
Serves 4
Write a review
Print
Prep Time
20 min
Cook Time
1 hr
Total Time
1 hr 20 min
Prep Time
20 min
Cook Time
1 hr
Total Time
1 hr 20 min
389 calories
61 g
0 g
12 g
12 g
2 g
302 g
667 g
9 g
0 g
10 g
Nutrition Facts
Serving Size
302g
Servings
4
Amount Per Serving
Calories 389
Calories from Fat 102
% Daily Value *
Total Fat 12g
18%
Saturated Fat 2g
8%
Trans Fat 0g
Polyunsaturated Fat 2g
Monounsaturated Fat 8g
Cholesterol 0mg
0%
Sodium 667mg
28%
Total Carbohydrates 61g
20%
Dietary Fiber 5g
22%
Sugars 9g
Protein 12g
Vitamin A
121%
Vitamin C
33%
Calcium
6%
Iron
10%
* Percent Daily Values are based on a 2,000 calorie diet. Your Daily Values may be higher or lower depending on your calorie needs.
Ingredients
  1. 3 Tablespoon Extra virgin Olive Oil
  2. 5 cloves garlic, minced
  3. 1 large red onion, very finely chopped
  4. 1 teaspoon Coarse salt
  5. 2 medium carrots, very finely chopped
  6. 250 grams cremini/button mushroom caps, finely minced
  7. 1/2 teaspoon freshly ground coarse black pepper
  8. 1/2 teaspoon Sugar
  9. 1/2 teaspoon Soy Sauce
  10. 1/2 teaspoon Red chilli flakes (Optional)
  11. 1/2 teaspoon Apple cider vinegar
  12. 2 cups pureed tomatoes
  13. 250 grams pasta
  14. 1/4 cup julienne fresh Basil
Instructions
  1. Add oil to a wide skillet set over medium heat until shimmering. Add in the minced garlic, very finely chopped onions and the salt. Saute till well done and starting to brown.
  2. Add the very finely chopped mushrooms and the carrots. Add in the sugar, soy sauce, apple cider vinegar, pepper and red chilli flakes if using. Cook until the moisture in the mushroom completely evaporates and the mushrooms are browned, about 15 minutes.
  3. Add in the pureed tomatoes and reduce the flame to low. Check for seasoning. Let it simmer for 20 minutes.
  4. Meanwhile, bring a large pot of water to a boil. Add pasta and cook until al dente. Drain and add to the pot with ragu and let it cook in the sauce for a couple of minutes.
  5. Remove from heat. Add the fresh basil and serve hot.
beta
calories
389
fat
12g
protein
12g
carbs
61g
more
kannamma cooks http://kannammacooks.com/

South Indian Mixed Vegetable Kurma – My Dads Recipe

$
0
0

Mixed_vegetable_kurma_south_indian_style_for_chapati_poori |kannammacooks.com #chapati #kurma #korma #curry #side_dish #south_indian #gravy #Veg_kuruma

Appa_cooking_Mixed_vegetable_kurma_south_indian_style_for_chapati_poori |kannammacooks.com #chapati #kurma #korma #curry #side_dish #south_indian #gravy #Veg_kuruma

My dad is a wonderful cook. He would cook once or twice a week for us whenever he was in town. He would make me and my brother stand near the kitchen counter and teach us how to do things in the kitchen. He was patient, never rushed anything and always willing to teach and learn. He would sit patiently for hours grinding and sharpening his knives. He does it for me even today whenever he visits me. He believes that getting children into the kitchen at a very young age is the only way to get them interested in food. He is in his early seventies now as I write this post and he still cooks whenever he visits me. A very simple man who firmly believes that he belongs to a generation which still believes that it takes 100 Paise to make a single Rupee. I love you daddy. This recipe is a house favorite. We call it as Chapati kuruma. Its a perfect side dish for roti, poori, ghee rice or pulao. There is a lot of nostalgia going on in this recipe.
Lets do my Dad’s Vegetable kurma before my eyes brings in the water works. Shall we?
There is going to be some prep involved. Once done the recipe progresses quickly. Crank up the food processor/mixie as we need to make some puree/paste. We need ginger-garlic paste, cashew-khuskhus(poppy seed) paste , coconut paste and tomato puree.

Mixed_vegetable_kurma_south_indian_style_for_chapati_poori |kannammacooks.com #chapati #kurma #korma #curry #side_dish #south_indian #gravy #Veg_kuruma

Next contender – Vegetables. Just pick up whatever veggies you have in your fridge. I used the classic veggies like potatoes, peas, beans, carrot and cauliflower. A cup of each. Boil them until AL-dente and keep aside.

Mixed_vegetable_kurma_south_indian_style_for_chapati_poori |kannammacooks.com #chapati #kurma #korma #curry #side_dish #south_indian #gravy #Veg_kuruma

Now lets play with the fire.
Heat oil in a wide skillet and when the oil is shimmering add the spices (cinnamon,cloves and cardamom), onions and saute until translucent. Add in the ginger garlic paste and salt and saute until you can see streaks of oil coming out of the mixture. That’s a sure sign that the garlic mixture is cooked.

Mixed_vegetable_kurma_south_indian_style_for_chapati_poori |kannammacooks.com #chapati #kurma #korma #curry #side_dish #south_indian #gravy #Veg_kuruma

Mixed_vegetable_kurma_south_indian_style_for_chapati_poori |kannammacooks.com #chapati #kurma #korma #curry #side_dish #south_indian #gravy #Veg_kuruma

Mixed_vegetable_kurma_south_indian_style_for_chapati_poori |kannammacooks.com #chapati #kurma #korma #curry #side_dish #south_indian #gravy #Veg_kuruma

Now add in the tomatoes and the spice masala. The spice masala includes turmeric, coriander powder, red chilli powder and black pepper. Reduce the flame to low and let it cook for 10 minutes. Now add the boiled veggies and cook for a couple of minutes. Now last add in the cashew-khuskhus paste and the coconut paste and cook for a mere minute or two. Don’t let it boil for long after adding these two pastes. Just a minute or two on simmer and take it off heat and garnish with cilantro/coriander leaves.
Serve hot with roti or pulao.

Mixed_vegetable_kurma_south_indian_style_for_chapati_poori |kannammacooks.com #chapati #kurma #korma #curry #side_dish #south_indian #gravy #Veg_kuruma

South Indian Mixed Vegetable Kurma
Serves 6
Write a review
Print
Prep Time
30 min
Cook Time
45 min
Total Time
1 hr 15 min
Prep Time
30 min
Cook Time
45 min
Total Time
1 hr 15 min
218 calories
32 g
0 g
8 g
7 g
2 g
338 g
510 g
8 g
0 g
6 g
Nutrition Facts
Serving Size
338g
Servings
6
Amount Per Serving
Calories 218
Calories from Fat 71
% Daily Value *
Total Fat 8g
13%
Saturated Fat 2g
8%
Trans Fat 0g
Polyunsaturated Fat 2g
Monounsaturated Fat 4g
Cholesterol 0mg
0%
Sodium 510mg
21%
Total Carbohydrates 32g
11%
Dietary Fiber 9g
37%
Sugars 8g
Protein 7g
Vitamin A
83%
Vitamin C
62%
Calcium
15%
Iron
14%
* Percent Daily Values are based on a 2,000 calorie diet. Your Daily Values may be higher or lower depending on your calorie needs.
For the Puree
  1. 4 Big Ripe Tomatoes
  2. 2 inch Ginger
  3. 10 Cloves Garlic
  4. 10 Whole Cashewnut
  5. 3 Tablespoon khus khus /white poppy seed
  6. 4 Tbs shredded coconut
Spice Masala
  1. 1 teaspoon Turmeric
  2. 1 teaspoon Red chilli powder
  3. 2 teaspoon Coriander powder
  4. 1/2 teaspoon pepper powder
Veggies
  1. 1 cup Potatoes diced
  2. 1 cup Peas
  3. 1 cup Cauliflower florets
  4. 1 cup Carrots diced
  5. 1 cup Beans diced
Other Ingredients
  1. 2 Tablespoon Oil
  2. 2 inch bark Cinnamon
  3. 3 Cloves whole
  4. 3 Cardamom Whole
  5. 2 Red Onion Chopped fine
  6. 1 teaspoon coarse salt
  7. 3 tablespoon chopped coriander leaves
  8. 500 ml water
Instructions
  1. The paste: Grind the ginger and garlic with a little water into a smooth paste and set aside. Grind the tomatoes to a smooth puree. No need to strain. Set aside. Grind the cashew and khus khus with a little water to a smooth paste and set aside. Grind the coconut with a little water to a smooth puree.
  2. Boil the veggies until Al-dente. Reserve the water used for boiling.
  3. In a wide saute pan, heat the oil until shimmering. Add in the cloves,cardamom and cinnamon.
  4. Add in the onions and fry till translucent.
  5. Add in the ginger garlic paste, salt and fry until little streaks of oil come out of the mixture.
  6. Now add in the tomatoes and the spice masala mixture and let it simmer in low flame for 10 minutes.
  7. Now add in the boiled veggies and the reserved water and boil for a couple of minutes.
  8. Add the cashew-khus khus paste
  9. Add the coconut paste
  10. Boil for a mere minute after adding the above two pastes. Do not let it boil for long.
  11. Remove from heat and garnish with cilantro/coriander leaves.
  12. Serve hot with Chapati or Ghee rice.
beta
calories
218
fat
8g
protein
7g
carbs
32g
more
kannamma cooks http://kannammacooks.com/

Sweet and soft Japanese milk Bread

$
0
0

Soft_and_sweet_milk_bread_hokkaido_tangzhong_65°C_recipe_pillowy_super_soft_bread |kannammacooks.com #hokkaido #water_roux#technique#easy_white_bread #Yvonne_Chen #bread_doctor

Baking bread is therapeutic. These are the simple pleasures of life to be grateful for. It was a revelation when I found about tangzhong or the water roux technique for making soft and pillowy bread. I first read about this a few years ago in the fresh loaf forum and I was thrilled. A lady by name Yvonne Chen wrote about this technique in her “65°C – Bread Doctor” book referring to tangzhong (water roux) as her secret ingredient. The forum went crazy for tangzhong and so did I.
So what is tangzhong?
A simple water flour roux is made by heating water and flour where the starch in the flour gelatinizes. Adding this flour-water roux to the dough results in an unbelievably moist fluffy bread. Tangzhong adds structure to the inside crumb of the bread.

Lets go make Japanese style Hokkaido Bread AKA Ultimate soft and sweet bread. Its bread time y’all!

Soft_and_sweet_milk_bread_hokkaido_tangzhong_65°C_recipe_pillowy_super_soft_bread |kannammacooks.com #hokkaido #water_roux#technique#easy_white_bread #Yvonne_Chen #bread_doctor

First lets make tangzhong. Mix the water and flour and heat it on medium flame until it starts to become a watery custard/pudding like the picture below.

Soft_and_sweet_milk_bread_hokkaido_tangzhong_65°C_recipe_pillowy_super_soft_bread |kannammacooks.com #hokkaido #water_roux#technique#easy_white_bread #Yvonne_Chen #bread_doctor
Second lets get the yeast working. Indian yeast is temperamental. so do not skip this step if you are in India. Add quarter cup of warm water plus a pinch of sugar to the yeast and leave it aside for 5 minutes so it becomes foamy. If it doesn’t foam, discard and start again with a fresh batch of yeast.

yeast proving |kannammacooks.com #yeast #prove

Mix the dry ingredients and whisk till combined – flour, sugar, milk powder, salt, lemon zest and orange zest. In a separate bowl mix together Milk, eggs, vanilla, all of the tangzhong, butter, and all of the yeast mixture. Add the wet ingredients to the dry ingredients and start kneading. Knead for 5 minutes on medium speed on a stand mixer. If kneading by hand, knead for a good 10 minutes. The trick in kneading by hand is to avoid the temptation of adding flour. Too much flour alters the moisture content which results in dry dense dough. Once the dough becomes cohesive, form into a ball and let it rise in a draft free place until doubled. About 60 to 90 minutes.

Soft_and_sweet_milk_bread_hokkaido_tangzhong_65°C_recipe_pillowy_super_soft_bread |kannammacooks.com #hokkaido #water_roux#technique#easy_white_bread #Yvonne_Chen #bread_doctor

Once doubled, Shape the dough. Divide dough into 4 equal pieces. each piece, roll the dough out into an oval. Fold the oval,crimp and then flatten. Roll the dough up lengthwise, then place into the loaf pan seam side down. Do the same for remaining 3 dough pieces. Cover it and let it double again. About 60 to 90 minutes.

Soft_and_sweet_milk_bread_hokkaido_tangzhong_65°C_recipe_pillowy_super_soft_bread |kannammacooks.com #hokkaido #water_roux#technique#easy_white_bread #Yvonne_Chen #bread_doctorSoft_and_sweet_milk_bread_hokkaido_tangzhong_65°C_recipe_pillowy_super_soft_bread |kannammacooks.com #hokkaido #water_roux#technique#easy_white_bread #Yvonne_Chen #bread_doctorSoft_and_sweet_milk_bread_hokkaido_tangzhong_65°C_recipe_pillowy_super_soft_bread |kannammacooks.com #hokkaido #water_roux#technique#easy_white_bread #Yvonne_Chen #bread_doctor

Coat the dough with egg wash and bake in a preheated oven at 200C/350F for 40 minutes. When it’s done, the bread will sound hollow when tapped. Let it cool briefly, then slice and enjoy!

Soft_and_sweet_milk_bread_hokkaido_tangzhong_65°C_recipe_pillowy_super_soft_bread |kannammacooks.com #hokkaido #water_roux#technique#easy_white_bread #Yvonne_Chen #bread_doctor

Sweet and soft Japanese style Hokkaido Milk Bread (tangzhong)
Serves 20
Write a review
Print
Prep Time
3 hr
Cook Time
45 min
Total Time
3 hr 45 min
Prep Time
3 hr
Cook Time
45 min
Total Time
3 hr 45 min
112 calories
20 g
22 g
2 g
3 g
1 g
47 g
70 g
3 g
0 g
1 g
Nutrition Facts
Serving Size
47g
Servings
20
Amount Per Serving
Calories 112
Calories from Fat 18
% Daily Value *
Total Fat 2g
3%
Saturated Fat 1g
5%
Trans Fat 0g
Polyunsaturated Fat 0g
Monounsaturated Fat 1g
Cholesterol 22mg
7%
Sodium 70mg
3%
Total Carbohydrates 20g
7%
Dietary Fiber 1g
3%
Sugars 3g
Protein 3g
Vitamin A
1%
Vitamin C
0%
Calcium
1%
Iron
2%
* Percent Daily Values are based on a 2,000 calorie diet. Your Daily Values may be higher or lower depending on your calorie needs.
For the tangzhong - water roux
  1. 1/2 cup water
  2. 1/4 cup + 1 Tablespoon all purpose flour
For the Yeast mixture
  1. 1/4 cup water
  2. 2 teaspoon yeast
  3. pinch of sugar
For the dough
  1. 400grams (around 2.5-3 cups) all purpose flour
  2. 1/4 cup sugar
  3. 25g (1/4 cup) milk powder
  4. 6 tablespoon milk
  5. 1 egg
  6. 2 Tablespoon butter
  7. 1/2 teaspoon salt
  8. 1 teaspoon vanilla extract (optional)
  9. 1 teaspoon lemon zest (optional)
  10. 1 teaspoon orange zest (optional)
  11. 1 more egg, beaten with a splash of water, for eggwash
Instructions
  1. Mix the water and flour and heat it on medium flame until it starts to become a watery custard or tangzhong.
  2. Add warm water plus a pinch of sugar to the yeast and leave it aside for 5 minutes so it becomes foamy.
  3. Mix the dry ingredients and whisk till combined – flour, sugar, milk powder, salt, lemon zest and orange zest.
  4. In a separate bowl mix together Milk, eggs, vanilla, all of the tangzhong, butter, and all of the yeast mixture.
  5. Add the wet ingredients to the dry ingredients and start kneading. Knead for 5 minutes on medium speed on a stand mixer. If kneading by hand, knead for a good 10 minutes. Let it rise in a draft free place until doubled. About 60 to 90 minutes.
  6. Once doubled, Shape the dough. Divide dough into 4 equal pieces. each piece, roll the dough out into an oval. Fold the oval, crimp and then flatten. Roll the dough up lengthwise, then place into the loaf pan. Do the same for remaining 3 dough pieces. Cover it and let it double again.
  7. Preheat the oven to 200C/350F.
  8. Coat the dough with egg wash and bake in a preheated oven at 200C/350F for 40 minutes. When it’s done, the bread will sound hollow when tapped.
Adapted from from the freshloaf.com
beta
calories
112
fat
2g
protein
3g
carbs
20g
more
Adapted from from the freshloaf.com
kannamma cooks http://kannammacooks.com/

Alamelu’s Chettinad meen kuzhambu / fish curry

$
0
0

Tamilnadu_karaikudi_chettinadu_vanjaram_meen_kuzhambu_fish_curry_authentic_recipe |kannammacooks.com #vanjaram #traditional #fish_curry #recipe # tamarind #meen #curry #kuzhambu
Food brings really good memories. Its those memories that brings back the smile. We lived in San Diego for quite a while and had this curry at a friends place for lunch. I was not a great fish curry fan until I tasted this recipe. I was just blown over. I had seconds, shamelessly even thirds. I just begged my friend Alamelu Annamalai for the recipe. I wouldn’t let her go until I made her write it. She not only shared the recipe but also packed the leftover fish curry to go. I had a happy fish curry overdose that day. Thank you so much Alamu for all the good memories and the wonderful chettinad fish curry. She hails from kaaraikudi and this fish curry is the ultimate fish curry I have ever tasted. You have got to try this to believe me. Lets go make a rock-star Sunday lunch! Shall we?

Heads Up – There is a lot of peeling involved. Alamelu-The chettinad girl insists that this curry be made with shallots only and not to be substituted with red onions.  And she is right. Shallots does make all the difference to the fish curry.

Tamilnadu_karaikudi_chettinadu_vanjaram_meen_kuzhambu_fish_curry_authentic_recipe |kannammacooks.com #vanjaram #traditional #fish_curry #recipe # tamarind #meen #curry #kuzhambu
Heat oil in a heavy pan and add in the cumin seeds, pepper and fennel seeds. Let it splutter. It will foam a little because of the sesame oil. Its fine. Add in the shallots and the garlic. Fry till the shallots become tender and starts to change color. About 5-8 minutes. Add in the chopped tomatoes and fry for a couple of minutes. Add in the shredded coconut and remove from heat. Cool briefly and grind to a very smooth paste. Add upto 2 cups of water while grinding. Set aside.

Tamilnadu_karaikudi_chettinadu_vanjaram_meen_kuzhambu_fish_curry_authentic_recipe |kannammacooks.com #vanjaram #traditional #fish_curry #recipe # tamarind #meen #curry #kuzhambuTamilnadu_karaikudi_chettinadu_vanjaram_meen_kuzhambu_fish_curry_authentic_recipe |kannammacooks.com #vanjaram #traditional #fish_curry #recipe # tamarind #meen #curry #kuzhambu Heat oil in a pan until shimmering. Add in the fenugreek seeds, cumin seeds, fennel seeds and curry leaves. Let it splutter. Reduce the flame to low and add in the chettinad masala paste and coarse salt. Fry for 3-4 minutes on medium flame until raw smell goes. Add the coriander powder and the red chilli powder. Add in the tamarind pulp, green chillies and about 1.5 – 2 cups water. Let the consistency of the curry be thin. Cook in low flame for about 30 minutes until the curry becomes thick. Check for seasoning of salt. Add more salt if necessary.

Tamilnadu_karaikudi_chettinadu_vanjaram_meen_kuzhambu_fish_curry_authentic_recipe |kannammacooks.com #vanjaram #traditional #fish_curry #recipe # tamarind #meen #curry #kuzhambu Tamilnadu_karaikudi_chettinadu_vanjaram_meen_kuzhambu_fish_curry_authentic_recipe |kannammacooks.com #vanjaram #traditional #fish_curry #recipe # tamarind #meen #curry #kuzhambu
Add in the fish pieces and cook for 3-4 minutes. Switch off the flame and garnish with cilantro/coriander leaves.

Tamilnadu_karaikudi_chettinadu_vanjaram_meen_kuzhambu_fish_curry_authentic_recipe |kannammacooks.com #vanjaram #traditional #fish_curry #recipe # tamarind #meen #curry #kuzhambu

Alamelu's Chettinad meen kozhambu/ fish curry
Serves 8
Write a review
Print
Prep Time
30 min
Cook Time
45 min
Total Time
1 hr 15 min
Prep Time
30 min
Cook Time
45 min
Total Time
1 hr 15 min
286 calories
17 g
48 g
17 g
18 g
4 g
180 g
688 g
7 g
0 g
12 g
Nutrition Facts
Serving Size
180g
Servings
8
Amount Per Serving
Calories 286
Calories from Fat 152
% Daily Value *
Total Fat 17g
26%
Saturated Fat 4g
18%
Trans Fat 0g
Polyunsaturated Fat 6g
Monounsaturated Fat 6g
Cholesterol 48mg
16%
Sodium 688mg
29%
Total Carbohydrates 17g
6%
Dietary Fiber 4g
17%
Sugars 7g
Protein 18g
Vitamin A
22%
Vitamin C
64%
Calcium
8%
Iron
13%
* Percent Daily Values are based on a 2,000 calorie diet. Your Daily Values may be higher or lower depending on your calorie needs.
For the Chettinad Masala
  1. 4 tablespoon Sesame / gingely Oil
  2. 1/2 tablespoon Cumin seeds
  3. 1 tablespoon fennel seeds
  4. 2 tablespoon black Pepper
  5. 2 cups Shallots
  6. 10 cloves garlic
  7. 2 ripe tomatoes, chopped
  8. 1/2 cup shredded coconut
For the Curry
  1. 2 Tablespoon Sesame Oil
  2. 1/2 teaspoon cumin seeds
  3. 1/2 teaspoon fennel seeds
  4. 1/2 teaspoon fenugreek seeds
  5. 20 curry leaves
  6. 1 heaped tablespoon Coriander powder
  7. 2 tablespoon Red chilli powder
  8. 2 green chillies
  9. 1 lime size tamarind soaked in 1 cup water
  10. 2 teaspoon coarse salt
  11. 1 sprig Coriander leaves/cilantro
  12. 1/2 kg fish steaks
Instructions
  1. Heat oil in a heavy pan and add in the cumin seeds, pepper and fennel seeds. Let it splutter. It will foam a little because of the sesame oil. Its fine.
  2. Add in the shallots and the garlic.
  3. Fry till the shallots become tender and starts to change color. About 5-8 minutes.
  4. Add in the chopped tomatoes and fry for a couple of minutes. Add in the shredded coconut and remove from heat. Cool briefly and grind to a very smooth paste. Add upto 2 cups of water while grinding. Set aside.
  5. Heat oil in a pan until shimmering. Add in the fenugreek seeds, cumin seeds, fennel seeds and curry leaves. Let it splutter. Reduce the flame to low and add in the chettinad masala paste and coarse salt. Fry for 3-4 minutes on medium flame until raw smell goes.
  6. Add the coriander powder and the red chilli powder. Add in the tamarind pulp, green chillies and about 1.5 - 2 cups water. Let the consistency of the curry be thin.
  7. Cook in low flame for about 30 minutes until the curry becomes thick. Check for seasoning of salt. Add more salt if necessary.
  8. Add in the fish pieces and cook for 3-4 minutes more.
  9. Switch off the flame and garnish with cilantro/coriander leaves
Notes
  1. It can be stored in the refrigerator for upto 2 days.
  2. The curry is traditionally made with seer fish aka vanjaram meen.
  3. I always use Idhayam brand gingely oil . Also called as nallennai in tamil.
beta
calories
286
fat
17g
protein
18g
carbs
17g
more
kannamma cooks http://kannammacooks.com/

Manjal poosanikai sambar / Pumpkin and lentil Sambar (Vegan)

$
0
0

Tamilnadu style pumpkin sambar manjal poosanikai sambar thuvaram paruppu sambar |kannammacooks.com #tamilnadu #sambar #pumpkin #lentils #recipe

As a south indian nothing satisfies me like a good sambar. Yellow pumpkin is called as manjal poosanikai in Tamil. This sambar is a staple in my house. It makes for a simple, healthy and a very satisfying meal.

Tamilnadu style pumpkin sambar manjal poosanikai sambar thuvaram paruppu sambar |kannammacooks.com #tamilnadu #sambar #pumpkin #lentils #recipe

Lets dive into making Sambar. Shall we?
Cut the pumpkin into half. De-seed the pumpkin and peel the outer skin. Dice the pumpkin into cubes and boil it with water until soft and keep aside. Do not discard the water used for boiling. Use the water to soak the tamarind.
Tamilnadu style pumpkin sambar manjal poosanikai sambar thuvaram paruppu sambar |kannammacooks.com #tamilnadu #sambar #pumpkin #lentils #recipe

Boil half a cup of toor-dal with 2 – 2.5 cups of water in a pressure cooker for 10 minutes. Reserve the excess water. Do not discard. If not using pressure cooker, soak the Dal for an hour in water and boil it in a heavy pan with a closed lid for 45 minutes or more until the lentils are soft.

Tamilnadu style pumpkin sambar manjal poosanikai sambar thuvaram paruppu sambar |kannammacooks.com #tamilnadu #sambar #pumpkin #lentils #recipe

OK, a good sambar powder is very very essential for a good sambar. You can make your own sambar powder but I like the taste of this particular store bought masala and I use it for the sake of convenience. I am from Coimbatore, Tamilnadu and I like Tamil style sambar. So the only Sambar powder that I use is Sakthi brand Sambar powder which comes from Tamilnadu and works extremely well. Sakthi masala doesnt pay me a penny for endorsing this product. My American friends can find it in indian stores near you. I do not like the flavor of any other sambar powders that are in the market.

Tamilnadu style pumpkin sambar manjal poosanikai sambar thuvaram paruppu sambar |kannammacooks.com #tamilnadu #sambar #pumpkin #lentils #recipe

We always use sesame oil most of the time in south indian cooking. Its called as நல்ல எண்ணெய் (Nalla ennai) in Tamil which literally translates as Good Oil. So its sesame oil in my kitchen for sambar. Heat sesame oil in a pan until shimmering. Add in the mustard seeds, Urad-dal, cumin seeds and curry leaves. Let it splutter. Add in the Onions and saute till soft and translucent in medium flame. Roughly about 3-4 minutes. Then add in the tomatoes and saute till the tomatoes are soft. Roughly about a couple of minutes. Add in the tamarind pulp.
Tamilnadu style pumpkin sambar manjal poosanikai sambar thuvaram paruppu sambar |kannammacooks.com #tamilnadu #sambar #pumpkin #lentils #recipe Add in the salt, asafoetida, sambar powder and turmeric. Let it simmer for 10 minutes in low flame. Simmering helps in cooking the masala powders and the tamarind to cook completely. Now add in the boiled pumpkin and the boiled toor dal. If the consistency is too thick, add in the reserved left over water from the Dal. Let it simmer for another couple of minutes. Add in the coriander leaves/cilantro. Remove from heat and serve it hot with rice.
Tamilnadu style pumpkin sambar manjal poosanikai sambar thuvaram paruppu sambar |kannammacooks.com #tamilnadu #sambar #pumpkin #lentils #recipe

Manjal poosanikai / pumpkin sambar
Serves 4
Write a review
Print
Prep Time
15 min
Cook Time
45 min
Total Time
1 min
Prep Time
15 min
Cook Time
45 min
Total Time
1 min
94 calories
14 g
0 g
4 g
2 g
1 g
190 g
600 g
6 g
0 g
4 g
Nutrition Facts
Serving Size
190g
Servings
4
Amount Per Serving
Calories 94
Calories from Fat 35
% Daily Value *
Total Fat 4g
6%
Saturated Fat 1g
4%
Trans Fat 0g
Polyunsaturated Fat 2g
Monounsaturated Fat 2g
Cholesterol 0mg
0%
Sodium 600mg
25%
Total Carbohydrates 14g
5%
Dietary Fiber 5g
19%
Sugars 6g
Protein 2g
Vitamin A
396%
Vitamin C
20%
Calcium
5%
Iron
12%
* Percent Daily Values are based on a 2,000 calorie diet. Your Daily Values may be higher or lower depending on your calorie needs.
Ingredients
  1. 1/2 kg pumpkin
  2. 1/2 cup toor dal
  3. 1 tablespoon Sesame/Gingely oil
  4. 1/2 teaspoon mustard seeds
  5. 1/2 teaspoon cumin seeds
  6. 1/2 teaspoon urad dal
  7. 2 sprigs curry leaves
  8. 1 onion, diced
  9. 1 tomato, diced
  10. 1 inch round tamarind piece
  11. 1 tablespoon sambar powder
  12. 1/2 teaspoon turmeric
  13. 1/4 teaspoon asafoetida
  14. 1 teaspoon salt
  15. 2 sprigs coriander leaves/cilantro
Instructions
  1. Cut the pumpkin into half. De-seed the pumpkin and peel the outer skin. Dice the pumpkin into cubes and boil it with water until soft and keep aside. Do not discard the water used for boiling. Use the water to soak the tamarind.
  2. Boil half a cup of toor-dal with 2 – 2.5 cups of water in a pressure cooker for 10 minutes. Reserve the excess water. Do not discard. If not using pressure cooker, soak the Dal for an hour in water and boil it in a heavy pan with a closed lid for 45 minutes or more until the lentils are soft.
  3. Heat sesame oil in a pan until shimmering.
  4. Add in the mustard seeds, Urad-dal, cumin seeds and curry leaves. Let it splutter.
  5. Add in the Onions and saute till soft and translucent in medium flame. Roughly about 3-4 minutes.
  6. Then add in the tomatoes and saute till the tomatoes are soft. Roughly about a couple of minutes.
  7. Add in the tamarind pulp.
  8. Add in the salt, asafoetida, sambar powder and turmeric. Let it simmer for 10 minutes in low flame. Simmering helps in cooking the masala powders and the tamarind to cook completely.
  9. Now add in the boiled pumpkin and the boiled toor dal. If the consistency is too thick, add in the reserved left over water from the Dal.
  10. Let it simmer for another couple of minutes.
  11. Add in the coriander leaves/cilantro.
  12. Remove from heat and serve it hot with rice.
Notes
  1. You can use other vegetables instead of pumpkin like carrots, radish, white pumpkin, drumstick.
beta
calories
94
fat
4g
protein
2g
carbs
14g
more
kannamma cooks http://kannammacooks.com/

Vegan Beetroot poriyal Stir-fry

$
0
0

Beetroot-poriyal-with-coconut-thoran-stir-fry-Vegan-south-indian-side-dish |kannammacooks.com #vegan #easy # healthy #beet # poriyal #thoran #stir-fry
Beetroot is such a hearty and earthy vegetable. Whenever I peel beets, I smell the scent of rain on dry earth or மண் வாசனை – manvasanai as we call it in Tamil. Peeling beets is calming. Beetroot poriyal makes for a very nice side dish. My young son has it with rice and calls the dish as pink rice. Its one of his favorites. Its an easy, healthy, straight forward recipe.  First the beetroot is steamed and then its tempered the indian way. Nothing fancy out here.

I have a trick for quick steaming the veggies. I put the cut veggies in a bowl and place the bowl in a pressure cooker filled with 1 inch of water. Pressure cook it for 3-4 minutes (2 whistles) and that gives perfect steamed vegetable every single time. Reduce the time if you want it a little al-dente.
Beetroot-poriyal-with-coconut-thoran-stir-fry-vegetable |kannammacooks.com #vegan #easy # healthy #beet # poriyal #thoran #stir-fry

Tempering:
Heat oil in a saute pan and add in the Urad dal, mustard seeds, cumin and let it splutter. Add in the curry leaves, green chillies and the minced ginger. Fry for a minute. Then add in the onions and salt and fry till soft and tender. About 3-4 minutes. Add the beets and saute for a minute more. Add the shredded coconut and toss until combined. Switch off the flame and remove it from heat. Serve with rice.

 Beetroot-poriyal-with-coconut-thoran-stir-fry-vegetable-vegan-south-indian |kannammacooks.com #vegan #easy # healthy #beet # poriyal #thoran #stir-fry
|kannammacooks.com #vegan #easy # healthy #beeBeetroot-poriyal-with-coconut-thoran-stir-fry-vegetable-vegan-south-indiant # poriyal #thoran #stir-fry

South indian Vegan beetroot poriyal -stir fry
Serves 3
Write a review
Print
Prep Time
15 min
Cook Time
15 min
Total Time
30 min
Prep Time
15 min
Cook Time
15 min
Total Time
30 min
169 calories
27 g
0 g
6 g
4 g
3 g
248 g
749 g
18 g
0 g
3 g
Nutrition Facts
Serving Size
248g
Servings
3
Amount Per Serving
Calories 169
Calories from Fat 52
% Daily Value *
Total Fat 6g
9%
Saturated Fat 3g
15%
Trans Fat 0g
Polyunsaturated Fat 1g
Monounsaturated Fat 2g
Cholesterol 0mg
0%
Sodium 749mg
31%
Total Carbohydrates 27g
9%
Dietary Fiber 7g
27%
Sugars 18g
Protein 4g
Vitamin A
8%
Vitamin C
140%
Calcium
5%
Iron
12%
* Percent Daily Values are based on a 2,000 calorie diet. Your Daily Values may be higher or lower depending on your calorie needs.
Ingredients
  1. 500 grams Beetroot diced (about 2 big beets)
  2. 2 teaspoon peanut oil (sesame,sunflower or vegetable oil works fine)
  3. 1/2 teaspoon urad dal
  4. 1/2 teaspoon cumin seeds
  5. 1/2 teaspoon mustard seeds
  6. 2 green chillies chopped (thai or serrano)
  7. 1 teaspoon minced ginger
  8. 1 sprig curry leaves
  9. 1 big red onion chopped
  10. 3/4 teaspoon salt
  11. 5 tablespoon shredded coconut
Instructions
  1. Steam the beetroot to your preference.( al-dente or fully cooked)
  2. Heat oil in a saute pan and add in the urad dal, mustard seeds and the cumin seeds. Let it splutter.
  3. Add in the green chillies, ginger and curry leaves all at once. Fry for a bare minute.
  4. Add in the onions and the salt. Saute until soft and tender.
  5. Add in the steamed beetroot and saute until combined. Add in the shredded coconut and toss to combine.
  6. Remove from heat and serve with hot rice.
beta
calories
169
fat
6g
protein
4g
carbs
27g
more
kannamma cooks http://kannammacooks.com/

Vazhakkai Podimas – Plantain (Raw Banana) Stir Fry – Vegan

$
0
0

tamilnadu-vazhakkai-podimas-recipe-raw-banana-plantain-valakkai-podimas-spice-masala-powder-spice masala |kannammacooks.com #vazhakkai #stir-fry #recipe #plantain #vegan
Plantain-vazhakkai is such a versatile vegetable that you can quickly whip up a curry, stir-fry, roast or even the quintessential south indian plantain chips.  This recipe makes a podimas. Podimas is a rustic mashed veggie that is tempered with indian spices. This podimas is rich and flavorful with coconut and spices. Plantain is lets say a blank canvas. It needs that oomph to make it stand out. I use a fragrant dry roasted spice powder to add more flavor to this otherwise boring veggie.
tamilnadu-vazhakkai-podimas-recipe-raw-banana-plantain-valakkai-podimas-spice-masala-powder-spice masala |kannammacooks.com #vazhakkai #stir-fry #recipe #plantain #vegan I steam the plantains with the skin in a pressure cooker for 6-8 minutes (3 whistles). Then coarsely mash it and temper it with the spice masala. It makes a perfect side dish for a south indian lunch of sambar or rasam with rice.

tamilnadu-vazhakkai-podimas-recipe-raw-banana-plantain-valakkai-podimas-spice-masala-powder-spice masala |kannammacooks.com #vazhakkai #stir-fry #recipe #plantain #vegan

Vazhakkai podimas - Plantain stir-fry / Roast
Serves 6
Write a review
Print
Prep Time
10 min
Cook Time
20 min
Total Time
30 min
Prep Time
10 min
Cook Time
20 min
Total Time
30 min
225 calories
39 g
0 g
9 g
3 g
2 g
175 g
413 g
20 g
0 g
6 g
Nutrition Facts
Serving Size
175g
Servings
6
Amount Per Serving
Calories 225
Calories from Fat 76
% Daily Value *
Total Fat 9g
13%
Saturated Fat 2g
10%
Trans Fat 0g
Polyunsaturated Fat 3g
Monounsaturated Fat 3g
Cholesterol 0mg
0%
Sodium 413mg
17%
Total Carbohydrates 39g
13%
Dietary Fiber 4g
16%
Sugars 20g
Protein 3g
Vitamin A
30%
Vitamin C
156%
Calcium
3%
Iron
8%
* Percent Daily Values are based on a 2,000 calorie diet. Your Daily Values may be higher or lower depending on your calorie needs.
For the spice powder
  1. 2 teaspoon urad dal
  2. 6-8 Red Chillies
  3. 2 teaspoon coriander seeds
  4. 1-1/2 teaspoon fennel seeds
For the coconut mixture
  1. 4 tablespoon fresh shredded coconut
  2. 2 teaspoon jaggery
  3. 1 inch strip of tamarind
  4. 1 teaspoon salt
Other ingredients
  1. 3 plantains steamed with skin,peeled and mashed
  2. 3 tablespoon sesame oil
  3. 1 teaspoon mustard seeds
  4. 2 sprigs curry leaves
  5. 1 onion finely diced (optional)
Instructions
  1. Dry roast all the ingredients for the spice powder on a low flame until golden brown. Keep aside.
  2. Dry roast the coconut on a low flame until golden brown . Dry roasting on a low flame is important as the ingredients can turn from brown to burnt very fast. Keep aside.
  3. Grind the above roasted ingredients along with raw jaggery, tamarind and salt to a fine powder. Keep aside.
  4. Steam the plantains in a pressure cooker for 6-8 minutes. Peel and mash. Keep aside.
  5. Heat oil in a saute pan. Add the mustard seeds and curry leaves. Let it splutter.
  6. Add in the chopped onions if using and fry till golden.
  7. Add in the plantains and the ground masala.
  8. Saute for another 5 minutes in low flame so the masala coats evenly.
  9. Remove from heat and serve with rice.
beta
calories
225
fat
9g
protein
3g
carbs
39g
more
kannamma cooks http://kannammacooks.com/

Semiya Payasam – Vermicelli Pudding

$
0
0

semiya-payasam-vermicelli-pudding-seviyan-kheer-tamil-new-year-onam-recipe |kannammacooks.com #pudding #payasam #festival #dessert #sweets #milk-pudding
No south indian meal is complete without a sweet ending of Payasam. I am a Payasam girl. I love it all. Semiya Payasam / vermicelli pudding is luscious and creamy and has a textural bite from the vermicelli. Its flavored with cardamom and ghee. This is also a very popular dessert made on all festival days in Tamilnadu. They make this dessert in Kerala for Onam. Cardamom adds a very nice aroma to the payasam. Cardamom is the world’s third most expensive spice after saffron and vanilla.

The main thing about Semiya Payasam is to roast the vermicelli till golden brown. Indian vermicelli is way thinner than its American equal. So if you are in the US, use angel hair pasta broken into 3/4 inch pieces. I like to dry roast the vermicelli till golden brown. All eyes on the pan y’all! Vermicelli tends to burn quickly. Keep sauteing all the time.

semiya-payasam-vermicelli-pudding-seviyan-kheer-tamil-new-year-onam-recipe-dry-roast-vermicelli-1 |kannammacooks.com #pudding #payasam #festival #dessert #sweets #milk-pudding

semiya-payasam-vermicelli-pudding-seviyan-kheer-tamil-new-year-onam-recipe |kannammacooks.com #pudding #payasam #festival #dessert #sweets #milk-pudding

Semiya Payasam - Vermicelli pudding
Serves 6
Write a review
Print
Prep Time
10 min
Cook Time
20 min
Total Time
30 min
Prep Time
10 min
Cook Time
20 min
Total Time
30 min
231 calories
31 g
23 g
10 g
5 g
5 g
156 g
78 g
26 g
0 g
4 g
Nutrition Facts
Serving Size
156g
Servings
6
Amount Per Serving
Calories 231
Calories from Fat 91
% Daily Value *
Total Fat 10g
16%
Saturated Fat 5g
27%
Trans Fat 0g
Polyunsaturated Fat 1g
Monounsaturated Fat 3g
Cholesterol 23mg
8%
Sodium 78mg
3%
Total Carbohydrates 31g
10%
Dietary Fiber 0g
2%
Sugars 26g
Protein 5g
Vitamin A
7%
Vitamin C
0%
Calcium
14%
Iron
3%
* Percent Daily Values are based on a 2,000 calorie diet. Your Daily Values may be higher or lower depending on your calorie needs.
Ingredients
  1. 1/2 cup vermicelli
  2. 3 cups whole milk
  3. 1/2 cup sugar
  4. 1/4 teaspoon ground cardamom
  5. pinch of salt
For the Garnish
  1. 2 tablespoon Ghee
  2. 3 tablespoon golden raisins
  3. 3 Tablespoon broken cashew nuts
Instructions
  1. Dry roast the vermicelli on low flame sauteing until it turns golden brown and it gives the wonderful toasted aroma.
  2. In a heavy saucepan, heat milk on medium flame. Add the fried vermicelli. Simmer on a low to medium flame for 6-8 minutes, or until the vermicelli is cooked. Add the sugar and simmer for five more minutes, stirring frequently to prevent sticking.
  3. In a separate pan fry the cashew-nut and raisins in ghee until lightly browned. Add it to the boiling pudding.
  4. Add in the cardamom powder (I use a mortar and pestle for powdering small quantities of cardamom and it works really well. )
  5. Serve it hot or chilled. We like it hot.
beta
calories
231
fat
10g
protein
5g
carbs
31g
more
kannamma cooks http://kannammacooks.com/

Hawaiian Sweet Buns (Almost Kings)

$
0
0

copycat-almost-kings-hawaiian-sweet-buns-recipe-from-scratch |kannammacooks.com #potuguese #buns #sweet-buns |kannammacooks.com #soft-bread #kings
copycat-almost-kings-hawaiian-sweet-buns-recipe-from-scratch |kannammacooks.com #Potuguese #buns #sweet-buns |kannammacooks.com #soft-bread #kings

There are very few pleasures in life that can equal the joy of eating warm, sweet buns out of the oven. I love kings Hawaiian sweet buns from the US and I miss them here in Bangalore. I adapted this recipe to satisfy that kings craving. Those soft and sweet buns were a picnic staple in our family. The buns are sweet with citrus notes, soft and delish! Its actually an adaptation of the Portuguese sweet bread!

I used the tangzhong method to get the soft and fluffy texture. So what is tangzhong? A simple water flour roux is made by heating water and flour where the starch in the flour gelatinizes. Adding this flour-water roux to the dough results in an unbelievably moist fluffy bread. Tangzhong adds structure to the inside crumb of the bread.First lets make tangzhong. Mix the water and flour and heat it on medium flame until it starts to become a watery custard/pudding like the picture below.

copycat-almost-kings-hawaiian-sweet-buns-recipe-from-scratch |kannammacooks.com #potuguese #buns #sweet-buns |kannammacooks.com #soft-bread #kings
Second lets get the yeast working. Indian yeast is temperamental. so do not skip this step if you are in India. Add quarter cup of warm water plus a pinch of sugar to the yeast and leave it aside for 5 minutes so it becomes foamy. If it doesn’t foam, discard and start again with a fresh batch of yeast.

yeast proving |kannammacooks.com #yeast #prove
Mix the dry ingredients and whisk till combined – flour, sugar, milk powder, salt, lemon zest and orange zest. In a separate bowl mix together Milk, eggs, vanilla, all of the tangzhong, butter, and all of the yeast mixture. Add the wet ingredients to the dry ingredients and start kneading. Knead for 5 minutes on medium speed on a stand mixer. If kneading by hand, knead for a good 10 minutes. The trick in kneading by hand is to avoid the temptation of adding flour. Too much flour alters the moisture content which results in dry dense dough. Once the dough becomes cohesive, form into a ball and let it rise in a draft free place until doubled. About 60 to 90 minutes.

copycat-almost-kings-hawaiian-sweet-buns-recipe-from-scratch |kannammacooks.com #potuguese #buns #sweet-buns |kannammacooks.com #soft-bread #kings
Once doubled, Shape the dough. Divide the dough into 16 equal parts. Make a ball and crimp the bottom. Put it in a 9×13 pan with seam side down. Do the same for remaining dough. Cover it and let it double again. About 60 to 90 minutes.

copycat-almost-kings-hawaiian-sweet-buns-recipe-from-scratch |kannammacooks.com #potuguese #buns #sweet-buns |kannammacooks.com #soft-bread #kings
Coat the dough with egg wash and bake in a preheated oven at 200C/400F for 30 minutes.
copycat-almost-kings-hawaiian-sweet-buns-recipe-from-scratch |kannammacooks.com #potuguese #buns #sweet-buns |kannammacooks.com #soft-bread #kings

Hawaiian Sweet Buns (Almost Kings)
Serves 16
Write a review
Print
Prep Time
3 min
Cook Time
30 min
Total Time
3 hr 30 min
Prep Time
3 min
Cook Time
30 min
Total Time
3 hr 30 min
140 calories
25 g
28 g
2 g
4 g
1 g
73 g
88 g
4 g
0 g
1 g
Nutrition Facts
Serving Size
73g
Servings
16
Amount Per Serving
Calories 140
Calories from Fat 22
% Daily Value *
Total Fat 2g
4%
Saturated Fat 1g
6%
Trans Fat 0g
Polyunsaturated Fat 0g
Monounsaturated Fat 1g
Cholesterol 28mg
9%
Sodium 88mg
4%
Total Carbohydrates 25g
8%
Dietary Fiber 1g
4%
Sugars 4g
Protein 4g
Vitamin A
2%
Vitamin C
1%
Calcium
2%
Iron
2%
* Percent Daily Values are based on a 2,000 calorie diet. Your Daily Values may be higher or lower depending on your calorie needs.
Ingredients
  1. For the tangzhong - water roux
  2. 1/2 cup water
  3. 1/4 cup + 1 Tablespoon all purpose flour
For the Yeast mixture
  1. 1/4 cup water
  2. 2 teaspoon yeast
  3. pinch of sugar
For the dough
  1. 400grams (around 2.5-3 cups) all purpose flour
  2. 1/4 cup sugar
  3. 25g (1/4 cup) milk powder
  4. 6 tablespoon milk
  5. 1 egg
  6. 2 Tablespoon butter
  7. 1/2 teaspoon salt
  8. 1 teaspoon vanilla extract (optional)
  9. 1 teaspoon lemon zest (optional)
  10. 1 teaspoon orange zest (optional)
  11. 1 more egg, beaten with a splash of water, for eggwash
Instructions
  1. Mix the water and flour and heat it on medium flame until it starts to become a watery custard or tangzhong.
  2. Add warm water plus a pinch of sugar to the yeast and leave it aside for 5 minutes so it becomes foamy.
  3. Mix the dry ingredients and whisk till combined – flour, sugar, milk powder, salt, lemon zest and orange zest.
  4. In a separate bowl mix together Milk, eggs, vanilla, all of the tangzhong, butter, and all of the yeast mixture.
  5. Add the wet ingredients to the dry ingredients and start kneading. Knead for 5 minutes on medium speed on a stand mixer. If kneading by hand, knead for a good 10 minutes. Let it rise in a draft free place until doubled. About 60 to 90 minutes.
  6. Once doubled,divide dough into 16 equal pieces. Form an uniform ball and crimp the bottom. Place in a 9x13 pan with the seam side of the dough down. Do the same for remaining dough pieces. Cover it and let it double again.
  7. Preheat the oven to 200C/400F.
  8. Coat the dough with egg wash and bake in a preheated oven at 200C/400F for 20 minutes. When it’s done, the bread will sound hollow when tapped.
Notes
  1. You can leave the egg and substitute 1/4 cup water/milk for each egg if you do not want to use egg.
  2. Adapted from the freshloaf.com
beta
calories
140
fat
2g
protein
4g
carbs
25g
more
kannamma cooks http://kannammacooks.com/

Strawberry Soup with citrus and Lemongrass

$
0
0

Strawberry Lemongrass soup recipe adapted from francois payard--Soup |kannammacooks.com #chilled-soup #strawberry #summer-soup #lemongrass #citrus #fruit-soup

This is one of my go to favorite lite dessert for any week day. Even though its a summer soup, I make it all year round. This recipe has been adapted from pastry chef Francois Payard. I saw a very tempting photograph in one of his books long back and I really liked the idea of a lite dessert soup which was different and kind of a rebel to me. When I came across this recipe I thought it was a genius idea to combine Asian flavors like lemongrass to give it that warmth and it totally works in this recipe. I absolutely love lite desserts.

A simple stock of lemongrass and lemon zest is poured over strawberries and the fruit kind of cooks in that hot stock. Chill it and enjoy for lunch or dinner. The addition of the optional pectin powder gives the soup some extra body and I like that lusciousness. This chilled fruit soup makes a unique ending for a meal.

Common y’all! Let us make some killer soup!

Dice the strawberries. I like to have it as small chunks. If you are in a mood for rustic, you can leave it whole too! Mix the diced strawberries with two tablespoon of sugar. Let it macerate while we prepare the stock. Combine 2 cups of water, Pectin if using, sugar, lemon zest and lemongrass in a saucepan and let it come to a boil over medium heat. Stir occasionally so the sugar dissolves. Once the mixture comes to a rolling boil, remove the pan from heat. Place a sieve over the bowl of strawberries and add the hot lemongrass stock. Cover the bowl with a plastic wrap and refrigerate for at least 6-8 hours. Leaving it overnight is fine. The flavors develop over time.
Strawberry Lemongrass soup recipe adapted from francois payard-collage |kannammacooks.com #chilled-soup #strawberry #summer-soup #lemongrass #citrus #fruit-soup

Serve the strawberry soup with a garnish of mint sprigs and thinly sliced strawberries. I just like to serve it plain and let the strawberries shine.
Strawberry Lemongrass soup recipe adapted from francois payard--collage-photo |kannammacooks.com #chilled-soup #strawberry #summer-soup #lemongrass #citrus #fruit-soup

Chilled Strawberry and Lemongrass Soup
Serves 5
Write a review
Print
Prep Time
10 min
Cook Time
10 min
Total Time
6 hr
Prep Time
10 min
Cook Time
10 min
Total Time
6 hr
124 calories
32 g
0 g
0 g
1 g
0 g
201 g
6 g
29 g
0 g
0 g
Nutrition Facts
Serving Size
201g
Servings
5
Amount Per Serving
Calories 124
Calories from Fat 2
% Daily Value *
Total Fat 0g
0%
Saturated Fat 0g
0%
Trans Fat 0g
Polyunsaturated Fat 0g
Monounsaturated Fat 0g
Cholesterol 0mg
0%
Sodium 6mg
0%
Total Carbohydrates 32g
11%
Dietary Fiber 2g
7%
Sugars 29g
Protein 1g
Vitamin A
0%
Vitamin C
80%
Calcium
2%
Iron
2%
* Percent Daily Values are based on a 2,000 calorie diet. Your Daily Values may be higher or lower depending on your calorie needs.
Ingredients for Stock
  1. 1 teaspoon pectin powder (optional)
  2. 1/2 cup sugar
  3. Grated Zest of one lemon
  4. 1 stalk lemongrass chopped
  5. 2 cups water
Other ingredients
  1. 250 grams strawberries
  2. 2 tablespoon Sugar
For the Garnish
  1. Sliced Strawberries
  2. Mint Sprigs
Instructions
  1. Dice the strawberries into small chunks and combine 2 tablespoon of sugar and let it macerate while we prepare the stock.
  2. Combine all the stock ingredients together in a saucepan and let it come to a boil over medium heat. Stir occasionally so the sugar dissolves. Once the mixture comes to a rolling boil, remove the pan from heat.
  3. Place a sieve over the bowl of strawberries and add the hot lemongrass stock. Cover the bowl with a plastic wrap and refrigerate for at least 6-8 hours. Leaving it overnight is fine. The flavors develop over time.
  4. Garnish: Garnish the soup with thinly sliced strawberries and mint sprigs.
Adapted from Francois Payard
beta
calories
124
fat
0g
protein
1g
carbs
32g
more
Adapted from Francois Payard
kannamma cooks http://kannammacooks.com/
Viewing all 1065 articles
Browse latest View live