Quantcast
Channel: Kannamma Cooks
Viewing all 1055 articles
Browse latest View live

Shanghai Street – Hong Kong

$
0
0

Where to buy kitchen supplies, kitchen utensils, baking supplies, small appliances for kitchen in Hong Kong? Basically all things Kitchen!
The ANSWER is Shanghai Street in Kowloon area. If you are looking for all things kitchen at reasonable prices, head straight to Shanghai Street. You need to take the MTR to Yau Ma Tei station in Kowloon. Its a couple of stops after Tsim Sha Tsui (TST). Once you land in Yau Ma Tei, then take exit B that goes to Portland Street.

Shanghai Street MTR Exit - Yau-ma-tei

You will exit the MTR to hit Portland Street. Cross Portland street across and keep walking to come to Shanghai Street. Shanghai street is parallel to Portland street. The shops should start right away after walking for about 3-4 minutes. If it doesn’t, you are going in the opposite direction.

Portland Street - Shanghai Street

You will find bargain priced quality kitchen supplies at this place. Shanghai Street has overflowing kitchen shops that serves the requirements of both restaurants and home cooks. You will find store after store filled with pots and pans, cleavers, regular knives, chopping boards, baking supplies, small appliances like blenders, rice cookers, and a super wide range of ceramic-ware. You will find industrial range of kitchen supplies too. If you love cooking, then its a delight to visit Shanghai Street. You will find repetitive items in some shops but that’s ok. Check for the prices in shops and pick the one that gives at the cheapest price. Wall mounted stainless steel racks to toothpicks, you will be delighted with so much choice on offer.

In India, we are so used to using stainless steel bowls for mixing, cooking etc… You will find them all here. I was surprised to find stainless steel plates and cups too! They even have pressure cookers.

Stainless-Steel-Vessels-Hong-Kong

Kitchen aid stand mixer costs a bomb at Hong Kong upmarket stores. You will find it at a comparatively lesser price here at Shanghai Street shops. Same goes with branded heavy duty blenders, juicers etc…

Pro Kitchen
This store is well stocked with all kind of western kitchenware, small appliances and gadgets. They had all sorts of small appliances popular in western countries like kitchen-aid stand mixers, juicers, coffee makers, blenders, bread makers, handheld mixers etc.. The nearby stores even had sous-vide cooking equipment’s and heavy duty blenders of all sizes.

kitchenaid-shanghai-street-Hong-Kong

Man Kee Chopping Board
They have been in business for more than 50 years. I was in awe to see the chopping boards that were carved out of a single piece of wood. Those giant wooden chopping boards that look like ottomans are a delight to watch. Do not miss this store.

man-kee-shanghai-street-Hong-Kong

They also sell all sizes of regular chopping boards, Japanese sushi making tools made of wood, cute little wooden spoons and all kinds of kitchen utensils.

man-kee-sushi-shanghai-street-Hong-Kong

You will also be able to find some traditional moon cake molds here.

wooden-spatula-shanghai-street-Hong-Kong

Chan Chi Kee knife shop
I first knew about Shanghai street after watching an Anthony Bourdain layover episode. He visits Chan Chi Kee knife shop on the show. The giant cleavers and the whole shop filled with knives that they show on the episode will make you want to visit Shanghai Street. You can watch the show here. (They show Shanghai street around the 18th minute onwards) Cleavers, cleavers and cleavers wherever you turn. Wooden handles, metal handles, so sharp and so many varieties.

cleaver-shanghai-street-Hong-Kong

I have found that even the cheap $50 HKD knives to be incredibly sharp. I bought one to test how long it stays sharp. I have had it for more than three weeks now and it is still very sharp just like day one even after 3 weeks of extensive chopping. They are worth it. Look for knives that are made in Japan.

Shanghai street is also a baking supplies galore. If you love baking, then you are a kid in a candy store. Tools, cutters, silicone moulds, cookie sheets, cake pans, baking ingredients…. You will find them all here.

baking-supplies-shanghai-street-Hong-Kong

I Love Cake
If you love baking, then you will get all the things you need here. From baking pans, cookie sheets, bundt pans, moulds, cookie cutters to cup cake wrappers, ramekins, food gel colours, nozzles, tart pans, metal icing tips, parchment etc… you will even find baking ingredients here.

ilovecake-Hong-Kong

You will pick up way more than you need if you like baking!!!!

baking-things-shanghai-street-Hong-Kong

It was an over populated whisk world across the shops in Shanghai street!

whisks-shanghai-street-Hong-Kong

And spatulas!

spatula-shanghai-street-Hong-Kong

Crockery
Lots of shops on the lane are well stocked with ceramic-ware. From plates to cups, teapots to sleek serveware. They have it all. The japanese ceramic-wares, teapots and saucers, soup bowls in shanghai street stores are all so elegant and cute.

ceramic-shanghai-street-Hong-Kong

I also came across super heavy mortar and pestles carved out of granite which looked too good to pass. Then the Le Creuset style enameled cast iron pots were there too!

le-creuset-Hong-Kong

The iron pans, woks, whisks, spatulas you will get everything here. Its a kitchen supply stores heaven.

iron-wok-shanghai-street-Hong-Kong

Even cast iron pans (mocked design like the American LODGE), Iron pancake pans, clay pots etc…

cast-iron-shanghai-street-Hong-Kong

Then, then, then I came across this knife store. I spent close to about couple of hours in the knife section. The Japanase hand crafted knives were so good. The price range starts from $1000 HKD upwards. The layers of steel was so so visible that one realises how much labour, man hours and craftsmanship would have gone into making these knives. Labor of knife love.

japanese-knives-shanghai-street-Hong-Kong

Plus, they have good stock of all popular knives. They had a full range of my favorite Wusthof knives. I have been eyeing on buying a nakiri vegetable knife for a long time and they had it.

wusthof-shanghai-street-Hong-Kong

And came the dim sum steamers!!!!!!!!! You would find bamboo steamers for very reasonable prices. Single bamboo dim sum steamers were so cute.

dim-sum-shanghai-street-Hong-Kong

And these! Sizzlers seems to be so popular here!

sizzler-shanghai-street-Hong-Kong

The streets seemed endless. Be prepared to carry a lot of stuff. Come with big shopping bags.

Have fun and shop to your hearts desire in this wonderful kitchen heaven!

The post Shanghai Street – Hong Kong appeared first on Kannamma Cooks.


Egg Biryani – Muttai Biryani in Pressure Cooker

$
0
0

Egg-Biryani

This is a very easy Egg (muttai) biryani done in the pressure cooker. But instead of just serving the biryani with boiled eggs, this recipe gives the boring eggs a twist. The eggs are stuffed and then pan fried. This is a very easy recipe that can be done within an hour from start to finish. Here is how to do it.

A quick biryani tip: One important thing to do for any biryani is to gently wash the rice and soak it in lots of water for at-least 20 minutes. It helps in keeping the rice grains from becoming starchy and mushy later. So before starting to cook, soak the rice and then move on with the other steps.

Heat oil in a pan and add in the bay leaves, cardamom, cloves and cinnamon. I added star anise too. If you want a rich biryani, you can substitute ghee instead of oil or use a combination of both. Fry for 10 seconds. Add in the sliced onions and fry till the onions are starting to brown.

Egg-Biryani-pressure-cooker-spices

Grind the ginger, green chillies and garlic with 1/4 cup of water to a smooth paste. Add in the ground paste and the chopped tomatoes to the pan. Fry till the tomatoes are soft and the mixture looks a little dry. Do not cook on high flame or the mixture will burn on the sides.

Egg-Biryani-pressure-cooker-tomatoes

Add in the salt and the chopped mint leaves and coriander leaves. Saute for a couple of minute.

Egg-Biryani-pressure-cooker-herb

Add in the water. For every cup of rice used, add 1.5 cups of water. We used 2 cups of rice. So add 3 cups of water. Let it come to a boil. Once the liquid comes to a boil, add in the soaked and drained rice. Check for seasoning. Close the pan and cook for exactly 2 whistles (6-7 minutes). Switch off the flame and let it rest until the pressure from the cooker gets released naturally. Open the cooker and gently fluff up the rice.

Egg-Biryani-pressure-cooker-rice

Now the eggs. Here is how to boil the eggs the correct way. Adding the eggs in hot water will help in easy peeling of eggs later on. Always start the eggs in hot boiling water.

Egg-Biryani-pressure-cooker-eggs

Cut the boiled eggs into half. Remove the yolk and set aside in a bowl. Add in the green chillies, coriander leaves, little milk, salt and a teaspoon of mayonnaise to the yolk mixture. The little tart and smooth mayonnaise works so well when frying eggs. Mix everything well.

Egg-Biryani-pressure-cooker-mutta-mixture

Fill the yolk mixture onto the halved eggs. Set aside.

Egg-Biryani-pressure-cooker-filling

Heat oil in a pan and add in the eggs, stuffed side down. Fry for a minute. Remove the fried eggs to a plate. Set aside.

Egg-Biryani-pressure-cooker-fry-eggs

Serve the biryani with fried eggs.

Egg Biryani - Muttai Biryani in Pressure Cooker
 
Prep time
Cook time
Total time
 
Easy Egg Biryani (Muttai Biryani) done using the pressure cooker method. Served with stuffed fried eggs.
Author:
Recipe type: Main Dish
Cuisine: Tamilnadu
Serves: 3 persons
Ingredients
For the Biryani
  • 2 Tablespoon Oil
  • 2 Bay leaves
  • 2 Cardamom
  • 3 Cloves
  • 2 Sticks Cinnamon
  • 1 Star Anise (optional)
  • 3 Red Onions, sliced
  • 10 Cloves Garlic
  • 2 inch piece Ginger
  • 4-5 green chillies
  • 3 Tomatoes, chopped
  • 2 Teaspoon Salt
  • ½ cup Mint leaves, chopped
  • ½ cup Coriander leaves, chopped
Rice
  • 2 cups Basmati rice
  • 3 cups Water
For the Stuffed Eggs
  • 4 Eggs (hard boiled)
  • 1 Green Chilli
  • a pinch of Salt
  • 2 teaspoon Milk
  • 1 teaspoon Mayonnaise
  • 2 sprigs Coriander leaves, chopped
  • 1 teaspoon Oil for frying the eggs
Instructions
For the biryani
  1. Heat oil in a pan and add in the bay leaves, cardamom, cloves and cinnamon. Add star anise if using. Fry for 10 seconds. Add in the sliced onions and fry till the onions are starting to brown.
  2. Grind the ginger, green chillies and garlic with ¼ cup of water to a smooth paste. Add in the ground paste and the chopped tomatoes to the pan. Fry till the tomatoes are soft and the mixture looks a little dry.
  3. Add in the salt and the chopped mint leaves and coriander leaves. Saute for a couple of minute.
  4. Add in the water. Once the liquid comes to a boil, add in the soaked and drained rice. Check for seasoning. Close the pan and cook for exactly 2 whistles (6-7 minutes). Switch off the flame and let it rest until the pressure from the cooker gets released naturally. Open the cooker and gently fluff up the rice.
For the Stuffed Eggs
  1. Cut the boiled eggs into half. Remove the yolk and set aside in a bowl. Add in the green chillies, coriander leaves, little milk, salt and a teaspoon of mayonnaise to the yolk mixture. Mix well. Fill the yolk mixture onto the halved eggs. Set aside.
  2. Heat oil in a pan and add in the eggs, stuffed side down. Fry for a minute. Remove the fried eggs to a plate. Set aside.
  3. Serve the biryani with fried eggs.


The post Egg Biryani – Muttai Biryani in Pressure Cooker appeared first on Kannamma Cooks.

Coriander Chicken Curry

$
0
0

coriander-chicken

Coriander Chicken curry – we call it as pacha kozhi kurma. This is an extremely simple recipe and can be put together in less than 45 minutes. The poppy seed paste (khus khus) added at the end adds an unique aroma. This is very popular in the pollachi / udumalpet region of Kongunad. Here is how to do the recipe.

Take a blender / mixie and add all the ingredients listed under “to be ground to a paste”. Add 1/2 cup of water and grind to a fine paste. Add the paste to the chicken pieces and mix well to coat. Set aside. Traditionally, the chicken is not marinated. But I like to do it this way. Let it marinate for 10-15 minutes.

coriander-chicken-curry-pacha-kozhi-kurma-marinate

Heat oil in a pan and add in the onions. Fry for few minutes till the onions are soft. Add in the chicken mixture to the pan.

coriander-chicken-curry-pacha-kozhi-kurma-cook

Cover the pan and cook the chicken gravy on medium flame for 4 whistles in the pressure cooker. Do not cook on high heat as the chicken can burn at the bottom. Switch off the flame and wait for the pressure to release naturally.

coriander-chicken-curry-pacha-kozhi-kurma-pressure-cooker

Now we need to make a spice paste. Dry roast the poppy seeds, cloves and cardamom until fragrant. Grind the spice mixture with 1/4 cup of water to a fine paste. Add the spice paste to the cooked chicken gravy.

coriander-chicken-curry-pacha-kozhi-kurma-poppy-seed-paste

Add in one cup of coconut milk. Bring the mixture to a mere simmer. Do not let the mixture to boil for a long time. Switch off the flame.

coriander-chicken-curry-pacha-kozhi-kurma-coc-milk

Serve with rice or chapati.

Coriander Chicken Curry
 
Prep time
Cook time
Total time
 
Easy recipe for coriander chicken curry. Made with ground coriander and spices.
Author:
Recipe type: Side Dish
Cuisine: Tamilnadu, Kongunad
Serves: 3 persons
Ingredients
To be ground to paste
  • 1 big bunch, 15-18 sprigs coriander leaves
  • 5 green chillies
  • 8 cloves garlic
  • 2 inch piece ginger
  • ½ teaspoon turmeric
  • 1 teaspoon salt
  • 500 grams chicken with bone, cut into small pieces
Other Ingredients
  • 2 teaspoon oil
  • 3 red onions, chopped fine
  • 1 cup thick coconut milk
Spice paste
  • 2 teaspoon poppy seeds (khus khus)
  • 2 cardamom
  • 2 cloves
Instructions
  1. Take a blender / mixie and add all the ingredients listed under “to be ground to a paste”. Add ½ cup of water and grind to a fine paste. Add it to the chicken pieces and mix well to coat. Set aside.
  2. Heat oil in a pan and add in the onions. Fry for few minutes till the onions are soft.
  3. Add in the chicken mixture to the pan. Cook the mixture on medium flame for 4 whistles in the pressure cooker. Switch off the flame and wait for the pressure to release naturally.
  4. Dry roast the poppy seeds, cloves and cardamom until fragrant. Grind the spice mixture with ¼ cup of water to a fine paste. Add the spice paste to the cooked chicken gravy. Add in one cup of coconut milk. Bring the mixture to a mere simmer. Do not let the mixture to boil for a long time. Switch off the flame.
  5. Serve with rice or chapati.

The post Coriander Chicken Curry appeared first on Kannamma Cooks.

Kung fu Panda Dumplings Recipe

$
0
0

kung-fu-panda-dumplings

My son is a great fan of Master Po ( me too ) and ever since we saw Kung fu Panda 3, we have been contemplating everyday to recreate “Master Po” style dumplings. The round ones. So we decided to make dragon warrior inspired chicken dumplings from scratch. After a couple of failed messy attempts, we managed to get pretty decent ones. As good as the ones at Mr. Pings Noodle shop if we say so ourselves. Please bear with our dumpling pleating skills. We are as messy as Po in that area.

I think Kung fu Panda is one of the awesome-est animated films of the recent years. The clumsy, childish panda becoming the dragon warrior is a brilliant story that stays for a long time. One of my favorite lines from the kung fu panda series is the one about the secret ingredient of the noodle soup.
Mr. Ping – “Po, I think it’s time I told you something I should have told you a long time ago! The secret ingredient of my secret ingredient soup is, ah ah The secret ingredient is……… NOTHING.”
Po – “Huh ?”
Mr. Ping – “You heard me. Nothing!There is no secret ingredient!”
Po – “Wait, wait, it’s just plain old Noodle Soup? You don’t add some kind of special sauce or something?”
Mr. Ping – “Don’t have to! To make something special, you just have to believe it’s special.”

panda-dumplings

So, presenting to you Dragon Warrior inspired chicken dumplings.

First we tackle the dumpling wrapper. We will make dough from scratch.

Take a bowl and add in the flour, salt and a teaspoon of oil. Add in the warm water and mix well. Add a little more water if the dough is very dry or a little more flour if its too wet. Knead the dough for 3-4 minutes until soft and pliable (similar to chapati dough consistency). Apply half a teaspoon of oil on the dough so the dough does not dry out. Store the dough to rest over night in the refrigerator. Well rested dough is easier to work when making dumplings. Remove the dough couple of hours before from the refrigerator and let it come to room temperature before rolling.

kung-fu-panda-dumplings-recipe-dough

In the mean time, make the filling. Here is the recipe for the filling.
Add in the ground chicken (just pulse the boneless chicken several times in the mixie), finely chopped spring onions, coriander leaves, finely minced ginger,  finely minced green chillies, soy sauce, little pinch of salt and one egg. Mix well until its combined. Use your hands to mix well. The filling is ready!

kung-fu-panda-dumplings-recipe-filling

Lets finish our wrapper business!
Dust the work surface with flour and roll the dough into thin sheets about 1/8th of an inch. Cut small rounds from them. Set aside the rounds. Cover the wrappers with parchment or cling wrap so the wrappers don’t stick with one another. Repeat until all the dough has been cut out.

kung-fu-panda-dumplings-recipe-wrapper

Its filling time. Now get your kitchen counter ready!
Get the dumpling wrappers and the filling. Place 1 tablespoon of filling on each dumpling wrapper. Don’t stuff them with filling. It gets really messy if over filled and it will be hard to pleat the dumplings. Gently gather the edges to the middle in pleats. Watch this video on how to wrap dumplings. Repeat with all the wrappers and the filling. Enjoy it with your kids. The aim is not perfect pleating. The aim is to have fun!
Just boil 2 inches of water in a kettle and keep the steamer on top. Steam the dumplings on a cabbage lined steamer for 12 minutes. Idli cooker works perfectly too.

kung-fu-panda-dumplings-recipe-steam

Serve hot with a dash of soy sauce for dipping. Ever since we moved to Hong Kong, Vedant has been trying hard to get the art of eating with chopsticks. I can say that he has come close.

kung-fu-panda-dumplings-recipe-chopstick

Enjoy the dumplings!

Kung fu Panda Dumplings Recipe
 
Prep time
Cook time
Total time
 
Asian Style Chicken Dumplings recipe inspired from the movie Kungu fu panda. Wrappers made from scratch with ground chicken filling.
Author:
Recipe type: Appetizer
Cuisine: Asian
Serves: 20
Ingredients
For the wrapper
  • 1½ cups All purpose flour (maida)
  • ½ cups warm water (approx)
  • ¼ teaspoon salt
  • 1 and ½ teaspoon vegetable oil
  • Extra flour for dusting
For the filling
  • 250 grams boneless chicken, ground
  • 7-8 stalks spring onions, finely chopped
  • 4 sprigs coriander leaves, finely chopped
  • 1 inch piece ginger, finely minced
  • 1 teaspoon soy sauce,
  • 2 green chillies, finely minced
  • 1 egg
  • little pinch of salt
  • 2-3 leaves of Cabbage for lining the steamer
Instructions
  1. Take a bowl and add in the flour, salt and a teaspoon of oil. Add in the warm water and mix well. Knead the dough for 3-4 minutes until soft and pliable. Apply half a teaspoon of oil on the dough so the dough does not dry out. Store the dough to rest over night in the refrigerator. Remove the dough couple of hours before from the refrigerator and let it come to room temperature.
  2. Mix all the ingredients listed under filling. Combine well. Set aside.
  3. Dust the work surface with flour and roll the dough into thin sheets about ⅛th of an inch. Cut small rounds from them. Set aside the rounds. Cover the wrappers with parchment or cling wrap so the wrappers don’t stick with one another. Repeat until all the dough has been cut out.
  4. Place 1 tablespoon of filling on each dumpling wrapper. Pleat the dough to form dumpling.
  5. Steam the dumplings in a cabbage lined steamer for 12 minutes.
  6. Serve hot.

The post Kung fu Panda Dumplings Recipe appeared first on Kannamma Cooks.

Cream of Chicken Soup with home made chicken stock

$
0
0

chicken-soup-recipe

The main ingredient for a good chicken soup is the chicken stock. I like to use homemade chicken stock for this soup as its more flavorful and one can control the amount of salt that goes into the stock. Its very easy to make chicken stock at home. I use the bones, wings, neck and giblets of the chicken for making stock. I use the pressure cooker method as its fast. Here is how to do it.

Take about 500 grams of chicken and its bones (mostly bones with little flesh) in a pressure cooker and add two liters of water. Add in the spices, half an onion, half a carrot and the garlic cloves. I don’t peel the garlic. I add it with the skin on. Cover the cooker and cook for 20 minutes on low flame (about 7-8 whistles). Remove from heat and let the pressure from the cooker release naturally. Drain the stock to a bowl.

chicken-soup-recipe-drain

Shred the chicken meat from the bones. Set aside. Discard the bones, spices and the veggies. Making stock at home is a very fulfilling experience. The chicken fat floating on the stock can be removed using a ladle. The easier way is to refrigerate the stock for a couple of hours and the fat would solidify. Its easier to remove the fat this way. Do not throw away the fat. Store it in the refrigerator and use it in your omelettes, stir-fry etc…instead of oil. You can store this stock at this stage in the refrigerator and use it whenever required.

chicken-soup-recipe-broth

Now lets make soup.

Heat a teaspoon of oil in a pan. Add in a teaspoon of dried Italian mixed herbs. You can use any store bought herb mixture. Add in the minced garlic and finely chopped onion. Saute until the onions are soft.

chicken-soup-recipe-spices

Take a cup and add in two tablespoons of All purpose flour (maida). Add in a cup of water and mix well to make a slurry. Add it to the pan. Add in the chicken stock. Add a cup of milk and a cup of cream.

chicken-soup-recipe-liquid

Add in the shredded chicken pieces, salt and pepper. Let it come to a simmer. Check for seasoning.

chicken-soup-recipe-seasoning

Serve hot!

Chicken Soup - Creamy Soup - Recipe
 
Prep time
Cook time
Total time
 
Cream of Chicken Soup recipe. Made with home made chicken stock and aromatics.
Author:
Recipe type: Soup
Cuisine: Fusion
Serves: 6-8 cups
Ingredients
For the Stock
  • 500 grams chicken bone
  • 2 liters water
  • 2 sticks Cinnamon
  • 2 bay leaves
  • 1 clove
  • 1 cardamom
  • 1 star anise
  • ½ onion
  • ½ carrot
  • 4 cloves garlic, with the skin
For the Soup
  • 1 teaspoon vegetable oil
  • 1 teaspoon dried italian herb mixture
  • 2 cloves minced garlic
  • ½ onion, finely chopped
  • 2 tablespoon all purpose flour (maida)
  • 1 cup water
  • 1 cup milk
  • 1 cup cream
  • 1½ teaspoon salt
  • 1 teaspoon pepper
Instructions
  1. Add in all the ingredients listed under making stock to a pressure pan. Cover the pressure pan and cook for 20 minutes on low flame. (about 7-8 whistles). Remove from heat and let the pressure from the cooker release naturally. Drain the stock to a bowl.
  2. Shred the chicken meat from the bones. Set aside.
  3. Heat a teaspoon of oil in a pan. Add in a teaspoon of dried Italian mixed herbs. Add in the minced garlic and finely chopped onion. Saute until the onions are soft.
  4. Take a cup and add in two tablespoons of All purpose flour (maida). Add in a cup of water and make a slurry. Add it to the pan. Add in the chicken stock. Add a cup of milk and a cup of cream.
  5. Add in the shredded chicken pieces, salt and pepper. Let it come to a simmer. Check for seasoning.Serve hot.

The post Cream of Chicken Soup with home made chicken stock appeared first on Kannamma Cooks.

Chicken Kurma – Easy and Quick Bachelor Recipe

$
0
0

chicken-kurma-pressure-cooker-method

This recipe for chicken kurma is something I picked up during our initial years after marriage. I always had home made spice masala powder stashed in the freezer at all times. My days at work used to be really long those years. If I had some friends or family coming for dinner, I would come back home after work and throw in some rice in the cooker and make this kurma in no time. This chicken kurma is effortless. The only thing that takes a few minutes to make is the masala paste. No frying, no sauteing. Add everything in the cooker and cook for 12- 15 minutes and your dinner can be served with absolutely zero stress. Try it out. The whole thing can be put together in less than 30 minutes.

The following is my non-veg masala powder that I use for a lot of dishes. I learned the masala powder recipe from my athama (aunt).

Here is what you will need for the masala powder.

chicken-kurma-spice-masala

Take a flat pan and add in all the ingredients for the masala spice powder except turmeric and poppy seeds (khuskhus). Fry until fragrant. Remove from heat and transfer the mixture to a mixie / spice grinder. Add in the turmeric and raw poppy seeds. If you cannot get poppy seeds in a country where you live, just skip it. But poppy seeds does add a lot of flavor to the chicken kurma. Grind the mixture to a very fine powder.

chicken-kurma-pressure-cooker-masala

In the same mixie, add in the onion, garlic and the ginger. Add 1/2 a cup of water and grind to make a smooth paste. Set aside.
Take a pressure pan and add in the chicken pieces. We use chicken pieces with bone for this recipe. Add in the ground masala paste. Add in 150 ml of coconut milk. I used store bought coconut milk. Add in 3 sprigs of curry leaves and the salt.

chicken-kurma-pressure-cooker-ingredients

Add a cup of water. Mix all the ingredients well. Cover the pan and cook for 5 whistles or for 12-13 minutes on medium flame. Remove from heat after all the whistles are over and wait for the pressure to release from the cooker naturally.

chicken-kurma-pressure-cooker-cook

Open the cooker and garnish the chicken kurma with coriander leaves.
chicken-kurma-pressure-cooker-coriander-leaves

Serve hot!

Chicken Kurma - Easy and Quick Bachelor Recipe
 
Prep time
Cook time
Total time
 
Easy and quick Bachelor Chicken Kurma Curry Recipe - Pressure Cooker Method. Can be put together in less than 30 minutes.
Author:
Recipe type: Side Dish / Gravy
Cuisine: Tamilnadu
Serves: 3 persons
Ingredients
For the Spice Powder
  • 6 dried red chillies
  • 1 cinnamon
  • 1 clove
  • 1½ tablespoon coriander seeds
  • ½ teaspoon cumin seeds
  • 1 teaspoon fennel seeds
  • ½ teaspoon Turmeric
  • 1½ teaspoon poppy seeds (khus khus)
For the paste
  • 1 onion, roughly chopped
  • 6 cloves garlic
  • 2 inch piece ginger, peeled and chopped
Other Ingredients
  • 500 grams chicken with bone
  • 3 sprigs curry leaves
  • 150 ml coconut milk, store bought
  • 1 cup water
  • 1 teaspoon salt
  • 3 sprigs coriander leaves, chopped
Instructions
  1. Take a flat pan and add in all the ingredients listed under "spice powder" except turmeric and poppy seeds (khuskhus). Fry until fragrant. Remove from heat and transfer to a mixie / spice grinder. Add in the turmeric and raw poppy seeds. Grind the mixture to a very fine powder.
  2. In the same mixie, add in the onion, garlic and the ginger. Add ½ a cup of water and grind to make a smooth paste. Set aside.
  3. Take a pressure pan and add in the chicken pieces. Add in the ground masala paste. Add in the coconut milk. Add in the curry leaves and the salt. Add one cup of water.
  4. Mix all the ingredients well. Cover the pan and cook for 5 whistles or for 12-13 minutes on medium flame. Remove from heat after all the whistles are over and wait for the pressure to release from the cooker naturally.
  5. Open the cooker and garnish the chicken kurma with coriander leaves.

The post Chicken Kurma – Easy and Quick Bachelor Recipe appeared first on Kannamma Cooks.

Carrot Pattani Poriyal – Carrot Peas Stir-Fry Recipe

$
0
0

Carrot-Pattani-Poriyal

This is an everyday healthy Carrot Pattani Poriyal recipe. This is a kids favorite stir-fry. The subtle sweetness from the carrot and peas is something most of the kids love. This can be paired with dal and that makes a simple and healthy everyday lunch. Here is how to do Carrot Pattani Poriyal.

Heat oil in a pan. Add in the mustard seeds and let it splutter. Add in the red chillies, green chillies, chopped garlic and chopped curry leaves. Fry for 10 seconds. Add in the chopped onions and fry till the onions are soft. No need to brown.


Carrot-Pattani-Poriyal-tempering

Add in the finely chopped carrots, peas, salt and turmeric powder. Add in a cup of water. Saute for a couple of minutes.

Carrot-Pattani-Poriyal-cook

Cover the pan with a lid and cook on medium flame for 30 minutes. Saute once in a while so the bottom does not scorch. If the water in the pan dries out before the veggies are fully cooked, Add in a little more water and continue to cook covered. Cook till the veggies are fork tender and the water in the pan has completely dried out. Switch off the flame and garnish with coriander leaves.

Carrot-Pattani-Poriyal-garnish

Serve Carrot Pattani Poriyal with Dal and Rice.

Carrot Pattani Poriyal - Carrot Peas Stir-Fry Recipe
 
Prep time
Cook time
Total time
 
Easy recipe for Carrot Pattani Poriyal - Carrot Peas Stir-fry Tamilnadu Style. Poriyal without coconut.
Author:
Recipe type: Side Dish
Cuisine: Tamilnadu
Serves: 3 persons
Ingredients
  • 2 teaspoon peanut oil
  • ¼ teaspoon mustard seeds
  • 2 dried red chillies
  • 2 green chillies, chopped
  • 3 cloves garlic, minced
  • 2 sprigs curry leaves, chopped
  • 1 onion, finely chopped
  • 3-4 carrots, finely chopped
  • 250 grams shelled fresh peas
  • 1 teaspoon salt
  • 1 teaspoon turmeric powder
  • 3 sprigs coriander leaves, finely chopped
Instructions
  1. Heat oil in a pan. Add in the mustard seeds and let it splutter. Add in the red chillies, green chillies, chopped garlic and chopped curry leaves. Fry for 10 seconds. Add in the chopped onions and fry till the onions are soft. No need to brown.
  2. Add in the finely chopped carrots, peas, salt and turmeric powder. Add in a cup of water. Saute for a couple of minutes. Cover the pan with a lid and cook on medium flame for 30 minutes.
  3. Cook till the veggies are fork tender and the water in the pan has completely dried out.
  4. Switch off the flame and garnish with coriander leaves.
  5. Serve Carrot Pattani Poriyal with Dal and Rice.

The post Carrot Pattani Poriyal – Carrot Peas Stir-Fry Recipe appeared first on Kannamma Cooks.

Stir Fried Rice Vermicelli Noodles with Garlic, Ginger and Scallions

$
0
0

Rice noodles is nothing but our idiyappam (very close). Stir fried rice noodles is a very simple and aromatic recipe. I am a fried garlic fan. The combo of ginger and garlic is so aromatic that one cannot go wrong. This is a very quick recipe that can be put together in no time. Here is how to do it.

vermicelli-rice-noodles

First we will tackle the rice noodles. Buy the thin variety of rice noodles that you can find in the super market. Boil a big pot of water ( 2 litres) until hot and bubbling. Switch off the flame and add in the dried noodles to the hot water. Make sure the noodles is fully immersed. Let it sit in the hot water for 3-4 minutes. The noodles would have swollen by this time. Drain the excess water and set aside to drain in a colander. These noodles cook very quickly. Just a soak in hot water and they are done. Do not over cook the noodles or they will become very soggy.


vermicelli-rice-noodles-cook

Garlic and ginger are the main ingredients in this stir-fry. We would need about 13-15 cloves of garlic and about a 2 inch piece of ginger. Mince them finely. Set aside. Heat oil in a wok until hot. Add in the ginger and garlic and fry briefly until the garlic is starting to brown.

vermicelli-rice-noodles-garlic-ginger

Add in the onions and fry for a couple of minutes. Add in the vegetables of your choice. Carrots, Cabbage, Capsicum etc.. I just added carrots today. Cook for a couple of minutes. Add in the chopped thai red chillies.

vermicelli-rice-noodles-spices

Add in the soy sauce, salt and a little bit of sugar. The soy sauce itself is salty. So go easy on the salt. Saute until the mixture is well coated. Add in the drained rice noodles and mix everything well to combine. Add in the chopped spring onions / scallions and serve hot!

vermicelli-rice-noodles-mix

Stir Fried Rice Vermicelli Noodles with Garlic, Ginger and Scallions
 
Prep time
Cook time
Total time
 
Easy and healthy rice noodles stir fry recipe with lots of garlic, ginger and scallions. Healthy, Vegan and Gluten free.
Author:
Recipe type: Main Dish
Cuisine: Asian
Serves: 3-4 servings
Ingredients
  • 300 grams thin rice noodles
  • 2 teaspoon peanut oil
  • 15 cloves garlic, finely chopped
  • 2 inch piece ginger, finely chopped
  • 2 onion, sliced
  • 1 Carrot, sliced
  • 1 Capsicum, sliced (optional)
  • ½ cup cabbage, sliced (optional)
  • 3-4 thai red chillies, chopped
  • 2 teaspoon soy sauce
  • ¾ teaspoon salt
  • ½ teaspoon sugar
  • 4 stalks spring onions, chopped
Instructions
  1. Boil a big pot of water ( 2 litres) until hot and bubbling. Switch off the flame and add in the dried noodles to the hot water. Make sure the noodles is fully immersed. Let it sit in the hot water for 3-4 minutes. The noodles would have swollen by this time. Drain the excess water and set aside to drain in a colander.
  2. Heat oil in a wok until hot. Add in the ginger and garlic and fry briefly until the garlic is starting to brown.
  3. Add in the onions and fry for a couple of minutes. Add in the vegetables of your choice. Carrots, Cabbage, Capsicum etc.. Cook for a couple of minutes. Add in the chopped thai red chillies.
  4. Add in the soy sauce, salt and a little bit of sugar. Saute until the mixture is well coated. Add in the drained rice noodles and mix everything well to combine. Add in the chopped spring onions / scallions and serve hot!

The post Stir Fried Rice Vermicelli Noodles with Garlic, Ginger and Scallions appeared first on Kannamma Cooks.


Thakkali Bajji – Tamil Style Recipe

$
0
0

Thakkali-bajji-recipe

This tomato chutney is called as thakkali bajji in the Coimbatore region. Its called as “maapilai thakkali bajji” or “tomato chutney fit for a groom”. The mother in law tries to impress the newly married groom with her elaborate feasts at every meal. The spices and coconut in the chutney makes it rich and very aromatic. This recipe is my cousin sister Shruti’s home favorite.

Shruti has to be the naughtiest among us cousins. I still remember this one incident vividly. She was in her 7th or 8th grade at that time and wanted to learn to drive. She was pestering me for a very long time to teach her. One day, I agreed. It was night time after dinner that day. The road was quiet and it must have been 10’o clock or something around that time. We started our trusty old TVS-50-moped and it was decided that she was to sit in the front and me at the back. Even though she was in the front, she squeezed a little to the front, so we both can hold the handle bar and the accelerator. I was supposed to control the speed of the moped. We started slowly. It was a good drive. we would have driven about a 100 meters. Then the rebel in her woke up. She just pushed off my hand and accelerated to the full. We landed in an open ditch straight. She continued her acceleration in the ditch for another 10-20 meters before we fell down completely from the moped and got fully covered in ditch water. I was furious, dirty and in shock. She just started laughing there till her stomach hurt. I dint speak a word. We rescued the TVS-50 and returned back home. My mom was shocked to see us. She made us bath in a liter of Dettol. Looking back at all that now makes me laugh so hard. Good old days. Here is how to do thakkali bajji.


shruti

We will need the following spices. Apart from the spices listed below, they also add the spice “black stone flower” called “kalpasi” to this thakkali bajji. It can be hard to come by in a local grocery store. If you can find it, add it to the spice list. Else you can just leave it.

Thakkali-bajji-recipe-spices

Heat oil in a pan until hot. Add in the mustard seeds. Let it splutter. Add in all the spices. Briefly fry for ten seconds. Add in the onions. Saute until the onions are soft.

Thakkali-bajji-recipe-tempering

Mince the ginger and garlic in a small mixie and add it to the pan. Add in the chopped green chillies.

Thakkali-bajji-recipe-ginger-garlic-paste

Fry till the mixture is starting to brown. Grind the tomatoes in the mixie to a paste. Add it to the pan. Add in the chilli powder, turmeric and salt. Add a little jaggery. That little slight sweetness from the jaggery goes well along with the tartness of the tomatoes. Add a cup of water to the pan.

Thakkali-bajji-recipe-tomatoes

Grind 1/4 cup of fresh coconut and 1/4 cup of water in a blender to a smooth paste. Add it to the pan. Saute for a couple of minutes.
Thakkali-bajji-recipe-coconut-paste

Cover the pan and cook for 4 whistes in a pressure pan. Wait for the pressure in the pan to release naturally. Open the pan and garnish with coriander leaves.

Thakkali-bajji-recipe-cook

Serve hot with idli, dosa or chapati.

Thakkali Bajji - Tamil Style Recipe
 
Prep time
Cook time
Total time
 
Thakkali Bajji - Tomato bhaji. Tamil Style Recipe. Side dish for idli, dosa and chapati.
Author:
Recipe type: Side Dish
Cuisine: Tamilnadu
Serves: 4 persons
Ingredients
Spices
  • 3 red chillies
  • 2 sticks cinnamon
  • 1 star anise
  • 2 cardamom
  • 2 cloves
  • 2 bay leaves
  • 2 marathi moggu (kapok buds)
  • 1 teaspoon fennel seeds
  • a pinch kalpasi ( black stone flower )
Other ingredients
  • 2 tablespoon oil
  • ¼ teaspoon mustard seeds
  • 3 Onions, chopped fine
  • 6 cloves garlic
  • 1.5 inch piece ginger
  • 2 green chillies
  • 6 Tomatoes
  • 1 teaspoon salt
  • 1 teaspoon red chilli powder
  • 1 teaspoon turmeric powder
  • ½ teaspoon jaggery
  • ¼ cup coconut
  • 2 sprig coriander leaves, chopped fine
Instructions
  1. Heat oil in a pan until hot. Add in the mustard seeds. Let it splutter. Add in all the spices. Briefly fry for ten seconds. Add in the onions. Saute until the onions are soft.
  2. Mince the ginger and garlic in a small mixie and add it to the pan. Add in the chopped green chillies.
  3. Fry till the mixture is starting to brown. Grind the tomatoes in the mixie to a paste. Add it to the pan. Add in the chilli powder, turmeric and salt. Add a little jaggery. Add a cup of water to the pan.
  4. Grind ¼ cup of fresh coconut in a blender with water to a smooth paste. Add it to the pan. Saute for a couple of minutes.
  5. Cover the pan and cook for 4 whistes in a pressure pan. Wait for the pressure in the pan to release naturally. Open the pan and garnish with coriander leaves.
  6. Serve hot with idli, dosa or chapati.

The post Thakkali Bajji – Tamil Style Recipe appeared first on Kannamma Cooks.

Arcot Mutton Chops – Mutton Chops Masala Roast Recipe

$
0
0

mutton-chops

I first saw this recipe in food lovers magazine that covered about Ebony Restaurant, Bangalore. The article featured some of the best mudaliar community family recipes. The Mudaliar community from the Arcot district of Tamil Nadu have a long and delicious culinary tradition. They established roots in places as far flung as Rangoon, Mallaca and Sholapur. They originally made this dish with goat meat on the bone, that would serve the Mudaliar families well on their long travels. The chops turn out really tender, juicy and fall of the bone. Here is how to do mutton chops.

Grind the ginger and garlic with water to a paste.
Mix all the ingredients under marination, ginger garlic paste and water in a bowl. Add in the trimmed lamb chops, marinate for 30 minutes.


mutton-chops-masala-dry-recipe-mix

In a pressure cooker, add the marinated lamb chops and cook it slowly on a low flame for 10 whistles until well done and the meat is almost falling off the bone. Once the lamb is cooked, remove the chops and keep aside to cool.

mutton-chops-masala-dry-recipe-cook

Reduce the remaining liquid in the cooker to form a thick sauce.

mutton-chops-masala-dry-recipe-sauce

Just before serving, grill the lamb chops on a hot griddle with some ghee, basting generously with the reduced sauce.

mutton-chops-masala-dry-recipe-roast

Serve hot.

mutton-chops-masala-dry-recipe

Arcot Mutton Chops - Mutton Chops Masala Roast Recipe
 
Prep time
Cook time
Total time
 
Tamilnadu Arcot style Mutton chops masala dry roast recipe. with step by step pictures.
Author:
Recipe type: Side Dish
Cuisine: Tamilnadu
Serves: 4 persons
Ingredients
For the ginger garlic paste
  • 5 cloves garlic
  • 1 inch piece ginger
  • 2 tablespoon water
For the Marination
  • 500 grams mutton chops
  • 2 tablsepoon plain yogurt / curd
  • 1 tablespoon red chilli powder
  • 1 teaspoon coriander powder
  • ½ teaspoon garam masala
  • ½ teaspoon salt
  • 200 ml water
For the Pan Roast
  • 1 tablespoon ghee
Instructions
  1. Grind the ginger and garlic with water to a paste.
  2. Mix all the ingredients under marination, ginger garlic paste and water in a bowl. Add in the trimmed lamb chops, marinate for 30 minutes.
  3. In a pressure cooker, add the marinated lamb chops and cook it slowly on a low flame for 10 whistles until well done and the meat is almost falling off the bone. Once the lamb is cooked, remove the chops and keep aside to cool.
  4. Reduce the remaining liquid in the cooker to form a thick sauce.
  5. Just before serving, grill the lamb chops on a hot griddle with some ghee, basting generously with the reduced sauce.
  6. Serve hot.

The post Arcot Mutton Chops – Mutton Chops Masala Roast Recipe appeared first on Kannamma Cooks.

Cauliflower Paneer Curry – Gobi Paneer Curry

$
0
0

cauliflower-paneer-curry-recipe

This is a one pot Cauliflower Paneer Curry with coconut milk. No grinding of masalas. No making pastes. A quick curry for those busy weekdays. It tastes great with rice or chapati. There are very few ingredients in this recipe and the curry is very mild and aromatic. Here is how to do cauliflower paneer curry.

Heat coconut oil in a pan and add in very finely minced ginger and curry leaves. Fry for a minute. Add in the finely chopped onion. Fry till the onions are soft. No need to brown the onions.

cauliflower-paneer-curry-recipe-ginger


Add in the finely chopped tomatoes. Add in the chopped green chilli. If you want a spicy curry, add more green chillies. Its totally up to you as to how spicy you want the curry. Adjust the quantity of the chillies accordingly. Add in a teaspoon of turmeric and a teaspoon of chilli powder. Add in the salt. Fry until the tomatoes are dry.

cauliflower-paneer-curry-recipe-tomatoes

Add in the cauliflower. Add in 1 cup of water. Let it simmer for 10 minutes in medium flame.

cauliflower-paneer-curry-recipe-add-gobi

Once the cauliflower is cooked to fork tender, add in the paneer. Reduce the flame to low. Add in the coconut milk. I used store bought canned coconut milk today. Let it simmer for a couple of minutes. Switch off the flame and garnish the cauliflower paneer curry with coriander leaves.

cauliflower-paneer-curry-recipe-paneer

Gobi Paneer Masala - Cauliflower Paneer Curry
 
Prep time
Cook time
Total time
 
Gobi paneer masala. This is a one pot curry with veggies and coconut milk. No grinding of masalas. No making pastes. A quick curry for those busy weekdays.
Author:
Recipe type: Side Dish
Cuisine: South Indian
Serves: 3 persons
Ingredients
  • 1 tablespoon coconut oil
  • 2 inch piece ginger, finely minced
  • 2 sprigs curry leaves
  • 2 onions, finely chopped
  • 3 green chillies, chopped
  • 2 tomatoes, finely chopped
  • 1 teaspoon salt
  • 1 teaspoon turmeric powder
  • 1 teaspoon chilli powder
  • 500 grams cauliflower, diced
  • 200 grams paneer, cubed
  • 150 ml canned coconut milk
  • 3 sprigs coriander leaves, chopped fine.
Instructions
  1. Heat coconut oil in a pan and add in very finely minced ginger and curry leaves. Fry for a minute. Add in the finely chopped onion. Fry till the onions are soft. No need to brown the onions.
  2. dd in the finely chopped tomatoes. Add in the chopped green chilli. Add in a teaspoon of turmeric and a teaspoon of chilli powder. Add in the salt. Fry until the tomatoes are dry.
  3. Add in the cauliflower. Add in 1 cup of water. Let it simmer for 10 minutes in medium flame.
  4. Once the cauliflower is cooked to fork tender, add in the paneer. Reduce the flame to low. Add in the coconut milk. Let it simmer for a couple of minutes. Switch off the flame and garnish cauliflower paneer curry with coriander leaves.

The post Cauliflower Paneer Curry – Gobi Paneer Curry appeared first on Kannamma Cooks.

Kongunad Style Senai kilangu Masala – Elephant Foot Yam Masala

$
0
0

senai-kilangu-masala

This is Renuka Aunts recipe for Senai kilangu Masala – Elephant Foot Yam Masala. I have some fond memories with her. She was 16 when she got married. Young. Too young! Her father ran a bus company that ran buses from Coimbatore to Mettupalayam. She was fondly called as the bus company Renu! We have had some of the most memorable moments. Me, Shruti and her, riding in her Premier Padmini 118 to Richie Rich at-least once a month for their superb sundaes. I loved their nut sundae. We would shop for the whole day around town till knees hurt. We would wind up for dinner at Annapoorna and I would gobble my ghee roast in no time. These are vivid memories that will stay forever with me. This Senai kilangu Masala is her moms recipe. This recipe has been passed on for generations. The interesting thing about this masala is that there is no onion or tomato in this recipe. The subtle flavor of the spices and coconut makes it very delicious. Here is Kongunad style Senai kilangu Masala – Elephant Foot Yam Masala.

renuka-shruti
There are 3 steps in this recipe for Senai kilangu masala
# Senai kilangu prep
# Masala prep
# Tempering and finishing Senai kilangu masala
NOTE: Be generous with oil at every step!
First, lets do the senai kilangu prep
Clean, scrape, peel and wash the senai kilangu. Wash them several times to get rid of all the dirt and sand. Cut the senai kilangu into little fingers like we do for finger chips. Set aside.

senai-kilangu-masala-elephant-foot-yam-clean

Heat a pan with a liter of water and add in the cut senai kilangu. Add in the turmeric and salt. Let it boil for 5-7 minutes until the senai kilangu is 3/4th done. Remove from heat and drain. Discard the drained water. Heat a pan with couple of tablespoon of oil and fry the senai kilangu for 10 minutes on medium flame. It should start to get brown on the edges. Remove from heat and set aside.

fry-senai-kilanguNow we will do the masala
Heat couple of tablespoon of oil in the pan until hot. Add in the cinnamon, cloves, garlic, ginger, dried red chillies, fennel seeds (sombu) and the curry leaves. Fry for a few seconds until fragrant. Add in the fresh shredded coconut, poppy seeds (khus khus), coriander powder and the salt. Fry for a couple of minutes. Remove from heat. Let it cool a bit. Transfer the mixture to a mixie/blender and add a cup of water. Grind to a very very smooth fine paste. Set aside.

senai-kilangu-masala-grindNow the tempering and finishing of Senai kilangu masala
Heat couple of tablespoon of oil in the pan until hot. Add in the mustard seeds, split urad dal and curry leaves. Let the mustard seeds splutter. Add in the ground masala and the fried Senai kilangu. Keep the flame on medium low and fry till the masala is well absorbed by the Senai kilangu.

senai-kilangu-masala-fry

Switch off the flame and serve Senai kilangu masala hot with rice.

senai-kilangu-masala-recipe

Kongunad Style Senai kilangu Masala - Elephant Foot Yam Masala
 
Prep time
Cook time
Total time
 
Recipe for kongunad style Senai Kilangu Masala / Elephant foot yam Masala flavored with subtle spices and coconut. This dish is usually served with rice.
Author:
Recipe type: Side Dish
Cuisine: Tamilnadu
Serves: 4 persons
Ingredients
Senai kilangu prep
  • 250 grams Senai kilangu / Elephant foot yam
  • 1 teaspoon turmeric
  • 1 teaspoon salt
  • 2 tablespoon peanut oil
Masala prep
  • 2 tablespoon peanut oil
  • 2 sticks cinnamon
  • 2 cloves
  • 6 cloves garlic
  • 1 inch piece ginger, chopped
  • 5 dried red chillies
  • 1½ teaspoon fennel seeds (sombu)
  • 2 sprigs curry leaves
  • ½ cup fresh shredded coconut
  • 1 tablespoon poppy seeds (khus khus)
  • 1 tablespoon coriander powder
  • 1 teaspoon salt
  • 1 cup water to grind
Tempering and finishing Senai kilangu masala
  • 2 tablespoon peanut oil
  • ½ teaspoon mustard seeds
  • ½ teaspoon urad dal
  • 2 sprigs curry leaves
Instructions
Senai kilangu prep
  1. Clean, scrape, peel and wash the senai kilangu. Wash them several times to get rid of all the dirt and sand. Cut the senai kilangu into little fingers like we do for finger chips. Set aside.
  2. Heat a pan with a liter of water and add in the cut senai kilangu. Add in the turmeric and salt. Let it boil for 5-7 minutes until the senai kilangu is ¾th done. Remove from heat and drain. Discard the drained water. Heat a pan with couple of tablespoon of oil and fry the senai kilangu for 10 minutes on medium flame. It should start to get brown on the edges. Remove from heat and set aside.
For the masala
  1. Heat couple of tablespoon of oil in the pan until hot. Add in the cinnamon, cloves, garlic, ginger, dried red chillies, fennel seeds (sombu) and the curry leaves. Fry for a few seconds until fragrant.
  2. Add in the fresh shredded coconut, poppy seeds (khus khus), coriander powder and the salt. Fry for a couple of minutes. Remove from heat. Let it cool a bit.
  3. Transfer the mixture to a mixie/blender and add a cup of water. Grind to a very very smooth fine paste. Set aside.
Tempering and finishing Senai kilangu masala
  1. Heat couple of tablespoon of oil in the pan until hot. Add in the mustard seeds, split urad dal and curry leaves. Let the mustard seeds splutter.
  2. Add in the ground masala and the fried Senai kilangu. Keep the flame on medium low and fry till the masala is well absorbed by the Senai kilangu.

The post Kongunad Style Senai kilangu Masala – Elephant Foot Yam Masala appeared first on Kannamma Cooks.

How to make soft Idli batter using mixie method

$
0
0

how-to-make-Soft-idli-batter-recipe-mixie

This is one of the most requested recipe in Kannamma Cooks.

I have already shared the following recipes for making idli batter using various techniques.
Best Method – Idli batter made in wet grinder
Making easy idlies – Idli batter made using idli rava

The ingredients for making this batter is very similar to this recipe. I strongly suggest you read that before you proceed with this recipe. I have explained each ingredient in detail in that post. The ingredients remain the same for this recipe too but with one addition. We use the addition of poha / avalakki in this recipe which makes the idlies softer in this mixie method. Here is how to do idli batter using a mixie/blender.
Measurements used 1 cup = 250 ml , 1 tablespoon = 15 ml
Wash all the ingredients separately in running water for 2-3 times. Soak Fenugreek Seeds (vendhayam) , Whole white Urad Dal and Idly Rice separately in lots of water for a minimum of 3-4 hours. Soak the poha/avalakki in 2 cups of water.

idli-batter-in-mixie-method-ingredients

Grind the soaked and drained fenugreek seeds along with the soaked poha/avalakki (it would have puffed up by now). No need to drain the water from poha. Add a cup of water and grind for 3 minutes until the seeds and poha are finely ground and have fluffed up. Remove the ground poha mixture and empty it into a big vessel.

idli-batter-in-mixie-method-avalakki

Now comes the tricky ingredient called urad dal!
The mixie / blender was making the urad dal hot when ground. While warmth encourages the growth of the bacteria, heat kills it. A very hot environment can make the batter sour too soon and the taste will not be good.
Fermentation of Idli batter is carried out largely by lactic acid bacteria. Not yeast. There are two kinds of lactic acid bacteria. Homofermentive and heterofermentive.
Homofermentive lactic acid bacteria produces only lactic acid.
Heterofermentive bacteria – the Idli bacteria (Leuconostoc mesenteroides) produces carbon dioxide in addition to lactic acid.

So for good Idli, we need the rise of batter (CO2 effect) and also souring of the batter. If the batter is too hot at the beginning, it gets fermented too soon and the resulting Idlies might not be very soft. Also the Idlies may be good for the first day but hard on the second day.
So we use ice water for grinding the urad dal so the dal doesnt get heated up when ground. Lets now grind the urad dal.

Now, add the drained urad dal in the mixie. Add in a cup of ice water. Grind for 3 minutes till the urad dal is perfectly smooth. We use ice water so as to keep the dal from heating up in the mixie. Remove the ground urad dal mixture and add it to the vessel.

idli-batter-in-mixie-method-urad-dal

Now grind the drained rice in 3-4 batches. Add upto 1.5 cups of water while grinding. Remove the ground rice mixture and add it to the vessel.

idli-batter-in-mixie-method-rice

Add in the salt and mix the batter well with hands.

idli-batter-in-mixie-method-mix

I marked the below orange tape to show you how much the batter ferments. Let the batter sit in a warm place. If the place where you live is cold, I have some tips to accelerate the fermentation. Keep the batter inside a cup board or a shelf or some place warm. Insulate the vessel with a warm heavy blanket. That will keep the vessel warm. If you have a small room heater, keep it running near the shelf where you place the batter. if you don’t have a heater, buy a small table lamp and leave it running near the idli batter vessel. You just need to make sure that the batter is kept warm.

idli-batter-in-mixie-method-before-fermentation

Allow the batter to ferment for 8-10 hours. As you can see, I wrapped the idli batter container in a blanket to make sure that its warm as its been cold in the place where I live. I also left a table lamp inside the shelf switched on. Once the batter is fermented, it would have doubled in volume. Mix the idli batter well and store it in the refrigerator and use it within the next 3 days.

idli-batter-in-mixie-method-after- fermentation

Lets make some idly now!
Put some water in an idly vessel and put it on medium flame. Oil the idli plate and gently fill the rounds with the batter. Put it inside the idly vessel and let it steam for 6-7 minutes. The key to good idlis – Do not allow it to over cook. It might become hard and dry. Just keep an eye and remove the idlis after 6-7 minutes. Do not remove the idlis immediately. It might stick. Leave it undisturbed for 4-5 minutes and then spoon it out. Serve hot with your favorite chutney and sambar.

how-to-make-Soft-idli-batter-cook

How to make soft Idli batter using mixie method
 
Prep time
Cook time
Total time
 
Soft Idli batter using Mixie. Idli batter ground in the mixie. Soft and fluffy idlies using mixie method. With tips for fermenting idli batter in cold weather.
Author:
Recipe type: Main Dish
Cuisine: Tamilnadu
Serves: 30-35 idlies
Ingredients
  • 1¼ Cups Urad Dal
  • 4 Cups Idly Rice
  • 1.5 cups thick poha / avalakki
  • 1 tablespoon Fenugreek seeds (Vendhayam)
  • 2 tablespoon Salt
Instructions
  1. Soak all the ingredients except salt in lots of water. Soak the ingredients separately.
  2. Grind the soaked and drained fenugreek seeds along with the soaked poha/avalakki . Add a cup of water and grind for 3 minutes until the seeds and poha are finely ground and have fluffed up. Remove the ground poha mixture and empty it into a big vessel.
  3. Now, add the drained urad dal in the mixie. Add in a cup of ice water. Grind for 3 minutes till the urad dal is perfectly smooth. Remove the ground urad dal mixture and add it to the vessel.
  4. Now grind the drained rice in 3-4 batches. Add upto 1.5 cups of water while grinding. Remove the ground rice mixture and add it to the vessel.
  5. Add in the salt and mix the batter well with hands. Let the batter sit in a warm place. Allow the batter to ferment for 8-10 hours. Once fermented, mix well and store it in the refrigerator.

The post How to make soft Idli batter using mixie method appeared first on Kannamma Cooks.

Keerai Kuzhambu / kulambu – Greens in Dal Recipe

$
0
0

keerai-kuzhambu-kulambu

We used to live in a residential colony when we were young. Mornings were lively and busy. The milk man would be the first to come. Followed by the fish guy on his cycle, with wicker baskets tied on either side of the carrier. The baskets would be filled with that days catch and crushed ice. The baskets would be dripping and was a sight to watch. The one that I looked for the most was this old lady who had a wet burlap lined wicker basket on her head selling greens. She had all kinds of greens. She would chew on the tobacco constantly. She was so kind and called everyone “kannu”. She would sing songs with the names of the greens that she had in the basket. She had an attitude like no one. So positive all the time. I loved watching her on the street. My mom would buy the greens and she would handle the change from a small pouch that she had tied to her saree. She would throw in a couple of sprigs of curry leaves and coriander leaves for free. That was customary then. Fresh produce was really the norm. The old lady is gone now. I only have memories of her. My mom used to make greens almost every day. She cooked simple food but I loved it. This is my moms recipe for making keerai kuzhambu. Her Keerai Kadayal recipe is a family favorite. She makes greens so flavorful that everyone at home loves greens. Here is how to do Keerai Kuzhambu with dal.

You can use any kind of regular keerai / greens like Arai keerai , siru keerai, amaranth and palak. Do not use bitter variety of leaves like drumstick leaves or methi. Wash and clean the greens and chop them roughly. Set aside.

Heat coconut oil in a pan and add in the mustard seeds. Let the mustard seeds splutter. Add in the cumin seeds, ginger and the roughly chopped curry leaves. Fry briefly for a minute.


keerai-kuzhambu-kulambu-recipe-ginger

Add in the chopped onions and saute until soft. About 2-3 minutes on medium flame. No need to brown the onions.

keerai-kuzhambu-kulambu-recipe-onion

Add in the chopped tomatoes and the finely chopped green chillies. Add in the salt and the turmeric powder. Saute on medium flame for 5 minutes until the tomatoes are mushy. Add in half a cup of water to the mixture.

keerai-kuzhambu-kulambu-recipe-tomatoes

Add in the chopped greens / keerai and let it cook for 7-8 minutes on medium flame. Once the greens are cooked, add in one cup of toor dal to the pan. Let it simmer for two minutes.

keerai-kuzhambu-kulambu-recipe-keerai

Grind half a cup of fresh shredded coconut with half a cup of water to a fine paste. Add it to the pan. Mix well to combine. Let the mixture simmer for a minute. Switch off the flame. Keerai kuzhambu is ready. Serve hot with rice for lunch.

keerai-kuzhambu-kulambu-recipe-coconut

Keerai Kuzhambu - Greens Kulambu Curry
 
Prep time
Cook time
Total time
 
Easy Recipe for Keerai Kuzhambu / kulambu. Made with toor dal, ginger and coconut. Served with rice. South Indian lunch recipe.
Author:
Recipe type: Curry
Cuisine: Tamilnadu
Serves: 4-5 persons
Ingredients
  • 1 teaspoon coconut oil
  • ¼ teaspoon mustard seeds
  • 1½ inch piece ginger, finely minced
  • 2 sprigs curry leaves, chopped
  • 2 medium sized red onion, finely chopped
  • 2 big tomatoes, finely chopped
  • 4 green chillies, finely chopped
  • 1 teaspoon turmeric powder
  • 1 teaspoon salt
  • 250 grams keerai / greens
  • 1 cup cooked toor dal
  • ½ cup fresh shredded coconut
Instructions
  1. Heat coconut oil in a pan and add in the mustard seeds. Let the mustard seeds splutter. Add in the cumin seeds, ginger and the roughly chopped curry leaves. Fry briefly for a minute.
  2. Add in the chopped onions and saute until soft. About 2-3 minutes on medium flame. No need to brown the onions.
  3. Add in the chopped tomatoes and the finely chopped green chillies. Add in the salt and the turmeric powder. Saute on medium flame for 5 minutes until the tomatoes are mushy. Add in half a cup of water to the mixture.
  4. Add in the chopped greens / keerai and let it cook for 7-8 minutes on medium flame. Once the greens are cooked, add in one cup of toor dal to the pan. Let it simmer for two minutes.
  5. Grind half a cup of coconut with half a cup of water to a fine paste. Add it to the pan. Mix well to combine. Let the mixture simmer for a minute. Switch off the flame. Keerai kuzhambu is ready. Serve hot with rice for lunch.

The post Keerai Kuzhambu / kulambu – Greens in Dal Recipe appeared first on Kannamma Cooks.

Indian Grocery in Hong Kong

$
0
0

Indian-grocery-hong-kong-ethnic

Most of the Indian grocery stores in Hong Kong do home delivery. The turn around time is usually 1-2 days from the time of order. Here is a list of grocery stores that I like. I ordered from a lot of Indian stores in the past couple of months. Some were really good and some were OK. The really good ones are here.

Indian-grocery-hong-kong

Maharaja’s Indian Emporium http://maharajahongkong.com/
205, 2nd Floor, Haiphong Mansions, 99-101, Nathan Road, Tsim Sha Tsui, Kowloon, Tel: 2756-5611, 2366-2941
Its not a big store but well stocked with ingredients one will need in an Indian pantry. Its the best store for South Indian ingredients. They have a lot of variety when it comes to south Indian masalas.  Its a good store to stock up on spices and dal.
Home Delivery – YES ( Mostly an old “uncle”, Mr. Arif picks up the call to take orders. He is adorable! If you talk Tamil, you will place orders from this store for the sheer joy of talking with him.) The orders are usually delivered the next day. Fruits and Vegetables comes fresh on Wednesdays to the store.


Regency Spices http://regencyspices.hk/
5th Floor Qualipak Tower, 122 Connaught Road West, Sai Ying Pun, Tel: 2517-6577, 2517-2316
This store is your one stop shop for all your spice needs. Their spices are very fresh and come in neatly packed bottles. I recommend this store for spices. They even grind the spices to order. Their turmeric is the most aromatic.

Spice Store http://www.spicestore.hk/
Tel – 2944-2336
This is an online grocery store. I have ordered from them multiple times and find their packaging to be so neat and their lentils were particularly amazing. I strongly recommend if you are into online ordering!
Shipping is free if you order more than $300. For orders below HKD 300, they charge a nominal delivery fee of HKD 30.

spice-store

Kiran’s Provision Store http://www.kiranstore.com/
Shop 52, 1/F, Mirador Mansion, 58 Nathan Road, Tsim Sha Tsui Tel: 2723-6781
Kiran is a very reliable Indian store. You can also do online ordering and pay by cash on delivery or transfer to bank account. They usually deliver the next day after ordering. They also undertake catering and have fresh indian snacks and sweets for pickup. A great store.

The Indian Provision Store
24 Bowrington Road, Causeway Bay, Tel – 2891-8324
This is a well stocked up store located in the Hong Kong Island. Its in Causeway Bay.

Star Trading http://www.starmarthk.com/
Shop No.16, G/F, Peninsula Apartment, 16 Mody Road, Tsim Sha Tsui,/ Shop 18, 1st Floor, Abba Shoping Mall, Aberdeen Tel :2366 6534.
You can order online with them and they usually deliver the next day. They have a wide range of products.

Spice Box Organics http://www.spiceboxorganics.com/
72 Third Street, G/F Shop K, Fook Moon Building, Sai Ying Pun, Tel: 2568 2728
If you are looking for organic indian ingredients, then spice box organics is your best option.

The post Indian Grocery in Hong Kong appeared first on Kannamma Cooks.


Jacques Pepin Eggs Jeanette – Les Oeufs Jeannette

$
0
0

eggs-jeanette-pepin
I am a complete fan of Jacques Pepin. I still remember the day when I got my personally autographed photo and a greeting card that had a copy of a picture painted by Jacques himself. A person of that stature to be so humble and to send a mail all the way from USA to India to a random fan is what makes him who he is. Its beyond my belief that someone can be so humble at that level to a person like me who doesn’t matter. He is the most respected chef in the whole world. He is my most respected teacher. No one teaches like him anymore.  His auto biography, The Apprentice: My Life in the Kitchen is a genius and its a book you can never put down once you start.

Jacques Pepin

In the book, after each chapter, he shares a recipe that has got something to do with that particular chapter. Pepin talks about his mother often in the book. His mother Jeanette served this dish regularly and he remembers it so vividly as it was his childhood dish. They mostly ate dishes that were economical (but delicious) as the country was battling war torn years during world war II. Here is an excerpt from the book “When we were kids, eggs were a staple on our table. Meat or poultry showed up there once a week at the most, and more often than not, our “meat” dinners consisted of a delicious ragout of potatoes or cabbage containing bits of salt pork or leftover roast. Eggs were always a welcome main dish, especially in a gratin with bechamel sauce and cheese, and we loved them in omelettes with herbs and potatoes that Maman would serve hot or cold with a garlicky salad. Our favorite egg recipe, however, was my mother’s creation of stuffed eggs, which I baptized “eggs Jeanette”. To this day, I have never seen a recipe similar to hers, and we still enjoy it often at our house. Serve with crusty bread as a first course or as a main course for lunch.”

I have adapted the recipe. Its the most delicious stuffed egg you will ever have. This is one of my go to easy easy dish that I do for parties and have had no left overs. People go crazy about these stuffed eggs. Don’t tell them that its this easy!
Here is the recipe for stuffed eggs Jeanette.

For the hard cooked eggs stuffing

Put the eggs in a small saucepan, and cover with boiling water. (Starting the eggs in boiling water helps in easy peeling later on). Bring to a very gentle boil, and let boil for 9 to 10 minutes. Drain off the water and shake the eggs in the saucepan to crack the shells. (This will help in the removal of the shells later on). Fill the saucepan with cold water and ice, and let the eggs cool for 15 minutes. Shell the eggs under cold, running water and split them lengthwise. Remove the yolks carefully, put them in a bowl. Add the finely minced green chillies, garlic, finely chopped coriander leaves, mayonnaise, and salt. Crush with a fork to create a coarse paste.

boiled-eggs-stuffing

Spoon the mixture back into the hollows of the egg whites, reserving 1 to 2 tablespoons of the filling to use in the dressing / sauce.

eggs-jeanette-add-stuffing

Heat the vegetable oil in a nonstick skillet / iron skillet and place the eggs stuffed side down. Cook over medium heat for 2 to 3 minutes, until the eggs are beautifully browned on the stuffed side. Remove, and set aside.

eggs-jeanette-fry-skilletFor the dressing
Mix all of the dressing ingredients in a small bowl with a whisk or a spoon until well combined.
Coat the warm eggs with the dressing and serve lukewarm with crunchy French bread as a first course or main course for lunch.

eggs-jeanette-dressing

Jacques Pepin Eggs Jeanette recipe - Les Oeufs Jeannette
 
Prep time
Cook time
Total time
 
Pepin often talks about this childhood dish served by his mother, Jeanette. It is easy, and makes a wonderful first course or main course for lunch.
Author:
Recipe type: Appetizer
Cuisine: Adapted French
Serves: 4 persons
Ingredients
For the hard cooked eggs stuffing
  • 4 Eggs
  • 1 clove garlic, finely minced
  • 2 green chillies, finely minced
  • 2 sprigs coriander leaves (cilantro), finely chopped
  • 2 tablespoon Mayonnaise
  • ¼ teaspoon salt
  • 2 teaspoon vegetable oil for frying stuffed eggs
Dressing
  • 1 to 2 tablespoons leftover egg stuffing (from above)
  • 1 tablespoon Mayonnaise
  • 2 tablespoons water
  • Dash of salt and freshly ground black pepper
  • 2 tablespoons extra-virgin olive oil
Instructions
For the hard cooked eggs stuffing
  1. Put the eggs in a small saucepan, and cover with boiling water. Bring to a very gentle boil, and let boil for 9 to 10 minutes. Drain off the water and shake the eggs in the saucepan to crack the shells. Fill the saucepan with cold water and ice, and let the eggs cool for 15 minutes. Shell the eggs under cold, running water and split them lengthwise.
  2. Remove the yolks carefully, put them in a bowl. Add the finely minced green chillies, garlic, finely chopped coriander leaves, mayonnaise, and salt. Crush with a fork to create a coarse paste.
  3. Spoon the mixture back into the hollows of the egg whites, reserving 1 to 2 tablespoons of the filling to use in the sauce.
  4. Heat the vegetable oil in a nonstick skillet / iron skillet and place the eggs stuffed side down. Cook over medium heat for 2 to 3 minutes, until the eggs are beautifully browned on the stuffed side. Remove, and arrange stuffed side up on a platter.
For the dressing
  1. Mix all of the dressing ingredients in a small bowl with a whisk or a spoon until well combined.
  2. Coat the warm eggs with the dressing and serve lukewarm with crunchy French bread as a first course or main course for lunch.
Notes
I have adapted the recipe over years. The original recipe does not use green chillies or cilantro. And, it uses mustard sauce in the dressing.

The post Jacques Pepin Eggs Jeanette – Les Oeufs Jeannette appeared first on Kannamma Cooks.

How to peel ginger with a spoon

Chicken Chinthamani Recipe

$
0
0

coimbatore-chicken-chinthamani-recipe

Chicken Chinthamani Recipe is a very rustic style of chicken preparation in the kongunad region. There is even a place in Coimbatore called Chinthamani Pudur. But I am not sure if this dish originated there. Chinthamani literally means a precious stone. A dry roasted chicken recipe using very few ingredients, is sure a winner. Its a very spicy dish. Chicken thighs are preferred for this Chicken Chinthamani as it stays juicy after the long roasting in the pan. Sesame oil is the traditional oil used for this recipe and it imparts a deep aroma into this dish. Remember that there aren’t many ingredients in the recipe. The flavor of this Chicken Chinthamani is robust from the sesame oil and the dried chilli. Here is how to do chicken chinthamani.

Clean and wash the chicken with bone. Cut the chicken into small bite sized pieces. Its important to keep the chicken pieces small. Else it will take longer time to cook. Set aside.
Heat oil in the pan until hot. Add in the mustard seeds and let it splutter. Add in the curry leaves and onion and fry till the onions are soft.

coimbatore-chicken-chinthamani-recipe-onion-fry

Add in the slit dried red chillies (seeds removed), and the chicken pieces. Add in the salt and red chilli powder. Add 1/2 cup of water. Mix well to combine. Cover the pan with a lid and let it cook in low flame for 10-15 minutes. Stir once a while so the chicken does not scorch at the bottom.

coimbatore-chicken-chinthamani-recipe-cook

After 15 minutes, remove the lid and fry for 5 minutes until the chicken is almost dry.
Add in the fresh shredded coconut and saute for a couple of minutes.

coimbatore-chicken-chinthamani-recipe-coconut

Add in the coriander leaves and remove from heat. Chicken Chinthamani is ready.

Serve Chicken Chinthamani hot as a side dish with rice. The perfect combination is rasam, rice and chicken chinthamani.

Chicken Chinthamani Recipe
 
Prep time
Cook time
Total time
 
Recipe for kongunad style chicken chinthamani. A very rustic roasted dry chicken recipe. Spicy side dish. Serve with rice or chapati.
Author:
Recipe type: Side Dish
Cuisine: Kongunad, Tamilnadu, Coimbatore
Serves: 2-3 persons
Ingredients
  • 300 grams chicken with bone, preferably thighs
  • 3 tablespoon sesame/ gingely oil (I used idhayam nallennai/sesame oil)
  • ¼ teaspoon mustard seeds
  • 3 sprigs curry leaves
  • 10 dry red chillies (seeds removed)
  • 2 teaspoon red chilli powder
  • 1 teaspoon salt
  • 2 sprigs coriander leaves, chopped for garnish
Instructions
  1. Clean and wash the chicken. Cut the chicken into small bite sized pieces. Set aside.
  2. Heat oil in the pan until hot. Add in the mustard seeds and let it splutter. Add in the curry leaves and onion and fry till the onions are soft.
  3. Add in the slit dried red chillies (seeds removed), and the chicken pieces. Add in the salt and red chilli powder. Add ½ cup of water. Mix well to combine.
  4. Cover the pan with a lid and let it cook in low flame for 10-15 minutes. Stir once a while so the chicken does not scorch at the bottom.
  5. After 15 minutes, remove the lid and fry for 5 minutes until the chicken is almost dry.
  6. Add in the fresh shredded coconut and saute for a couple of minutes.
  7. Add in the coriander leaves and remove from heat.
  8. Chicken Chinthamani is ready.
  9. Serve hot as a side dish with rice.
Notes
As the dried red chillies are used without the seeds, only the flavor will be imparted. It will not be spicy. If you want a really hot chinthamani, add more red chilli powder.

The post Chicken Chinthamani Recipe appeared first on Kannamma Cooks.

Tips and Tricks for making Idli Batter

$
0
0

I get a lot of mails everyday about idli batter fermentation. This post might be useful for all the people trying to make soft idlies at home. If you are specifically looking for recipes, here they are.
How to make idli batter in wet grinder. This is my preferred method.
How to make idli batter using an Indian heavy duty mixie
How to make idli batter using idli rava /rawa.

So lets talk about the ingredients first. The first important ingredient in making idli is the urad dal.
Urad Dal
There are basically four kinds of urad dal thats available in the market.
The black whole urad dal. Nothing but the urad dal with the husk still on. This is not good for making idlies. But they make the fantastic dal bukhara.

Soaked-Urad-Dal

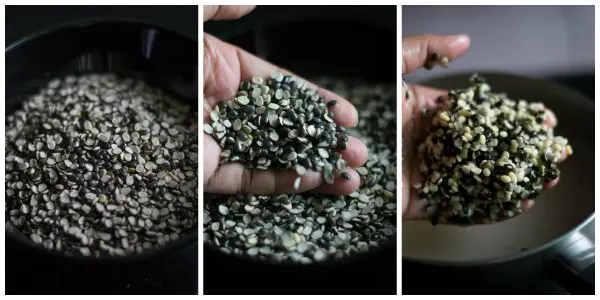
The second is the split black urad dal. Its same as the previous one but its just that each grain of dal is split into two. This is the dal my mother and my grand mother used for a long time to make idli. This dal makes hands down the bestest idli. The down side of this dal is that it involves a lot of labour. Its time consuming. So if you have decided to go the old fashioned way and want to make idlies with this dal, here is what you should do.
Soak the split urad dal for 3-4 hours in lots of water. Then try rubbing the dal in your palm. Some of the black husk attached to the dal will get seperated. Drain the water along with the husk. Again fill the vessel with water and rub the dal in your palms. Repeat until all the husk is removed and only the white part of the dal remains. It will take about 15 minutes of rubbing and washing. After all the washing, a little bit of black husk – one or two here and there would remain and that’s fine. If you have the time, go ahead and try this atleast once. Its very rewarding.

idli-batter-tips-dal

Then comes the white whole urad dal. Its the urad dal without the husk or skin. The naked dal. This is the dal we use now for making idlies. But there is a catch. There are two varieties of this white whole urad dal available in the market. The polished dal popularly referred to as nylon urad and the unpolished white urad dal. We will use only unpolished urad dal.

how-to-make-Soft-idli-batter-recipe-whole-urad

The last one is the split white urad dal. Its the urad dal without its skin which has been split. This is popularly referred to as the tempering / tadka dal. We do not use this dal.

idli-batter-tips-splitdal

Why selecting the dal is important.
The factory process of removing the husk from the dal requires a certain amount of heat. The heat might have muted some of the good bacteria thats needed for fermentation.
The modern manufacturing methods have reduced this by a great extent, so using unpolished whole white urad dal is ok. But if you are a purist, go the grandmas route and buy split black urad dal and de husk the dal yourself.

Now the rice.
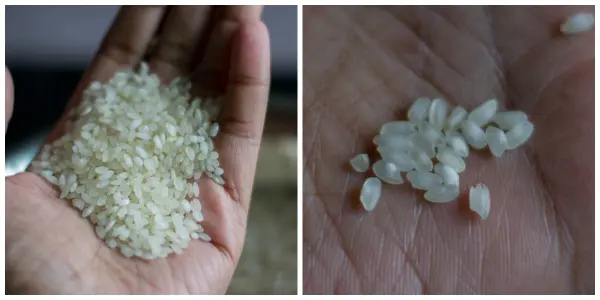
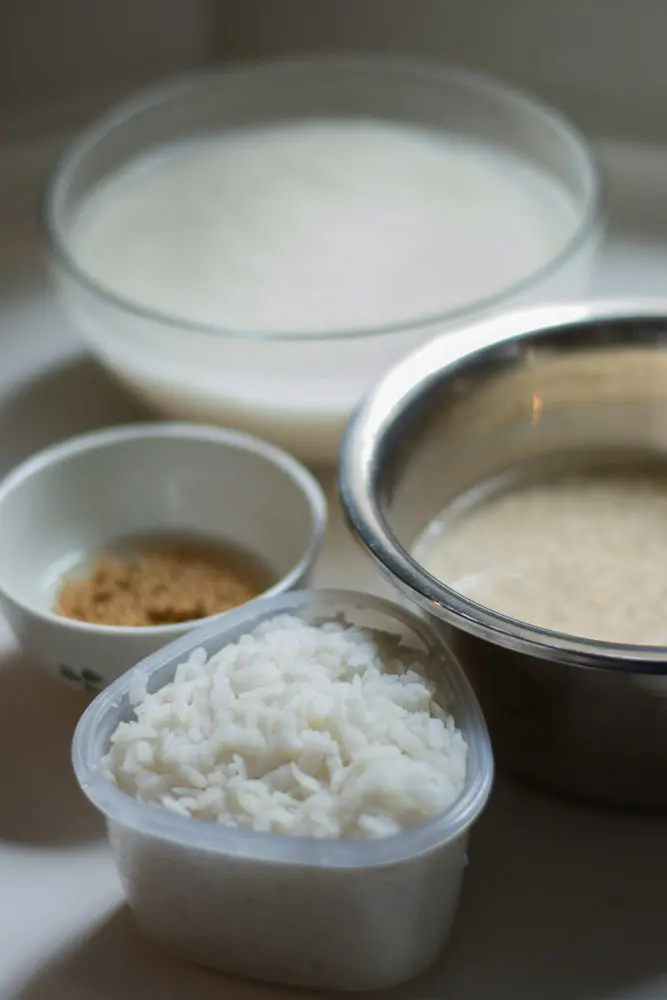
The only rice that will give you desired results while making idli is par boiled rice. Raw rice doesnt work. In particular, a par-boiled variety called idly rice is extensively used for making idli in the Tamilnadu region. The technical variety of parboiled rice thats referred to as simply “idly rice” is called as “salem kara” or “salem car”. If you cannot procure idly rice, try getting a good quality par boiled rice. Idly rice is a unique short grained fat rice. Here is a picture of idli rice.

idli-batter-tips-rice-idlyrice

Now, the fenugreek seeds.
I need to be honest with you here. This is an optional ingredient. But I love the flavor that fenugreek imparts in the idli or dosa. Thats the flavor that reminds me of childhood. Its healthy and it also aids in fermentation. But if you use a lot, your idli is going to be bitter. The smell of idli, and particularly the dosa roasting on a pan is something that I look forward to every time. Fermented fenugreek seeds is an important reason for that unforgettable dosa aroma. Its like petrichor. Something mostly everyone loves.
But if you dont like fenugreek seeds, you can just omit them. If you want a really really white idli, skip the fenugreek seeds.

Salt
What type of salt is used?
Rock Salt. The simple reason for using rock salt is that its minimally processed and may not contain anything else other than salt. Table salt contains other ingredients such as anti-caking agents etc… which may interfere in fermentation. So try avoiding table salt while making idli.

Other Ingredients people add while making idli batter
The two most common ingredients that I see people adding now to get more fluffier idlies are
Sabudana and Avalakki
Sabudana (Sago) or Javvarisi is a by product of Tapioca root that’s been cooked and dried. Any cooked and dried product when comes in contact with water rots (ferments) faster. In our case sabudana aids in fermentation by helping good bacteria do its work more efficiently.
Avalakki – Beaten rice – Poha
Avalakki is made from Paddy. Paddy is soaked and cooked in hot water and then dried. The dried paddy is roasted and pressed to make flakes. So it gives the same effect as Sabudana.

idli-batter-tips-aval

Idli Rava / Idli Rawa
Even though many people use idli rava to make idlies, I do not prefer this method the most. Have this as the last resort. Its ok to make idlies using idli rava when you are in a hurry. But the texture is going to be different. Also the shelf life of the batter is very limited. You will start getting hard idlies on the second day. If you are used to eating soft idlies from a wet grinder, you will not like the idlies from this method.

So that’s about the ingredients. Here are some of the common questions I get asked frequently.

Can you tell me something about fermentation?
Fermentation of Idli batter is carried out largely by lactic acid bacteria. Not yeast. There are two kinds of lactic acid bacteria. Homofermentive and heterofermentive.
Homofermentive lactic acid bacteria produces only lactic acid.
Heterofermentive bacteria – the Idli bacteria (Leuconostoc mesenteroides) produces carbon dioxide in addition to lactic acid.

Why the wet grinder method is superior than the mixie method?
Number 1. The ingredients do not get heated up while grinding in a wet grinder. The same is not the case with the mixie. The wet grinder method is slow but its the best.
Number 2 and the most important factor. The urad dal when ground in the wet grinder fluffs up in volume. This wont happen in the mixie.

When to add salt?
There are two schools of thought. Whether to add salt while fermenting or to add it later. There is no right or wrong thing when it comes to adding salt. Its just a matter of choice. Salt inhibits fermentation and interferes with good bacteria to a certain extent. So one might want to add the salt after fermentation. At the same time, if you live in a hot and humid place then salt might be your friend because your batter will not be over fermented and will not turn sour soon. So when do I add salt? I add salt to the batter before fermenting in summers and add it after fermenting in winters.

My mixie is getting heated up. What can I do?
The one thing thats important while grinding batter in a mixie is to make sure that the mixie jar doesnt get heated up. Invariably thats going to happen. So what to do about it. Use ice water to grind the ingredients.

Do I need to wash the ingredients before soaking?
Yes. of course. Especially idli rice if you want whiter idlies. Wash it several times in running water. The water should run clear after some time.

How long do I soak the ingredients?
Minimum of 4 hours. Maximum – over nite.
I prefer the over nite method.

How much water to add while grinding the batter?
Its a tricky question. But this is a close guess.
Drain the water completely from the ingredients after soaking.
While grinding Urad dal – Lets say you used 1 cup urad dal. While grinding, dont use more than 1.5 cups of water.
Rice – Lets say you used 4 cups of rice. While grinding, don’t use more than 2 cups of water.
Lesser the water, the better. You can always adjust the consistency of the batter later if its too thick. You cannot do anything if the batter goes runny.

So what is the consistency of the batter?
Lets say, thick pouring consistency. The consistency that resembles a thick pan cake batter.
When the ladle from the batter is lifted and the idli batter falls from the ladle , it should form a slight ribbon which slowly becomes flat on the surface. If its too thick or the ribbon takes longer time to dissolve, add a little water to the batter.  Here is a video!

Can I use the water that I soaked the dal and rice while grinding?
You may. No harm in it. But if you want whiter idlies, drain the water completely and use fresh water for grinding.

My idli batter doesnt rise in the idli pan. Why?
The main reason for the idli pan to cook flat is that the batter was too runny.

How long do I cook the idlies?
Idli takes roughly about 7-10 minutes to cook. Insert the back of a spoon after 7 minutes and if it comes out clean without wet batter, the idlies are good to go.

My idli doesnt come off the pan? Please help.
First, Always grease the idli plates with a little oil before ladling the batter.
Do not try removing idlies from the idli plates as soon as it comes out from the steamer. Wait for 2-3 minutes.
If you are in a hurry. Pour little water on the back of the idli plate. It will help in easy release of idlies.
Also use a sharp spoon to spoon out the idlies from the idli mould.

What is thuni idli?
Thuni idli is nothing but idlies made on a cloth. Thuni means cloth in tamil. If you are a purist, then this is how you will make idlies. This is how idlies are made in hotels.
Just line a wet cloth (just wet NOT dripping with water) on top of the idli plates and ladle out the idli batter on the plates. Steam as usual. The resultant idlies will be called as gourmet idlies. They are by far the best idlies I have ever eaten. Long live thuni idlies.

idli-batter-tips-thuni-idli

Why my idli sticks to the upper idli pan?
There is a way to set the idli pans, one on top of the other. The dent from the upper mould should be inbetween the dents of the lower mould. There need to be room for the idlies to expand or it will hit the upper mold.

Do I need a special idli cooker for cooking idlies?
No. Any pan with lid that can accomodate the idli plates / moulds will work. Add a little water on the bottom and place the idli plates on top of it. Cover with the lid and steam. Here is an example of a make shift pressure pan steamer.

idli-batter-tips-pan

I live in cold weather. My batter never ferments. Please help?
If you have an oven in your home, then put the pilot light on and then leave the batter inside the oven. The heat from the light will warm up the oven compartment and will help in fermenting the batter.
I do not have an oven. What do I do?
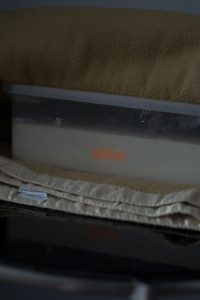
1) You will need two things. A small table lamp and a blanket.
Keep the batter inside a cup board or a shelf or some place warm. Insulate the vessel with a warm heavy blanket. That will keep the vessel warm. Have a small table lamp running near the idli batter vessel. You just need to make sure that the batter is kept warm.
2) If the place where you live has extreme weather conditions, buy a portable room heater and have it running near the batter vessel.
Here is a picture of batter insulated with a blanket.
idli-batter-in-mixie-method-after- fermentation

Do I need a separate batter recipe for dosa?
My mom and grandmom used just one recipe for both idli and dosa. But here is the deal.
The first couple of days after the batter is fermented, it will be idli days. My mom made idli with “the” just fermented idli batter.
Dosa will be made from the second day of fermentation. The batter needs to sour up a little more for good dosas.
Also the batter needs to be diluted with water to make dosas.

My dosa is white. Please help.
There can be several reasons for white dosas.
# The pan is not hot.
# The dosa pan is not heavy. You need a sturdy pan that will retain the heat for making good dosas. Here is a dosa pan that I really like. Lodge Logic Pre-Seasoned Cast Iron Tawa Pan – 10.5-Inch
# If the idli/dosa batter is too thick, your dosas are going to be white. Try diluting a little with water. Don’t add too much water. Just a few tablespoons at a time.

My dosas are sticking. Please help.
Please refer to this article. Your dosa pan may need seasoning.

What equipment do you recommend?
I am from Coimbatore. If you dint know, electrical wet grinder was invented in Coimbatore. So we know wet grinder better than anyone else. I heavily fall for grinders manufactured from Coimbatore. There are very reputable brands available in the market. This is the one that I personally like. The best dosa pan in the world.

Elgi Ultra Bigg + 2.5-Litre Table Top Wet Grinder

When it comes to mixie, these are the brands that I like.
Panasonic MX-AC300S-H 550-Watt 3-Jar Super Mixer Grinder (Grey)
Preethi Mixie

So that’s a wrap.
Hope you are able to make soft idlies with these tips.

If you are looking for recipes, here they are.
How to make idli batter in wet grinder. This is my preferred method.
How to make idli batter using an Indian heavy duty mixie
How to make idli batter using idli rava /rawa.

The post Tips and Tricks for making Idli Batter appeared first on Kannamma Cooks.

How to deseed and cut Capsicum

Viewing all 1055 articles
Browse latest View live