Quantcast
Channel: Kannamma Cooks
Viewing all 1055 articles
Browse latest View live

Green Peppercorn Pickle – Kurumilagu Oorugai Recipe

$
0
0

pepper-pickle-milagu-pickle-recipe

I have a confession to make. I don’t eat yogurt. I can never touch that stuff. Its a childhood aversion that continues to this day. So no curd rice and no pickle for me. I am happy I told it to you. But, but do not judge me ok. I know you wont. Thank you! This Green Peppercorn Pickle made with young peppercorn is marinated in a brine. Its sour, hot and delicious. I love to chop them and use it in omelettes and sandwiches. Its perfect with curd rice too. This is Vinodh’s sister Padma Akka’s favorite pickle. This is her recipe. This recipe is very popular in the Palakkad region near Coimbatore. This is a very simple recipe with just 3 ingredients. Green peppercorns, lemon juice and salt. That is it. You mix everything and wait for it to mature. Waiting is the hardest part and as with any pickle, it gets better as they age.

green-pepper-corn

Here is to how to do an awesome green peppercorn pickle. Use only a glass or a ceramic jar for making this recipe. Metals and plastic containers tend to react to the pickle and hence using them is not recommended.

Wash and dry the green peppercorn.

pepper-corn

Cut the pepper into small strips. Cut them along with the stem. Do not remove the stem. Cut them about 1 to 1.5 inch in size. I used about 150 grams of green peppercorn today.

pepper-pickle-milagu-pickle-recipe-cut-pepper

Add in the juice of 10 Indian Lemons. The juice should cover all the peppercorn in the bottle.

pepper-pickle-milagu-pickle-recipe-lemon-juice

Add in 1/4 cup of salt.

pepper-pickle-milagu-pickle-recipe-add-salt

Cover the bottle with a lid and shake well. Set aside. Shake the bottle once everyday for the next 10 days. You can start consuming the pickle after that. Its yum!

pepper-pickle-milagu-pickle-recipe-marinate

Use it as an accompaniment for curd rice. Chop them coarsely and add it to your salads, omelettes, sandwiches etc…

pepper-pickle-milagu-pickle

Green Peppercorn Pickle - Kurumilagu Oorugai Recipe
 
Prep time
Total time
 
Recipe for Green Peppercorn Pickle made in lemon brine and salt. Kurumilagu oorugai.
Author:
Recipe type: Pickles
Cuisine: Tamilnadu - Kongunad
Serves: 1 cup
Ingredients
  • 150 grams green peppercorn with stem
  • 10 Indian Lemons
  • ¼ cup Salt
Instructions
  1. Wash and dry the green peppercorn.
  2. Cut the pepper into small strips.Cut them about 1 to 1.5 inch in size.
  3. Add in the juice of 10 Indian Lemons. The juice should cover all the peppercorn in the bottle.
  4. Add in ¼ cup of salt.
  5. Cover the bottle with a lid and shake well. Set aside. Shake the bottle once everyday for the next 10 days. You can start consuming the pickle after that. Its yum!

The post Green Peppercorn Pickle – Kurumilagu Oorugai Recipe appeared first on Kannamma Cooks.


Chola Paniyaram Recipe / Sorghum Paniyaram / Aebleskiver

$
0
0

Tamilnadu Style Chola paniyaram Recipe #sorghum #millet #glutenfree #breakfast #healthy #wholegrain #traditional #tamilnadu #SouthIndian #fermented

My aunt Sarasu Athama told this story behind today’s chola paniyaram recipe. Long long time ago……. Whenever there was sorghum paniyarams for breakfast, my uncle Kandasamy Abba would always complain to my aunt Sarasu athama that his wife Perur athama  was making bad sorghum paniyarams. He used to say that even her paniyarams were equally bad.  He said that he liked his sisters paniyarams much better and both of them could never make food like her sister. Both my aunts denied the case vehemently (what else did you expect) saying that his sister used a lot of oil and that was the reason her paniyarams tasted better. This drama continued for a long time. Kandasamy Abba’s sisters name is also Sarasu. So my Sarasu athama had gone for breakfast to the other Sarasu athama’s house one day and guess what? She was making Chola Paniyaram for breakfast. Sarasu athama found out the secret of good chola paniyarams from her that day. She now laughs at the whole thing saying how furious they would get if someone compared their food with another. Particulary that too with the food of MIL or SIL. Coming back to the secret. The secret was that the fermented batter was not to be mixed after fermentation. The batter will be well aerated and bubbly once fermented. So taking the aerated batter without mixing much and ladling into the pan was the key to fluffy and airy sorghum paniyarams. Such a simple but great technique. Ever since, all athama’s are making super duper paniyarams. Here is a wonderful recipe for my aunt’s sorghum paniyaram. I wont eat something just because its healthy. I need flavour. Here is a list of millet recipes to check out.

English – Sorghum , Hindi – Jowar, Tamil – Cholam, Telugu – Jonna, Kannada – Jola, Malayalam- Cholum 

Wash the Cholam/Sorghum in running water 2-3 times to get rid of the dirt and any husk. Now soak it in lots of water for 8-10 hours. Soak the urad dal and fenugreek seeds in water separately.

Chola-paniyaram-recipe-soak

After the soaking, we need to grind them. Drain the water from urad dal and fenugreek seeds. Grind it to a very fine paste. Add up to half a cup of water while grinding. Set aside.

Chola-paniyaram-recipe-grind-dal

Now lets grind the Cholam/Sorghum. Drain the water from the Sorghum and add it to the mixie/blender. To this, add shallots (small onions), dried red chillies, cumin seeds, Salt and curry leaves. Add about 1 to 1.5 cups of water and grind to a paste. Do not grind it to a smooth paste. The texture should be that of coarse sooji rava / semolina. Once ground, remove the mixture and set aside.

Chola-paniyaram-recipe-grind-sorghum

Mix the Sorghum mixture and urad dal mixture well to combine.

Chola-paniyaram-recipe-mix

Now cover the batter with a lid and allow it to ferment in a warm place. This sorghum batter usually ferments slowly than idli/dosa batter. Usually in summer, it will take about 8-10 hours to ferment. Its winter here in Bangalore and it took almost 24 hours for my batter to ferment. So do not hurry. Wait for the batter to ferment completely. After fermentation, the batter would have risen a little (it will rise more if you live in a hot place) and will be very bubbly. Do not mix the batter. That’s the key as lots of bubbles would have formed and that aerated batter is what makes the paniyaram fluffy. So keep that spatula away.

Chola-paniyaram-recipe-ferment

After fermentation, the batter is ready for making paniyaram. If you will not use the batter immediately, store in the refrigerator for up to a day. Its time to make paniyaram. Heat a paniyaram pan until hot. Add in 1/4 teaspoon of oil (be generous with the oil) to each of the mold and set the pan on low flame. Sorghum takes time to cook. High heat will burn the paniyarams. So low heat is also key to get crispy paniyarams. Ladle the paniyaram batter to the pan. Drop the batter gently to fill the mold. Cook for a minute. Then turn and cook on the other side. Turn again if necessary to make sure the paniyaram is evenly cooked on both sides and its nicely golden in colour. The outer skin will crisp up nicely.

Chola-paniyaram-recipe-fry

The paniyaram is ready if it has become crispy and golden on both sides.

Chola Paniyaram Recipe / Sorghum Paniyaram / Aebleskiver
 
Prep time
Cook time
Total time
 
Recipe for kuzhi panitaram made with cholam / sorghum millet. An easy way to add millets in your diet.
Author:
Recipe type: Breakfast
Cuisine: Coimbatore, Tamilnadu, South Indian
Serves: 3 persons
Ingredients
  • 1 Cup Cholam / Sorghum
  • ½ Cup Whole Urad Dal
  • ¼ teaspoon fenugreek seeds
  • 10 shallots / small onions
  • 3 Dry Red Chillies
  • 1 teaspoon Salt
  • 1 teaspoon Cumin Seeds
  • 1 sprig Curry Leaves
Instructions
  1. Wash the Cholam/Sorghum in running water 2-3 times. Soak it in lots of water for 8-10 hours. Soak the urad dal and fenugreek seeds in water separately.
  2. Drain the water from urad dal and fenugreek seeds. Grind it to a very fine paste. Add upto half a cup of water while grinding. Set aside.
  3. Drain the water from the Sorghum and add it to the mixie/blender. To this, add shallots, dried red chillies, cumin seeds, Salt and curry leaves. Add about 1 to 1.5 cups of water and grind to a paste. Do not grind it to a smooth paste. The texture should be that of sooji rava / semolina. Once ground, remove the mixture and set aside.
  4. Mix the Sorghum mixture and urad dal mixture and mix well to combine.
  5. Now cover the mixture with a lid and allow it to ferment in a warm place.
  6. After fermentation, the batter would have risen a little (it will rise more if you live in a hot place) and will be very bubbly. Do not mix the batter.
  7. Heat a paniyaram pan until hot. Add in ¼ teaspoon of oil to each of the mold and set the pan on low flame. Ladle the paniyaram batter to the pan. Cook for a minute. Then turn and cook on the other side.
  8. The paniyaram is ready if it has become crispy and golden on both sides.

The post Chola Paniyaram Recipe / Sorghum Paniyaram / Aebleskiver appeared first on Kannamma Cooks.

Tamilnadu Fish Curry Recipe / Dindigul Style Meen Kuzhambu

$
0
0

Tamilnadu-fish-curry-recipe

I met Chef Paramraj during my travels. His food was home style comforting South Indian food which I liked a lot. His fish curry blew my mind. Clean flavors, nothing over powering and delicious in every single bite. I went to tell that his food was awesome after dinner and we had a good chat for a long time and he was happy to share the recipe for this curry. This is his home town Dindigul style fish curry. He says they never used ginger or garlic in fish curries in that part of the region. Its an extremely simple and easy recipe. He uses sesame oil / gingely oil for this curry. He says that gingely oil is the only oil used in Tamilnadu style fish curries. The flavor of gingely oil in south Indian curries cant be beat. I have to agree.
Chef Paramraj His food is a perfect example of home style rustic cooking that can be mind blowing. I got reminded of what Chef Jacques Pepin told once in an interview. “One of the biggest problems with young chefs is too much addition to the plate. You put cilantro and then tarragon and then olive oil and then walnut oil or whatever. It’s too much. It is important to have food nicely represented and all of that. But there is a certain quality to the food itself. Many young chefs add too much to their plates. I call it Punctuation Cuisine. They put sauce commas and dashes, one after the other. I get lost.”

Here is what you will need for the fish curry. First we need to make a fried masala paste. We will need gingely oil, Shallots (small onions) and fresh shredded coconut. Heat sesame oil (gingely oil) in a pan and add in the shallots and fry till slightly golden.

Tamilnadu-fish-curry-shallots

Then add the fresh shredded coconut and fry on low flame until its golden. Its important to fry the coconut along with the shallots on low flame. Getting the coconut nice and roasted imparts a nutty delicious flavor to the curry. Remove the mixture from heat once its golden. Grind to a smooth pasting adding up to 1.5 cups of water. Its important to grind the mixture to a very fine paste so the curry will be smooth and velvety. Set aside.

Tamilnadu-fish-curry-coconut-paste

Heat sesame oil (gingely oil) in a pan until hot. Sesame oil is important for this curry. Add in the mustard seeds and fenugreek seeds. Let the mustard seeds splutter. Add in the sliced onions and curry leaves. Saute till the onions are soft.

Tamilnadu-fish-curry-tempering

Add in the masala powders Turmeric, Chilli powder and Coriander Powder and fry for 10 seconds on low flame. Add in more chilli powder if you want a spicy curry. Fry the masalas on low flame so they don’t burn. Burnt masala powders will spoil the taste of the curry. So all eyes on the pan guys.

Tamilnadu-fish-curry-masala

Grind the tomatoes in a small mixie to a paste. Add it to the pan.

Tamilnadu-fish-curry-tomatoes

Fry until the mixture is completely dry.

Tamilnadu-fish-curry-fry

Soak a lime size tamarind in two cups of water for 20 minutes. Squeeze the tamarind in the water to extract all the juices. Strain the juice and set aside the tamarind pulp / juice. Discard the tamarind seeds and the pith. Add the tamarind pulp to the pan. Add in the salt. Add in the ground shallot-coconut mixture and a cup of water.

Tamilnadu-fish-curry-coconut-paste-add-water

Keep the stove on low flame and cover the pan with a lid. Let it simmer for 20 minutes on low flame. Stir the curry once or twice when simmering. After 20 minutes, add in the fish steaks. I used Indian Salmon today. Cover the pan again and cook for 7-8 minutes on low flame. Remove from heat.

Tamilnadu-fish-curry-cook

Let the curry rest for at-least one hour. The fish will soak up all the flavors of the curry. Below is a picture of fish curry pond :).

Tamilnadu-fish-curry-cooked

Serve with rice.

Tamilnadu-fish-curry

Tamilnadu Fish Curry Recipe / Dindigul Meen Kuzhambu
 
Prep time
Cook time
Total time
 
Recipe for Tamilnadu style fish curry / meen kuzhambu recipe.
Author:
Recipe type: Curry
Cuisine: Tamilnadu
Serves: 4 persons
Ingredients
For the Paste
  • 2 tablespoon sesame oil (gingely oil)
  • 20-25 shallots (small onions)
  • ½ cup fresh shredded coconut
Other Ingredients
  • 2 tablespoon sesame oil (gingely oil)
  • ¼ teaspoon mustard seeds
  • ¼ teaspoon fenugreek seeds
  • 2 onions, sliced
  • 1 teaspoon turmeric
  • 2 teaspoon red chilli powder
  • 3 teaspoon coriander powder
  • 3 tomatoes
  • lime size tamarind
  • 1½ teaspoon salt
  • 600 grams fish steaks (I used Indian Salmon)
Instructions
  1. Heat sesame oil (gingely oil) in a pan and add in the shallots and fry till slightly golden.
  2. Then add the fresh shredded coconut and fry on low flame until its golden. Grind to a smooth pasting adding up to 1.5 cups of water. Its important to grind the mixture to a very fine paste so the curry will be smooth and velvety. Set aside.
  3. Heat sesame oil (gingely oil) in a pan until hot. Add in the mustard seeds and fenugreek seeds. Let the mustard seeds splutter. Add in the sliced onions and curry leaves. Saute till the onions are soft.
  4. Add in the masala powders Turmeric, Chilli powder and Coriander Powder and fry for 10 seconds on low flame.
  5. Grind the tomatoes in a small mixie to a paste. Add it to the pan.
  6. Fry until the mixture is completely dry.
  7. Soak a lime size tamarind in two cups of water for 20 minutes. Squeeze the tamarind in the water to extract all the juices. Add the tamarind pulp to the pan. Add in the salt. Add in the ground shallot-coconut mixture and a cup of water.
  8. Let it simmer covered for 20 minutes on low flame.
  9. Stir the curry once or twice when simmering. After 20 minutes, add in the fish steaks. Cover the pan again and cook for 7-8 minutes on low flame. Remove from heat.
  10. Let the curry rest for at least one hour. The fish will soak up all the flavors of the curry.
  11. Serve with rice.

The post Tamilnadu Fish Curry Recipe / Dindigul Style Meen Kuzhambu appeared first on Kannamma Cooks.

Vendhaya Keerai Kadalai Poriyal / Methi Chana Stir Fry

$
0
0

Vendhaya Keerai - Methi Greens Poriyal / Stir Fry with Chickpeas / Chana. Healthy and delicious stir fry. #methi #greens #vegan #glutenfree #protein #coconut #recipe #southindian #tamilnadu

Vendhaya Keerai or Methi leaves turn out to be such a tasty green if cooked properly. Its my husbands favorite keerai. We can never have enough of methi. Not to forget that its one of the healthiest greens around. The addition of chickpeas / chana adds for a very satisfying bite. Here is how to do it.

Methi leaves usually have a lot of dirt and sand in it. Separate the leaves from the stems and soak it in water for about 20 minutes. The sand will settle in the bottom of the water. So remove the greens from the top gently so the sand stays at the bottom. Then wash it in clean running water 2-3 times until all the grime is gone. Chop the leaves coarsely. Set aside.

cut-methi

Methi-kadalai-poriyal

Heat oil in a pan and add in the mustard seeds, urad dal and dried red chillies. Let the mustard seeds splutter.

Vendhaya-keerai-methi-keerai-Kadalai-Poriyal-tadka

Add in the finely chopped curry leaves and the onions. Fry till the onions are soft. I like to chop and add the curry leaves for this dish.

Vendhaya-keerai-methi-keerai-Kadalai-Poriyal-onion

Add in the chopped vendhaya keerai / methi leaves, salt and fry for 3-4 minutes.

Vendhaya-keerai-methi-keerai-Kadalai-Poriyal-fry

Add in the cooked chickpeas/chana and the fresh shredded coconut. Saute for a couple of minutes.

Vendhaya-keerai-methi-keerai-Kadalai-Poriyal-chana

Remove from heat and serve.

Vendhaya-keerai-methi-keerai-Kadalai-Poriyal-recipe


Vendhaya Keerai Kadalai Poriyal / Methi Chana Stir Fry
 
Prep time
Cook time
Total time
 
Easy and healthy Vendhaya Keerai Poriyal / Methi Stir fry with kadalai / chana. Healthy lunch recipe.
Author:
Recipe type: Side Dish
Cuisine: Tamilnadu
Serves: 3 persons
Ingredients
  • 200 grams Vendhaya Keerai / Methi Leaves
  • 1 teaspoon Peanut Oil
  • ¼ Mustard Seeds
  • ¼ Urad Dal
  • 3 Red Chillies
  • 3 sprigs Curry Leaves, finely chopped
  • 2 Onions, finely chopped
  • 1 teaspoon salt
  • 2 cups boiled chickpeas / chana
  • ¼ cup shredded coconut
Instructions
  1. Clean and wash keerai in clean running water 2-3 times until all the grime is gone. Chop the leaves coarsely. Set aside.
  2. Heat oil in a pan and add in the mustard seeds, urad dal and dried red chillies. Let the mustard seeds splutter.
  3. Add in the finely chopped curry leaves and the onions. Fry till the onions are soft. I like to chop and add the curry leaves for this dish.
  4. Add in the chopped vendhaya keerai / methi leaves, salt and fry for 3-4 minutes.
  5. Add in the cooked chickpeas/chana and the fresh shredded coconut. Saute for a couple of minutes.
  6. Remove from heat and serve.

The post Vendhaya Keerai Kadalai Poriyal / Methi Chana Stir Fry appeared first on Kannamma Cooks.

Neeraja’s Ultimate Vengaya Pakkavada / Onion Pakkavada

$
0
0

onion-pakkavada

Neeraja is a friend of mine who is an amazing cook. She is the queen of Indian sweets and snacks. When we used to live in CA, there was a rule among us close friends. Parties strictly meant home cooked food. So if a friend’s son or daughter was having a birthday party, we would all be delegated work. So that day, it was a party at another friend Alli’s place. I was to do biryani for 40 people. Neeraja arrived at Alli’s place at 5.00 am and when I reached there at about 5.15, she had already started with her dish. I started the biryani and the biryani was cooking. By about 6.30 am, other friends had also come to help out. We were like a gang on eternal red bull. Each one had so much energy. Suddenly the big pan in which biryani was cooking overflowed by half an inch and the fat floating on top dripped down on the stove and caught fire. I just stared at the fire. I froze for a minute not knowing what to do. Immediately, Neeraja – my avenger jumped and bravely switched off the stove. She took couple of towels and covered the fire around the biryani pan to cut off oxygen supply. Zoom! The fire was off. I just stood still. Neeraja, after doing all this, said, OK girls, get back to work. We have very less time. She was so cool about it. We all clapped and hugged our Avenger. No one makes indian sweets like her. I have learnt so many recipes and techniques from her. This is her legendary onion pakkavada recipe that’s to die for. Dont wait for rain to make pakkavadas. Just go and make it. Its one of the best things that will happen to you. Here is Neerajas Ultimate Onion pakkavada.

onion-pakkavada-neeraja-manoharan

Here is what you will need. A dozen ingredients. Slice the onions. Finely chop curry leaves and green chillies. Crush the ginger and garlic in a mortar and pestle. Add it to the other ingredients and mix well. Onions and Curry leaves add an important flavor to the pakkavada. Be generous. Adding little oil to the dough helps in keeping the pakkavada soft and crispy. Do not add a lot of oil. The pakkavada will become brittle.

onion-pakkavada-board

Take all the ingredients together and add 3/4 cup of water and mix well. Do not add all the water at once. Add slowly. You might need a little less or a little more. It will be a wet dough.

onion-pakkavada-dough

Heat oil in a pan until hot. Take small pieces and drop them in oil. No need to shape them. Just drop them in random sizes gently in oil. Fry pakkavadas in medium hot oil until the bubbles from the oil settle and the pakkavadas are golden.

onion-pakkavada-fryRemove the pakkavada carefully using a slotted spatula. Drain on paper towels.

onion-pakkavada-drain

Serve the pakkavadas hot. The pakkavada can be stored for up to two days at room temperature. It stays crisp.

onion-pakkavada-recipe


Neeraja's Ultimate Vengaya Pakkavada / Onion Pakkavada
 
Prep time
Cook time
Total time
 
Recipe for crispy and crunchy Onion Pakkavada. South Indian, Tamilnadu style. Foolproof recipe.
Author:
Recipe type: Appetizer
Cuisine: Tamilnadu
Serves: 4 persons
Ingredients
  • Measurement Used - 1 Cup = 250 ml and 1 teaspoon = 5ml
  • 1¼ Cup Besan / Kadalai Maavi
  • ¾ Cup Rice Flour
  • ½ teaspoon Baking Soda / Aapa Soda
  • 1 teaspoon Salt
  • 1 teaspoon Fennel Seeds
  • 2 Big Onions, sliced
  • 7-8 sprigs Curry Leaves, finely chopped
  • 6 Green Chillies, finely chopped
  • 1 inch Ginger, Crushed
  • 10 Garlic Cloves , Crushed
  • 15 Cashewnut, broken in half
  • 5 teaspoon Vegetable Oil for making dough
  • ¾ cup Water
  • Vegetable Oil for frying Pakkavada
Instructions
  1. Take all the ingredients together and add ¾ cup of water and mix well. Do not add all the water at once. Add slowly.
  2. Heat oil in a pan until hot. Take small pieces and drop them in oil. No need to shape them. Just drop them gently in oil. Fry in medium hot oil until the bubbles from the oil settle and the pakkavada is golden.
  3. Remove the pakkavada carefully using a slotted spatula. Drain on paper towels.
  4. Serve the pakkavada. The pakkavada can be stored for up to two days at room temperature. It stays crisp.

The post Neeraja’s Ultimate Vengaya Pakkavada / Onion Pakkavada appeared first on Kannamma Cooks.

Cauliflower Sukka – Dry Cauliflower Roast Recipe

$
0
0

cauliflower-sukka

This is an everyday cauliflower recipe that’s been slow roasted on the stove. The cauliflower gets caramelized and roasted and it tastes crunchy and delicious. Traditionally Cauliflower is deep fried for sukka but I usually pan fry as it is healthy and I like it too. This is a very simple recipe. All the ingredients are added together in the pan and slow roasted for 30-40 minutes until the Cauliflower is nicely roasted. Here is how to do dry roast Cauliflower sukka recipe.

Heat oil in a pan and add in the mustard seeds. Let it splutter. Add in the chopped onions, diced Cauliflower florets, finely chopped curry leaves, finely chopped green chillies, finely chopped red chillies, salt and sugar. Saute for couple of minutes.

cauliflower-sukka-recipe-tempering

Keep the flame on low and cover the pan with a lid and cook for the next 10 minutes covered. Do not add any water. The moisture from the Cauliflower would suffice. After 10 minutes, remove the lid and let it roast well for the next 30 minutes. Its important to keep the flame low else the cauliflower will burn. Keep sauteing once in a while.

cauliflower-sukka-recipe-cook

Once the Cauliflower is nicely roasted but firm, add in the coriander leaves and saute for a minute to combine.

cauliflower-sukka-recipe-garnish

Remove from heat and serve.

Cauliflower Sukka
 
Prep time
Cook time
Total time
 
Recipe for Cauliflower sukka roast. Dry preparation Tamilnadu style recipe
Author:
Recipe type: Side dish - Stir fry
Cuisine: Tamilnadu
Serves: 3 persons
Ingredients
  • 3 teaspoon Vegetable oil
  • ¼ teaspoon mustard seeds
  • 1 onion, finely chopped
  • 500 grams Diced Cauliflower florets
  • 4 sprigs curry leaves, finely chopped
  • 4 green chillies, finely chopped
  • 3 red chillies, finely chopped
  • 1 teaspoon salt
  • 1 teaspoon sugar
  • 5 sprigs coriander leaves, finely chopped
Instructions
  1. Heat oil in a pan and add in the mustard seeds. Let it splutter. Add in the chopped onions, diced Cauliflower florets, finely chopped curry leaves, finely chopped green chillies, finely chopped red chillies, salt and sugar. Saute for couple of minutes.
  2. Cover the pan with a lid and cook for the next 10 minutes covered.
  3. After 10 minutes, remove the lid and let it roast well for the next 30 minutes on low flame. Keep sauteing.
  4. Once the Cauliflower is nicely roasted but firm, add in the coriander leaves and saute for a minute to combine.
  5. Remove from heat and serve.

The post Cauliflower Sukka – Dry Cauliflower Roast Recipe appeared first on Kannamma Cooks.

Biscotti Recipe – Easy Almond Biscotti

$
0
0

almond-nut-biscotti-recipe

If there is one recipe that I have made a zillion times and still not tired, it would be this Italian Almond Nut Biscotti. It was my number one selling item during my home catering business days. This recipe is very very special to me. I adapted this recipe from my very old autographed cook book, Dessert Circus by Jacques Torres. Jacques Torres in his book mentions that he learnt this recipe when he worked for Sirio Maccioni of Le Cirque. He learnt it in Italy in a small town called Montecatini. Traditionally, the Italians bake biscotti two times to produce a hard cookie that they like to dip in sweet wine. This recipe has been adapted so the cookies are not quite hard and are great by themselves or to be dunked in coffee. I have made kilos and kilos of this biscotti for my clients. Just try it once and you will be hooked. This recipe is in grams. I like to weigh my ingredients for baking as its more accurate and gives consistent results every single time.

almond-biscotti-recipe -jacques-torres

Here is how to do it. We will be using toasted nuts for the recipe. Preheat the oven to 300°F (150°C). Spread the almonds and pistachios evenly on a baking sheet and place in the oven. Toast for about 30 minutes, until they are golden brown. You will be able to smell the nuts when they are ready. A good test is to break a nut in half and check to see if it is light brown on the inside. Toasting the nuts brings out their natural flavor. Remove them from the oven and allow to cool completely on the baking sheet on a wire rack.

almond-biscotti-recipe -toasted-nuts

Place the remaining ingredients in a large mixing bowl and beat with an electric mixer on medium speed until well combined, about 5 minutes; the mixture will hold together in a soft dough.

almond-biscotti-recipe -mix

Chop the toasted nuts coarsely. Add the cooled, chopped toasted nuts and mix until they are evenly incorporated, about 1 minute. If you are using a hand-held mixer, you may want to knead in the nuts by hand to avoid burning out the motor of the mixer.

almond-biscotti-recipe -almonds-pista

Remove the dough from the mixing bowl and place on a plastic cling wrap surface. Divide the dough into two equal pieces. Wet your hands and roughly roll each piece into a log with your hands.

almond-biscotti-recipe -log

Cover the dough with cling wrap and nicely roll the dough. Use the palms of your hands to roll to create an even log that measures about 12 inches – 1 to 1 1/2 inches in diameter. Each rope should be even and fit on your baking sheet lengthwise. Roll firmly to remove any trapped air bubbles.

almond-biscotti-recipe -log-roll

Refrigerate the dough for a minimum of one hour up to overnight. I always refrigerate the dough overnight. I feel the flavor improves tremendously.

Preheat the oven to 350°F (175°C).

Place the biscotti ropes on a parchment paper-covered baking sheet. Bake until golden brown, about 30 minutes. Remove from the oven and let cool slightly on the baking sheet.

almond-biscotti-recipe-bake

Use ONLY a serrated knife to slice the biscotti on a diagonal into 1/2-inch thick cookies. If you do this while the biscotti are still warm, they will not crumble. The biscotti will harden as they cool. Place the slices on a baking sheet and bake at 300°F (150°C) for another 10 to 15 minutes.

almond-biscotti-recipe-cut

Store in an airtight container at room temperature for two to three weeks.

Biscotti Recipe - Easy Almond Biscotti
 
Prep time
Cook time
Total time
 
Easy Italian Almond biscotti recipe. With eggs. Measurement in grams. Recipe adapted from Jacques Torres.
Author:
Recipe type: Snacks, Sweets
Cuisine: Italian
Serves: 30 cookies
Ingredients
  • 100 grams Whole Almonds
  • 50 grams Whole pistachios
  • 100 grams Cold unsalted butter
  • 150 grams Granulated sugar
  • 250 grams All-purpose flour (Maida)
  • 1 teaspoon Baking powder
  • Grated zest of 1 lemon
  • 2 large eggs
  • Pinch of salt
Instructions
  1. Preheat the oven to 300°F (150°C). Spread the almonds and pistachios evenly on a baking sheet and place in the oven. Toast for about 30 minutes, until they are golden brown. Remove them from the oven and allow to cool completely on the baking sheet on a wire rack.
  2. Place the remaining ingredients in a large mixing bowl and beat with an electric mixer on medium speed until well combined, about 5 minutes; the mixture will hold together in a soft dough.
  3. Chop the toasted nuts coarsely. Add the cooled, chopped toasted nuts and mix until they are evenly incorporated, about 1 minute. If you are using a hand-held mixer, you may want to knead in the nuts by hand to avoid burning out the motor of the mixer.
  4. Remove the dough from the mixing bowl and place on a plastic cling wrap surface. Divide the dough into two equal pieces. Wet your hands and roughly roll each piece into a log with your hands.
  5. Cover the dough with cling wrap and nicely roll the dough. Use the palms of your hands to roll to create an even log that measures about 12 inches – 1 to 1½ inches in diameter.
  6. Refrigerate the dough for a minimum of one hour up to over night.
  7. Preheat the oven to 350°F (175°C).
  8. Place the biscotti ropes on a parchment paper-covered baking sheet. Bake until golden brown, about 30 minutes. Remove from the oven and let cool slightly on the baking sheet.
  9. Use a serrated knife to slice the biscotti on a diagonal into ½-inch thick cookies. If you do this while the biscotti are still warm, they will not crumble. The biscotti will harden as they cool. Place the slices on a baking sheet and bake at 300°F (150°C) for another 10 to 15 minutes.
  10. Store in an airtight container at room temperature for two to three weeks.
Notes
You can add ¼ teaspoon anise seeds if you like the flavor of Anise.

Easy Italian Almond biscotti recipe. With eggs. Measurement in grams. Recipe adapted from Jacques Torres. #jacquesTorres #Recipe #easy #toasted #nuts #dessertcircus #cookies

The post Biscotti Recipe – Easy Almond Biscotti appeared first on Kannamma Cooks.

Kerala Prawn Pickle Recipe / Chemmeen Pickle

$
0
0

kerala-prawn-pickle-recipe

This recipe is from my friend Aparna. Appu is my batch mate from my post graduation days. She used to bring big bottles of Prawn Pickle every time she came to hostel after vacation. That was the first time I tasted Prawn Pickle. We all would devour on her bottle and it will be over very soon. Our senior Pramod would come to see Aparna at the hostel. He always brought flowers when he came to see her. The room would have some flowers all the time. I have this memory of Pramod bringing his pens, pencils and a ruler nicely packed in an empty Pringles box for semester exams. Pringles was not readily available those days at shops in India. It had to come from the middle east or USA when someone visited you. I used to save my empty Pringles boxes like a treasure and used it to store stationery. I was surprised to see another person doing the same thing just like me. Appu and Pramod are now married with two children. Wonderful memories. OK. Back to the pickle. This recipe is a flavor bomb. Here is how to do Kerala style Prawn Pickle.

kerala-prawn-pickle-recipe-chemmeen-pickle-ap

Clean, Peel and de-vein the prawns. We use small prawns for this recipe. Add in the salt and turmeric and mix well. Set it on a strainer for the excess water in the prawns to drain. Let it marinate for 30 minutes.

kerala-prawn-pickle-recipe-chemmeen-pickle-marinate

Heat quarter cup of oil in a pan and add in the prawns and the red chilli powder. Fry on low flame for 5 minutes until cooked. Remove from heat and set aside.

kerala-prawn-pickle-recipe-chemmeen-pickle-fry-prawns

The ginger and garlic are 50% of the weight of the prawns in this pickle. I have used 250 grams of small prawns today. I used 60 grams each of garlic and ginger. Run the garlic and ginger in a small mixie jar without adding any water to coarsely crush them. Do not make it into a paste. Just coarsely grind. Set aside. Add the remaining oil in the pan and add in the ginger and garlic mixture.

kerala-prawn-pickle-recipe-chemmeen-pickle-ginger-garlic

Saute for two minutes. Add in the chopped green chillies and continue to saute until the garlic and the ginger are nicely roasted. About 5 minutes on medium flame.

kerala-prawn-pickle-recipe-chemmeen-pickle-fry-gg

Add in the masala powders and the salt and fry for a minute.

kerala-prawn-pickle-recipe-chemmeen-pickle-masala

Add in the prawns, vinegar and quarter cup of water. Do not add all of the vinegar at once. First add the 1/4 cup of vinegar and taste it. Add more if you think you might need more. Let it simmer for 5 minutes.

kerala-prawn-pickle-recipe-chemmeen-pickle-vinegar

After 5 minutes, the mixture would become slightly dry and the oil would start to float on top completely. Switch off the flame and allow it to cool for an hour.

kerala-prawn-pickle-recipe-chemmeen-pickle-cool

Transfer the mixture to a ceramic or a glass jar. Use only a glass or a ceramic jar for making this recipe. Metals and plastic containers tend to react to the pickle and hence using them is not recommended.

kerala-prawn-pickle-recipe-chemmeen-pickle

I refrigerate my pickle. You can store it refrigerated for upto a month.

kerala-prawn-pickle-recipe-chemmeen-pickle-dry-pan

Kerala Prawn Pickle Recipe / Chemmeen Pickle
 
Prep time
Cook time
Total time
 
Kerala Style Prawn pickle recipe. Chemmeen Achar made with prawns, ginger, garlic, spices and vinegar.
Author:
Recipe type: Pickle
Cuisine: South Indian, Kerala
Serves: 2 cups
Ingredients
For Marinating and Cooking Prawns
  • 250 grams small prawns
  • 2 teaspoon salt
  • 1 teaspoon turmeric
  • 1 tablespoon red chilli powder
  • ¼ cup vegetable oil
For the Pickle
  • 60 grams ginger
  • 60 grams garlic (weighed after peeling)
  • 20 green chillies, chopped
  • ¼ cup vegetable oil
  • ¼ cup - ½ cup vinegar
Masala Powders
  • 1½ tablespoon Salt
  • 1 teaspoon garam masala
  • 1 tablespoon red chilli powder
  • 2 tablespoon black pepper powder
  • 2 teaspoon turmeric
Instructions
  1. Clean, Peel and de-vein the prawns. Add in the salt and turmeric and mix well. Set it on a strainer for the excess water in the prawns to drain. Let it marinate for 30 minutes.
  2. Heat quarter cup of oil in a pan and add in the prawns and the red chilli powder. Fry on low flame for 5 minutes until cooked. Remove from heat and set aside.
  3. Add the remaining quarter cup of oil in the pan and add in the crushed ginger and garlic mixture. Saute for two minutes. Add in the chopped green chillies and continue to saute until the garlic and the ginger are nicely roasted. About 5 minutes on medium flame.
  4. Add in the masala powders and the salt and fry for a minute.
  5. Add in the prawns, vinegar and quarter cup of water. Do not add all of the vinegar at once. First add the ¼ cup of vinegar and taste it. Add more if you think you might need more. Let it simmer for 5 minutes.
  6. After 5 minutes, the mixture would become slightly dry and the oil would start to float on top completely. Switch off the flame and allow it to cool for an hour.
  7. Transfer the mixture to a ceramic or a glass jar. You can store it refrigerated for upto a month.

The post Kerala Prawn Pickle Recipe / Chemmeen Pickle appeared first on Kannamma Cooks.


Easy French Apple Tart / Rustic Apple Tart

$
0
0

Easy-french-apple-tart-recipe

If you have a party at home and want to impress your guests, then go bake this. This is one of our family favorites and I have made it for almost all parties at home. This is a Barefoot Contessa recipe. I love everything about Ina Garten. I used to watch repeated episodes of BC for atleast an hour everyday. Her recipes are simple, home style and oh my oh! her Hamptons kitchen!

Her career shift from a white house employee to a specialty food store owner will blow your mind. She once said “I worked for the Office of Management and Budget in the White House, on nuclear energy policy. But I decided it would be much more fun to have a specialty food store, so I left Washington D.C. and moved to the Hamptons. And how glad I am that I did!” What a story!

Here is her rustic easy home-style french apple tart recipe. I have minimally adapted this recipe to suit my Indian Kitchen!

For the pastry, place the flour, salt, and sugar in the bowl of a food processor (an Indian mixie works perfectly well too). Pulse for a few seconds to combine. Add the butter and pulse 10 to 12 times, until the butter is in small bits the size of peas. With the motor running, pour the ice water down the feed tube and pulse just until the dough starts to come together.

Easy-french-apple-tart-recipe-dough

Dump onto a cling wrap surface and knead quickly into a ball. Do not knead for a long time. Just try to gather everything together and thats all there is to it. Wrap in plastic and refrigerate for at least 1 hour.

Easy-french-apple-tart-gather

Roll the dough directly on a parchment paper slightly larger than 10 x 14 inches. Cut the parchment roughly to that size so you know that you need to roll to the size of the paper. Spread a plastic cling wrap sheet on top of the dough while rolling. This will help in smooth rolling as the dough wont stick to the rolling pin when rolled. Just roll to a rough rectangle. Its a rustic tart. The measurement or the shape need not be accurate. Using a small knife, trim the edges. Place the dough on the prepared sheet pan and refrigerate for another one more hour.

Easy-french-apple-tart-recipe-roll

Preheat the oven to 200 degrees Celsius.

Peel the apples and cut them in half through the stem. Remove the stems and cores with a sharp knife and a melon baller. Slice the apples crosswise in ¼-inch-thick slices. I love my Melon Baller for removing the stem and seeds and I use it almost every single day.

Easy-french-apple-tart-recipe-cut-apples

Place overlapping slices of apples diagonally down the middle of the tart and continue making diagonal rows on both sides of the first row until the pastry is covered with apple slices. Sprinkle with the full ½ cup sugar and dot with the butter.

Easy-french-apple-tart-recipe-butter

Bake for 45 minutes to 1 hour, until the pastry is browned and the edges of the apples start to brown. Rotate the pan once during cooking. Don’t worry! The apple juices will burn in the pan but the tart will be fine!

When the tart’s done, heat the apricot jelly or orange marmalade with water until its completely melted. Brush the apples and the pastry completely with the jelly mixture.

Easy-french-apple-tart-recipe-glaze

Loosen the tart with a metal spatula so it doesn’t stick to the paper. Allow to cool and serve warm or at room temperature.

Easy-french-apple-tart

Easy French Apple Tart / Rustic Apple Tart
 
Prep time
Cook time
Total time
 
Easy Rustic French Apple Tart Recipe. Tarte aux pommes.
Author:
Recipe type: Dessert
Cuisine: French
Serves: 8 persons
Ingredients
For the pastry
  • 2 cups all-purpose flour
  • ½ teaspoon kosher salt
  • 1 tablespoon sugar
  • 150 grams cold unsalted butter, diced
  • ½ cup ice water
For the apples
  • 4 Apples (preferably tart apples like Granny Smith)
  • ½ cup sugar
  • 4 tablespoons cold unsalted butter, small-diced
  • ⅓ cup apricot jelly or orange marmalade
  • 2 tablespoons water
Instructions
  1. For the pastry, place the flour, salt, and sugar in the bowl of a food processor (an Indian mixie works perfectly well too). Pulse for a few seconds to combine. Add the butter and pulse 10 to 12 times, until the butter is in small bits the size of peas. With the motor running, pour the ice water down the feed tube and pulse just until the dough starts to come together.
  2. Dump onto a cling wrap surface and knead quickly into a ball. Wrap in plastic and refrigerate for at least 1 hour.
  3. Roll the dough directly on a parchment paper slightly larger than 10 x 14 inches. Place the dough on the prepared sheet pan and refrigerate for another one more hour.
  4. Preheat the oven to 200 degrees Celsius.
  5. Peel the apples and cut them in half through the stem. Remove the stems and cores with a sharp knife and a melon baller. Slice the apples crosswise in ¼-inch-thick slices.
  6. Place overlapping slices of apples diagonally down the middle of the tart and continue making diagonal rows on both sides of the first row until the pastry is covered with apple slices. Sprinkle with the full ½ cup sugar and dot with the butter.
  7. Bake for 45 minutes to 1 hour, until the pastry is browned and the edges of the apples start to brown. Rotate the pan once during cooking. Don’t worry! The apple juices will burn in the pan but the tart will be fine!
  8. When the tart’s done, heat the apricot jelly or orange marmalade with water until its completely melted. Brush the apples and the pastry completely with the jelly mixture.
  9. Loosen the tart with a metal spatula so it doesn’t stick to the paper. Allow to cool and serve warm or at room temperature.

The post Easy French Apple Tart / Rustic Apple Tart appeared first on Kannamma Cooks.

Kerala Style Ulli Theeyal Recipe / Small Onions in Coconut Gravy

$
0
0

ulli-theeyal-recipe

I saw this recipe on Teevee. The recipe was prepared meticulously by “Metro” Priya and her mother. I immediately knew that I wanted to try. I love traditional recipes like these a lot. This is a very classic traditional Kerala style curry. The flavor of the nicely roasted coconut is to die for. The gravy is simmered in a tamarind sauce and goes very well with rice. I have used coconut oil today. You can use any oil of your choice but I strongly suggest you to use coconut oil. It imparts a distinct aroma and flavour to this dish. Here is how to do it.

Soak a lime size tamarind in two cups of water for 20 minutes. Squeeze the tamarind in the water to extract all the juices. Strain the juice and set aside the tamarind pulp. Discard the tamarind seeds and the pith.

Also chop the shallots (small onions). The shallots needs to be chopped as it gives a different flavor than adding shallots whole. Set aside.

The main prep work for this curry is the theeyal masala and here is how to do it. Heat 2 tablespoon of coconut oil in a pan. Add in the coriander seeds, dried red chillies and fresh shredded coconut. Fry on medium flame, sauteing constantly until the coconut turns golden. Its important to fry well till the coconut turns really golden. I call it fiery gold!

ulli-theeyal-recipe-masala

Grind the masala to a fine paste without adding any water. The oil from the coconut will separate while grinding and the mixture will become into a paste. Set aside.

ulli-theeyal-recipe-masala-ground

Heat oil in a pan and add in the curry leaves and the chopped shallots. Fry till the shallots are soft and slightly starting to brown. Add in the tamarind juice, the theeyal masala, turmeric and the salt. Let it simmer in medium flame for 10 minutes. Stir once in a while.

ulli-theeyal-recipe-cook

After 10 minutes, the oil will separate and float on top. Now add in the coconut milk and let it simmer for a couple of minutes. Switch off the flame.

ulli-theeyal-recipe-coconut-milk

Now lets do the tempering for the curry. Heat oil in a small kadai and add in the mustard seeds, fenugreek seeds (vendayam) and curry leaves when the oil is hot. Let the mustard seeds splutter. Add it to the curry.

ulli-theeyal-tempering

Ulli Theeyal is ready for serving. It goes amazingly well with rice and some ghee.

ulli-theeyal

Ulli Theeyal Recipe
 
Prep time
Cook time
Total time
 
Traditional Kerala Style Ulli Theeyal Recipe. Made with roasted coconut and spices simmered in a tamarind gravy.
Author:
Recipe type: Side Dish
Cuisine: Kerala, South Indian
Serves: 4 persons
Ingredients
For the Theeyal Masala
  • 2 tablespoon coconut oil
  • 1 cup coconut
  • 2 teaspoon coriander seeds
  • 6 dried red chillies
For the Gravy
  • 1 teaspoon coconut oil
  • 20 shallots, chopped
  • 2 sprigs curry leaves
  • lime size tamarind
  • 1 teaspoon turmeric powder
  • 1 teaspoon salt
  • ½ cup thick coconut milk
For the Tempering
  • 1 teaspoon coconut oil
  • ¼ teaspoon mustard seeds
  • ¼ teaspoon fenugreek seeds
  • 2 sprig curry leaves
Instructions
  1. Heat 2 tablespoon of coconut oil in a pan. Add in the coriander seeds, dried red chillies and fresh shredded coconut. Fry on medium flame, sauteing constantly until the coconut turns golden. Grind the masala to a fine paste without adding any water.
  2. Heat oil in a pan and add in the curry leaves and the chopped shallots. Fry till the shallots are soft and slightly starting to brown. Add in the tamarind juice, the theeyal masala, turmeric and the salt. Let it simmer in medium flame for 10 minutes.
  3. After 10 minutes, the oil will separate and float on top. Now add in the coconut milk and let it simmer for a couple of minutes. Switch off the flame.
  4. Heat oil in a small kadai and add in the mustard seeds, fenugreek seeds (vendayam) and curry leaves when the oil is hot. Let the mustard seeds splutter. Add it to the curry.

The post Kerala Style Ulli Theeyal Recipe / Small Onions in Coconut Gravy appeared first on Kannamma Cooks.

Mutton Kola Urundai Recipe

$
0
0

Mutton-Kola-Urundai-balls

This is another gem of a recipe from Neikarapatti amma. This is a specialty at amma’s house. The masala was always ground in the Attangallu (ஆட்டங்கல்லு). Once the maid finishes grinding the masala, amma would carefully portion out the masala and one part would be mixed with minced mutton and be made into mutton kola and the other would be mixed with plantain and be made into vazhakkai kola for the vegetarians. The making of kola urundai is mesmerizing. The wonderful aroma from the ground masala, the golden color and the round shape is so nostalgic and brings back so many good memories. Here is how to do Mutton Kola Urundai, Neikarapatti amma style.

Take the fried gram dal / pottu kadalai and make it to a fine powder in a small mixie jar / spice grinder. Please do not substitute besan for this recipe. The vada will come out rock hard.

Mutton-Kola-Urundai-Recipe-pottu-kadalai

Now comes the Kola Masala. You will need the following ingredients.

Mutton-Kola-Urundai-Masala

Add in all the ingredients listed under kola masala along with the salt into a mixie / blender and grind it to a smooth paste. Add very little water while grinding. Few tablespoon at a time. Take time to grind it as fine as possible. Trust me, that’s the key to this recipe. Once its finely ground, transfer the paste to a bowl. Set aside.

Mutton-Kola-Urundai-Recipe-masala

We will have to cook the minced mutton now. Clean the minced meat. Remove any extra fat that might be there in the minced meat. (The white fatty bits.) Most of the time the butcher himself cleans and sells. I hardly see fatty tissues these days. Take a kadai and add in the meat. Fry the minced mutton till its completely dry. The minced mutton will cook in its own juices. Do not add extra water. Once its cooked and thoroughly brown and dry, switch off the flame. Run the cooked minced mutton in a mixie / blender. Pulse for just a couple of times. Set aside.

Mutton-Kola-Urundai-Recipe-kaima

Add the minced meat, ground masala and the fried gram (pottu kadalai) powder and mix well to form a soft dough. Apply little oil to your hands. Make small 1.5 inch balls with your hands. Make sure you do not make big balls as the inside might not cook when frying. So remember to make the balls small in size. Its a very soft messy dough. Handle the dough gently. Make the balls with a smooth finish.

Mutton-Kola-Urundai-Recipe-balls

I like to refrigerate the balls for 30 minutes before frying. This kind of crusts the outer skin and it helps in keeping the vada from disintegrating in hot oil.

Heat oil in a pan in medium heat. Once the oil is hot, fry the balls in low medium flame until golden. Do not crowd the pan or disturb the balls for the first minute. Either of this will make the balls to break. Just leave the balls and do not touch them after it hits the oil for the first minute. When the kolas are golden, remove from oil and drain on paper towels. Do not fry in really hot oil. The kolas will get browned faster and the inside will not have time to cook. So keep the flame at medium at all times.

mutton-kola-deep-fry

Serve mutton kolas hot.

Mutton-Kola-Recipe

Mutton Kola Urundai Recipe
 
Prep time
Cook time
Total time
 
Mutton Kola Urundai Recipe made with minced mutton and ground masala.
Author:
Recipe type: Appetizer
Cuisine: Tamilnadu
Serves: 25 kolas
Ingredients
  • Measurements Used - 1 Cup = 250 ml, 1 teaspoon = 5 ml, 1 tablespoon = 15 ml.
Ingredients for grinding
  • ½ cup fresh shredded coconut
  • 1 medium sized onion
  • 5 cloves garlic
  • 1 inch piece ginger
  • 1 inch piece cinnamon
  • 1 clove
  • 1 cardamom
  • 1 teaspoon fennel seeds
  • 1 tablespoon khuskhus - white poppy seeds
  • 1 teaspoon coriander powder
  • 1 teaspoon red chilli powder
  • 3 green chillies
  • 2 sprig curry leaves
  • 5 stalks coriander leaves
  • 1 teaspoon salt
Other Ingredients
  • 250 grams minced mutton
  • ¾ cup to 1 cup fried gram / pottu kadalai
For Frying
  • 500 ml Vegetable oil
Instructions
  1. Take the fried gram dal / pottu kadalai and make it to a fine powder in a small mixie jar / spice grinder.
  2. Add in all the ingredients listed under kola masala into a mixie / blender and grind it to a smooth paste.
  3. Take a kadai and add in the meat. Fry the minced mutton till its completely dry. Run the cooked minced mutton in a mixie / blender. Pulse for just a couple of times. Set aside.
  4. Add the minced meat, ground masala and the fried gram (pottu kadalai) powder and mix well to form a soft dough. Apply little oil to your hands. Make small 1.5 inch balls with your hands.
  5. Refrigerate the balls for 30 minutes before frying.
  6. Heat oil in a pan in medium heat. Once the oil is hot, fry the balls in low medium flame until golden.
  7. Serve mutton kolas hot.

The post Mutton Kola Urundai Recipe appeared first on Kannamma Cooks.

Chutney Powder for Idli Recipe / Karnataka style Garlic Peanut Chutney Podi

$
0
0

karnataka-chutney-podi-recipe-for-idli

This is a very easy basic chutney powder recipe that goes so well with idli or dosa. This is a Karnataka style recipe. The flavor of peanuts and roasted garlic is to die for. I am sure you will have an extra idli or two when this chutney powder is around. I still remember an incident that happened at my sons preschool in California long long time ago. There was a small talk about the food habits of children and many moms were worried if their children were getting enough of their dietary needs. A mom said that peanut butter is an excellent way to sneak in protein into a kids diet. She even explained the numbers which left all of us stunned. Dont believe me. Take a look at this pic and be in awe for a minute.

karnataka-chutney-podi-protein-pic

Source – USDA Google

So the great thing about this recipe is that its almost exclusively made with peanuts and kids love this chutney powder. Its tangy and nutty. Give it a shot and I am sure you will like it. Its healthy too. Now back in business. Here is how to do Karnataka style chutney podi.

We will have to roast all the ingredients and then grind it into a powder. Keeping the stove on low flame is key to this recipe. Do not rush the roasting process. First lets fry the peanuts. Add in a teaspoon of oil in a heavy bottomed pan and roast the peanuts in low flame for 5 minutes. Remove from heat and set aside on a plate to cool.

karnataka-chutney-podi-recipe-for-idli-peanut

Now, slightly crush the garlic in a mortar and pestle. Have the skin on. No need to peel the skin. In the same pan, add in a teaspoon of oil and add in the crushed garlic. Fry for 2 minutes on low flame until slightly golden. Remove from heat and set aside on a plate to cool.

karnataka-chutney-podi-recipe-for-idli-garlic

Add in the dried red chillies. I like to use Karnataka Byadagi Chillies which are not very spicy but give a good aroma and colour. You can adjust the red chillies according to your spice levels. Add more of chillies if you want a spicy chutney powder. Fry for a minute in low flame. Remove from heat and set aside on a plate to cool.

karnataka-chutney-podi-recipe-for-idli-1-9

Add in the curry leaves and fry till they are dry. Remove from heat and set aside on a plate to cool.

karnataka-chutney-podi-recipe-for-idli-curry-leaves

Add in a teaspoon of oil in a pan and fry the tamarind and hing (katti perungayam or solid asafoetida compound) on low flame for a minute. Remove from heat and set aside on a plate to cool.

karnataka-chutney-podi-recipe-for-idli-1-10

Now its time to grind. Get all the fried ingredients and other ingredients ready. Make sure all the fried ingredients have cooled to room temperature.

karnataka-chutney-podi-recipe-for-idli-ing

Add in all the ingredients in a mixie except garlic and peanuts. Grind it to a powder. Pulse it several times. Stop in between several times and mix everything with a spatula so the mixture gets ground to a smooth powder. It might not become a very fine powder but try to run the mixie for atleast 2-3 minutes and stop and scrape in between with a spatula several times.

karnataka-chutney-podi-recipe-for-idli-grind

Add in the roasted peanuts and the roasted garlic to the ground powder and grind everything together. Pulse everything several times. Stop in between frequently and scrape the mixture with a spatula. Do not run the mixie continuously. You need to pulse and scrape several times until it becomes a powder whose texture is similar to that of the slightly moist sand at the beach. Check for seasoning. The chutney powder is ready to go!

karnataka-chutney-podi-recipe-for-idli-powder

The chutney powder will stay fresh for 10 days at room temperature. If you plan to use it beyond 10 days, store it in the refrigerator and use it as required. It will stay fresh in the refrigerator for about 30 days.

Chutney Powder for Idli Recipe / Karnataka style Garlic Peanut Chutney Podi
 
Prep time
Cook time
Total time
 
South Indian Karnataka Style recipe for chutney powder. Chutney powder recipe for Idli and Dosa. Made with peanut, garlic and spices.
Author:
Recipe type: Chutney Powder
Cuisine: South Indian
Serves: 2 cups
Ingredients
  • 1 Cup / 250 ml peanuts
  • 1 pod / bulb garlic
  • 4 sprigs curry leaves
  • 6 dried red chillies
  • Half a lime size tamarind
  • ¼ teaspoon asafoetida compound
  • 1 teaspoon salt
  • 1 teaspoon jaggery
  • 3 teaspoon peanut oil
Instructions
  1. Add in a teaspoon of oil in a heavy bottomed pan and roast the peanuts in low flame for 5 minutes. Remove from heat and set aside on a plate to cool.
  2. In the same pan, add in a teaspoon of oil and add in the crushed garlic. Fry for 2 minutes on low flame until slightly golden. Remove from heat and set aside on a plate to cool.
  3. Add in the dried red chillies. Fry for a minute in low flame. Remove from heat and set aside on a plate to cool.
  4. Add in the curry leaves and fry till they are dry. Remove from heat and set aside on a plate to cool.
  5. Add in a teaspoon of oil in a pan and fry the tamarind and asafoetida on low flame for a minute. Remove from heat and set aside on a plate to cool.
  6. Allow the ingredients to cool to room temperature. Add in all the ingredients in a mixie except garlic and peanuts. Grind it to a powder. Pulse it several times.
  7. Add in the roasted peanuts and the roasted garlic to the ground powder and grind everything together. Store in an airtight container for upto 10 days.
Notes
If you want your chutney powder to be bright red in colour, use a combination of Kashmiri chillies and byadagi or guntur. Kashmiri chillies imparts a deep red colour to the chutney powder.

The post Chutney Powder for Idli Recipe / Karnataka style Garlic Peanut Chutney Podi appeared first on Kannamma Cooks.

Pasi paruppu sambar / moong dal sambar

$
0
0

pasi-paruppu-sambar-recipe

This sambar made with Pasi Paruppu / moong dal is so light on the stomach and very easy to digest. As its so good and so easy to digest, you will find a version of this sambar in almost all the tamil kitchens all the time. Especially pasi paruppu sambar is what you will be made to eat when you are pregnant, nursing, or when you have aged people at home who want to eat light food. If you are down with flu or tired from work, then this sambar is what you should be making as its very light and very healthy. Here is how to do it. There is no tamarind used in this sambar and its so easy to make this recipe.

Take a bowl and add in the washed moong dal. Add in the chopped onion, tomatoes, curry leaves and vegetables of your choice. I added carrots, brinjal and yellow pumpkin today. You can add whatever you have in your fridge. Add 2 cups of water and cook in a pressure cooker for 2 whistles. Not more than that. You want the dal to have a little texture. If you cook moong dal for a long time, it will become slimy and mushy and the sambar wont have the right consistency. So do not overcook your lentils. After the 2 whistles, switch off the flame and allow the cooker to release its pressure naturally. Set aside.

pasi-paruppu-sambar

Heat sesame oil in a pan and add in the mustard seeds when the oil is hot. Add in the cumin seeds and the fenugreek (vendhayam) seeds. Let the seeds splutter. Add in the asafoetida (perungayam). Add 1/2 a cup of water to the pan. After adding the water, add in the sambar powder and turmeric powder. If you don’t have home made sambar powder, no worries. Any store bought sambar powder will do. Add in the salt. Let it cook for 3 minutes so the masala powders gets fully cooked.

pasi-paruppu-sambar-recipe-temper

Add in the boiled lentil mixture and mix well. If you think the sambar is too thick, then add 1/2 a cup of hot water to the pan. Add only if you think its really necessary. Let it simmer on low flame for a couple of minutes. The dal will have a nice texture and should not be mushy. Add in the coriander leaves and switch off the flame.

pasi-paruppu-sambar-recipe-garnish

Serve the pasi paruppu sambar hot with south Indian tiffin items.

Pasi paruppu sambar / moong dal sambar
 
Prep time
Cook time
Total time
 
Recipe for pasi paruppu sambar. Sambar recipe made with moong dal. Very light recipe which is easy to digest.
Author:
Recipe type: Side Dish
Cuisine: Tamilnadu
Serves: 4 persons
Ingredients
Lentils and Veggies
  • ⅓ cup split moong dal (paasi paruppu)
  • 1 onion, chopped
  • 1 tomato, chopped
  • 1 sprig curry leaves
  • 2 cups vegetables of your choice
  • (I used 1 carrot, 1 brinjal and ½ cup of yellow pumpkin)
For the Tempering
  • 1 teaspoon sesame oil
  • ¼ teaspoon mustard seeds
  • ¼ teaspoon cumin seeds
  • ⅛ teaspoon fenugreek seeds
  • a big pinch of asafoetida
  • 1 teaspoon sambar powder
  • ½ teaspoon turmeric
  • 1 teaspoon salt
  • 2 sprigs coriander leaves, chopped
Instructions
  1. Take a pressure cooker and add in all the ingredients listed under Lentils and Veggies. Add 2 cups of water and cook in a pressure cooker for 2 whistles. Switch off the flame and allow the cooker to release its pressure naturally. Set aside.
  2. Heat sesame oil in a pan and add in the mustard seeds when the oil is hot. Add in the cumin seeds and the fenugreek (vendhayam) seeds. Let the seeds splutter. Add in the asafoetida (perungayam). Add ½ a cup of water to the pan. After adding the water, add in the sambar powder and turmeric powder. Add in the salt. Let it cook for 3 minutes so the masala powders gets fully cooked.
  3. Add in the boiled lentil mixture and mix well. If you think the sambar is too thick, then add ½ a cup of hot water to the pan.
  4. Let it simmer on low flame for a couple of minutes. Add in the coriander leaves and switch off the flame.

The post Pasi paruppu sambar / moong dal sambar appeared first on Kannamma Cooks.

Kori Kempu Bezule / Mangalore Chicken Bezule

$
0
0

kori-kempu-bezule

I first tasted this dish at The Gateway Hotels – Karavalli Restaurant in Bangalore. We loved it a lot. The description of the dish was something like this. “Boneless chicken, marinated to perfection in a traditional mangalorean masala, tossed in yoghurt, green chillies and curry leaves.” It was true to every word of that description. The slight tang from the white bits of curdled yogurt and the aroma of curry leaves made this dish a winner to be remembered for a long time. Here is my adapted recipe for Karavalli style Kori Kempu Bezule / Mangalore Chicken Bezule. I adapted this recipe from The Best of Indian Cooking (A Selection of Recipes From the Taj Group of Hotels)

karavalli-kori-kempu-bezule

The important ingredient in this recipe is the dried red chillies. Its the Karnataka Byadagi chillies. BAY-DIG-GAY as its pronounced, Byadagi Chillies come from the Haveri district in Karnataka. The chilli is long and wrinkled and deeply red. Its not very hot but imparts a dark color and aroma. Its not a very spicy variety of chilli. So if you can get Byadagi chillies, its good. Else you can use Kashmiri chillies.

Byadagi Chillies Karnataka

Boil the dried red chillies in a cup of water for 10 minutes. Drain the water and set aside. Take a small mixie jar and add in the boiled and drained chillies, turmeric powder, salt and the garlic cloves. Add an egg to the mixture. Make it into a fine paste. Set aside.

kori-kempu-bezule-masala

Take 3 boneless chicken breasts and cut into 2 inch strips. Take a bowl and add in the corn flour and maida (all purpose flour). Add the chicken strips and the ground masala. Mix well to coat evenly. Let the chicken marinate for 30 minutes at room temperature. Set aside.

kori-kempu-bezule-marinate

Heat oil in a pan until hot. Add the marinated chicken strips to the oil. Here are some points to note while frying chicken so the chicken doesn’t become hard.
# Do not fry chicken in really super hot oil. Let the flame be at medium high at all times. Frying in really hot smoking oil makes the chicken hard and rubbery.
# Do not crowd the pan. Add only as much the pan will hold without crowding.
# Boneless chicken breast cooks fast after marination. Once the bubbles in the oil subside, its an indication that the chicken is done. Remove and drain on paper towels. Continuing to cook the chicken even after the bubbles have mostly subsided will give you hard chicken. Some bubbles will remain and that’s fine.
# It took not more than 2 minutes for me for each batch of chicken. Take a chicken strip from oil and break it into two. If the meat is white inside, its done. Do not over cook the meat.

Here is a picture where the bubbles in the oil subside. When most of the bubbles have gone, remove the chicken strips from oil. Set aside.

kori-kempu-bezule-fry

Now we will toss the chicken in yogurt sauce. This is what transforms the chicken into an awesome dish.
Take 2 teaspoon of oil in a pan. I used the same oil used for frying chicken. Add in the curry leaves. Add lots of curry leaves. The aroma of curry leaves is very important for this recipe. Add chopped green chillies. Add more if you want a spicy chicken bezule. Add in the yogurt and saute for a minute. The yogurt will curdle and that’s what we want.

kori-kempu-bezule-yogurt

Add in the fried chicken pieces to the curdled yogurt sauce and briefly toss to coat. Remove off heat and serve kori kempu bezule, hotel karavalli style.

kori-kempu-bezule-temper

5.0 from 1 reviews
Kori Kempu Bezule / Mangalore Chicken Bezule
 
Prep time
Cook time
Total time
 
Mangalorean style Kori Kempu Bezule. Boneless chicken, marinated to perfection in a traditional mangalorean masala, tossed in yoghurt, green chillies and curry leaves.
Author:
Recipe type: Appetizer
Cuisine: Mangalorean, South India
Serves: 4 persons
Ingredients
For the masala paste
  • 6 byadagi dried red chillies
  • 1 teaspoon turmeric
  • 1 teaspoon salt
  • 10 cloves garlic
  • 1 egg
For the marinade
  • ¼ cup corn flour (corn starch)
  • 2 tablespoon maida (all purpose flour)
For the Sauce
  • 2 teaspoon oil (I used oil that was used for frying)
  • ¼ cup yogurt
  • 4 sprigs curry leaves
  • 4 green chillies, chopped
Other Ingredients
  • 3 chicken breasts, cut into strips
  • 500 ml vegetable/sunflower oil for deep frying
Instructions
  1. Boil the dried red chillies in a cup of water for 10 minutes. Drain the water and set aside. Take a small mixie jar and add in the boiled and drained chillies, turmeric powder, salt and the garlic cloves. Add an egg to the mixture. Make it into a fine paste. Set aside.
  2. Take 3 boneless chicken breasts and cut into 2 inch strips. Take a bowl and add in the corn flour and maida (all purpose flour). Add the chicken strips and the ground masala. Mix well to coat evenly. Let the chicken marinate for 30 minutes at room temperature. Set aside.
  3. Heat oil in a pan until hot. Add the marinated chicken strips to the oil. Cook till done. Set aside
  4. Take 2 teaspoon of oil in a pan. I used the same oil used for frying chicken. Add in the curry leaves and green chillies. Add lots of curry leaves. Add in the yogurt and saute for a minute. The yogurt will curdle.
  5. Add in the fried chicken pieces to the curdled yogurt sauce and briefly toss to coat. Remove off heat and serve warm.

The post Kori Kempu Bezule / Mangalore Chicken Bezule appeared first on Kannamma Cooks.

Kongunad Kathirikkai Bajji / Coimbatore Style Brinjal Chutney

$
0
0

coimbatore-kathirikkai-bajji

This is my mom’s recipe. I have eaten this chutney with dosa several times a week during my entire childhood. Its a simple chutney that goes so well with dosa. We call this chutney as bajji and that might be due to the influence of the vast telugu speaking community of Coimbatore region. There is no tempering involved in this chutney and the recipe itself is so unique and different. Its simple to make and tastes awesome. Try it to believe it. My dad loves this chutney. So, that was even more a reason for my mother to make it very often. Here is how to do Kongunad style Kathirikkai Bajji.

Tips for the chutney
Just get all the ingredients ready. Peanut oil is used in this recipe. You can use vegetable oil or sunflower oil if you do not have peanut oil at home. Baby brinjals makes this chutney very tasty. Also use “Naatu Thakkali” or country tomatoes. Cut the onions and tomatoes as fine as possible, so it will be easy in the end to mash the chutney. Dice the potatoes and brinjals. I used one potato for this recipe. Do not use more. The chutney will become starchy. Store the cut brinjals and potatoes in a bowl filled with water till you cook so it does not discolor.

coimbatore-kathirikkai-bajji-ingredients

Heat oil in a pan and add in the finely chopped onions. Fry till the onions are soft. No need to brown the onions. Add in the chopped green chillies, tomatoes, salt and turmeric. Saute for 2 minutes until the tomatoes are soft.

coimbatore-kathirikkai-bajji-cook

Add in the diced potatoes and brinjal. There is a secret ingredient in this recipe and thats quarter teaspoon of sugar. It rounds the flavor of the chillies and tomatoes. Add just a little sugar. Sugar is optional. Leave it if you do not want to use it. Add in a cup of water.

coimbatore-kathirikkai-bajji-steam

Now close the pressure pan with its lid and let it cook for 3 whistles. Switch off the heat and wait for the pressure from the cooker to release naturally. Open the pan and mash the chutney with a masher or with a cup. Mash them well. The chutney is ready.

coimbatore-kathirikkai-bajji-mash

Serve the chutney with dosa. One of our all time favorites!

4.0 from 1 reviews
Kongunad Kathirikkai Bajji / Coimbatore Style Brinjal Chutney
 
Prep time
Cook time
Total time
 
Kongunad Coimbatore style kathirikkai bhajji / brinjal chutney. Awesome side dish for dosa. Very simple to make.
Author:
Recipe type: Chutney
Cuisine: Kongunad, Tamilnadu
Serves: 3 persons
Ingredients
  • 2 teaspoon peanut oil
  • 1 onion, finely chopped
  • 2 country tomatoes (naatu thakkali), finely chopped
  • 2 green chillies, chopped (add more if you want a spicy chutney)
  • 1 teaspoon salt
  • 1 teaspoon turmeric powder
  • 1 medium potato, peeled and diced
  • 200 grams baby brinjals, diced
  • ¼ teaspoon sugar (optional)
Instructions
  1. Heat oil in a pan and add in the finely chopped onions. Fry till the onions are soft. Add in the chopped green chillies, tomatoes, salt and turmeric. Saute for 2 minutes until the tomatoes are soft.
  2. Add in the diced potatoes and brinjal. Add in the water. Add in the sugar if using.
  3. Close the pressure pan with its lid and let it cook for 3 whistles. Switch off the heat and wait for the pressure from the cooker to release naturally. Open the pan and mash the chutney with a masher or with a cup. Mash them well. The chutney is ready.

The post Kongunad Kathirikkai Bajji / Coimbatore Style Brinjal Chutney appeared first on Kannamma Cooks.


Baked Vanilla Yogurt with Orange Glaze Sauce

$
0
0

baked-yogurt-recipe

There is something magical about recipes like these which are so simple to make but the guests just cannot get enough of it. Its a simple 5 ingredient recipe. Its perfect for parties as they can be made ahead of time. Its also perfect to make as dessert for your family for those easy cozy friday night dinners. Here is how to make baked vanilla yogurt.

Take a bowl and add in half a cup each of plain yogurt, heavy cream and condensed milk. I used home made fresh yogurt that’s not sour. Store bought yogurt works fine too. In India, we do not get heavy whipping cream. We get only low fat cream and it works fine for this recipe. I used Amul cream today.

baked-yogurt-recipe-ingredients

Now we need to add vanilla. We need real good quality vanilla extract for this recipe. Please do not use imitation vanilla. Once you have tasted good vanilla, you will never go back to anything else. I use the brand of pure vanilla extract called Goodness Vanilla. It also makes me proud that it comes from my home town near Coimbatore from a place called Pollachi. Its one of the best vanilla you will find in India. Buy Goodness Vanilla Online. 
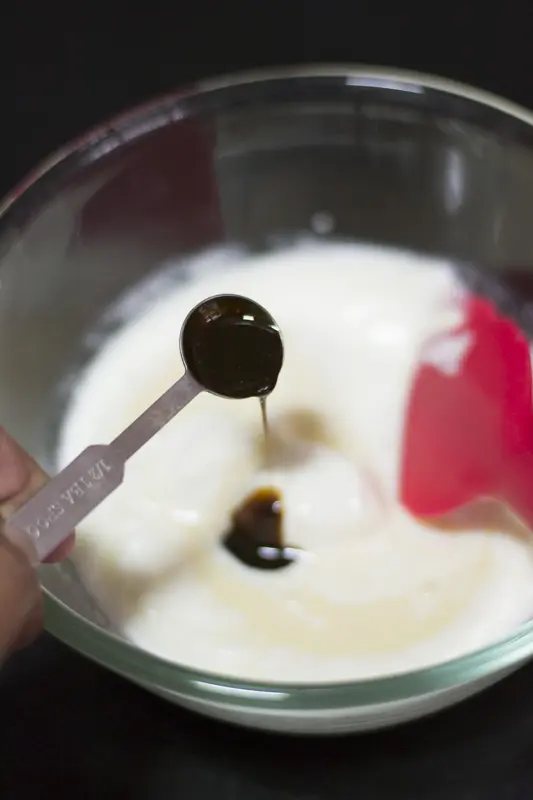
I cannot emphasize more on using good quality ingredients. Your end product will only be as good as the quality of the ingredients you use. Add in 1/2 a teaspoon of vanilla extract to the mixture.

baked-yogurt-recipe-vanilla

Mix everything well until smooth. Pour it in ramekins and bake in a 120° celsius oven for 15-20 minutes. No need to preheat the oven for this recipe. After 15 minutes, the middle of the ramekins should be jiggly. If its still liquid, bake for a couple of minutes more. Do not let it cook for long else it will become hard. Remove from the oven and allow it to cool.

baked-yogurt-recipe-bake

In the mean time lets make the glaze for the yogurt. Take 2 tablespoon of orange marmalade or jam of your choice and add in 2 tablespoon of water. Bring it to a simmer until the jam has melted. Allow it to cool a bit and pour a tablespoon of the melted syrup on each ramekin. Refrigerate for 6-8 hours in the fridge and serve cold.

baked-yogurt-recipe-glaze

One of the simple and best desserts ever!

Baked Vanilla Yogurt with Orange Glaze Sauce / 5 Ingredient Recipe
 
Prep time
Cook time
Total time
 
Easy 5 ingredient recipe for baked vanilla yogurt with orange glaze sauce. Beginners recipe.
Author:
Recipe type: Dessert
Cuisine: Indian
Serves: 3 persons
Ingredients
  • ½ cup yogurt
  • ½ cup heavy whipping cream (Amul cream works fine)
  • ½ cup condensed milk
  • ½ teaspoon pure vanilla extract
  • 2 tablespoon orange marmalade
Instructions
  1. Take a bowl and add in half a cup each of plain yogurt, heavy cream and condensed milk.
  2. Add in the vanilla extract.
  3. Mix everything well until smooth. Pour it in ramekins and bake in a 120° celsius oven for 15-20 minutes. No need to preheat the oven for this recipe. After 15 minutes, the middle of the ramekins should be jiggly. If its still liquid, bake for a couple of minutes more. Remove from the oven and allow it to cool.
  4. Take 2 tablespoon of orange marmalade or jam of your choice and add in 2 tablespoon of water. Bring it to a simmer until the jam has melted. Allow it to cool a bit and pour a tablespoon of the melted syrup on each ramekin. Refrigerate for 6-8 hours in the fridge and serve cold.

The post Baked Vanilla Yogurt with Orange Glaze Sauce appeared first on Kannamma Cooks.

Poondu Rasam Recipe / Why Rasam should never be boiled for a long time?

$
0
0

Poondu-rasam-recipe

Before we jump into the recipe, there are a few things that grandmothers would tell you when making rasam. Especially if its a tamarind based rasam.

# Rasam should never be brought to a roaring boil
# Salt should be added only in the end
# Always cook rasam at a low temperature

BUT WHY?

Traditionally rasam in Tamilnadu was made in eeya chatti. Eeyam or Velleeyam that’s used for cooking is nothing but a vessel coated with Tin. Tin is supposed to have health properties. But there was one problem. Tin has a very low melting point. Tin melts at a low temperature of about 200 – 230 °C. So the liquid cannot be heated up in a tin vessel for long. If heated for too long, the metal itself would start to melt.

Also reactive ingredients like tamarind, lemon and salt were never boiled for a long time in the vessel. That’s the reason lemon and salt were added during the end of cooking process. Tamarind water was never boiled for too long for the same reason. Rasam made in eeya chatti tastes different. But today, steel vessels have taken over every kitchen. So people have forgotten the reason as to why things were done in a certain way. But if one follows the same principles even today, you will end up with a lip smacking rasam that will cozy up your tummy and warm up your heart. You will end up with a rasam that tastes as close to your grandma.

Lets make traditional style poondu rasam today. Not in eeya chatti but in an everyday steel vessel. I adapted this recipe from a Coimbatore cookbook called “simply homemade” by Jayanthi Manohar. The book has recipes from the kongunad region. We will need to make “Jillakara Mirel” powder for this rasam. Its nothing but cumin and pepper powder. Grind the cumin and pepper in a mortar and pestle. Set aside. Also roughly crush the garlic cloves along with its peel. Set aside. Soak tamarind in water for 20 minutes. Squeeze the tamarind to make tamarind pulp. Discard the seeds and the pith. Set the tamarind pulp aside.

Poondu-rasam-recipe-prep

Heat sesame oil in a pan and add in the mustard seeds, fenugreek seeds and compound asafoetida / katti perungayam. Katti perungayam tastes so much better than the usual asafoetida powder. If you dont have compound, then you can add powder. Let the seeds splutter. Add in the crushed garlic and fry for a minute to roast the garlic. Add in the “Jillakara Mirel” / cumin-pepper powder and fry for 20 seconds. Frying the cumin and pepper brings out the essential oils in them and the final rasam tastes more flavorful.

Poondu-rasam-recipe-fry

Now add in the tamarind pulp and reduce the flame to low. Add in the curry leaves and turmeric. The flavor of curry leaves that is tempered in oil vs boiled in liquid is totally different. Add in the curry leaves after adding the tamarind liquid. Let it come to a mere simmer. The rasam will slowly foam up and slightly start to boil. That is it. Switch off the flame.

Poondu-rasam-recipe-simmer

Green chillies are added in almost every rasam at the last in the kongunad region. It doesn’t make the rasam spicy but the chilli aroma gets steeped into the rasam and makes it so aromatic. Add in the coriander leaves and the salt.

Poondu-rasam-recipe-garnish

Now comes the important part. Immediately after adding these 3 ingredients, cover the rasam with a lid and allow the flavors to steep for 15 minutes.

Poondu-rasam-recipe-soak

Serve the rasam with rice for lunch.

Poondu Rasam Recipe / Why Rasam should never be boiled for a long time?
 
Prep time
Cook time
Total time
 
Recipe for Tamilnadu style poondu rasam. Very good for digestion and very tasty.
Author:
Recipe type: Rasam
Cuisine: Tamilnadu
Serves: 4 persons
Ingredients
  • 1 teaspoon sesame oil (gingely / nallennai)
  • ¼ teaspoon mustard seeds
  • ⅛ teaspoon fenugreek seeds
  • a big pinch asafoetida
  • 1 teaspoon cumin seeds
  • 1 teaspoon black pepper corns
  • 12 cloves garlic
  • ½ a lime size tamarind
  • 2 sprigs curry leaves
  • ½ teaspoon turmeric
  • 1 teaspoon salt
  • 2 green chillies, chopped
  • 2 sprigs coriander leaves, chopped
Instructions
  1. Grind the cumin and pepper in a mortar and pestle. Also roughly crush the garlic cloves along with its peel. Soak tamarind in water for 20 minutes. Squeeze the tamarind to make tamarind pulp. Discard the seeds and the pith. Set aside.
  2. Heat sesame oil in a pan and add in the mustard seeds, fenugreek seeds and compound asafoetida. Let the seeds splutter.
  3. Add in the crushed garlic and fry for a minute to roast the garlic. Add in the cumin-pepper powder and fry for 20 seconds.
  4. Now add in the tamarind pulp and reduce the flame to low. Add in the curry leaves and turmeric. The rasam will slowly foam up and slightly start to boil. Switch off the flame.
  5. Add in the chopped green chillies, coriander leaves and the salt.
  6. Cover the rasam with a lid and allow the flavours to steep for 15 minutes.

The post Poondu Rasam Recipe / Why Rasam should never be boiled for a long time? appeared first on Kannamma Cooks.

Arisi Paruppu Saadham

$
0
0

arisi-paruppu-saadam-sivakumar

If there is one recipe that is so proudly kongunad, then it has to be arisiyum paruppum saadham. Actor Sivakumar is from Coimbatore and in his autobiography idhu raaja paatai alla, he writes his love for arisiyum paruppum saadham. I am a great fan of his writing more than his acting I should say. Grapevine has it that, it is still his favorite dish and proudly refers the dish to everyone on the dining table as “kavundar biriyani”. Arisi Paruppu Saadham has to be one of the most comforting food for the people of Coimbatore. Here is an excerpt from the book where he talks about his love for the dish.

காலை நேரத்தில் சோளச் சோறும் கெட்டித்தயிரும். அதன் ருசியே தனி. இரவு சோள தோசை, ராகி தோசை, ராகி உப்மா அல்லது பச்சை பயறு, தட்டை பயறு, கொள்ளுச் சுண்டல்.
பொங்கச் சோறு போட முடியாம என்னை ஏன் பெத்தே? என்று ஒரு நாள் அம்மாவை பார்த்து கேட்டேன். பொங்கலுக்கு பயன் படுத்தும் அரிசியை கொண்டு சமைப்பது பொங்கச் சோறு. அதாவது அரிசிச் சோறு.! எனது பள்ளிப் படிப்பு முடியும் வரையிலும் ஏறக்குறைய 11 வருஷம் – எப்படியோ காசு மிச்சம் பிடித்து, கொஞ்சம் அரிசி வாங்கி தினமும் ஒரு கைப்பிடி அரிசி எடுத்து, சாதம் செய்து பள்ளிக்கு மட்டும் கொடுத்து அனுப்பினார்.
அரிசியும் பருப்பும் சாதம் கொங்கு நாட்டில் பிரசித்தம். எலுமிச்சை சாதம் போல தோற்றமளிக்கும். ஆனால் அதன் ருசி சாப்பிட்டு அனுபவிதவர்களுக்கு தான் தெரியும். என்னை விட மூன்று வயது பெரியவள் என் சகோதரி. ஒரு நாள், சட்டியின் ஓரத்தில் கொஞ்சம் சாதம் ஒட்டி இருப்பதை பார்த்து அவளிடம் கேட்டேன்! “அது வந்து கண்ணு, முழுசா சட்டிய சொரண்டினா தரித்திரம் புடிச்சுக்கும். அதான் கொஞ்சம் ஓரத்துல விட்டிருக்கேன்” என்றார். பாவம்! அரிசி சாதத்தை ருசி பார்க்க அவளுக்கு மட்டும் ஆசை இருக்காதா என்ன? நான் பள்ளிக்குச் சென்றபின், சட்டியை சுரண்டி, ஒரு கை அளவே ஆகும் அந்தச் சாதத்தை சாப்பிட்டு, ஆசையை தணித்துக் கொள்வார்.

Here is the recipe for Arisi paruppu saadham. This is a very simple recipe and requires very few ingredients. Parboiled rice like ponni rice is usually used for making this rice. If you do not have parboiled rice, then any good raw rice variety like sona masuri works well for this recipe. Wash the rice well in running water for 2-3 times. Soak the rice and the toor dal in water. We need to soak the rice for at-least 20-30 minutes. Set aside. Chop the onion and tomatoes fine. Set aside.

arisi-paruppu-saadam-veggies

Heat oil in a pan until hot. Sesame oil (nallennai) is preferred for this recipe. Add in the mustard seeds, cumin seeds, curry leaves and dried red chillies. Let the mustard seeds splutter. Add in the onions and the garlic and fry till the onions are soft and slowly starting to brown. About 5 minutes on medium flame.

arisi-paruppu-saadam-tempering

Add in the finely chopped tomatoes, turmeric powder, sambar powder and salt. Store bought sambar powder works fine for this recipe. Fry well till the tomatoes are juiced down and mashed together. About 5 minutes on medium flame.

arisi-paruppu-saadam-masala

In the mean time, bring a bowl of water to a boil. We are using one cup of rice and half cup of dal today. For this quantity, we will be using 3.5 cups of water. Add in the hot water to the pan. Strain the rice and dal and add it to the pan. Check for seasoning. Adjust for salt if need be at this stage. Let the mixture come to a boil. Mix well once and cover the pan.

arisi-paruppu-saadam-cook

Cook the rice in a pressure pan for 3 whistles on medium flame. Remove from heat. Wait for the pressure from the cooker to release naturally. Do not omit this step!

arisi-paruppu-saadam-pc

Arisiyum paruppum saadham is ready to be served! This dish is always ALWAYS served with hot ghee. Just add a teaspoon and mix and enjoy your meal!

arisi-paruppu-saadam

5.0 from 5 reviews
Arisi Paruppu Saadham
 
Prep time
Cook time
Total time
 
Arisiyum paruppum saadham recipe
Author:
Recipe type: Main COurse
Cuisine: Tamilnadu
Serves: 3 persons
Ingredients
Main Ingredients
  • 1 cup Rice, preferably parboiled rice like ponni
  • ½ cup toor dal
  • 3.5 cups water
Other Ingredients
  • 2 tablespoon sesame / gingely oil
  • ¼ teaspoon cumin seeds
  • ¼ teaspoon mustard seeds
  • 2 sprigs curry leaves
  • 2 dried red chillies
  • 2 onions. finely chopped
  • 6 cloves garlic
  • 2 tomatoes, finely chopped
  • 1 teaspoon salt
  • ½ teaspoon turmeric powder
  • 1 teaspoon sambar powder
  • 2 tablespoon hot Ghee for serving
Instructions
  1. Wash and soak the rice and the toor dal in water.
  2. Heat oil in a pan until hot. Add in the mustard seeds, cumin seeds, curry leaves and dried red chillies. Let the mustard seeds splutter. Add in the onions and the garlic and fry till the onions are soft and slowly starting to brown.
  3. Add in the finely chopped tomatoes, turmeric powder, sambar powder and salt. Fry well till the tomatoes are juiced down and mashed together.
  4. Add in the hot water to the pan. Strain the rice and dal and add it to the pan. Check for seasoning.
  5. Cook the rice in a pressure pan for 3 whistles on medium flame. Remove from heat.
  6. Serve hot!

The post Arisi Paruppu Saadham appeared first on Kannamma Cooks.

Pasi Payaru Upma / Moong Dal Upma

$
0
0

pasi-payaru-upma-recipe

This is a very unique recipe for upma made entirely with moong dal. Its very healthy and very easy to make. This is popular around Coimbatore region and usually made for breakfast. Here is how to do Pasi Payaru Upma. We use split green gram dal with the green skin still on. This works well for the recipe.

Wash and soak the moong dal in water for 4-5 hours. After soaking, scrub the lentils well between fingers. Wash in running water and drain several times. Drain between your fingers to get rid of the green skin. Repeat the procedure until most of the green skin from the dal has been removed. Some of the skin might still be attached. That’s fine. Set aside.

pasi-payaru-upma-recipe-wash

Add around 1 to 1 1/2 cups of water and grind the dal to a smooth paste. Add the salt and mix well.

pasi-payaru-upma-recipe-grind

Put some water in an idly vessel and put it on medium flame. Oil the idli plate and gently fill the rounds with the batter. Put it inside the idly vessel , cover the vessel, and let it steam for 15-20 minutes. After around 15 minutes, insert a spoon into the idlis. It should come clean. If it comes clean, the moong dal idlis are done. Remove from heat. Scoop the idlis out of the idli mold onto a plate.

pasi-payaru-upma-recipe-steam

Shred the moong dal idlis using a vegetable shredder. It should resemble shredded cheese. Set aside.

pasi-payaru-upma-recipe-shred

Now we will make upma.
Heat oil in a pan until hot. Add in the mustard seeds. Let it splutter. Add in the finely chopped ginger, dried red chillies and curry leaves. Fry for a few seconds until fragrant. Add in the chopped onions and green chillies. Using a lot of onions in this dish makes the upma very tasty. Fry till the onions are soft. Add in a little salt to taste.

pasi-payaru-upma-recipe-tempering

Add in the shredded dal and coriander leaves and mix well to combine. Switch off the flame and serve warm with coconut chutney.

pasi-payaru-upma-recipe-garnish


Pasi Payaru Upma
 
Prep time
Cook time
Total time
 
Recipe for healthy pasi payaru upma. green moong dal pulao.
Author:
Recipe type: Main
Cuisine: Tamilnadu
Serves: 4 persons
Ingredients
For the Moong dal Idlis
  • 1 Cup (250 ml) Green Moong Dal - Split
  • 1 teaspoon Salt
  • 1 - 1½ cups of water for grinding
  • 1 teaspoon oil for coating idli plates
For Tempering
  • 2 teaspoon sesame oil (gingely oil)
  • ½ teaspoon mustard seeds
  • 2 inch ginger, finely chopped
  • 2 dried red chillies
  • 2 sprigs curry leaves
  • 3 onions, finely chopped
  • ½ teaspoon salt
  • 3 green chillies, chopped
  • 3 sprigs coriander leaves, chopped
Instructions
  1. Wash and soak the moong dal in water for 4-5 hours. After soaking, scrub the lentils well between fingers. Wash in running water and drain several times. Drain between your fingers to get rid of the green skin. Set aside.
  2. Add around 1 to 1½ cups of water and grind the dal to a smooth paste. Add the salt and mix well.
  3. Put some water in an idly vessel and put it on medium flame. Oil the idli plate and gently fill the rounds with the batter. Put it inside the idly vessel , cover the vessel, and let it steam for 15-20 minutes. Remove from heat. Scoop the idlis out of the idli mold onto a plate.
  4. Shred the moong dal idlis using a vegetable shredder. Set aside.
  5. Heat oil in a pan until hot. Add in the mustard seeds. Let it splutter. Add in the finely chopped ginger, dried red chillies and curry leaves. Fry for a few seconds until fragrant. Add in the chopped onions and green chillies. Using a lot of onions in this dish makes the upma very tasty. Fry till the onions are soft. Add in a little salt to taste.
  6. Add in the shredded dal and coriander leaves and mix well to combine. Switch off the flame and serve warm with coconut chutney.

The post Pasi Payaru Upma / Moong Dal Upma appeared first on Kannamma Cooks.

Tomato Salna Recipe

$
0
0

tomato-salna-for-idli-recipe

Hello everyone. Its been so quiet here for sometime. We just moved to Hong Kong a couple of weeks back and that’s what has kept me away from Kannamma Cooks. We are still settling down and things should become normal in a couple of weeks time. Its been super cold here and foggy most of the time. I have been cooking minimally. Our son starts school next month. So its been boring for him with all the shopping and tenancy agreements that he is forced to do with me. But he likes it so far or so he says. Except for the long days pushing shopping trolleys with me.
hongkong
I made idli batter successfully in this chilly weather here. It was so good to have idlis at home after almost three weeks. I will share the technique for fermenting idli batter in cold weather in the coming weeks. Hope life comes to regulars soon. Here is a simple recipe. Its a recipe for Easy Tomato Salna that goes well with idli or dosa.

The thing about this salna is that its cooked in a pressure cooker for 4 whistles. Its uncommon to cook salna for 4 whistles but that does the trick as everything gets cooked so well. Its perfect for dunking idlis in. Here is how to do it.

Heat vegetable oil in a pan until hot. Add in the fennel seeds and let it splutter. Add in the chopped red onion and fry till the onions are soft. About 2-3 minutes on medium flame. Run three tomatoes in a mixie/blender with a cup of water until pureed. Add it to the pan.

tomato-salna-for-idli-recipe-tempering

Run quarter cup of fresh shredded coconut in a blender with a cup of water until it becomes a fine paste. Add it to the pan. Add in the salt, turmeric powder and red chilli powder. Mix well to combine. The salna at this stage should be watery. Add little more water if you feel that the salna is thick. Add in a teaspoon of sugar. The little sugar cuts the tartness from the tomatoes and makes it more flavorful.

tomato-salna-for-idli-recipe-add-coconut

Cover the pressure pan with a lid and cook for 4-5 whistles on medium flame. Switch off the heat after the said whistles and wait for the pressure from the cooker to release naturally.

tomato-salna-for-idli-recipe-garnish

Open the pan and check for seasoning. Add coriander leaves for garnish and serve hot with idlis.

tomato-salna-for-idli

5.0 from 1 reviews
Tomato Salna Recipe
 
Prep time
Cook time
Total time
 
Easy Tomato Salna that goes well with idli or dosa.
Author:
Recipe type: Side Dish
Cuisine: Tamilnadu
Serves: 3 persons
Ingredients
  • 1 teaspoon vegetable Oil
  • ½ teaspoon fennel seeds
  • 1 red onion, finely chopped
  • 3 ripe tomotoes
  • ¼ cup fresh shredded coconut
  • 1 teaspoon salt
  • ½ teaspoon turmeric
  • 1 teaspoon sugar
  • 1 teaspoon red chilli powder
  • 2 sprigs coriander leaves, chopped
Instructions
  1. Heat vegetable oil in a pan until hot. Add in the fennel seeds and let it splutter. Add in the chopped red onion and fry till the onions are soft.
  2. Run three tomatoes in a mixie/blender with a cup of water until pureed. Add it to the pan.
  3. Run quarter cup of fresh shredded coconut in a blender with a cup of water until it becomes a fine paste. Add it to the pan.
  4. Add in the salt, turmeric powder and red chilli powder. Mix well to combine. The salna at this stage should be watery. Add little more water if you feel that the salna is thick. Add in a teaspoon of sugar.
  5. Cover the pressure pan with a lid and cook for 4-5 whistles on medium flame. Switch off the heat after the said whistles and wait for the pressure from the cooker to release naturally.
  6. Open the pan and check for seasoning. Add coriander leaves for garnish and serve hot with idlis.

The post Tomato Salna Recipe appeared first on Kannamma Cooks.

Viewing all 1055 articles
Browse latest View live