Veg Kothu Parotta Recipe – Kothu Parotta Madurai Tamil Veetu Style
Long time ago, friends were home for dinner. The children were playing and we were talking. One of our good friends Karthi had asked us to come to their home the next weekend as he wanted to give us a party for his son’s birthday. Immediately, Manoj, another friend of ours told Karthik, “I want unga veetu (your home) kothu parotta for party.” Karthi nodded his head as he does all the time. Karthi is from Madurai. We went for the party and I was eagerly waiting for the kothu parotta. I wanted to know what that “unga veetu kothu parotta” was all about. Oh my god! It was that good. It was not like any other kothu parotta. This one was soft and juicy and had absorbed so much of the masala gravy that I must have had 3-4 servings. Its now a compulsory dish that needs to be on the table for any party at Karthi’s place. I asked Satya, Karthi’s wife for the recipe and when she told me the recipe, I was surprised at the method in which the dish was made. No complicated masalas, no coconut and no parottas. YES. No parottas. You bet! They make this dish with maida pooris. Oh my god. This recipe is a genius. You should try this at home. Here is Satya and Karthi posing for my camera.
 Here is Veg Kothu Parotta Recipe – Kothu Parotta Madurai Tamil Veetu Style
Mix Maida, salt and baking soda (Aapa soda) until combined. Add water and mix well to form a stiff dough similar to that of Poori dough. Knead for 3-4 minutes. Apply a teaspoon of oil to hands while kneading so the dough does not stick to the hands. Cover the dough and set aside. Let it rest for a minimum of 1 hour up to 2 hours.
Make small 2 inch balls from the dough and dredge the balls in maida and roll it into even circles. Let it not be super thin. It wont fluff up in oil. Keep the circles slightly on the thicker side.

Heat oil in a pan and fry the pooris on both sides and drain on paper towels. Once all the pooris are fried, tear the pooris using your hand into bite sized pieces and place it in a bowl. Set aside.
 Now lets make Masala Paste.
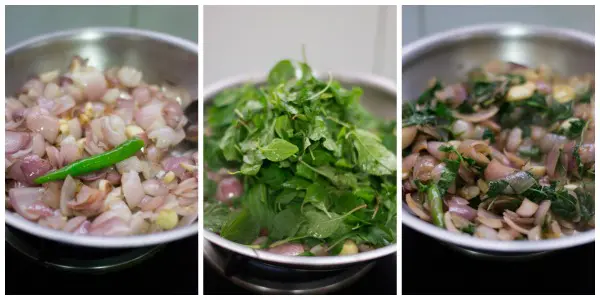
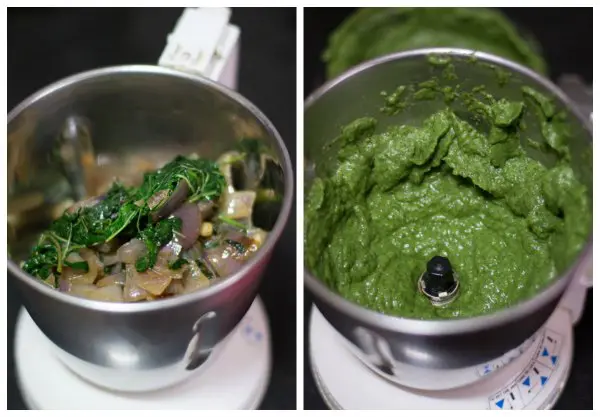
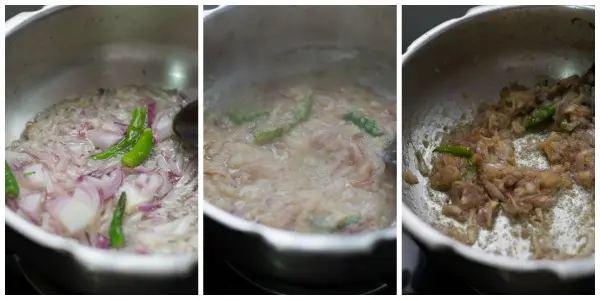
Heat oil in a pan and add in the onion and garlic. Fry till the onions are soft. Add in the sliced tomatoes and fry till the tomatoes are soft too. Remove from heat and grind the mixture to a smooth paste. Add up to a cup of water while grinding. Set aside.
 Now lets make Gravy
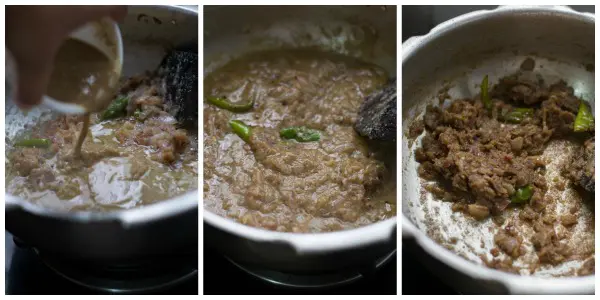
Heat oil in a pan and add in the cumin seeds. When the cumin seeds splutter, add in the ground masala, chilli powder, garam masala, curry leaves, salt and one cup of water. Bring the mixture to a boil.

Once the mixture is boiling, add in the pooris and mix well. Switch off the flame and add sliced onions, mint leaves, green chillies and lots of coriander leaves. Close the pan with a lid and let it rest for one hour.

Kothu parotta is ready after resting. Serve with raita.
- 1½ cups Maida
- ¼ teaspoon Baking soda / Aapa Soda
- ½ teaspoon Salt
- 1 teaspoon Vegetable oil
- Water for the dough
- Vegetable Oil for deep frying
- 2 teaspoon Vegetable oil
- 2 Onions, sliced
- 5 Cloves Garlic
- 3 Tomatoes, sliced
- 1 teaspoon Vegetable Oil
- 1 teaspoon Cumin seeds
- 1 teaspoon Salt
- 2 sprig Curry leaves
- 1 teaspoon Garam masala
- 1 teaspoon Chilli powder
- ½ Onions, sliced
- 3 sprigs Mint leaves, chopped
- 3 stalks Coriander leaves, chopped
- 2 Green chillies, chopped
- Mix Maida, salt and baking soda until combined. Add water and mix well to form a stiff dough similar to that of Poori dough. Knead for 3-4 minutes. Apply a teaspoon of oil to hands while kneading so the dough does not stick to the hands. Cover the dough and set aside. Let it rest for a minimum of 1 hour up to 2 hours. Make small balls from the dough and dredge the balls in maida and roll it into even circles. Let it not be super thin. It wont fluff up in oil. Keep the circles slightly on the thicker side.
- Heat oil in a pan and fry the pooris on both sides and drain on paper towels. Once all the pooris are fried, tear the pooris using your hand into bite sized pieces and place it in a bowl. Set aside.
- Heat oil in a pan and add in the onion and garlic. Fry till the onions are soft. Add in the sliced tomatoes and fry till the tomatoes are soft too. Remove from heat and grind the mixture to a smooth paste. Add upto a cup of water while grinding. Set aside.
- Heat oil in a pan and add in the cumin seeds. When the cumin seeds splutter, add in the ground masala, chilli powder, garam masala, curry leaves, salt and one cup of water. Bring the mixture to a boil.
- Once the mixture is boiling, add in the pooris and mix well. Switch off the flame and garnish with sliced onions, mint leaves, green chillies and lots of coriander leaves. Close the pan with a lid and let it rest for one hour.
The post Veg Kothu Parotta Recipe – Kothu Parotta Madurai Tamil Veetu Style appeared first on Kannamma Cooks.