Cooking without chillies in India is like cooking without fire. We are the kings of spice. The substance that gives chillies their heat and intensity when eaten is called capsaicin. Its mainly found in the seeds of the chillies. So if you want the flavor but less heat, then take out the seeds and use the skin alone. The general rule of thumb is that the smaller the chilli, higher the heat. When you eat a chilli, the capsaicin chemicals sends a message to the brain that something hot has been eaten. The pain receptors sends this message from the tongue and the throat. The brain in turn responds to the heat in the mouth by raising the heart rate and brings in the sweat / perspiration.
There are numerous varieties of chillies available in India. India is the worlds largest producer and consumer of chillies. We eat a lot of chillies. I have just compiled the most popular ones that I have used and come across.
Kashmiri Red Chilli – Its an intensely colored chilli. It does not have much heat to it but its the most sought after chilli for its color. When ground, the seeds are removed and the skin is ground to a fine powder. The chillies as such are not widely used. Its more known for the powder that’s made out of it. Its called as Kashmiri mirch.
Guntur – Guntur chilli has to be the most popular chilli in South India. Its spicy and a hot variety of chilli. It comes from Guntur district of Andhra Pradesh. Guntur sannam is a sub-variety that’s very popular and has high demand.
Salem Gundu – Its the most popular chilli used in Tamilnadu and its medium hot. Gundu in Tamil means fat. Its a small round fat chilli with lots of seeds in it. Its widely used in making chutney and sambar and for tempering / tadka purposes.
Byadagi – Byadagi Chillies come from the Haveri district in Karnataka. The chilli is long and wrinkled and deeply red. Its not very hot but imparts a dark colour and aroma. This is my favorite chilli. Its widely used in udipi and mangalore cuisine.
Dhani – Its the dried form of birds eye chilli. Its really spicy and hot and pungent.
Here is a picture of the other popular chillies around the world.
First things first. I did not make up this dish. Mr. Eggs Kejriwal is for real. I was very intrigued when I first saw this dish – Eggs Kejriwal. I came across this gem at Monkey Bar, Bangalore. I wanted to know more. It happens that this recipe was invented in Southern Mumbai at the Willingdon Club. Its an egg and chilli cheese sandwich. Its said that there was a man named Devi Prasad Kejriwal who liked eggs but his family were strict vegetarians. Kejriwal was a popular in the club and since he couldn’t get his favorite eggs at home, he had it in the club his way. It was a toast and a fried egg sprinkled with spicy green chillies as he liked spicy food. This Eggs Kejriwal is a little refined version that’s served in most places nowadays which uses cheese and tomatoes. The cheese helps to cut the hit of the green chilli. This recipe is inspired by the Kejriwal served at monkey bar. They serve it on the classic Pav Bread. I made it today on a roll. Come, lets make an awesome breakfast.
First, lets make an easy spicy fried salsa.
Heat oil in a pan and add in the finely chopped onions and fry for a minute. We don’t need to cook the onions for long. We want to saute the onions for just about a minute to avoid the harsh raw bite. So a minute is more than enough. Add in the tomatoes, chopped chillies, pepper powder and the salt. Fry for 15-20 seconds and switch off the flame. Add in the chopped coriander leaves and mix well. Set aside.
Next, the fried eggs. This is how to do an easy fried egg. I got a neat tip for eggs that holds its shape. Cut an onion ring about half inch high. Place it on the pan that’s been heating on low flame. Break the eggs into the ring. If you are like me, little spillage will happen. Never mind. I am no Ina Garten. So I just let it go. Sprinkle some salt and pepper and cover it with a lid and cook on low flame for 2 minutes. I like my eggs runny. If you want to fully cook your eggs, then turn it over and cook for a minute more. Remove the eggs from the pan and set aside.
When the eggs are cooking, gently toast the buns with some butter. Set aside. If you want your cheese on the bun to be melted, then add a slice of cheese to the bun when toasting and cover the pan with a lid for 30 seconds. The steam inside will melt the cheese.
Now lets assemble. Add some salsa on top of the cheese melted bun. Top it with a fried egg and you are good to go. Breakfast should be this good.
This recipe for Eggs Kejriwal is a cheese, egg and chilli sandwich invented by the Willingdon Club in Mumbai. Its spicy and delicious. Inspired from Chef Manu Chandra, Monkeybar - Bangalore
Author: Kannamma - Suguna Vinodh
Recipe type: Breakfast
Cuisine: Indian
Serves: 2
Ingredients
For the fried salsa
1 teaspoon oil
½ onion, finely chopped
½ tomato, finely chopped
1 green chilli, finely chopped
few sprigs coriander leaves
¼ teaspoon salt
⅛ teaspoon freshly ground pepper powder
For the fried eggs
¼ teaspoon oil
Onions cut into half inch rings
2 eggs
¼ teaspoon freshly ground pepper powder
Assembly
2 buns toasted
2 Cheddar Cheese slices
Instructions
Heat oil in a pan and add in the finely chopped onions and fry for a minute. Add in the tomatoes, chopped chillies, pepper powder and salt. Fry for 15-20 seconds and switch off the flame. Add in the chopped coriander leaves and mix well. Set aside.
Next the fried eggs. Cut an onion ring about half inch high. Place it on the pan that’s been heating on low flame. Break the eggs into the ring. Sprinkle some salt and pepper and cover it with a lid and cook on low flame for 2 minutes. Set aside.
When the eggs are cooking, gently toast the buns with some butter. Set aside.
If you want your cheese on the bun to be melted, then add a slice of cheese to the bun when toasting and cover the pan with a lid for 30 seconds. The steam inside will melt the cheese.
For assembling - Add some salsa on top of the cheese melted bun. Top it with a fried egg.
I really don’t like to use things like ” the worlds best recipe”, “the best thing I ever ate” and things like that. But I do not know how else to describe this amazing Badam Halwa. Its the best thing I have ever eaten. Two years back, we celebrated Diwali with all our family together at Ooty. Vinodh’s aunt had come to Ooty and she had brought this Badam Halwa. It was the best best best ever Badam Halwa. Vinodh’s Aunt Shantha Amma makes the most delicious sweets. This is her signature dessert. She got married when she was 16 years old. At that time, she did not know how to cook. Her husband was living away from home in a place near Coimbatore called Palani due to work. She joined him there to be with him. They appointed a cook. But his food turned out to be awful. She was so disappointed that the food was bad but she did not have any other option. She was away from home, very young and longed for simple home cooked good food. Restaurant scene was almost non-existent those days. It was the 1960’s – 1970’s period. Finally, she was done with the cook’s food. She took matters in her own hand and entered the kitchen. She got help over phone from her mother and sisters and that is how her culinary journey began. She has mastered her recipes well over the years. Really well. There were no good cookbooks available and that was also the age of no internet. So if you wanted to know something, you learn from someone in person. Those were the golden days where there was no wi-fi and people spoke with each other. Shantha Amma is an extremely sweet person and I am so so happy to share her recipe here. I wish her loads of health in the coming years. We love you Amma.
Here is how to do the most authentic Badam Halwa. Dishes with very simple ingredients are the most difficult to make. This is one such dish. Its all about the technique. This dish has Almonds, Ghee, Sugar, saffron and little milk. That’s about it. But when these ingredients cooked in a right way can transform into something genius.
First soak a generous pinch of saffron in half a cup (125 ml) of milk. Set aside.
Then, soak Almonds in boiling hot water for 20 minutes.
Now, drain the water and peel the almonds. After 20 minutes, it should peel off easily. If it does not peel, add more boiling hot water and leave it for 5-10 minutes. Drain the water and peel all the almonds. Once its peeled, grind it in a mixer/blender with a cup of milk (250 ml). Do not grind it to a fine paste. It is important to have the texture of the ground almond paste to resemble semolina / upma rava. So keep checking the mixer and stop when the almonds are grainy. This is a very important step. So eyes on the mixer please…..
Next, lets talk about the pan in which we are going to cook the halwa. You definitely need a heavy bottomed pan. Sugar burns fast. So heavy bottomed pan is very essential for any indian dessert. If you do not have a heavy pan, you can use the pressure pan ( cooker ) for making this halwa. One more important thing. The flame should be at low at all times. So do not get tempted and increase flame. You need to cook low and slow.
Mix the almond paste and sugar in the pan and keep it on stove on low flame. Keep stirring continuously.
Slowly some foam will start forming on top of the pan. Keep stirring. Stirring is key. Be at the stove at all times.
Once the foam subsides, little bubbles will form. If you stir vigorously, the bubbles might splash. So slowly, but constantly, keep stirring until all the bubbles have subsided and very few bubbles are remaining. Add in the saffron milk mixture. You can notice the color change into yellow soon after the saffron is added.
Bubbles will start to appear again after saffron milk is added. Keep stirring until all the bubbles have mostly subsided. One or two bubbles here and there is fine.
Now is the time to add ghee. Don’t add all the ghee at once. Add 1/4 cup of ghee at a time. Once the ghee is added, keep stirring and notice that the ghee is totally absorbed into the halwa.
Once the first addition of ghee is absorbed, add the next 1/4 cup of ghee. Wait for the ghee to be absorbed before adding more ghee. Repeat the procedure until all the ghee has been added.
After all the ghee has been added, keep stirring until the mixture is slightly thick like below.
When the consistency is thick but not solid like above, Switch off the flame. Remove the pan to the kitchen counter and start mixing with a spatula. Use a folding motion to mix. Keep mixing until its warm.
Once its warm, take big bite size pieces of the mixture and pack like a candy on a parchment paper.
Recipe for South Indian Tamilnadu style Badam Halwa with step by step pictures. Best halwa ever.
Author: Kannamma - Suguna Vinodh
Recipe type: Dessert
Cuisine: South Indian
Serves: 20
Ingredients
200 grams Almonds
300 grams Ghee
400 grams Sugar
1 cup (250 ml ) milk for grinding Almonds
A big pinch Saffron
½ cup (125 ml) warm milk for soaking saffron
Instructions
Soak a generous pinch of saffron in half a cup (125 ml) of warm milk. Set aside.
Then, soak Almonds in boiling hot water for 20 minutes. Drain the water and peel the almonds. Once its peeled, grind it in a mixer/blender with a cup of milk (250 ml) to a grainy paste.
Mix the almond paste and sugar in the pan and keep it on stove on low flame. Keep stirring continuously. Slowly some foam will start forming on top of the pan. Keep stirring. Stirring is key. Be at the stove at all times. Once the foam subsides, little bubbles will form. keep stirring until all the bubbles have subsided and very few bubbles are remaining.
Add in the saffron milk mixture. You can notice the color change into yellow soon after the saffron is added. Keep stirring until all the bubbles have mostly subsided.
Add ¼ cup of ghee at a time. Once the ghee is added, keep stirring and notice that the ghee is totally absorbed into the halwa. Once the first addition of ghee is absorbed, add the next ¼ cup of ghee. Wait for the ghee to be absorbed before adding more ghee. Repeat the procedure until all the ghee has been added.
After all the ghee has been added, keep stirring until the mixture is slightly thick.
Switch off the flame. Remove the pan to the kitchen counter and start mixing with a spatula. Use a folding motion to mix. Keep mixing until its warm. Once its warm, take big bite size pieces of the mixture and pack like a candy on a parchment paper.
Usha Aunty was my neighbor in San Diego. She loved to cook. She loved to cook for others. She was the one who taught us ( a bunch of friends ), how to make biryani for 50 people in an 80 sq.ft tiny kitchen. We must have cooked tonnes of biryani in her kitchen. She rocks. Her enthusiasm is infectious. She physically pushes herself every single time for that extra mile to show that nothing is impossible. Good food meant happy people. We all used to follow behind her to the kitchen like children following their mama wherever they go. We have had countless number of parties and countless number of this amazing biryani. Her husband Pandurangan Uncle is an equally adorable man. I have seen him say ” குடு மா அந்த தேங்காய நான் ஒடச்சி தர்றேன் ” – “give me the coconut ma, i will break it for you “, and he would take the coconut to the balcony to break it for her. He would come to the kitchen frequently to see if Usha aunty needs any help. She has that little Madras slang that I soooooo love. She used to be there for everyone when they needed something. She is the true living proof that age is just a number and she just does not care about that. She is my true inspiration. She is not here now with me but I have really really fond memories that revolve around food and behind this biryani. After all food is nothing but memories. My son calls her as poori paati as paati not only makes the tastiest biryani but poori too. I have learnt a lot of dishes from her. This one takes the crown.
Here is the recipe for an amazing Madras Style Chicken Biryani.
Soak basmati rice in water for 15 minutes. I used 2.5 cups of rice today. For every cup of rice, use 1.5 cups of water. So I used 3 3/4 cups of water. You can cook the rice in a rice cooker or a pressure cooker. If cooking in a pressure cooker, then cook in medium flame and switch off the flame after 2 whistles. Immediately release the pressure and cool it on a plate. You need to cool the rice immediately else it might become mushy. If cooking in a rice cooker, remove the rice once its done onto a plate and allow it to cool completely. Once cool, mix some ghee into the rice to thoroughly coat. Set aside. Usha aunty sprinkles ghee on rice before putting it in dum, but I feel mixing ghee at this stage helps spreading the ghee evenly all over the rice.
Heat oil in a pan and add in the cloves, cardamom and cinnamon sticks. Add in the sliced onions and fry till soft.
In the mean time make a paste of ginger and garlic. Add a little water while grinding if necessary.
Add in the chopped tomatoes and the ginger garlic paste, fry till the tomatoes are soft. It will take about 4-5 minutes in medium flame. Add in the coriander powder, chilli powder, green chillies, curd and salt. Fry for a minute to combine. Add in the chicken pieces and allow it to cook. Do not add any water. The juices from the chicken will be enough to cook the meat.
Cook the chicken until tender and the gravy has thickened. Keep stirring to avoid scorching at the bottom. Once the gravy has thickened, add in the lemon juice and switch off the flame. Keep stirring to avoid scorching at the bottom.
Now its time for layering the biryani. Approximately divide the chicken gravy and rice into 3 equal parts.
# Take a big bowl and add a layer of chicken gravy at the bottom.
# Add in a layer of rice. If you dint add ghee to the rice before, spoon a tablespoon of ghee onto the rice now.
# The Chennai Biryani has that little streaks of orange color on the rice that comes from artificial coloring. Its optional. If you want to use it, spoon a little of the coloring mixed with water on the rice. I use edible food coloring used for cake decorating ( like Wilton, Americolor etc..).
# Finally, Sprinkle some chopped mint leaves and coriander leaves.
Repeat the layering process, until all the rice and gravy has been used. Tightly cover it with an aluminium foil and close it with a lid. Now its ready for dum. Traditionally, dum is done using charcoal. But that’s not feasible at home. The substitute for dum cooking at home is to use an oven. Place the biryani bowl in a preheated 400 degree F oven for 30 minutes. If you don’t have an oven, heat a dosa pan on the stove and put the biriyani bowl on top of the dosa pan and allow it to cook on low flame for 15 minutes.
Once the dum cooking is over, open the lid and gently fluff up the rice to mix. Serve hot with raita.
Chennai Madras Style Spicy Chicken Biryani. Made using the Dum method. Tastes good with mutton too.
Author: Kannamma - Suguna Vinodh
Recipe type: Biryani
Cuisine: South Indian
Serves: 6
Ingredients
For cooking Rice
Measurements Used - 1 cup = 250 ml
2.5 cups (625 ml) basmati rice
3¾ cups water
¼ cup ghee
For the gravy
1 kg chicken with bone
4 tablespoon peanut oil
3 stick cinnamon
5 cardamom
5 cloves
5 medium onion, sliced
3 medium tomatoes, chopped
2 pod garlic
3 inch piece ginger
5 green chillies, slit
1 tablespoon salt
1 tablespoon red chilli powder
2 tablespoon coriander powder
½ cup plain yogurt
Juice of a small lemon
Herbs for layering
15-20 mint leaves, coarsely chopped
6-7 sprigs coriander leaves, coarsely chopped
orange food color (optional)
Instructions
Soak basmati rice in water for 15 minutes. You can cook the rice in a rice cooker or a pressure cooker. If cooking in a pressure cooker, then cook in medium flame and switch off the flame after 2 whistles. Immediately release the pressure and cool it on a plate. Once cool, mix some ghee into the rice to thoroughly coat. Set aside.
Heat oil in a pan and add in the cloves, cardamom and cinnamon sticks. Add in the sliced onions and fry till soft.
Add in the chopped tomatoes and the ginger garlic paste, fry till the tomatoes are soft. Add in the coriander powder, chilli powder, green chillies, curd and salt. Fry for a minute to combine. Add in the chicken pieces and allow it to cook. Do not add any water.
Cook the chicken until tender and the gravy has thickened. Once the gravy has thickened, add in the lemon juice and switch off the flame.
Layer the biriyani. Take a big bowl and add a layer of chicken gravy at the bottom.. Add in a layer of rice. Finally, Sprinkle some chopped mint leaves and coriander leaves. Repeat the layering process, until all the rice and gravy has been used. Tightly cover it with an aluminium foil and close it with a lid. Place the biryani bowl in a preheated 400 degree F oven for 30 minutes.
This recipe is from my good friend Anandhi. This is her mom’s recipe. We used to work together almost a decade back (gosh – its been a long time). At that time, the food at the canteen/food court was horrible. We were doing crazy night shifts at that time and we were so tired to get into the kitchen after we came back home. We did not have time to go out for dinner too. So we were stuck with the horrendous food from the food court. Our horrible meal times continued day after day. In-spite of the night shift and crazy 12-14 hour work days, she made this dal and brought one day. Food is memories. This is a simple everyday dal that’s so nourishing and a healthy meal. Anandhi is the most cutest and the sweetest person you will meet in life. Some people leave an indelible mark in our lives. Below is Anandhi with her daughter.
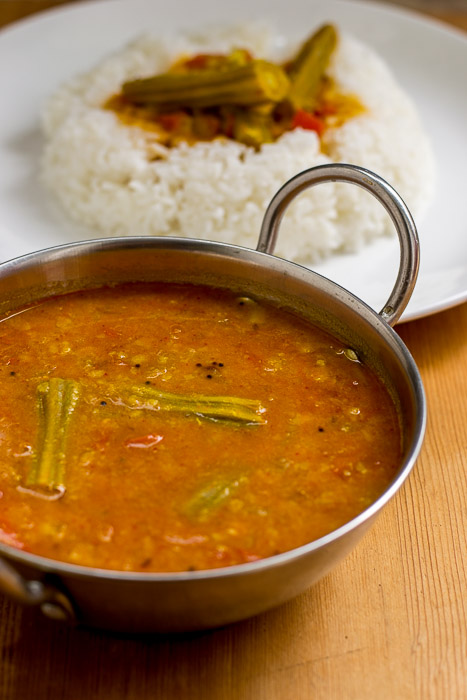
Here is the recipe for Madras Style everyday Sambar.
Boil 200 grams (3/4 cup) of toor-dal, chopped onions, chopped tomatoes, cumin seeds and garlic (optional) with 3 cups of water in a pressure cooker for 10 minutes (5 whistles). Let the pressure from the cooker release naturally. Set aside. Soak half a lime size tamarind in one cup of water for 20 minutes. Once the tamarind has been soaked, squeeze it between the fingers to release all the juices. Strain the juice. Set aside.
Clean the drumsticks, peel the outer skin of the drumsticks if its very hard. Chop them to 3 inch pieces. Set aside.
Heat sesame oil in a pan until hot. Add in the mustard seeds, cumin seeds, fenugreek seeds (வெந்தயம்) and curry leaves. Let it splutter. Reduce the flame to low and add in the asafoetida, chilli powder, coriander powder and turmeric powder. Fry for 10 seconds. Add 1 cup of water and the drumsticks.
Add in the tamarind juice to the pan. Add in the salt and jaggery. Anandhi’s mom does not use jaggery. I like a little jaggery in my sambar. Cover the pan with a lid and let it cook for 10-15 minutes in medium flame until the drumsticks are soft and tender. Lightly mash the dal and the tomatoes in the pressure cooker with a ladle and add it to the pan. Add some water to the pan if the dal is very thick. Add water only if necessary. Let it simmer for 15 minutes.
Switch off the flame. Add in the coriander leaves and serve hot with rice.
Recipe for Tamilnadu Madras style murungakkai sambar for idli and rice. Indian Chennai drumstick Sambar.
Author: Kannamma - Suguna Vinodh
Recipe type: Dal/Lentils
Cuisine: South Indian, Tamilnadu, Madras
Serves: 4
Ingredients
Pressure Cooking Ingredients
200 grams Toor dal
4 medium sized Tomatoes
3 onions
1 teaspoon cumin seeds
2 cloves garlic (optional)
Other Ingredients
2 tablespoon sesame/gingely oil
¼ teaspoon fenugreek seeds
½ teaspoon mustard seeds
2 sprigs curry leaves
¼ teaspoon asafoetida
1 tablespoon chilli powder
1 tablespoon coriander powder
1 teaspoon turmeric powder
2 Drumsticks
half a lemon size Tamarind
1 tablespoon salt
1 teaspoon jaggery (optional)
4 sprigs Coriander leaves
Instructions
Boil 200 grams (3/4 cup) of toor-dal, chopped onions, chopped tomatoes, cumin seeds and garlic (optional) with 3 cups of water in a pressure cooker for 10 minutes (5 whistles). Set aside. Soak half lime size tamarind in one cup of water for 20 minutes. Once the tamarind has been soaked, squeeze it between the fingers to release all the juices. Strain the juice. Set aside.
Clean the drumsticks, peel the outer skin of the drumsticks a little if its very hard. Chop them to 3 inch pieces. Set aside.
Heat sesame oil in a pan until hot. Add in the mustard seeds, cumin seeds, fenugreek seeds and curry leaves. Let it splutter. Reduce the flame to low and add in the asafoetida, chilli powder, coriander powder and turmeric powder. Fry for 10 seconds. Add 1 cup of water and the drumsticks.
Add in the tamarind juice to the pan. Add in the salt and jaggery. I like a little jaggery in my sambar. Cover the pan with a lid and let it cook for 10-15 minutes in medium flame until the drumsticks are soft and tender.
Lightly mash the dal and the tomatoes in the pressure cooker with a ladle and add it to the pan. Let it simmer for 15 minutes.
Switch off the flame and garnish with coriander leaves.
A quick egg curry is a staple at my home. Serve it with rice or roti and its sure a happy meal. Kerala egg roast is a very popular dish that’s usually served with appam. I found this recipe for Kerala egg roast in Rick Stein’s India cookbook. Its one of the finest books on Practical Indian Cooking. He writes in his book that he found this recipe for Kerala egg roast at a restaurant that his driver took him, en-route to Thekkady. Egg roast is a popular dish in Kerala. Nobody quite knows why it’s called an egg roast because they are actually boiled, peeled, then simmered in a pan with an intense masala flavored with Kashmiri chillies, tomato and coconut oil. Here is the recipe for an awesome Kerala Style Spicy Naadan Egg Roast.
Heat the coconut oil in a heavy-based pan over a medium heat. Add the curry leaves and fennel seeds and fry for 30 seconds, then add the ginger and garlic and fry for 2–3 minutes.
Add onion, dried red chillies and fry for 10 minutes until softened and golden brown.
Make a puree out of the tomatoes in the blender / mixie.
Also get all the spice powders ready.
Add the tomato puree and salt. Then stir in the spice powders. Simmer for about 15 minutes until rich and reduced.
Then add the whole eggs, put a lid on and simmer for 4–5 minutes to heat the eggs through. Sprinkle with the chopped coriander and serve.
Recipe for Spicy Kerala Style Naadan Egg Roast masala with gravy preparation. Serve with appam, rice or chapati. Kerala hotel mutta curry.
Author: Kannamma - Suguna Vinodh
Recipe type: Side Dish
Cuisine: South Indian, Kerala
Serves: 4
Ingredients
6 Eggs
2 tablespoon coconut oil
Small handful of fresh curry leaves
1 tsp fennel seeds
4 cm ginger, finely chopped
6 cloves garlic, finely crushed
2 medium onions, sliced
2 dried Kashmiri chillies, torn into pieces
1 teaspoon ground coriander
1 teaspoon ground cumin
1 teaspoon Kashmiri chilli powder (add more if you want it spicy)
1 teaspoon ground black pepper
½ teaspoon turmeric
5 ripe tomatoes
1 teaspoon salt
Handful of fresh coriander leaves
Instructions
Boil and peel the eggs and set aside.
Heat the coconut oil in a heavy-based pan over a medium heat. Add the curry leaves and fennel seeds and fry for 30 seconds, then add the ginger and garlic and fry for 2–3 minutes.
Add onion, dried red chillies and fry for 10 minutes until softened and golden brown.
Add the tomato puree and salt. Then stir in the ground coriander, cumin, chilli powder, black pepper and turmeric. Simmer for about 15 minutes until rich and reduced.
Then add the whole eggs, put a lid on and simmer for 4–5 minutes to heat the eggs through.
Appam is my sons all time favorite dish. Appam with sweet coconut milk is something he can have everyday. This is my aunts appam recipe and comes out so good every single time. There is no addition of yeast. The batter ferments naturally. Here is how to do Tamilnadu style appam mavu or appam batter. I like to use idly rice for making appam batter. If you cannot get idly rice, you can use raw rice.
Wash the rice well for 2-3 times in running water. Then soak the rice and fenugreek seeds in water for two hours. We will also need 1/2 a cup of cooked rice. You can use any variety of cooked rice. Also cut or shred 1/2 a cup of fresh coconut and set aside.
Drain the water from the rice. Grind all the ingredients in the blender together to make a smooth fine paste. We soaked 2 cups of rice. So while grinding, you can use up-to 2 cups of water. If your blender is not big, grind it in two to three batches. Do not grind everything at a time.The motor in the blender might over heat and stop working. So have patience and grind it in batches.
Cover the batter bowl with a lid and leave it in a warm place. Leave it untouched for at least 8-10 hours. After the rest, the batter would have doubled.The batter would be foamy like below after fermentation. Mix well. Store in the refrigerator for up to 3 days and use when required.
Now to make appam, we need to add baking soda ( also called as aapam soda ), salt and sugar to the batter. DO NOT add the soda, salt and the sugar to the whole batter at once. The appam wont fluff up. Just take how much ever batter is required for that particular time and then add soda, salt and sugar and proceed with the recipe.
Transfer some of the batter to a separate bowl. I transferred one third of the batter. Add a tablespoon of sugar and 1/4 teaspoon of baking soda and 1/4 teaspoon of salt. Mix well to combine.
The appam batter consistency should be thin. Little thinner than the dosa batter consistency. Add water if necessary to adjust the consistency.
Heat appam kadai or appa chatti until hot. Ladle some batter into the kadai in the middle. Slowly rotate the pan to make the batter adhere to all over the sides of the pan. Use your hands to rotate the pan in a circular motion and guide the batter to stick to all over the sides. Cover with a lid and let it cook for 40-50 seconds.
Appam cooks only on one side. Appam is done when the sides are brown. Remove the appam slowly with the help of a spatula.
Serve hot with coconut milk or vegetable stew or a side dish of your choice.
What can go wrong while making Appam?
1.If the holes are really big and wide and the batter is not sticking to the pan, the batter is very thin in consistency. Add more batter to adjust the consistency.
2.If the appam is coming very heavy, then batter is very thick and needs to be diluted with some water.
3.If the batter is not browning properly, it means the batter has not been fermented enough or very less sugar has been added.
4.If you added too much soda, appam will not be white but will be a little yellow. If the appam is coming yellow, then add more batter to adjust the soda.
Tamilnadu style easy Appam Recipe Without Yeast using rice and coconut. Serve hot with coconut milk or vegetable stew
Author: Kannamma - Suguna Vinodh
Recipe type: Crepe, Bread
Cuisine: South Indian, Breakfast
Serves: 20
Ingredients
Main Ingredients for batter
2 cups (500 ml) Idly rice or raw rice
¼ teaspoon fenugreek seeds
½ cup cooked rice
½ cup fresh coconut
2 cups water for grinding
For making appam
For one third of the batter use the following
1 tablespoon sugar
¼ teaspoon baking soda
¼ teaspoon salt
Instructions
For the batter
Wash the rice well for 2-3 times in running water. Then soak the rice and fenugreek seeds in water for two hours.
Drain the water from the rice. Grind all the ingredients in the blender together to make a smooth fine paste. We soaked 2 cups of rice. So while grinding, you can use up-to 2 cups of water.
Cover the batter bowl with a lid and leave it in a warm place. Leave it untouched for at least 8-10 hours. After the rest, the batter would have doubled. Store in the refrigerator for up to 3 days and use when required.
For making appam
Transfer some of the batter to a separate bowl. I transferred one third of the batter. Add a tablespoon of sugar and ¼ teaspoon of baking soda and ¼ teaspoon of salt. Mix well to combine.
Heat appam kadai or appa chatti until hot. Ladle some batter into the kadai in the middle. Slowly rotate the pan to make the batter adhere to all over the sides of the pan. Use your hands to rotate in a circular motion and guide the batter to stick to all over the sides.
Cover with a lid and let it cook for 40-50 seconds. Appam cooks only on one side. Appam is done when the sides are brown. Remove the appam slowly with the help of a spatula.
Appam married two women in life. The first lady being Vegetable stew and the second lady being the sweet coconut milk. Here is the recipe for easy and simple Vegetable Stew. Vegetable stew and appam is one of the best breakfast dishes ever. This vegetable stew has a very mild flavor and is so good to have with appam or idiyappam. The richness of the coconut milk is what makes this stew the best ever.
Usually in Indian curries, the spices are dry roasted and then ground. But for this vegetable stew, the spices are ground raw. Grind all the ingredients listed below with about 1 cup of water to a smooth paste.
Boil the vegetables until firm and keep aside. We use carrots, peas and potato for stew at home. Do not use a lot of veggies. 3-4 should be good.
Lets make coconut milk. I used one whole coconut ( a small one) for this recipe. About 350-400 grams. Take out the coconut meat from the coconut and run it in a blender/mixie adding 1 cup of water. Strain. The strained milk is what we call as the first milk or thick milk. Run the strained coconut bits again in the blender with 1 cup of water for a minute. Strain. The strained milk is called second milk or thin milk. Set aside.
Heat coconut oil in a saute pan. Coconut oil is traditional for this recipe. I love coconut oil. Add in 3 sprigs of curry leaves. Let it splutter. Add in the julienne ginger. Ginger is an important ingredient in this stew. So do not skip the ginger. Fry for 1-2 minutes on medium flame until you can smell the ginger and curry leaves.
Add in the chopped onions and salt. Saute till the onions are soft. No need to brown the onions.
Add in the ground masala paste and fry for 2 minutes.
Add in the veggies and the second pressed coconut milk and let it simmer in low flame for about 3-4 minutes. Let the flame be on low. Cooking in high flame might curdle the gravy.
Take a small cup and add a tablespoon of cornstarch or maida (All purpose flour). Add 1/2 cup water to it and make a slurry. Add the slurry to the gravy. The slurry helps in thickening the gravy. Do not add the corn starch or maida directly as it may lump up. Simmer for a minute more. The gravy should thicken.
Add in the first pressed coconut milk and reduce the flame to low. Simmer for 30 seconds. The coconut milk might curdle if you cook it for long.
Recipe for Appam Vegetable Stew made with coconut milk.
Author: Kannamma - Suguna Vinodh
Recipe type: Side dish
Cuisine: South Indian, Breakfast
Serves: 6
Ingredients
For the raw ground paste
¼ cup cashews
1 clove
2 cardamom
1 inch cinnamon
3 green chillies
2 tablespoon white poppy seeds (khus khus)
Boiled Vegetables
1 cup carrots
1 cup potatoes
1 cup peas
Other Ingredients
2 tablespoon coconut oil
2 sprigs curry leaves
2 inch piece ginger, julienne
1 medium onion, chopped
1 teaspoon salt
1 tablespoon cornstarch
Coconut milk
1 whole coconut - pressed for fresh coconut milk
Instructions
Grind the spices with a little water. Set aside.
Boil the vegetables until firm and keep aside. We use carrots, peas and potato for stew at home.
Take out the coconut meat from the coconut and run it in a blender/mixie adding 1 cup of water. Strain. The strained milk is what we call as the first milk or thick milk. Run the strained coconut bits again in the blender with 1 cup of water for a minute. strain. The strained milk is called second milk or thin milk. Set aside.
Heat the oil in a saute pan. Add in 2 sprigs of curry leaves. Let it splutter. Add in the julienne ginger. Add in the chopped onions and salt. Saute till soft.
Add in the ground masala paste and fry for 2-3 minutes.
Add in the second pressed coconut milk and boiled vegetables and let it simmer until beginning to boil.
Take a small cup and add a tablespoon of cornstarch. Add ½ cup water to it and make a slurry. Add the slurry to the gravy. Simmer for a minute.
Add in the first pressed coconut milk and reduce the flame to low. Simmer for 30 seconds. The coconut milk might curdle if you cook it for long.
Appam married two women in life. The first lady being Vegetable stew and the second lady being the sweet coconut milk. And they lived happily ever after. Here is the recipe for easy and simple sweet coconut milk. This combination is very famous all over Tamilnadu. The appam is soaked in coconut milk and then relished. The slight sweetness from the jaggery, the aroma from the cardamom and the richness from the coconut milk is to die for. Here is the recipe for Appam. Here is the recipe for Vegetable stew.
Here is how to do a very simple sweet coconut milk for appam.
Lets make coconut milk. I used one half coconut for this recipe. About 150-200 grams. Take out the coconut meat from the coconut and run it in a blender/mixie adding 1 cup of water. Strain. The strained milk is what we call as the first milk or thick milk. Run the strained coconut bits again in the blender with 1 cup of water for a minute. Strain. The strained milk is called second milk or thin milk. Set aside.
Peel the cardamom and remove the black seeds. Make a powder with the inner black seeds in a mortar and pestle. Set aside.
Mix one cup of water with half a cup of jaggery. Add in the cardamom powder and the outer skin of the cardamom. Keep it on the stove on medium flame. Let the jaggery melt completely. Remove off stove and strain to remove the impurities from the jaggery.
Take a pan and add in the jaggery water, a pinch of salt and the second extract of thin coconut milk. Heat it on a very low flame for 2 minutes until its slowly boiling. Switch off the flame.
Add in the first extract of thick coconut milk and mix well. Serve with appam.
Dunk the appam in the sweet coconut milk and enjoy!
Sweet Coconut Milk for Appam - Thengai paal recipe
Lets make coconut milk. I used one half coconut for this recipe. About 150-200 grams. Take out the coconut meat from the coconut and run it in a blender/mixie adding 1 cup of water. Strain. The strained milk is what we call as the first milk or thick milk. Run the strained coconut bits again in the blender with 1 cup of water for a minute. strain. The strained milk is called second milk or thin milk. Set aside.
Peel the cardamom and remove the black seeds. Make a powder with the inner black seeds in a mortar and pestle. Set aside.
Mix one cup of water with half a cup of jaggery. Add in the cardamom powder and the outer skin of the cardamom. Keep it on the stove on medium flame. Let the jaggery melt completely. Remove off stove and strain to remove the impurities from the jaggery.
Take a pan and add in the jaggery water, a pinch of salt and the second extract of thin coconut milk. Heat it on a very low flame for 2 minutes until its slowly boiling. Switch off the flame.
Add in the first extract of thick coconut milk and mix well. Serve with appam.
This happened some time back. My son had lunch at my friend Manasa’s place one day. He generally never says whether he liked the food or not. He just says I had lunch. Yes, it was good. That’s all. But that day as soon as he came home, he was really excited. He told me that “mummy, Manasa auntie gave me some yellow thing to eat. It was so nice Amma. Can you make it for me again for dinner?” I was super excited as he rarely asks, can you make this? can you make that? except for the occasional doughnut or a pizza that he asks me to make. I called Manasa immediately to know what the yellow thing was and the rest is history. I make it once a week for him. The moment he comes back from school and sees this potato fry, and smiles and says yummy! my day is made. Lot of times, simplest dishes are the best dishes and this one fits the bill perfectly. Here is the recipe for an awesome Andhra Style Potato fry.
Wash and peel the potatoes. Dice them into really small pieces. Its important to cut them small so it cooks faster and crispier.
Take a bowl and add lots of water. Add a tablespoon of salt to the water. Soak the diced potatoes in water for 10-15 minutes. After soaking, wash the potatoes in running water and drain. Set aside.
Heat oil in a kadai until really hot. Just drop a couple of diced potatoes and if it foams and bubbles and fries, the oil is ready. Add in the diced potatoes to the oil. Let the flame be high. Potatoes take time to cook. Occasionally, stir it once or twice. Fry for at-least 7-8 minutes.
The potatoes will slowly start to become lightly golden on the edges. When its starting to become golden on the edges, the potatoes are ready. Remove from the hot oil and drain on a paper towel.
Now we need to season the potatoes.
Now I reveal the secret that makes this potatoes amazing. Its the hint of garlic. Just roughly crush some garlic cloves. No need to peel the skin of the garlic cloves. Add it to a bowl. Add the hot drained fried potatoes to the bowl. Add salt and chilli powder. Toss to coat. The heat of the potatoes takes in the flavor of the garlic so well. Its really amazing how such a simple step can really transform a dish.
Serve it with rice. My son loves to have it with curd rice.
Recipe for Spicy and crispy Andhra Style Potato Fry - Aloo gadda fry.
Author: Kannamma - Suguna Vinodh
Recipe type: Side Dish
Cuisine: South Indian, Andhra
Serves: 2
Ingredients
4 medium sized potatoes
5-6 garlic cloves
½ teaspoon salt
½ teaspoon chilli powder
1 tablespoon salt for soaking potatoes in water
300-400 ml Oil for deep frying
Instructions
Wash and peel the potatoes. Dice them into really small pieces.
Take a bowl and add lots of water. Add a tablespoon of salt to the water. Soak the diced potatoes in water for 10-15 minutes. After soaking, wash the potatoes in running water and drain. Set aside.
Heat oil in a kadai until really hot. Just drop a couple of diced potatoes and if it foams and bubbles and fries, the oil is ready. Add in the diced potatoes to the oil. Let the flame be high. Potatoes take time to cook. Occasionally, stir it once or twice. Fry for at-least 7-8 minutes.
The potatoes will slowly start to become lightly golden on the edges. When its starting to become golden on the edges, the potatoes are ready. Remove from the hot oil and drain on a paper towel.
Roughly crush some garlic cloves. No need to peel the skin of the garlic cloves. Add it to a bowl. Add the hot drained fried potatoes to the bowl. Add salt and chilli powder. Toss to coat.
We love coconut based curries in our house. Long time ago, I saw this recipe for Kerala fish molly in a WGBH show made by Chef Sanjeev. On the show, Chef told how his mother would apply turmeric mixed with milk on him when he was young for good skin. I remember my mom doing the same to me when I was young. The yellow colour would not go even after taking bath. I used to go to school with an yellow skinned face. All the girls at school came with an yellow skin. It was a Friday ritual. Good old memories. I fell in love with the way he made this curry. Kerala Fish molly or meen moilee as its called is a traditional stew popular in Kerala. Fish molly is a very very easy to make recipe which can be put together in less than 30 minutes. Here is how to do an awesome Kerala style fish molly or fish stew.
I like to use coconut oil for Kerala Fish Molly. If you do not like coconut oil, you can substitute any vegetable oil.
Heat coconut oil in a pan and add in very finely chopped ginger and curry leaves. Fry for a minute.
Add in the finely chopped onion and garlic. Add in the chopped green chilli. If you want a spicy stew, add more green chillies. Its totally up to you as to how spicy you want the stew. Adjust the quantity of the chillies accordingly.
Fry till the onions are soft. No need to brown the onions. Add in the finely chopped tomatoes and the salt and fry until the oil floats on top. It will take about 5 minutes in medium flame.
Add in a teaspoon of turmeric and a teaspoon of chilli powder. Fry for 30 seconds. Add in a cup of water and let it come to a boil. Once the water boils, add in the fish. I like to use king fish for fish molly. Let it simmer for 5 minutes in medium flame. Do not stir. The fish might break.
Reduce the flame to low. Add in the coconut milk.
If using store bought coconut milk, Add 250 ml of store bought coconut milk plus 250 ml of water.
If using fresh coconut milk, add in 500 ml of the fresh coconut milk. ( I used first pressed and second pressed coconut milk combined). To know how to make coconut milk, click here.
Add in the lime juice and the vinegar. Let the stew simmer for 5 minutes on a very low flame. Its important to have the flame on low as the coconut milk might curdle on a very high heat.
Switch off and serve hot with with basmati rice. Kerala fish molly is ready. Traditionally its served with appam or idiyappam. I like it with rice. It is fish molly with rice for me.
South Indian Kerala style Meen moilee, fish molly/molee. A very mild coconut milk based fish stew.
Author: Kannamma - Suguna Vinodh
Recipe type: Side Dish
Cuisine: South Indian, kerala
Serves: 4
Ingredients
500 grams fish steaks ( I used king fish)
4 tbsp coconut oil
2-3 sprigs curry leaves
2 inch fresh ginger, very finely chopped
2 onion, finely chopped
3 green chillies, chopped
6 cloves garlic, finely chopped
2 tomatoes, finely chopped
1½ teaspoon salt
1 teaspoon turmeric powder
1 teaspoon chili powder
500 ml fresh coconut milk or 250 ml canned coconut milk
Juice of one small lime
1 teaspoon vinegar
Instructions
Heat coconut oil in a pan and add in very finely chopped ginger and curry leaves. Fry for a minute.
Add in the finely chopped onion and garlic. Add in the chopped green chilli.
Fry till the onions are soft. No need to brown the onions. Add in the finely chopped tomatoes and the salt and fry until the oil floats on top. It will take about 5 minutes in medium flame.
Add in a teaspoon of turmeric and a teaspoon of chilli powder. Fry for 30 seconds. Add in a cup of water and let it come to a boil. Once the water boils, add in the fish. Let it simmer for 5 minutes.
Reduce the flame to low. Add in the coconut milk.
If using fresh coconut milk, add in 500 ml of the fresh coconut milk. ( I used first pressed and second pressed coconut milk combined).
If using store bought coconut milk, Add 250 ml of store bought coconut milk plus 250 ml of water.
Add in the lime juice and the vinegar. Let it simmer for 5 minutes on a very low flame.
Home made pasta sauce is so easy to make and more tastier than the jarred versions. Arrabbiata Sauce, called as all’arrabbiata in Italian, is a spicy sauce. The word Arrabbiata means “angry” in Italian. Arrabbiata Sauce is a traditional Southern Italian sauce originating from the Campania region. Arrabbiata Sauce or “Angry” sauce refers to the flavor of this sauce made with crushed red pepper to add spicy flavor. We will be making this Arrabbiata Sauce with fresh tomatoes today. Arrabbiata Sauce is usually served with penne pasta. I have minimally adapted Mario Batali’s Arrabbiata Sauce recipe for making this recipe today.
Lets make an awesome Arrabbiata Sauce. Traditionally this Arrabbiata Sauce is made with San Marzano tomatoes. As I am far far faaaaar away from San Marzano, I will be using regular tomatoes for our Arrabbiata Sauce.
The tomatoes need to be peeled, de-seeded and juiced before making the Arrabbiata Sauce.
Bring a lot of water to boil in a kettle. Drop in the tomatoes and let it cook for 2-3 minutes until the skin of the tomatoes starts to crack. Remove from heat and let it cool. Peel the skin of the tomatoes.
Cut the tomatoes into half and remove the seeds.
Keep a strainer below while removing seeds to catch the juices. Add in the strained juices to the tomato meat and blend in a mixer to a puree.
Home made tomato puree is ready for our Arrabbiata Sauce.
Heat Extra virgin olive oil in a pan and add in the finely chopped garlic and chopped onion. Fry till the onions are soft.
Add in the pureed tomatoes, salt, pepper and red chilli flakes.
Now we add the secret ingredients to this Arrabbiata Sauce. This is not a very traditional step, but I think it boosts the flavor of the sauce a lot. Adding a teaspoon of sugar to tomato sauce really rounds out the flavor. So add in a little sugar. Also add a teaspoon of balsamic vinegar. If you do not have balsamic vinegar, use apple cider vinegar. The vinegar just boosts the tang in the tomatoes.
Simmer the Arrabbiata Sauce for 10 minutes. Add in some chopped basil to the Arrabbiata Sauce and switch off the flame.
Your Arrabbiata Sauce is now ready. You can store this Arrabbiata Sauce for up to a week in the refrigerator.
Putting together pasta and Arrabbiata Sauce:
Add some cooked pasta in a pan and set the stove on medium heat. Add in some of the pasta sauce and a teaspoon of olive oil. Briefly saute the mixture for a minute. The pasta sauce needs to adhere and coat the pasta. If the pasta is too dry, add in some drained leftover pasta water and cook till desired consistency.
Remove off heat. Serve the pasta with some grated parmesan cheese or any aged cheese of your choice. Serve hot.
Enjoy your pasta. Buon appetito.
3.3.3077
Best Italian Arrabbiata Sauce Recipe With Fresh Tomatoes
Best Italian Arrabbiata Sauce Recipe made with fresh tomatoes and crushed red pepper flakes. Recipe adapted from Mario Batali. Served with Penne pasta.
Author: Kannamma - Suguna Vinodh
Recipe type: Pasta Sauce
Cuisine: Italian
Serves: 3 cups
Ingredients
8-10 ripe Tomatoes
¼ cup Extra virgin olive oil
1 medium onion, chopped
4 cloves garlic, chopped
11/2 teaspoon salt
11/2 teaspoon crushed red pepper flakes
1 teaspoon black pepper powder
1 teaspoon sugar
1 teaspoon balsamic vinegar
handful of chopped basil leaves
Instructions
Bring a lot of water to boil in a kettle. Drop in the tomatoes and let it cook for 2-3 minutes until the skin of the tomatoes starts to crack. Remove from heat and let it cool. Peel the skin of the tomatoes. Cut the tomatoes into half and remove the seeds. Keep a strainer below while removing seeds to catch the juices. Add in the strained juices to the tomato meat and blend in a mixer to a puree. Set aside.
Heat Extra virgin olive oil in a pan and add in the finely chopped garlic and chopped onion. Fry till the onions are soft.
Add in the pureed tomatoes, salt, pepper, red chilli flakes. little sugar and a teaspoon of balsamic vinegar.
Simmer the Arrabbiata sauce for 10 minutes. Add in some chopped basil and switch off the flame.
Ambur in Tamilnadu has more biryani hotels per capita than any other city in the world. What makes Ambur mutton biryani what it is? The legend has it that the mutton biryani was introduced to the Arcot royals through their connection with the Hyderabadi Nizams. Sir Hassan Baig, a cook himself for the Nawab at the Royal palace of Arcot made this biryani regularly for the royals. Later in the years, his son Kurshid Baig started to spread the delicacy by selling this biryani over a bicycle. That’s how the famous Star Briyani hotel was born. Note that they spell it as BRIYANI and not Biryani. They have been doing this since 1890. Star Briyani recipe has become a tradition that is continuing now for 4 generations. I have adapted this recipe based on a lot of information gathered from videos and articles featuring Mr.Ahmed and Chef Barkathullah of Star Briyani Hotel in Ambur.
What makes Ambur Briyani (Biryani) unique?
Mr.Ahmed says there are two ingredients Green Chillies and Ghee, that should never be used for Ambur mutton biryani. Seeraga Samba rice is the only traditional rice used for making this Ambur mutton biryani. All the masalas are hand ground using a grindstone called ammi அம்மி for Ambur mutton biryani. They use only wood fire to cook this Ambur mutton biryani and they use DUM method of cooking. Lastly “Kai Pakkuvam” or the “gift of hand from the god”. The chefs at Star Hotel are all followers of Islam and according to their belief, “அடை மழை பெய்யும் பொழுதும் கூட சமையல் செய்தார்கள் எனின் பற்ற வைக்கும் நெருப்பு அணையாது – அது அவர்களுக்கு கடவுள் தந்த வரம்.”. “Even during a very heavy rain, the fire started by the chef will not fade away. Such is the gift they possess with their hands blessed from god.”
He says Ambur mutton biryani is very light on the stomach. Its easily digestible when compared to the other masala laden and fat laden mutton biryani. Here is how to do an awesome Ambur mutton biryani adapted to be made in a home kitchen.
We need to make 3 pastes. Garlic paste, ginger paste and chilli paste. Grind all the ingredients in a blender/ mixie separately to a very smooth paste. Add very little water while grinding. Set aside. Here are the other things that you will need for making the mutton gravy for the mutton biryani.
Soak the rice in lots of water. Set aside.
Heat oil in a pan and add a table spoon of curd. The reason for adding little curd in the oil while making this mutton biryani is that it takes away the imperfections if any in the oil. Who am I to question this age old tradition that they have been following since 1890. So add a tablespoon of curd to the oil. Add in the Cinnamon, cloves and cardamom. Fry for 10 seconds. Add in the garlic paste. Fry for 2-3 minutes on medium flame. The ginger and garlic are added separately as garlic takes more time to fry. Ambur people feel that the flavor of the mutton biryani comes from the ginger and for that to happen, garlic should be fried well. Otherwise garlic will overpower the ginger.
Now, add in the ginger paste. Fry for 2-3 minutes until the raw smell of the ginger goes off.
Add in the chilli paste, mutton, the mint and coriander leaves, chopped onions, tomatoes, sea salt, curd and lime juice. Add in a cup (250 ml) of water. Mix well to combine.
Cover and pressure cook everything for 10-12 whistles on medium flame. Switch off the flame and wait for the pressure to release naturally.
Bring a pot of water to a boil and add in the soaked rice. Add in the salt. Cook until the rice is half done. Its very difficult for me to give a time frame as the rice cooks differently according to the age of rice, amount of water added etc…The gauge for the texture of the rice for mutton biryani is that the rice at this stage should not be fully cooked. The center of the rice kernel should be still dry and raw.
Drain the water and add the rice to the mutton pan. Mix well to combine. Now its ready for dum.
Traditionally, dum is done using charcoal. But that’s not feasible at home. The substitute for dum cooking at home is to use an oven. Place the mutton biryani pan / vessel in a preheated 400 degree Fahrenheit oven for 30 minutes. If you don’t have an oven, heat a dosa pan on the stove and put the mutton biryani pan / vessel on top of the dosa pan and allow it to cook on low flame for 15 minutes. Put the whistle also along if you want the rice to be very soft. If you are putting the whistle, then do the dum only for 10 minutes. Let the pressure release naturally.
Once the dum cooking is over, open the lid and gently fluff up the rice to mix. Serve mutton biryani hot with raita.
5.0 from 1 reviews
Ambur Mutton Biryani (Briyani) - Tamilnadu Arcot Muslim Style Biryani
Authentic Ambur Vaniyambadi style Mutton Biryani Recipe. Adapted from Star Briyani Hotel. Authentic Tamilnadu Arcot Muslim Style Star Mutton Biryani.
Author: Kannamma - Suguna Vinodh
Recipe type: Biryani
Cuisine: South Indian, Tamilnadu
Serves: 4
Ingredients
500 grams Mutton
500 grams Seeraga Samba Rice
½ cup (125 ml) refined Sunflower Oil
50 grams Garlic paste
50 grams Ginger paste
2 medium Onion, sliced
2 medium Tomatoes, chopped
8 Red chillies ground to paste
3 Cloves
3 Cardamom
5 Cinnamon sticks
5 stalks Coriander leaves
5 stalks Mint leaves
¼ cup (60 ml) plus 1 tablespoon Curd
juice of 1 Lime
1½ teaspoon Sea salt while cooking mutton gravy
1 tablespoon Sea salt while boiling rice in water
Instructions
Soak the rice in lots of water. Set aside.
Heat oil in a pan and add a table spoon of curd. Add in the Cinnamon, cloves and cardamom. Fry for 10 seconds. Add in the garlic paste. Fry for 2-3 minutes on medium flame.
Now, add in the ginger paste. Fry for 2-3 minutes until the raw smell of the ginger goes off.
Add in the chilli paste, mutton, the mint and coriander leaves, chopped onions, tomatoes, sea salt, curd and lime juice. Add in a cup (250 ml) of water. Mix well to combine.
Cover and pressure cook everything for 10-12 whistles on medium flame. Switch off the flame and wait for the pressure to release naturally.
Bring a pot of water to a boil and add in the soaked rice. Add in the salt. Cook until the rice is half done.
Drain the water and add the rice to the mutton pan. Mix well to combine. Place the mutton biryani pan / vessel in a preheated 400 degree Fahrenheit oven for 30 minutes. If you don’t have an oven, heat a dosa pan on the stove and put the mutton biryani pan / vessel on top of the dosa pan and allow it to cook on low flame for 15 minutes.
Once the dum cooking is over, open the lid and gently fluff up the rice to mix. Serve mutton biryani hot with raita.
This Indian style Coriander Mint Chutney is called as the Green Chutney. This Green Chutney can be used as a spread or as a dip. This can be stored in the refrigerator for days. It can also be served with Vadapav, Bhel, Dhokla, Samosa, Chaat etc. Here is how to do a quick Green Chutney.
Everything is ground raw in this green chutney recipe. Wash and clean the coriander leaves (cilantro) and mint leaves. Clean and peel the ginger. Take a blender / mixie and add in all the ingredients except the oil to the blender. Add more green chillies if you need it really spicy. If you do not have jaggery, use sugar. While adding lemon juice, make sure you do not add the seeds of the lemon as the chutney might become really bitter. Lemon juice also helps in retaining the colour of the chutney.
Grind everything together without adding water. Pulse 5-6 times for a minute. The chutney will come together after some time. Add in 2 tablespoons of sunflower oil or vegetable oil and pulse it for another 10 seconds. Taste for seasoning. The Coriander Chutney – Green Chutney is ready. Store in an airtight container in the refrigerator for up to 3 days. This chutney can be used for sandwiches as a spread.
5.0 from 1 reviews
Coriander Mint Chutney for Sandwiches | Green Chutney for Sandwich Recipe
Indian style Coriander Mint Chutney for Sandwich. Green chutney. Can be served with Vadapav, Bhel, Dhokla, Samosa and Chaat. Use it as a spread or as a dip.
Author: Kannamma - Suguna Vinodh
Recipe type: Chutney, Sandwich Spread, Dips
Cuisine: Indian
Serves: ½ cup
Ingredients
1 cup Coriander leaves
½ cup Mint leaves
2 Green Chillies
1 inch piece Ginger
¼ teaspoon Cumin powder
½ teaspoon Salt
½ teaspoon Jaggery
Juice of a small Lemon
2 tablespoon Sunflower/Vegetable Oil
Instructions
Wash and clean the coriander leaves (cilantro) and mint leaves and set aside. Take a blender / mixie and add in all the ingredients except the oil to the blender.
Grind everything together without adding water. Pulse 5-6 times for a minute. The chutney will come together smooth on its own. Add in the sunflower oil or vegetable oil and pulse it for another 10 seconds. Taste for seasoning.
Store in an airtight container in the refrigerator for up to 3 days.
School lunch boxes are a big deal. Mornings are really tight that I cannot cook exotic things for my kid’s lunch box. I am always looking for easy and quick recipes that can be made in no time. This Paneer Sandwich recipe can be put together so quickly. Its perfect for the crazy mornings at home.
You will need one recipe of easy Green Chutney. Please click the link to see how its made. You can grind the chutney the previous day and store it in the refrigerator. Even if you decide to do the chutney fresh, you will be able to do it within 10 minutes. Once the chutney is ready, you can prepare the paneer sandwich in less than 5 minutes.
Now lets make the Paneer Sandwich. Butter all the slices of bread. Buttering the bread helps in keeping the bread dry and not become soggy after applying the Green Chutney. Apply green chutney on the bread slices. I used store bought Paneer for this recipe. Cut the paneer into thin slices and place one slice per sandwich. Decide on the thickness of the paneer according to your taste. I like it about 1/4 inch thick. Sprinkle some pepper on the paneer.
You can toast the sandwich on a Panini Press, a grill pan, or a normal pan. I used a grill pan today. Use the same procedure if using a normal pan too. Heat the pan to medium hot. Place the sandwich ( butter the sides if you like it ) on the pan.
Keep a weight on top of the sandwich. I used an iron pan to weigh it down like below.
After 40-45 seconds turn the sandwich and cook the other side. Remove when lightly brown and serve.
Butter two slices of bread. Apply Green Chutney on both the slices. Cut the paneer as one thin slice and place it on the bread slice. Sprinkle some pepper on the paneer.
Toast the sandwich and serve hot or at room temperature.
I saw this recipe long time back on a television show where Playback singer Kaushik Menon made this amazing Palada Pradhaman. This is my favorite Payasam / Pradhaman. I have a story behind Palada Pradhaman.
When I was young, we used to get a children’s magazine called Gokulam. One of the stories in that magazine long time back was about this Payasam. Here is the story. There was this boy in a small town in Tamilnadu who loved Payasam. He loved all kinds of Payasam. Milk based, lentil based – he loved it all. The only Payasam he never had was Palada Pradhaman. He always longed to try this one. He comes to know about a grand wedding where Palada Pradhaman was going to be served as the final dessert. Being summer holidays, he accompanies the wedding photographer as an assistant. So he could get to taste the Palada Pradhaman. On the wedding day the photographer tells the cook/chef that he would be the last to eat after taking all the photographs. But he wants everything on the menu served and asks the chef to keep his portion aside so he does not miss anything on the menu. The boy is happy. After the long session of photos after photos, finally they go and sit to eat. They are the last ones in the dining hall. Banana leaf was spread and the feast was served. Dessert time came. The Photographer stood up to go and wash his hands. The boy was like, Stop! Stop! Dessert has not come yet. The photographer said “Oh yeah! I am a diabetic. So I don’t take desserts. I told the chef to keep everything but dessert. Sorry I totally forgot about you.” The boys dreams were shattered. He rushed into the kitchen to get his share of Pradhaman. But to his disappointment all the Pradhaman was long gone and the empty Payasam copper vessel lay there. His Pradhaman hunt continued…..This story has stuck to me at the back of my mind. Every-time I eat Palada Pradhaman, I think about that little boy who never got to taste the Pradhaman that day. This Palada Pradhaman is for him.
We will be using store bought dried Ada to make our Payasam today. Wash Ada in running water. Soak it in boiling water for 20 minutes. The Ada should puff up after soaking.
In the mean time bring the milk to a boil. Once the milk is boiling, drain the Ada and add it to the pan. Let it boil for 5 minutes. Keep stirring, else the Ada will stick to the bottom.
Add in the sugar and condensed milk. Stir well.
Let the mixture boil for 5 more minutes until it becomes little thick. Switch off the flame.
Heat a pan and roast the cashew-nuts in ghee until the nuts are slightly brown. Add it to the Pradhaman.
Grind the cardamom pods to a very fine powder. Add it to the Pradhaman and mix well.
Drumroll please!!!!!!! Awesome Palada Pradhaman is ready.
You can serve it hot or cold. I like to serve the Palada Pradhaman chilled. I think it tastes so good when its cold.
This is another great school lunch box meal idea. My son has this thing about lunch box. When its a Sandwich, Roll or a Quesadilla, he completes his lunch. He likes the “hold in your hands factor” about the meal. Whenever I send him food that needs a spoon, 40% will come back home unfinished. He will have his own reasons for having not finished his lunch. I am sure I am not alone. So I am always looking for more ways to send healthy sandwiches to school. Doing the sandwich this way helps in keeping the stuffing intact and not spill while eating. Here is how you can put together a great Mushroom Quesadilla in no time.
There is essentially only 5 ingredients in the Mushroom stuffing excluding salt and pepper.
Heat oil in a pan and add in the chopped onions and the finely sliced mushrooms. Add in the salt, pepper and the Italian herb seasoning all at once. You can use any store bought dry herb seasoning mix. The mushrooms will reduce a lot in volume when cooked. Keep sauteing until the onions and mushrooms are cooked and the mixture is dry and light brown. It will take about 6-7 minutes in medium flame.
Add in a tablespoon of All purpose flour (Maida) and fry for a minute.
Add in the water and stir well for 15 seconds until it forms a thick mixture. Switch off the flame.
The mushroom filling is ready.
Putting together the sandwich
Take a cooked Chapati and place 2 tablespoons of the filling on one half of the chapati. Slightly wet the edges of the chapati with water. Fold the chapati like a half moon. Using a fork, press the corners to seal the chapati.
Heat a pan and place the chapati on the pan and cook for 30 seconds on each side sprinkling little oil.
Remove the chapati sandwich from the pan and let it cool slightly. Cut it into half.
Mushroom Quesadilla Sandwich is ready!
Dinner is something my husband looks forward to happily after the usually long and stressful days at work. Chapathi Kurma makes him a happy man at the table. His favorite is his moms Vellai Kurma. After that I would say he will strongly fall for this one. This recipe was shared by Miss.Banumathi Balasubramanian long time back in a food forum. She told that she got this Hotel Saravana Bhavan Vegetable Kurma Recipe from a very popular Tamil magazine called Mangayar Malar. It was a Deepavali issue about 2 decades ago. This is one fine recipe. Here is the recipe.
There is some prep work involved. There are a zillion ingredients in this recipe. But each one is very worth it. I would strongly advise you to assemble all the ingredients ready on your kitchen counter before starting the stove. So get your Mise en place – your setup ready.
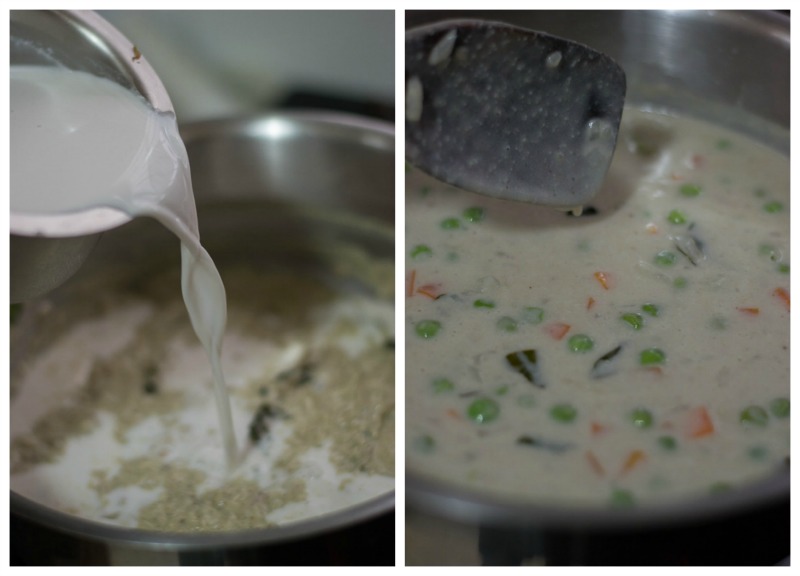
We will need to make a paste. We will call this the white paste. Add in all the ingredients for the white paste and grind it in a blender / mixie until very smooth. Set aside.
You will need the following Vegetables.
Cook the veggies in a cup of water with the salt and turmeric powder until firm but not mushy. If you are using a pressure cooker, cook for 2 whistles. Let the whistle release naturally. Set aside.
Get these spices ready.
Heat oil and ghee in a pan and add in the spices. Fry for 10 seconds. Add in the onions and fry till the onions are soft.
Add in the tomatoes and the ginger garlic paste. Fry for 4-5 minutes until the raw smell goes away and the oil starts to appear on top of the kurma.
Get the following Spice powders and the sea salt ready.
Add in the cooked vegetable mixture. Add in the spice powders and the salt. Cook for a minute.
Add in the white paste, garam masala powder and curd . Whip the curd well before adding. Let it boil just for two minutes. The curd is the secret ingredient in this recipe that does the magic.
Add in one cup of hot milk and leave it to come to a boil.
Switch off the flame and garnish with coriander leaves.
Tamilnadu Chennai Hotel Saravana Bhavan Vegetable Kurma is ready. Serve it with Chapati or Parotta.
Recipe for Hotel Saravana Bhavan style Parotta Kurma. How to make South Indian Chennai Vegetable kuruma / Chapati guruma.
Author: Kannamma - Suguna Vinodh
Recipe type: Kurma, Side dish
Cuisine: South Indian, Tamilnadu
Serves: 5
Ingredients
For the white paste
6 Whole Cashewnuts
¼ cup Water
1 teaspoon khuskhus - White Poppy Seeds
4 tablespoon fresh grated Coconut
For Cooking Veggies
½ cup chopped Potato
½ cup chopped Beans
½ cup Carrots
½ cup Green Peas
½ cup Chow Chow
½ teaspoon Salt
½ teaspoon Turmeric powder
1 cup water
Spices
1 Bay leaf
2 Cardamom
3 Cloves
1 small piece Cinnamon
2 green chillies, slit into half
Spice Powders and salt
1 teaspoon Red chilli powder
½ teaspoon turmeric powder
1 teaspoon salt
2 teaspoon coriander powder
Other Ingredients
2 tablespoon Vegetable Oil
1 teaspoon Ghee
2 medium sized Onion, finely chopped
2 teaspoon ginger garlic paste (made with 6 cloves garlic and 2 inch piece ginger)
3 medium sized tomatoes, finely chopped
¼ cup Curd
½ Cup Milk
1 teaspoon Garam Masala Powder
4 sprigs Coriander leaves, chopped
Instructions
Add in all the ingredients for the white paste and grind it in a blender / mixie until very smooth. Set aside.
Cook the veggies in a cup of water with the salt and turmeric powder until firm but not mushy. If you are using a pressure cooker, cook for 2 whistles. Let the whistle release naturally. Set aside.
Heat oil and ghee in a pan and add in the spices. Fry for 10 seconds.
Add in the Onions and fry till the onions are soft.
Add in the tomatoes and the ginger garlic paste. Fry for 4-5 minutes until the raw smell goes away and the oil starts to appear on top of the kurma.
Add in the cooked vegetable mixture.
Add in the spice powders and the salt. Cook for a minute.
Add in the white paste, garam masala powder and curd . Whip the curd well before adding. Let it boil just for two minutes. The curd is the secret ingredient in this recipe that does the magic.
Add in one cup of hot milk and leave it to come to a boil. Switch off the flame and garnish with coriander leaves.
My first pancake was out of a box and I loved it. I used to make pancakes out of boxed mixes during my initial years in the USA for our weekend breakfast. I really loved it all. But now, I make it from scratch. Its so easy to make and its a great way to get your kids into the kitchen. Let them whisk for you. Let them cook with you. Lets make a rocking Sunday morning breakfast party. Just one thing before that. If I call you darling, will you call me pancakes?
In a small bowl, strain the lemon juice. Combine the milk and lemon juice and set aside for 5 minutes to thicken.
Add the egg, stirring it gently to break the yolk. Set aside.
Meanwhile, in a medium bowl, combine the flour (maida), sugar, baking powder, baking soda, and salt, and gently whisk for 10 seconds to combine. Make sure its combined well. Let your little hands measure things for you. Set aside.
Gently fold the liquid ingredients into the flour mixture. Rest the batter for 5 minutes. Let The Batter Rest for a few minutes (5-10 minutes) after you’ve mixed it. This gives the gluten a chance to develop, and your pancakes will rise even more while cooking.
Meanwhile, heat a large skillet or griddle over medium heat. When the surface is hot, add the butter or vegetable oil to coat. A ¼-Cup Measure of batter should yield a pretty consistent 4-inch pancake. I use an old ladle for easy portioning and to keep it nice and round. You can use an ice-cream scoop too for even portioning. In General, pancakes are ready to flip when bubbles appear across the top surface. Wait for the bubbles to appear. Do not rush.
Flip when bubbles appear.Flip only Once.
Cook for another minute, then remove the pancakes and serve.
Top with butter and maple syrup, as desired. “I don’t have to tell you I love you. I fed you pancakes.”
I came to know about this life changing way of cooking “OPOS Cooking” from Mrs. Chitra Viswanathan. She is a wonderful cook. She is one of my biggest inspiration. This method of cooking was invented by Mr.Ramakrishnan. So what is OPOS? OPOS stands for One Pot One Shot. The dish is prepared in the pressure cooker in one shot. No sauteing, No frying…..Add all ingredients in the cooker and cook it for a specified time and the dish is ready. Its the simplest way to cook. Its the perfect answer for someone who does not have the time to cook or someone who is new to cook or someone who does not want to spend hours in the kitchen. Each dish takes only five to six minutes and strictly sticking to the concept of a single vessel in OPOS.
Here is my recipe for Peerkangai Chutney – Ridgegourd Chutney using OPOS Method.
Peel the Ridgegourd and cut it into cubes. Chop the onions and tomatoes roughly. Add all the ingredients (everything listed under ingredients) in a pressure cooker.
Cook for 5-6 minutes or for 4 whistles.
Wait for the pressure to release naturally.
Blend the chutney to a fine paste using a blender / mixie. OPOS Peerkangai Chutney Ridgegourd Chutney is ready. Serve it with idli or dosa.
OPOS is quick. OPOS is easy. Cooking need not be intimidating.
Here is a recap.
#1 Mix ingredients
#2 Cook
#3 Open and Serve


 Here is the recipe for


 Putting together pasta and Arrabbiata Sauce:


