Quantcast
Channel: Kannamma Cooks
Viewing all 1072 articles
Browse latest View live

Fish Curry in Ginger and Coconut Milk Sauce

$
0
0

fish-curry-in-ginger-and-coconut-milk-sauce

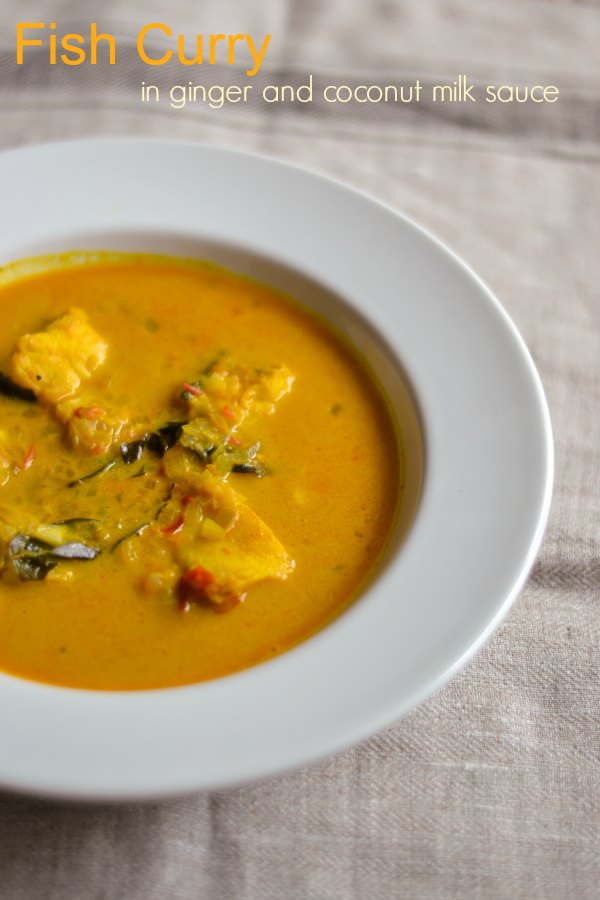
Fish is something we do at home often. This is an easy every day fish curry that can be made in minutes and its perfect for the weekdays where time is a crunch. Its getting hot and very humid these days in Hong Kong and I have no energy to sweat it out for long hours in the kitchen after a long day. This fish curry in coconut milk makes it for an easy week night dinner. Its packed with subtle flavor and its very aromatic. There are two main ingredients in this dish. Ginger and coconut milk. I think they are best friends. There are very few ingredients in this recipe and its a perfect recipe for beginners.

We will be using coconut oil for this recipe. Understand that there are few ingredients in this recipe and the top flavors are that of ginger and coconut. Coconut oil works very well in this recipe giving a very mild subtle aroma and taste. Heat oil in the pan. Add in the ginger and curry leaves. Curry leaves, ginger, coconut oil – it doesn’t get any more south Indian than this. Fry the ginger and curry leaves for a minute. The aroma of ginger fried in oil will fill your kitchen.

fish-curry-in-ginger-and-coconut-milk-sauce-fry-ginger

Add in the finely chopped onions and fry for a couple of minutes in medium flame until the onions are soft. No need to brown the onions.

fish-curry-in-ginger-and-coconut-milk-sauce-onion

Add in the tomatoes, green chillies, turmeric and the salt. Green chillies is used for spiciness and turmeric is for the color. Add more green chillies if you want a fiery curry. Fry till the tomatoes are cooked and the mixture is almost dry.

fish-curry-in-ginger-and-coconut-milk-sauce-chilli

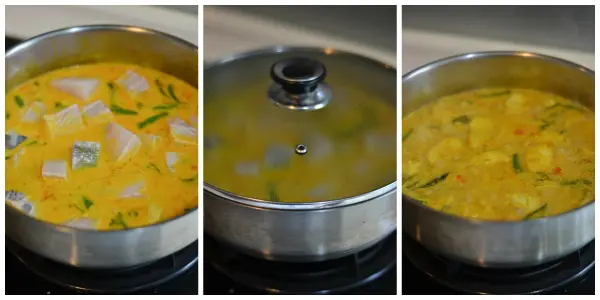
Add in a cup of water and a cup of coconut milk. If using home made coconut milk, add in second coconut milk. Here is how to do fresh coconut milk at home.. You can use canned coconut milk too. Mix well and let it simmer to a boil.

fish-curry-in-ginger-and-coconut-milk-sauce-cook

Once the mixture is coming to a boil, add in the fish. Cover the pan and cook for 10 minutes on medium flame.

fish-curry-in-ginger-and-coconut-milk-sauce-simmer

Switch off the flame and serve the fish curry hot with rice, appam or idiyappam. One of the most easiest and the tastiest curries ever.

Fish Curry in Ginger and Coconut Milk Sauce
 
Prep time
Cook time
Total time
 
Easy fish curry in a rich coconut milk sauce with ginger and curry leaves. A very flavorful curry that goes so well with aapam and idiyappam.
Author:
Recipe type: Curries
Cuisine: South Indian
Serves: 3 servings
Ingredients
  • 1 tablespoon coconut oil
  • 2 inch piece ginger, finely minced or shredded
  • 2 sprigs curry leaves
  • 2 medium sized onions, finely chopped
  • 1 medium sized ripe tomato, finely chopped
  • 5 green chillies, chopped
  • 1 teaspoon turmeric
  • 1 teaspoon salt
  • 1 cup coconut milk
  • 500 grams fish filet (I used cat fish today)
Instructions
  1. Heat oil in the pan. Add in the ginger and curry leaves. Fry for a minute.
  2. Add in the finely chopped onions and fry for a couple of minutes in medium flame until the onions are soft.
  3. Add in the tomatoes, green chillies, turmeric and the salt. Green chillies is the used for spiciness and turmeric is for the color. Fry till the tomatoes are cooked and the mixture is almost dry.
  4. Add in a cup of water and a cup of coconut milk. You can use canned coconut milk too. Mix well and let it simmer to a boil.
  5. Once the mixture is coming to a boil, add in the fish. Cover the pan and cook for 10 minutes on medium flame.
  6. Switch off the flame and serve the fish curry hot with rice, appam or idiyappam.


fish-curry-in-ginger-and-coconut-milk-sauce-recipe

The post Fish Curry in Ginger and Coconut Milk Sauce appeared first on Kannamma Cooks.


Lemon Rice – Elumichai Sadam recipe

$
0
0

Lemon-rice-elumichai-sadam-recipe

Lemon rice for a South Indian is all about nostalgia. I don’t remember a single picnic when I was young without lemon rice. Whether its for the school lunch box or a picnic brunch or even as a temple prashad, lemon rice is so versatile. The thing about lemon rice is its color and aroma. It comes from a good dose of Turmeric. The turmeric blends along with the lemon to infuse flavor into the rice. Lemon rice is a comfort food for a South Indian. Turmeric belongs to the ginger family and finds an important place in an Indian kitchen.

Lemon-rice-elumichai-sadam-recipe-turmeric-pdr

This superfood ingredient also has a bunch of health benefits. Its an ancient spice and is known for its anti-inflammatory properties. My mom would feed us turmeric mixed with warm milk when we were sick with a cold or a flu. It immediately soothes the throat. To this day in South India, women take turmeric bath at least once a week. Turmeric is anti septic and helps fight infection. Turmeric is considered auspicious and even offered to god at temples.

Lemon-rice-elumichai-sadam-recipe-coconut

This is an easy to do dish that can be put together in minutes. We will be using cooked rice for this recipe. I have a tip for cooking rice that stays fluffy and does not become mushy. The secret for fluffy rice is to soak the rice in water for at least half an hour. I cook my rice in a rice cooker. I usually use Indian raw rice (sona masuri) variety for lemon rice. I add 3 cups of water for every cup of soaked and drained rice. If using basmati rice, use 1.5 cups of water to 1 cup of rice and cook according to your rice cooker instructions.

I use one more ingredient that’s not traditional but i use it in lemon rice as it enhances the aroma and taste so much. Its the lemon zest. The skin of the lemon has all the essential oils and its packed with a lot of flavour. Make sure to only zest the top skin and not the white part that’s beneath the skin of the lime. The white part is the pith and its very bitter. You can substitute lemon for lime in this recipe and it works well.

lemon-zest-lemon-rice

For this recipe, keep the flame of the stove at low at all times as the spices and seeds burn at hot temperature.
Now for the tempering of the rice. Heat oil in a pan until hot. Add in the mustard seeds, split urad dal (black gram dal), split chana dal, dried red chillies, cumin seeds and curry leaves. Let the mustard seeds splutter. Add in the chopped cashew nut and the peanuts. Roast till the cashew nuts are golden and the dals are slightly brown.

Lemon-rice-elumichai-sadam-recipe-dal

Add in the finely minced ginger, lemon zest, chopped green chillies, salt and the sugar. Saute for 20 seconds. Add in the turmeric and mix well to combine. Make sure the turmeric doesn’t burn and the flame is set to low. Saute for 5-10 seconds.

Lemon-rice-elumichai-sadam-recipe-turmeric

Add in the cooked rice and mix well. Switch off the flame. Add in the lemon juice and coriander leaves. Always add lemon juice at the last. Cooking lemon juice for a long time will make it bitter. So I always add lemon juice after removing from heat. The residual heat of the rice will cook the juice just enough.

Lemon-rice-elumichai-sadam-recipe-lemon-juice

The best partner for lemon rice is Potato Poriyal or Chicken Bezule. Serve warm.

Lemon Rice - Elumichai Sadam recipe
 
Prep time
Cook time
Total time
 
Recipe for lemon rice / elumichai sadam made with lemon juice, turmeric, ginger and spices. A perfect south indian recipe.
Author:
Recipe type: Main Course
Cuisine: Tamilnadu
Serves: 3 servings
Ingredients
  • 1 Cup (250 ml) Rice, cooked
  • 2 teaspoon vegetable oil
  • ¼ teaspoon mustard seeds
  • 1 teaspoon split urad dal ( split black gram lentil)
  • 1 teaspoon chana dal
  • 2 dried red chillies, broken into small pieces
  • ¼ teaspoon cumin seeds
  • 2 sprigs curry leaves
  • 6 cashew nuts, chopped
  • 2 tablespoon peanuts
  • 1 inch piece ginger, finely minced
  • zest of one lemon / lime
  • 4 green chillies, chopped
  • 1 teaspoon salt
  • 1 teaspoon sugar
  • 1 teaspoon turmeric powder
  • Juice of one lemon / lime
  • 3 sprigs coriander leaves, chopped fine
Instructions
  1. Heat oil in a pan until hot. Add in the mustard seeds, split urad dal (black gram dal), split chana dal, dried red chillies, cumin seeds and curry leaves. Let the mustard seeds splutter. Add in the chopped cashew nut and the peanuts. Roast till the cashew nuts are golden and the dals are slightly brown.
  2. Add in the finely minced ginger, lemon zest, chopped green chillies, salt and the sugar. Saute for 20 seconds. Add in the turmeric and mix well to combine. Make sure the turmeric doesn’t burn and the flame is set to low. Saute for 5-10 seconds.
  3. Add in the cooked rice and mix well. Switch off the flame. Add in the lemon juice and coriander leaves. Always add lemon juice at the last. Cooking lemon juice for a long time will make it bitter. So I always add lemon juice after removing from heat. The residual heat of the rice will cook the juice just enough.
  4. Serve warm.

Lemon-rice-elumichai-sadam

The post Lemon Rice – Elumichai Sadam recipe appeared first on Kannamma Cooks.

Hot and Sweet Chicken Drumsticks

$
0
0

hot-and-sweet-chicken-drumsticks

This is an easy recipe for hot and sweet chicken drumsticks.  This recipe for chicken can be prepped ahead hours in advance and cooked just in time. The chicken is marinated in a combination of sauces for about 12 hours and then cooked to perfection. The chicken can be marinated for up-to 24 hours. Its a kids favorite.

The chicken is coated in a marinade of sauces and allowed to rest in the refrigerator so the meat becomes tender. Chicken thighs or drumsticks is preferred for this recipe. Wash and dry the chicken drumsticks. Make 3-4 incisions with the help of a knife into the drumsticks so the meat gets marinated well. Set aside.

Here is what you will need for the marinade.

hot-and-sweet-chicken-drumsticks-ing

Take a bowl and place the chicken. Add in all the ingredients listed under marinade to the chicken pieces and mix well. Cover with a cling wrap and let it marinate overnight in the refrigerator.

hot-and-sweet-chicken-drumsticks-marinate

Now its time to cook the meat. Take a pressure cooker and add in the marinated meat along with the juices. Remember we did not add any salt in this recipe. The marinade sauces has enough salt and that will be more than enough. so NO SALT. Cover the cooker and cook for 6 minutes in medium heat. You should get about 6 whistles. Switch off the flame after 6 whistles and allow it to rest for 10 minutes before opening. Let the pressure from the cooker release manually.

Take a pan and add in the cooked chicken mixture. Let it simmer for a couple of minutes. Add in the cornstarch slurry. Add in 2 tablespoon of butter. Saute for a couple of minutes. Remove from heat and garnish with spring onions.

Here is the video of the recipe. Hope you enjoy!

Hot and Sweet Chicken Drumsticks
 
Prep time
Cook time
Total time
 
Recipe for hot and sweet chicken drumsticks. Chicken marinated in sauce and cooked tender. Perfect for parties.
Author:
Recipe type: Side Dish
Cuisine: Indo-Chinese
Serves: 3 servings
Ingredients
For the marinade
  • 2 tablespoon ginger garlic paste
  • 1 tablespoon Worcestershire sauce
  • 1 tablespoon light soy sauce
  • 2 teaspoon rice vinegar
  • 2 tablespoon tomato ketchup
  • 1 tablespoon hot sauce
  • 7-8 Chicken drumsticks
For corn starch slurry
  • 1 teaspoon corn starch
  • 2 tablespoon water
Other ingredients
  • 2 tablespoon butter
  • 2 sprigs spring onion, chopped
Instructions
  1. Wash and dry the chicken drumsticks. Make 3-4 incisions with the help of a knife into the drumsticks so the meat gets marinated well. Set aside.
  2. Take a bowl and place the chicken. Add in all the ingredients listed under marinade to the chicken pieces and mix well. Cover with a cling wrap and let it marinate overnight in the refrigerator.
  3. Take a pressure cooker and add in the marinated meat along with the juices. Remember we did not add any salt in this recipe. The marinade sauces has enough salt and that will be more than enough. so NO SALT. Cover the cooker and cook for 6 minutes in medium heat. You should get about 6 whistles. Switch off the flame after 6 whistles and allow it to rest for 10 minutes before opening. Let the pressure from the cooker release manually.
  4. Take a pan and add in the cooked chicken mixture. Let it simmer for a couple of minutes. Add in the cornstarch slurry. Add in 2 tablespoon of butter. Saute for a couple of minutes. Remove from heat and garnish with spring onions.

The post Hot and Sweet Chicken Drumsticks appeared first on Kannamma Cooks.

Chicken Masala Gravy Recipe

$
0
0

chicken-masala

This is my dads chicken masala recipe. He doesn’t remember now (he is in his seventies) as to how and from whom he learnt this chicken masala recipe but has been doing it for years now. He uses finely chopped boneless chicken for this recipe. Those days when we were young, he would first cook the chicken with the bone in water. Then, he would remove the meat from the bone and cut it into small pieces and add it to the curry. But these days, we just use boneless chicken breast. This is one very flavorful curry. My kid loves coconut based curries and I have never had any leftovers. This one is a dynamite. Here is how to do Chicken Masala Gravy Coimbatore Style.

Cut the boneless chicken into very small pieces and add in the salt, pepper, ginger garlic paste and turmeric powder. Mix well to combine. Set aside. Let it marinate briefly for 5-10 minutes.

chicken-masala-recipe-mix-masala

we will now make a masala powder for the curry. Dry roasting of spices brings out the essential oil in the spices and flavors the chicken and makes it so aromatic. Add in all the spices listed under “masala powder” to a heavy pan and dry roast on a low flame until very fragrant and the pepper starts to pop. Remove from heat and allow it to cool completely. Grind the mixture in the mixie to make a powder. Set aside.

chicken-masala-recipe-powder

Heat oil in a pan and add in the cinnamon, cloves, cardamom, cashews and the curry leaves. Saute for a minute on medium flame. Add in the onions and fry till they are soft. About 3-4 minutes. Add in the tomatoes. Fry for a couple of minutes.

chicken-masala-recipe-onion

Add in the chicken mixture and the ground masala powder. Saute for 7-8 minutes until the chicken is completely cooked and dry.

chicken-masala-recipe-add-chicken

Add in the coconut milk and let it simmer for a couple of minutes. Remove from heat and garnish with coriander leaves. If using fresh coconut milk, Here is the recipe. Use thick coconut milk for this recipe.

chicken-masala-recipe-mix-coconut-milk

Serve hot with Biryani or Coconut milk rice.

chicken-masala-recipe

Chicken Masala Gravy Recipe
 
Prep time
Cook time
Total time
 
Recipe for South Indian Tamilnadu style Chicken Masala Gravy recipe. Made with coconut milk and spices. Serve hot with Pulao, Biryani or rice.
Author:
Recipe type: Side Dish
Cuisine: Tamilnadu
Serves: 3 persons
Ingredients
Spices For the Masala Powder
  • 1 teaspoon black pepper
  • 1 teaspoon fennel seeds (sombu)
  • 2 dried red chilli
  • 2 teaspoon coriander seeds
For marinating chicken
  • 250 grams boneless chicken breast, cut into small pieces
  • 1 teaspoon chilli powder
  • ½ teaspoon pepper powder
  • ½ teaspoon turmeric powder
  • 1 teaspoon salt
Other Ingredients
  • 2 tablespoon vegetable oil
  • 1 stick cinnamon, 2 inches
  • 2 cardamom
  • 2 cloves
  • 3 sprigs curry leaves
  • 5-6 cashewnuts
  • 1 onion, chopped
  • 1 tomato chopped
  • 1 cup coconut milk (thick)
  • 3 sprigs coriander leaves, chopped
Instructions
  1. Cut the boneless chicken into very small pieces and add in the salt, pepper, ginger garlic paste and turmeric powder. Mix well to combine. Set aside. Let it marinate for 5-10 minutes.
  2. Add in all the spices listed under “masala powder” to a heavy pan and dry roast on a low flame until very fragrant and the pepper starts to pop. Remove from heat and allow it to cool completely. Grind the mixture in the mixie to make a powder. Set aside.
  3. Heat oil in a pan and add in the cinnamon, cloves, cardamom, cashews and the curry leaves. Saute for a minute on medium flame. Add in the onions and fry till they are soft. About 3-4 minutes. Add in the tomatoes. Fry for a couple of minutes.
  4. Add in the chicken mixture and the ground masala. Saute for 7-8 minutes till the chicken is completely cooked and dry.
  5. Add in the coconut milk and let it simmer for a couple of minutes. Remove from heat and garnish with coriander leaves.


The post Chicken Masala Gravy Recipe appeared first on Kannamma Cooks.

Spicy Chettinad Prawn Masala / Chettinad Eral Masala

$
0
0

chettinad-prawn-masala

I don’t do much of prawn dishes at home as my husband is allergic to shell fish. But I love prawns. This recipe for Chettinad Prawn Masala is my favorite. More than a decade ago, we were on an Air India flight to Mauritius for our honey moon. They had just served prawn curry for in flight meals and we were just casually talking and eating. He ate the bread and then went on to have a big bite of rice and the curry. Suddenly he started coughing. Coughing really badly and his eyes were all red. He did not realize that it was prawn curry and he told me that he was allergic to prawns. He was suffering. I froze for a minute. That was the first time I was seeing someone react to food allergy. I am severely allergic to pollen etc.. myself and so I carry anti-histamines with me all the time. He had one of those and he kind of became OK after a couple of hours. Poor guy. I love prawns. My son is kind of getting to like prawns nowadays. So I do it at home once in a while when my husband is travelling. Little perks of things when husband is not home. Prawns cook very fast and this Chettinad Prawn Masala is so easy to make. This dish can be put together in less than 20 minutes.

Use only sesame oil for this recipe. Add the curry leaves lavishly. The aroma of curry leaves fried in sesame oil is to die for in this Chettinad Prawn Masala.
Heat sesame oil (gingely oil / nallennai ) in a pan and add in the fennel seeds (sombu), cardamom and curry leaves. Let it sizzle. Add in the finely chopped onions and fry for 5-6 minutes until the onions are brown.

chettinad-prawn-masala-onion

Add in the chopped tomatoes, ginger garlic paste, spice powders and the salt. Saute for 5-6 minutes on medium flame until the tomatoes are cooked and the oil starts separating from the mixture. The mixture should be dry by now.

chettinad-prawn-masala-spices

Add in the cleaned and de-veined prawns to the mixture. Prawns cook fast. Saute for 4-5 minutes until the prawns are fully cooked. Switch off the flame and garnish the prawn masala with coriander leaves.

chettinad-prawn-masala-eral

Serve Chettinad Prawn Masala with some piping hot rice and a dollop of ghee. yum o yum!
This dish can also be served with thengai paal saadam   or  egg biryani.

chettinad-prawn-masala-recipe

Chettinad Prawn Masala is Ready.

Here is a printable recipe for Chettinad Prawn Masala.

Spicy Chettinad Prawn Masala / Chettinad Eral Masala
 
Prep time
Cook time
Total time
 
Recipe for Tamilnadu Chettinad style Prawn Masala. Spicy Eral masala Recipe. Easy Prawn Masala Recipe.
Author:
Recipe type: Side Dish
Cuisine: Tamilnadu
Serves: 3 servings
Ingredients
Main Ingredients
  • 2 tablespoon sesame oil
  • 2 cardamom
  • 1 teaspoon fennel seeds (sombu)
  • 3 sprigs curry leaves
  • 2 medium sized onions, finely chopped
  • 2 medium tomatoes, finely chopped
  • 2 teaspoon ginger garlic paste
  • 1 teaspoon salt
  • 250 grams prawns, cleaned and de-veined
  • 2 sprigs coriander leaves, finely chopped
Spice Powders
  • 1 teaspoon pepper powder
  • 1 teaspoon chilli powder
  • ½ teaspoon turmeric
  • 1 teaspoon coriander powder
Instructions
  1. Heat sesame oil in a pan and add in the fennel seeds, cardamom and curry leaves. Let it sizzle. Add in the finely chopped onions and fry for 5-6 minutes until the onions are brown.
  2. Add in the tomatoes, ginger garlic paste, spice powders and the salt. Saute for 5-6 minutes on medium flame until the tomatoes are cooked and the oil starts separating from the mixture. The mixture should be dry by now.
  3. Add in the cleaned and de-veined prawns to the mixture. Prawns cook fast. Saute for 4-5 minutes until the prawns are fully cooked. Switch off the flame and garnish the prawn masala with coriander leaves.

The post Spicy Chettinad Prawn Masala / Chettinad Eral Masala appeared first on Kannamma Cooks.

sprouting mung beans moong at home, how to sprout mung beans

$
0
0

how-to-sprout-mung-bean

Even though ready made sprouted mung bean is easily available, sprouting mung bean is one of the most easiest things to do at home. One does not need any special equipment to do this. This method works well for mung beans – moong beans.
Traditionally they would allow the mung to sprout on a tied muslin cloth. I have even made it simpler by eliminating the cloth method. A simple bowl just works fine.

Here is how to do it.
Wash the mung beans in lots of water 2-3 times to get rid of the dirt and dust. Soak the mung bean in water for 8-10 hours or over night. After 8 hour soak, the bean would have considerably swollen. Drain the beans and rinse the beans. Set aside.

soak-mung

Set the drained beans in a bowl and cover it with a lid and set aside in a relatively dark place. I kept it inside a kitchen cupboard. Allow it to germinate for the next 24 hours. After about 24 hours, it will look like this picture below. The bean would have started sprouting vigorously. It might take longer time to germinate if the weather is slightly cold. It will germinate fast in hot and humid conditions.

soak-mung-sprout

At this stage, use the sprouted bean immediately or store in the refrigerator and use it within the next 2 days.

sprouting mung beans moong at home, how to sprout mung beans
 
Prep time
Total time
 
Easy way to sprout mung beans at home. Making sprouted beans is effortless and this recipe is fool proof.
Author:
Recipe type: Basics
Cuisine: Indian
Serves: 2 cups
Ingredients
  • 1 Cup Moong Bean / Mung Bean
  • Water
Instructions
  1. Wash the mung beans in lots of water 2-3 times to get rid of the dirt and dust. Soak the mung bean in water for 8-10 hours or over night. After 8 hour soak, the bean would have considerably swollen. Drain the beans and rinse the beans. Set aside.
  2. Set the drained beans in a bowl and cover it with a lid and set aside in a relatively dark place. I kept it inside a kitchen cupboard. Allow it to germinate for the next 24 hours. After about 24 hours, it will look like this. The bean would have started sprouting vigorously. It might take longer time to germinate if the weather is slightly cold. It will germinate fast in hot and humid conditions.
  3. At this stage, use the sprouted bean immediately or store in the refrigerator and use it within the next 2 days.

The post sprouting mung beans moong at home, how to sprout mung beans appeared first on Kannamma Cooks.

Moong sprouts curry – Mulai payaru masala – Mung Curry

$
0
0

mulai-payir-masala

Mung bean or pasi payaru / pachai payaru is a staple in the kongunad region. Sundal, dosa, vada, upma – mung dal is used in such varied recipes. Its health benefits are endless and sprouted mung beans curry is something that’s so tasty and flavorful. Its a lunch staple in many households. We used to have this curry at-least once a week with rice.

Even though ready made sprouted mung bean is easily available, sprouting mung bean is one of the most easiest things to do at home. I have used home made mung sprouts for this recipe.
Here is how to sprout mung moong bean at home.

Moong sprouts curry – Mulai payaru masala – Mung Curry

Heat sesame oil in a pan until hot. Add in the mustard seeds, cumin seeds, dried red chillies and curry leaves. Let it splutter. Add in the finely chopped onions and saute for 5 minutes until the onions are cooked and soft and slightly starting to brown on the edges.

chettinad-prawn-masala-onion

Add in the chopped ripe tomatoes, minced ginger, turmeric powder, chilli powder, coriander powder and salt. Saute till the mixture is fully cooked and the tomatoes become mushy and looks like a thick paste. It will take about 5 minutes of sauteing on medium flame. Add in the tamarind pulp.

mulai-payir-masala-tomatoes

Add the sprouted mung dal. Mix well and cover with a lid and let it simmer on a low flame for 20 minutes until the sprouts are well cooked and the curry has become thick and all the liquid has been absorbed and its a thick masala.

mulai-payir-masala-tomatoes-simmer

Add in the coconut milk (optional) and the curry leaves. Switch off the flame and serve hot with rice.

mulai-payir-masala-milk

Moong sprouts curry - Mulai payaru masala - Mung Curry
 
Prep time
Cook time
Total time
 
Moong sprouts masala - Mulai payaru Kuzhambu. Easy to make sprouted mung curry. A kongunad Specialty. Tamilnadu recipe.
Author:
Recipe type: Side Dish
Cuisine: Tamilnadu
Serves: 4 persons
Ingredients
  • 2 teaspoon sesame oil
  • ½ teaspoon mustard seeds
  • ½ teaspoon cumin seeds
  • 2 dried red chillies
  • 2 sprigs curry leaves
  • 2 medium sized onions, finely chopped
  • 2 ripe tomatoes, chopped
  • 1 inch piece ginger, minced
  • 1 teaspoon turmeric powder
  • 2 teaspoon chilli powder
  • 2 teaspoon coriander powder
  • 1½ teaspoon salt
  • 1 inch tamarind soaked in 2 cups of water and pulp extracted.
  • 2 cups sprouted mung bean / mulai payaru
  • ⅓ cup thick coconut milk (optional)
  • 2 sprigs coriander leaves, finely chopped
Instructions
  1. Heat sesame oil in a pan until hot. Add in the mustard seeds, cumin seeds, dried red chillies and curry leaves. Let it splutter. Add in the finely chopped onions and saute for 5 minutes until the onions are cooked and soft and slightly starting to brown on the edges.
  2. Add in the chopped ripe tomatoes, turmeric powder, chilli powder, coriander powder and salt. Saute till the mixture is fully cooked and the tomatoes become mushy and looks like a thick paste. It will take about 5 minutes of sauteing on medium flame.
  3. Add in the tamarind pulp and the sprouted mung dal. Mix well and cover with a lid and let it simmer on a low flame for 20 minutes until the sprouts are well cooked and the curry has become thick and all the liquid has been absorbed and its a thick masala.
  4. Add in the coconut milk (optional) and the curry leaves. Switch off the flame and serve hot with rice.

The post Moong sprouts curry – Mulai payaru masala – Mung Curry appeared first on Kannamma Cooks.

Leftover Rice Dosa – Cooked Rice Dosa Recipe – Leftover Rice Recipe

$
0
0

leftover-rice-dosa-cooked-rice-dosa
Leftover Rice Dosa – Cooked Rice Dosa Recipe – Leftover Rice Recipe

Leftover rice can be bothering at times. People often convert leftover rice into variety rice. But there are a lot of things that can be done with leftover rice and this dosa is one such beautiful way of using up that leftover rice. This dosa is kind of a soft dosa and is perfect for breakfast or as an afterschool snack for the children. Here is how to do it.

Take a mixie / blender and add in the left over rice, wheat flour (atta), cumin seeds, salt, curry leaves and dried red chillies. Add in a cup of water and grind to a smooth paste. The batter will be thick.

leftover-rice-dosa-cooked-rice-dosa-grind

Thin out the batter with about half a cup of water. Add water little by little so the batter doesn’t go very watery. The batter should be of pouring consistency. Now add in a cup of dosa batter. The dosa batter helps in spreading the batter on the griddle and crisping the dosa.

leftover-rice-dosa-cooked-rice-dosa-add-batter-con

Heat a dosa pan / skillet until hot. Let the flame be at high. Pour a ladle of the batter onto the skillet. You can gauge the consistency of the batter from the below picture. Cover the skillet and cook the dosa for little over a minute on each side.

leftover-rice-dosa-cooked-rice-dosa-cook

This dosa cooks slow. It took about 3 minutes for me for making each dosa. So be patient and do not rush. The dosa will be gummy if its not properly cooked.

leftover-rice-dosa-cooked-rice-dosa-timing

Also be gentle while spreading the batter. Applying pressure will scrape the batter from the pan. Also that little addition of regular dosa batter is really necessary else the dosa comes very dense and gummy.

leftover-rice-dosa-cooked-rice-dosa-tips

Enjoy your dosa. I served the dosa today with coconut chutney, onion thokku and idli podi.

leftover-rice-dosa-recipe

Leftover Rice Dosa - Cooked Rice Dosa Recipe - Leftover Rice Recipe
 
Prep time
Cook time
Total time
 
Recipe for Leftover Rice Dosa recipe. Excellent recipe for utilizing leftover rice. Leftover rice recipes. Easy and instant leftover rice dosa recipe.
Author:
Recipe type: Breakfast
Cuisine: Tamilnadu
Serves: 10-12 dosas
Ingredients
  • 1½ cup leftover rice
  • ½ cup whole wheat flour (atta)
  • 1 teaspoon cumin seeds
  • 1 teaspoon salt
  • 2 sprigs curry leaves
  • 1 dried red chillies
  • 1 cup water
  • 1 cup dosa batter
  • 1.5 - 2 cups water
Instructions
  1. Take a mixie / blender and add in the left over rice, wheat flour (atta), cumin seeds, salt, curry leaves and dried red chillies. Add in a cup of water and grind to a smooth paste. The batter will be thick.
  2. Thin out the batter with about half a cup of water. Add water little by little so the batter doesn’t go very watery. The batter should be of pouring consistency. Now add in a cup of dosa batter. Mix well.
  3. Heat a dosa pan / skillet until hot. Let the flame be at high. Pour a ladle of the batter onto the skillet. Cover the skillet and cook the dosa for little over a minute on each side.
  4. Serve the dosa with your favorite chutney.

The post Leftover Rice Dosa – Cooked Rice Dosa Recipe – Leftover Rice Recipe appeared first on Kannamma Cooks.


Ratna Cafe Style Sambar – How to make Ratna Cafe sambar

$
0
0

ratna-cafe-style-sambar-recipeRatna Cafe Style Sambar – How to make Ratna Cafe sambar – Video Recipe

This recipe is purely a genius from my friend Bhavani Ganesan. She shared this recipe in a forum and I had to immediately try it. Everyone who has lived in Chennai for sometime would love the sambar idli from Ratna Cafe. I love the mini idli sambar from Ratna Cafe. The idlis that are dunked in sambar and topped with a spoonful of raw onions. The soft idli, the flavorful sambar and the slight crunch from the onions are all now food memories for me.

She describes this recipe as “So simple and tasty!!!” She has a great memory of her childhood that’s associated with this sambar and this is her story. This story is the one with her uncle, Maama – Mr. Srinivasan. He worked with the Pallavan transport corporation.  “When we were on vacations at Triplicane mama’s house, every morning, mama’s tenant, who was one of the staffs at the Cafe would take us to the restaurant early morning around 5 o’ clock. Maama was doing night shifts as a cashier and we would go with the tenant uncle to the cafe and wait for him. Maama would join us at about 6.30 in the morning. Till then, I would be sitting in the kitchen watching all the action live. There was a big stone mill used for grinding the masalas. The place was filled with fragrant roasted chillies, coriander seeds, browned lentils etc… They were glistening as they were roasted in copious amounts of oil and ghee and the kitchen was hot and fragrant. The cut veggies, fresh shredded coconut, onions, tomatoes all were lined up in huge vessels. There was a person designated for crushing tomatoes by hand. It was a sight to watch. We were given our share of raw tomatoes for snacking too. The taste of country tomatoes is something that i remember very vividly. They are my sweet memories. Tamarind was never added in their sambar.”

Here is a picture of Bavani Ganesan with her maama. Her maama is differently abled. He was one of the victims of polio.

ratna-cafeHere is how to do Ratna Cafe Style Sambar – How to make Ratna Cafe sambar

First we need to make a Sambar Masala. Let the smell of fragrant roasted spices waft your kitchen.

Take a heavy pan and add in a teaspoon of ghee. Add in the dried red chillies, coriander seeds, fenugreek seeds (vendhayam) and urad dal. Fry for a couple of minutes until the seeds and lentils are well roasted and the urad dal is golden. Add in dessicated coconut and fry till the coconut is nice and golden. Switch off the flame and set aside to cool.
Take a mixie grinder jar and add in the roasted spices mixture. Add in the onion, tomato, green chilli, turmeric powder, chilli powder, jaggery, salt and asafoetida. The original recipe uses compound asafoetida. I have used Asafoetida powder (perungayam) as that’s what I had. Add in quarter cup of water and grind to a smooth paste. Set aside.

ratna-cafe-style-sambar-masala

Take a pressure cooker and add in the cleaned and washed toor dal and moong dal. Add 2 cups of water. Cook for 4 whistles. Remove from heat and wait for the pressure to be released naturally. Set aside.

ratna-cafe-style-sambar-dal

Take a pressure cooker and add in the chopped tomatoes. Add in half cup of water. Add in the curry leaves. Add in the veggies. Add in the cooked dal mixture. Add in the ground masala. Cover the cooker and cook for 2 whistles. Remove from heat and wait for the pressure to be released naturally. Set aside. Sambar is almost ready.

ratna-cafe-style-sambar-cook

Now lets do the tempering.

Heat ghee in a pan until hot. Add in the mustard seeds and cumin seeds. Let it splutter. Remove from heat immediately and add it to the sambar.

Serve Sambar with soft idlis and top it with chopped onions, Ratna Cafe Style.

Here is the Video of the recipe. Hope you like it.

Ratna Cafe Style Sambar - How to make Ratna Cafe sambar
 
Prep time
Cook time
Total time
 
Recipe for Chennai Ratna cafe style Sambar. Sambar Made with home ground masala and spices.
Author:
Recipe type: Side Dish
Cuisine: Tamilnadu
Serves: 4 persons
Ingredients
For Sambar Masala
  • 1 teaspoon ghee
  • 4 dried red chillies
  • 1 teaspoon coriander seeds
  • ¼ teaspoon fenugreek seeds
  • ½ teaspoon urad dal
  • ½ medium sized onion, chopped
  • 1 tomato, chopped
  • 1 green chilli, chopped
  • ¼ teaspoon asafoetida
  • ¼ cup dessicated coconut
  • ¼ teaspoon turmeric powder
  • 1//4 teaspoon chilli powder
  • 1 teaspoon jaggery
  • 1 teaspoon salt
  • ¼ cup water to grind
For cooking dal
  • ¼ cup toor dal
  • ¼ cup yellow moong dal
  • 2 cups water
Other Ingredients
  • 3 tomatoes, chopped
  • ½ cup water for final cooking
  • 2 sprigs curry leaves
Veggies
  • 1 drumstick, chopped
  • (Add veggies of your choice in your kitchen)
For Tempering
  • 1 teaspoon ghee
  • ¼ teaspoon mustard seeds
  • ¼ teaspoon cumin seeds
Instructions
  1. Take a heavy pan and add in 2 teaspoon of oil. Add in the dried red chillies, coriander seeds, fenugreek seeds (vendhayam) and urad dal. Fry for a couple of minutes until the seeds and lentils are well roasted and the urad dal is golden. Add in dessicated coconut and fry till the coconut is nice and golden. Switch off the flame and set aside to cool.
  2. Take a mixie grinder jar and add in the roasted spices. Add in the onion, tomato, green chilli, turmeric powder, chilli powder, jaggery, salt and asafoetida. Add in quarter cup of water and grind to a smooth paste. Set aside.
  3. Take a pressure cooker and add in the cleaned and washed toor dal and moong dal. Add 2 cups of water. Cook for 4 whistles. Remove from heat and wait for the pressure to be released naturally. Set aside.
  4. Take a pressure cooker and add in the chopped tomatoes. Add in ½ cup of water. Add in the curry leaves. Add in the veggies. Add in the cooked dal mixture. Add in the ground masala. Cover the cooker and cook for 2 whistles. Remove from heat and wait for the pressure to be released naturally. Set aside. Sambar is almost ready.
  5. Now lets do the tempering.
  6. Heat ghee in a pan until hot. Add in the mustard seeds and cumin seeds. Let it splutter. Remove from heat immediately and add it to the sambar.

ratna-cafe-style-sambar

The post Ratna Cafe Style Sambar – How to make Ratna Cafe sambar appeared first on Kannamma Cooks.

Ramzan Nombu Kanji – Authentic Palli Vaasal Nombu Kanji – Veg Recipe

$
0
0

nombu-kanji

Nombu Kanji / Nonbu Kanji is a porridge made during the ramadan season to break the fast in the evening.
This recipe is from my good friend Thahira. Thahira’s father was a Quran scholar in Vridhachalam, Tamilnadu. Their house was inside the Town Juma Palli Vaasal (Masjid) compound. Thahira remembers the Ramadan season very vividly. As their house was inside the masjid compound, she has seen the making of Nombu Kanji / Nonbu Kanji countless number of times. Nombu Kanji was made in huge vessels and stirred continuously by masjid men. This is the same recipe she makes it even today and this is what she had to say about the making of the Nombu Kanji. “We prefer our Kanji to be very light. We do not add too much spices as it can irritate the stomach after the long fast and can make one feel very thirsty afterwords. This recipe is very soothing to the tummy. Fenugreek seeds (vendhayam) is an important ingredient in the kanji. We never make kanji without vendhayam (fenugreek). It helps to keep the body cool as fenugreek has cooling properties. This is a plain kanji. Sometimes, we also add little drumstick leaves to make it a little more rich and nourishing.”
Drumstick leaves is a nutrient dense food. Drumstick leaves is an iron-rich food source (31% Daily Value per 100 g consumed). She says during the ramadan season, the rice is sold as grits “noi arisi” or “arisi kurunai” in shops. If one cant find the rice grits or lives abroad, it can be made easily at home in bulk and can be stored and used. I have shared the recipe for making rice grits below. Let this Ramadan season bring in lots of love to everyone.

Here is the recipe for authentic Palli Vaasal Nombu Kanji.

First, lets make rice grits. You can make it in larger quantity if you want and store it and use it for the entire season. Take raw rice and wash it in water for 3-4 times. Soak the raw rice in water for 10 minutes. After soaking, drain the water completely and dry the rice on a cloth for 15 minutes.

nombu-kanji-nonbu-kanji-recipe-rice-grits

Once the rice is dried and has very little moisture left, pulse it in a mixie one or two times so that each grain of rice gets broken into 2-3 pieces. Set aside.

nombu-kanji-nonbu-kanji-recipe-kurunai

Here is how to make the porridge.

Heat oil in a pan and add in one clove and a small half inch piece of cinnamon. Do not add in too many spices. Add in the fenugreek seeds (vendhayam) and the yellow moong dal (paasi paruppu ) and fry on a low flame for 3-4 minutes until its roasted well and very fragrant.

nombu-kanji-nonbu-kanji-recipe-dal

Add in the onion, tomato, ginger garlic paste and green chillies. Add in the rice grits and water. Cover the pressure pan and cook for 4 whistles. Switch off the flame and wait for the pressure from the cooker to release naturally.

nombu-kanji-nonbu-kanji-recipe-water

Open the cooker and add in the fresh shredded coconut, finely chopped coriander leaves and the salt. Mix well to combine. Note on salt: Thahira remembers very well that the salt was always added at the last. Salt hinders with the cooking of dal and rice to a very mashy consistency. So always add the salt at the end. Also too much salt can make one thirsty and interfere with the Ramadan fasting. So go easy on the salt if you are fasting.

nombu-kanji-nonbu-kanji-recipe-garnish

Nombu Kanji is ready!

nombu-kanji-nonbu-kanji-recipe-serve

If Thahira was here, she would have said Bismillah! before serving the Kanji!
Bismillah (Arabic: “In the name of God” or “In the name of Allah”) is the first word in the Quran. Holy Quran’s opening phrase in Arabic, bismillāhi r-raḥmāni r-raḥīm (“In the name of God, the Most Gracious, the most Merciful”).

nombu-kanji-pic

Ramzan Nombu Kanji - Authentic Palli Vaasal Nombu Kanji - Veg Recipe
 
Prep time
Cook time
Total time
 
Authentic Pallivaasal Nombu kanji recipe. Vegetarian nonbu kanji recipe. Made during the ramadan/ramzan season.With step by step pictures.
Author:
Recipe type: Porridge
Cuisine: Tamilnadu
Serves: serves 2
Ingredients
  • 1 teaspoon vegetable oil
  • 1 clove
  • ½ inch piece cinnamon
  • ¾ teaspoon fenugreek seeds
  • ¼ cup yellow moong dal
  • ½ of a medium onion, chopped fine
  • ½ of a ripe tomato, chopped fine
  • ½ teaspoon ginger garlic paste
  • 1 green chilli, chopped
  • ½ cup rice grits -kurunai arisi - recipe given above.
  • 3½ cups water
  • 2 tablespoon fresh shredded coconut
  • ½ teaspoon salt
  • 2 sprigs coriander leaves, finely chopped
Instructions
  1. Heat oil in a pan and add in one clove and a small half inch piece of cinnamon. Add in the fenugreek seeds (vendhayam) and the yellow moong dal (paasi paruppu ) and fry on a low flame for 3-4 minutes until its roasted well and very fragrant.
  2. Add in the onion, tomato, ginger garlic paste and green chillies. Add in the rice grits and water. Cover the pan and cook for 4 whistles. Switch off the flame and wait for the pressure from the cooker to release naturally.
  3. Open the cooker and add in the fresh shredded coconut, coriander leaves and the salt. Mix well to combine.

The post Ramzan Nombu Kanji – Authentic Palli Vaasal Nombu Kanji – Veg Recipe appeared first on Kannamma Cooks.

chicken biryani using shan masala, with readymade biryani masala

$
0
0

chicken-biryani-using-biryani-masala

Even though, I have shared many recipes for biryani, I keep getting requests asking for making a simple meat biryani using ready made biryani masala and simple ingredients. So I am sharing that recipe here today. You can use any ready made biryani masala available in the super markets and I have used Shan Biryani Masala today as that is what is available easily even abroad. Just use whatever brand you like.

Here is how to make chicken biryani using shan masala, readymade biryani masala. Shan Chicken Biryani
First we need to marinate the chicken. Take a big bowl and add in the chicken pieces. We use chicken pieces with bone for biryani. Do not use bone less chicken please for this recipe. Add 3 tablespoon of the biryani masala. Most of the ready made biryani masalas have salt. So no need to add any salt. Just check the ingredients of the pack to double confirm. Add in the yogurt, ginger garlic paste, chopped green chillies, chopped mint leaves and chopped coriander leaves. Mix well. Let the chicken marinate for one hour.

chicken-biryani-using-biryani-masala-marinate

In the mean time soak basmati rice in water for one hour. After one hour, boil a big pot of water and add in a tablespoon full of salt to the water. Let it come to a boil. Add in the soaked and drained rice to the boiling water. Cook until the rice is 80% done. Its very difficult for me to give a time frame as the rice cooks differently according to the age of rice, amount of water added etc… Approx – from 8-12 minutes. The gauge for the texture of the rice for biryani is that the rice at this stage should not be fully cooked. The center of the rice kernel should be still a little dry and chewy. Drain off the rice immediately and set aside to cool.

chicken-biryani-using-biryani-masala-rice

Now lets make shan chicken biryani.
Heat oil in a pan and add the onions and cover the pan with a lid. Cook until the onions are brown. Open the lid and saute once in a while so the bottom of the pan doesn’t burn.

chicken-biryani-using-biryani-masala-onion

Add in the marinated chicken. Add 1/2 cup of water. Mix well. Slightly increase the flame and cover the pan with a lid. Cook for 20 minutes stirring occasionally. After 20 minutes, the chicken will be cooked and there will be some gravy. Add in the partially cooked rice. Mix well to combine.

biryani-biryani-masala-cook-masala

Now, we are ready for dum. Take a dosa pan and place the biryani pot on the dosa pan. Put the flame of the stove on low and let it cook in dum for 15 minutes.

chicken-biryani-using-biryani-masala-dum

Biryani is ready. Serve with raita.

biryani-biryani-masala-recipe

chicken biryani using shan masala, with readymade biryani masala
 
Prep time
Cook time
Total time
 
Recipe for easy chicken biryani made using shan biryani masala. Easy bachelors biryani made with readymade biryani masala.
Author:
Recipe type: Biryani
Cuisine: Indian
Serves: 4 persons
Ingredients
For marinating Chicken
  • 1 Kg Chicken
  • 3 tablespoon readymade biryani masala
  • ⅓ cup yogurt
  • 2 tablespoon ginger garlic paste
  • 4 green chillies, chopped
  • 5 sprigs mint leaves , chopped
  • 5 sprigs coriander leaves, chopped
Other Ingredients
  • 2 Cups / 500 ml Basmati Rice
  • 1 tablespoon salt added to water for cooking rice
  • 4 tablespoon vegetable / sunflower oil
  • 3 medium sized onions, sliced
Instructions
  1. Take a big bowl and add in the chicken pieces. We use chicken pieces with bone. Add 3 tablespoon of the biryani masala. Most of the ready made biryani masala have salt. So no need to add any salt. Add in the yogurt, ginger garlic paste, chopped green chillies, chopped mint leaves and chopped coriander leaves. Mix well. Let the chicken marinate for one hour.
  2. In the mean time soak basmati rice in water for one hour. After one hour, boil a big pot of water and add in a tablespoon full of salt to the water. Let it come to a boil. Add in the soaked and drained rice to the boiling water. Cook until the rice is 80% done.
  3. Heat oil in a pan and add the onions and cover the pan with a lid. Cook until the onions are brown. Open the lid and saute once in a while so the bottom of the pan doesn’t burn.
  4. Add in the marinated chicken. Add ½ cup of water. Mix well. Slightly increase the flame and cover with a lid. Cook for 20 minutes stirring occasionally. After 20 minutes, the chicken will be cooked and there will be some gravy. Add in the partially cooked rice. Mix well to combine.
  5. Now, we are ready for dum. Take a dosa pan and place the biryani pot on the dosa pan. Put the flame of the stove on low and let it cook in dum for 15 minutes.
  6. Biryani is ready. Serve with raita.

The post chicken biryani using shan masala, with readymade biryani masala appeared first on Kannamma Cooks.

Karamani Poriyal / Yard long Beans Poriyal / How to make long Beans Stir-Fry

$
0
0

karamani-poriyal-long-beans-poriyal-recipeYard Long Beans or karamani as called in tamil is a vegetable that’s similar looking like the regular beans but long and slim. This veggie is very healthy and tastes good too.

Sometimes, this veggie may be quite stringy and very fibrous if it was picked at a mature stage. So pick up only the young ones from the market. Young karamani / yard long beans do not have bumps and are even and thin. Here is how to do Tamilnadu style Karamani Poriyal / Yard long Beans Poriyal.

Clean and wash the karamani / yard long beans and cut it into small even pieces. Set aside.

karamani-poriyal-long-beans-poriyal-recipe-veggie

Put the cut veggies in a bowl and place the bowl in a pressure cooker filled with 1 inch of water. Pressure cook it for 3-4 minutes (2 whistles) on high flame and that gives perfect cooked vegetable every single time. Wait for the pressure to release naturally.

karamani-poriyal-long-beans-poriyal-recipe-cook

Tempering:
Heat oil in a pan and add in the mustard seeds and curry leaves. Let the seeds splutter. Add in the cooked karamani / yard long beans. Add in the salt and the red chilli powder. Saute for 3-4 minutes. The karamani / yard long beans will start to brown on the edges.

karamani-poriyal-long-beans-poriyal-recipe-temper

Once the karamani / yard long beans has charred here and there, add in the dessicated coconut powder and fry for a couple of minutes more. Switch of the flame and serve with sambar or rasam.

karamani-poriyal-long-beans-poriyal-recipe-tempering

Karamani Poriyal / Yard long Beans Poriyal / How to make long Beans Stir-Fry
 
Prep time
Cook time
Total time
 
Recipe for Karamani Poriyal / Yard long Beans Poriyal / How to make long Beans Stir-Fry Tamilnadu style.
Author:
Recipe type: Side Dish
Cuisine: Tamilnadu
Serves: 4 servings
Ingredients
  • 250 grams Karamani / Yard long Beans
  • 2 teaspoon vegetable oil
  • ¼ teaspoon mustard seeds
  • 2 sprigs curry leaves
  • 1 teaspoon red chilli powder
  • 1 teaspoon salt
  • 2 teaspoon dessicated coconut powder
Instructions
  1. Clean and wash the karamani / yard long beans and cut it into small pieces.
  2. Put the cut veggies in a bowl and place the bowl in a pressure cooker filled with 1 inch of water. Pressure cook it for 3-4 minutes (2 whistles) and that gives perfect steamed vegetable every single time. Wait for the pressure to release naturally.
Tempering:
  1. Heat oil in a pan and add in the mustard seeds and curry leaves. Let the seeds splutter. Add in the cooked karamani / yard long beans. Add in the salt and the red chilli powder. Saute for 3-4 minutes. The karamani / yard long beans will start to brown on the edges.
  2. Once the karamani / yard long beans has charred here and there, add in the dessicated coconut powder and fry for a couple of minutes more. Switch of the flame and serve with sambar or rasam.

The post Karamani Poriyal / Yard long Beans Poriyal / How to make long Beans Stir-Fry appeared first on Kannamma Cooks.

Muttai Kuruma – Egg kuruma – Egg Curry – 10 minute Recipe

$
0
0

Muttai Kuruma – How to make Tamilnadu style Muttai Kuruma – Egg kuruma – Egg Curry – 10 minute Recipe
mutta-curry-egg-curry-recipe

This is an easy and quick 10 minute muttai kuruma made using home made curry masala powder. Here is the recipe for homemade curry masala powder. The powder is very versatile and can be used to flavor kurmas, chicken and meat dishes.

This muttai kuruma is a part OPOS Recipe – One Pot One Shot recipe.
We are not going to saute or fry anything in this recipe. We will layer the ingredients in a cooker and cook. Do not scale the recipe up or down. Use exact measurements and equipment. This recipe works well ONLY in a 2 or 3 liter Indian style pressure cooker. Do not use a big cooker without adjusting the quantity. It wont work. If using induction stove (recommended), cook the curry at 1200W for 6 minutes or 3 whistles whichever is earlier. If using gas stove, cook on medium heat for 3 whistles.

Many people ask me if things will be raw after cooked as we are not sauteing anything. My answer is no. It will be perfectly cooked. Just try it once. I am sure you will like it.The food cooks in its own juices making it so flavorful. The thing with OPOS is that we use very little water in cooking. So the flavor gets concentrated with the liquids found in vegetables.

Lets start the layering for the muttai kuruma. Add in two teaspoon of vegetable oil in a pressure cooker. Add in the ginger garlic paste (dont add too much, the curry will become pungent), Add in the sliced onions and then the tomatoes. Add in 1 1/2 teaspoon of the home made curry masala powder, tamarind and the salt.

Here is the recipe for homemade curry masala powder.

curry-masala-powder-layer

Set your stove to medium high heat on a gas stove, if using induction set it to 1200W. Cook for 3 whistles.

mutta-curry-egg-curry-cook

Switch off the flame and wait for the pressure from the cooker to release naturally. Open the cooker and transfer the cooked mixture to a mixie / grinder and grind to a smooth paste.

mutta-curry-egg-curry-grind

Transfer the ground mixture to the pan and add in the curry leaves, coriander leaves and the coconut milk. Let it simmer for a minute. Add in the boiled eggs. Muttai kuruma is ready. Serve with aapam ,  idli , thengai paal saadam or dosa.

mutta-curry-egg-curry-coconut-milkHere is how to do coconut milk at home.  If using canned coconut milk, just add one cup of canned milk in total.

Popular Egg Dishes from Kannamma Cooks

10 minute egg curry
 
Prep time
Cook time
Total time
 
Easy and quick ten minute egg curry - muttai kuruma. Mutta curry made with home made spice powder. OPOS - One Pot One Shot easy 10 minute egg curry recipe
Author:
Recipe type: Side Dish
Cuisine: Tamilnadu
Serves: 4 persons
Ingredients
For layering
  • 2 teaspoon vegetable oil
  • 1 teaspoon ginger garlic paste
  • 3 medium sized onions, sliced
  • 2 tomatoes, chopped
  • 1½ teaspoon homemade curry masala powder
  • 1 teaspoon salt
  • ½ inch piece of tamarind, goose berry size
For finishing
  • ½ cup thick coconut milk
  • ½ cup thin coconut milk
  • 2 sprigs curry leaves
  • 3-4 eggs, hardboiled
  • 2 sprigs coriander leaves
Instructions
  1. Add in two teaspoon of vegetable oil in a pressure cooker. Add in the ginger garlic paste, Add in the sliced onions and then the tomatoes. Add in the home made curry masala powder, tamarind and salt.
  2. Set your stove to medium high heat on a gas stove or your induction stove to 1200W. Cook for 3 whistles.
  3. Switch off the flame and wait for the pressure from the cooker to release naturally. Open the cooker and transfer the cooked mixture to a mixie / grinder and grind to a smooth paste.
  4. Transfer the ground mixture to the pan and add in the curry leaves, coriander leaves and the coconut milk. Let it simmer for a minute. Add in the boiled eggs and serve with chapati, aapam, idli or dosa.
Notes
If using canned coconut milk, just add one cup of canned milk in total.
Do not use too much ginger garlic paste or curry masala powder. The curry will become very pungent to taste.

The term OPOS and One Pot One Shot are registered trademarks owned by Mr.Ramakrishnan. The recipes have been adapted using his OPOS principle. They are used in Kannamma Cooks with prior permission.

The post Muttai Kuruma – Egg kuruma – Egg Curry – 10 minute Recipe appeared first on Kannamma Cooks.

curry masala powder – Home made curry powder – Non-veg curry powder

$
0
0

curry-masala-powder-recipe

Once a year, perur athama would grind curry masala powder. The quintessential masala powder used for kurmas, chicken and mutton curries. She would put in so much of effort right from selecting the chillies and spices, dry roasting them, drying them in the sun so its absolutely dry and lasts for a long time, grinding them etc… Her long time driver Kennedy would load the jeep with all the roasted spices and carefully take it to the rice mill and grind it to ammas preference.

The hot ground masala was spread on newspapers lined in the dining room to cool. The entire house smelled of the masala. After 3-4 hours of cooling, the masala was carefully packed and stored in the kitchen store room. Perur athama was persnickety and her kitchen ran on a zero error policy. Everything was carefully looked upon and her dishes are legendary in our family. She is a true treasure. She would also send the curry masala spice powder in nice stainless steel boxes sealed on the outside with another plastic bag to all of her family. It lasted for an year. She is getting quite old now and I wish her a lot of health. This recipe is legendary and can turn even an ordinary recipe to something gourmet.

mutton masala

This recipe can be doubled or tripled according to your needs. Here are some tips to be followed so the masala powder lasts for a long time.

# Make sure the ingredients are well roasted.
# If you are grinding the powder at home, make sure the mixie / grinder is completely dry. Use a cloth to wipe off any moistness
# Spread the ground masala on a newspaper and allow it to dry completely. The grinding process makes the masala hot and it needs to be completely cool before you can store it in bottles.
# Make sure the masala powder is absolutely moist free and dry before storing it
# For retaining the freshness of the masala, store the masala in the freezer and use as required.

Here is how to do home made curry masala powder. I make this masala once in a month and grind in my mixie. You can double or triple this recipe if you want to. This recipe is so versatile. Use it while making kurmas, chicken or mutton dishes. Just a tablespoonful of this masala makes the dish very flavorful.

curry-masala-powder-ing

Dry roast all the ingredients separately until well roasted and fragrant. Set aside on a plate to cool.
First lets dry roast the red chillies. Dry roast the chillies on low flame until the chillies starts to fluff up a bit and is brown here and there. Please use caution to not burn the chillies. The entire masala will be ruined if burnt spices are used. Set aside on a plate to cool.

curry-masala-powder-chillies

Add in the rest of the ingredients and dry roast till its very fragrant and the seeds are slightly brown. If your are doubling or tripling the recipe, dry roast in batches.

curry-masala-powder-seeds

Wait for the roasted spices to completely cool before grinding.

Grind the spices to a very smooth and fine powder. If the quantity is large, then grind it in batches.

curry-masala-powder-grind

Spread the ground masala on a newspaper to cool. Let it completely cool before you can store it in bottles.

curry-masala-powder-dry

Here are some of the recipes you can make with curry masala powder.

10 Minute Egg Curry

Kongunad Mutton Kuzhambu

Home made curry powder - curry masala powder - Non-veg curry powder
 
Prep time
Cook time
Total time
 
Recipe or making home made curry masala powder. South Indian Style curry masala powder used for kurma and non-veg dishes.
Author:
Recipe type: Spice Powder
Cuisine: Tamilnadu
Serves: ¾ cup
Ingredients
  • 30 dried red chillies
  • 5 sticks cinnamon (two inch sticks)
  • 5 cloves
  • ½ cup coriander seeds
  • 1 tablespoon cumin seeds
  • 2 tablespoon fennel seeds
Instructions
  1. Dry roast the chillies on low flame until the chillies starts to fluff up a bit and is brown here and there. Please use caution to not burn the chillies.
  2. Add in the rest of the ingredients and dry roast till its very fragrant and the seeds are slightly brown. If your are doubling or tripling the recipe, dry roast in batches.
  3. Wait for the roasted spices to completely cool before grinding.
  4. Grind the spices to a very smooth and fine powder. If the quantity is large, then grind it in batches.
  5. Spread the ground masala on a newspaper to cool. Let it completely cool before you can store it in bottles.


The post curry masala powder – Home made curry powder – Non-veg curry powder appeared first on Kannamma Cooks.

Godhumai Upma – Kheema Upma -How to make Keema broken Wheat Upma

$
0
0

Broken-wheat-upma

Broken wheat Upma or Godhumai Uppuma might be a great meal in itself if made properly. The one big problem with godhumai upma is getting the right texture. A good godhumai upma should be lump free. It should not be hard and at the same time it should not be gooey. Many people fret on hearing the word upma as we all have had our share of night mare upma’s in our life. I am just being honest. But a good upma is delightful and my family loves this upma. I first had godhumai kaima upma at Usha Aunties home. She took a humble upma and made it gourmet. Ever since that day, I make kaima upma very often. The recipe got even better after I tried the OPOS – One Pot One Shot way of doing godhumai upma. No frying, no sauteing, no worry about lumps. Fool proof divine upma every single time with very little effort. Here is how to do it.

The first thing to do in this godhumai upma is to double roast the broken wheat granules. Take a pan and add in a teaspoon of oil. Add in the godhumai / broken wheat and saute for 5 minutes on low flame. It will start to slowly brown and become very fragrant. Switch off the flame and transfer the broken wheat to a plate. Set aside to cool for 10 minutes.

Roast one more time. Take the same pan and add in a teaspoon of oil. Add in the roasted and cooled godhumai / broken wheat and saute for 5 minutes on low flame. The wheat will start to brown. Switch off the flame and transfer the broken wheat to a plate. Set aside to cool.

Broken-wheat-upma-roast

Get the veggies and the chicken ready.

Broken-wheat-upma-ing

Take a pressure cooker and add in all the ingredients except the roasted wheat. Cook for one whistle in high flame. Manually release pressure.

Broken-wheat-upma-cook

Add in the roasted broken wheat to the hot water mixture in the cooker and mix well to combine. Cover the pressure pan and cook for 1 whistle in medium flame. Switch off the pressure cooker and wait for the pressure from the cooker to release naturally. Open the cooker, gently fluff up the upma and serve hot.

Here is the video of godhumai upma. Hope you enjoy!

Godhumai Upma - Kheema Upma -How to make Keema broken Wheat Upma
 
Prep time
Cook time
Total time
 
Broken wheat upma / godhumai upma made with minced meat. Udhir Udhir upma. Fool proof recipe which can be made in under 20 minutes. Video Recipe.
Author:
Recipe type: Main Dish
Cuisine: Tamilnadu
Serves: 3 people
Ingredients
For Roasting Broken Wheat
  • 1 Cup Broken Wheat / Godhumai Kurunai
  • 2 teaspoon vegetable oil
For Cooking
  • 200 grams minced chicken
  • 4 green chillies, chopped
  • 6 mint leaves, chopped
  • 2 sprigs coriander leaves, chopped
  • ½ tomato, chopped
  • 1 inch piece ginger, chopped
  • 1 teaspoon salt
  • 2½ cups water
Instructions
Double Roast Broken Wheat
  1. Take a pan and add in a teaspoon of oil. Add in the godhumai / broken wheat and saute for 5 minutes on low flame. It will start to slowly brown and become very fragrant. Switch off the flame and transfer the broken wheat to a plate. Set aside to cool for 10 minutes.
  2. Roast one more time. Take the same pan and add in a teaspoon of oil. Add in the roasted and cooled godhumai / broken wheat and saute for 5 minutes on low flame. The wheat will start to brown. Switch off the flame and transfer the broken wheat to a plate. Set aside to cool.
Cooking
  1. Take a pressure cooker and add in all the ingredients except the roasted wheat. Cook for one whistle in high flame. Manually release pressure.
  2. Add in the roasted broken wheat to the hot water mixture in the cooker and mix well to combine. Cover the pressure pan and cook for 1 whistle in medium flame. Switch off the pressure cooker and wait for the pressure from the cooker to release naturally. Open the cooker, gently fluff up the upma and serve hot.
Notes
The term OPOS and One Pot One Shot are registered trademarks owned by Mr.Ramakrishnan. The recipes have been adapted using his OPOS principle. They are used in Kannamma Cooks with prior permission.

The post Godhumai Upma – Kheema Upma -How to make Keema broken Wheat Upma appeared first on Kannamma Cooks.


chicken pakoda recipe, how to make chicken pakoda | Chicken Pakora

$
0
0

Chicken-Pakoda

I used to spend a couple of weeks of my summer vacation at my aunts place in Mettupalayam. My aunt’s husband ran an entertainment club in the 90’s in Mettupalayam. So the cook at the club would make different kinds of evening snacks for people who came in to play cards. My uncle would come home for dinner and he would bring this pakoda for us to snack. It was so good. Whenever there was a party at home, the cook from the club would come and cook. His name was Raju. This pakoda was a must in the menu. There were never leftovers and everyone relished it so much.

I never got the complete recipe. I improvised this recipe based on Neerajas Pakoda Recipe. One thing I remember vividly is him asking my aunt for “sola maavu kudunga, sola maavu kudunga” Sola Maavu or corn flour was not available in Mettupalayam those days. Corn Flour was an exotic ingredient. Yeah! Those were the days! So my uncle would always stop to pick up groceries at Coimbatore. He would purchase things only at one store. It was called Rangasamy Chettiar and Sons. The entire family of my mom clan is a fan of that store and they still talk about how crisp biscuits would come in big tins in the 1950’s from that shop.

Chicken-Pakoda-Pakora-recipe

Back to our pakoda. There are three ingredients that make for Tamilnadu style Pakoda. We call it as pakkavada. Its fennel seeds (sombu), curry leaves and onions. The aroma of fennel seeds and curry leaves needs to be predominant in a pakoda. The crunch from the fried curry leaves and its taste is something that makes it uniquely Tamilnadu Pakoda. Now, answer this. What happens to chicken nuggets if it’s infused with flavour bomb and went to dynamite heaven? It becomes Chicken Pakoda with a Tamilnadu Soul.

Here is how to do it. Cut the boneless chicken breast pieces into small cubes. Add it to a big bowl. Add in the fennel seeds, ginger garlic paste, red chilli powder, chopped green chillies and the salt. Mix well to combine. Add in the mint leaves, coriander leaves and curry leaves.

Chicken-Pakoda-Pakora-recipe-cut

Add in the Sliced onions, baking soda, corn flour, besan (kadala maavu, chickpea flour), and oil. Oil helps to crisp up the pakodas while frying. Adding a lot of oil will make it very soggy when frying. So dont add too much of oil. Mix everything well with your fingers and slowly add 3-4 tablespoons of water adding very little at a time. It should be a very stiff, thick batter.

Chicken-Pakoda-Pakora-recipe-mix

Heat oil in a pan until hot. Drop a little pakoda batter into the oil and if it sizzles, the oil is hot and ready. Take little teaspoonful’s of batter and drop them gently in oil. If the batter is sticking to the bottom, gently move it with the help of a fork. If the oil is hot, the batter wont stick. Fry them until golden. As the chicken pieces are really small, they cook in no time. Do not cook for a long time. Cooking chicken for a long time makes it dry.

Chicken-Pakoda-Pakora-recipe-drop

Once the pakodas are golden and most of the bubbles in the oil has settled, remove the pakodas and drain on paper towels. Each batch should take about 3 minutes. We never have leftovers. Its perfect for parties and can be made easily.

Chicken-Pakoda-Pakora-recipe-fry

Enjoy!

Chicken-Pakoda-Pakoraa

chicken pakoda recipe, how to make chicken pakoda | Chicken Pakora
 
Prep time
Cook time
Total time
 
Easy recipe for South Indian style Tamilnadu style Chicken Pakoda. Spicy Chicken Pakoda recipe perfect for parties.
Author:
Recipe type: Appetizer
Cuisine: Tamilnadu
Serves: 6 servings
Ingredients
  • 250 grams boneless chicken breast
  • 1 teaspoon fennel seeds
  • 2 teaspoon ginger garlic paste
  • 1 teaspoon red chilli powder
  • 3 green chillies, chopped fine
  • 1 teaspoon salt
  • 3 sprigs mint leaves, chopped
  • 3 sprigs coriander leaves, chopped
  • 4 sprigs curry leaves
  • 2 medium sized Onions, Sliced
  • ½ teaspoon baking soda
  • ¼ cup corn flour
  • ½ cup besan (kadala maavu, chickpea flour)
  • 2 teaspoon oil
  • 3-4 tablespoons water
  • Oil for deep frying
Instructions
  1. Cut the boneless chicken breast pieces into small cubes. Add it to a big bowl. Add in the fennel seeds, ginger garlic paste, red chilli powder, chopped green chillies and the salt. Mix well to combine. Add in the mint leaves, coriander leaves and curry leaves.
  2. Add in the Sliced onions, baking soda, corn flour, besan and oil. Mix everything well with your fingers and slowly add 3-4 tablespoons of water adding very little at a time. It should be a very stiff, thick batter.
  3. Heat oil in a pan until hot. Drop a little pakoda batter into the oil and if it sizzles, the oil is hot and ready. Take little teaspoonful’s of batter and drop them gently in oil. Fry until golden. Drain on paper towels and serve hot!

The post chicken pakoda recipe, how to make chicken pakoda | Chicken Pakora appeared first on Kannamma Cooks.

Sweet Corn Sandwich, How to make Corn Mayo Sandwich

$
0
0

corn-mayo-sandwich

I still remember how I got this recipe. I was working out a recipe for sweet corn sandwich long time back and somehow I felt that it was becoming a little dry after sometime. One day I was talking casually to my good friend and fellow baker, Anusha of Delicioso. I have seen Anusha’s customers rave about this sweet corn sandwich of hers. So I begged her for the recipe. Actually I dint have to ask her hard. She was so sweet to give the recipe. She adds a little bit of cream to the filling and that makes the sandwich so rich and flavorful. If you are in Chennai, do check her out. Her cakes are just fabulous.

We worked together in the same bank and for the same client. It was our first job for both of us and we had such good times. Never did we know that we would fall in love with baking. Banking to Baking. Just an “N” short. Not that big a change I guess name wise. She is so passionate about food and her cakes are just too good. She is a chocolate lover and so is her husband. But, I am not. During our initial days, we had gone for a movie at Satyam theatre and after the movie, they both spoke high of a hot chocolate from a nearby place. I told them that I am not a great fan of chocolate. That’s it! They kind of disowned me that day. They both saw me like “What kind of a girl are you?” kind of look. She has helped me a lot during my initial years and still remains one of my very good friends. I wish her a lot of happiness!

The original recipe adds a little spinach in it too. Here is my version of Anusha’s recipe. There are different versions of corn and mayo sandwich that’s made with white sauce, milk etc… But this version is hands down the best.

First we need to make the filling. Try to get the corn that’s available in the market as american corn or sweet corn. Its easily available as frozen sweet corn in the grocery stores. Boil the corn in water for 5-7 minutes. Drain and set aside.

corn-mayo-sandwich-recipe-corn

Take a pan and add in a teaspoon of oil. Add in the mixed herbs, garlic and onion. Saute the onion and garlic for a couple of minutes until they are soft. Switch off the flame and remove from heat. Set aside.

corn-mayo-sandwich-recipe-saute

Take a bowl and add in the onion mixture, cooked corn, pepper powder, coriander leaves, salt, mayo and cream. Mix well to combine. Add in the cheese. Cheese is really an optional ingredient. My son loves cheese in this sandwich. So I add cheese. Mix well and the filling is ready.

corn-mayo-sandwich-recipe-mix

Remove the crusts from the sandwich bread slices and fill one side of the bread with the filling. Place another bread on top of the filling and gently press on top. Apply ghee on both sides slightly and set aside. Prepare all the sandwiches like these.

corn-mayo-sandwich-recipe-spread

Heat an iron pan or a sandwich maker and toast the sandwich slightly on both sides and serve. Its perfect for school lunch boxes.

corn-mayo-sandwich-recipe-toast

Its a kids favorite. Try it today!

corn-mayo-sandwich-recipe-yum

Corn and Mayo Sandwich, Corn Mayonnaise Sandwich
 
Prep time
Cook time
Total time
 
Easy Corn and Mayonnaise Sandwich recipe. Perfect for school lunch boxes and can be made in less than 20 minutes.
Author:
Recipe type: Brunch
Cuisine: Indian
Serves: 5 Sandwiches
Ingredients
  • 2 cups Sweet Corn
  • 1 teaspoon vegetable oil
  • 1 teaspoon dried herb mixture
  • 1 medium size onion, finely chopped
  • 3 cloves Garlic, finely chopped
  • 3 tablespoon Mayonnaise
  • 3 tablespoon cream
  • ¼ teaspoon salt
  • ¼ teaspoon pepper
  • 2 sprigs coriander leaves, chopped
  • ¼ cup mozarella cheese, shredded (optional)
Instructions
  1. Boil the corn in water for 5-7 minutes. Drain and set aside.
  2. Take a pan and add in a teaspoon of oil. Add in the mixed herbs, garlic and onion. Saute the onion and garlic for a couple of minutes until they are soft. Switch off the flame and remove from heat. Set aside.
  3. Take a bowl and add in the onion mixture, cooked corn, pepper powder, salt, mayo, coriander leaves and cream. Mix well to combine. Add in the cheese if using. Mix well. Set aside.
  4. Remove the crusts from the sandwich bread slices and fill one side of the bread with the filling. Place another bread on top of the filling and gently press on top. Apply ghee on both sides slightly and set aside. Prepare all the sandwiches like these.
  5. Heat an iron pan or a sandwich maker and toast the sandwich slightly on both sides and serve. Its perfect for school lunch boxes.

The post Sweet Corn Sandwich, How to make Corn Mayo Sandwich appeared first on Kannamma Cooks.

tamarind paste recipe, how to make tamarind paste at home

$
0
0

home-made-tamarind-paste-recipe

Tamarind paste is a very common ingredient in South Indian Cooking. Its one of the main souring agents that is used in a lot of recipes. Making Homemade tamarind paste is very easy and has a very long shelf life. Its worth the effort and can come in handy in everyday cooking. Here is how to do it. Tamarind Block bought from shops usually comes along with the seed. We need to remove the seeds and the hard fibre before making the pulp. I like to remove the seeds before cooking as it makes for storage after cooking easier.

home-made-tamarind-paste-puli

Take the tamarind and break the tamarind block into bits. Try removing the seeds and the thick fiber. Set aside. Discard the seeds and fibre.

home-made-tamarind-paste-clean

Take a pressure cooker and add in the cleaned tamarind and water. Cook for 15 minutes in low flame. After 15 minutes, remove from heat and wait for the pressure to release naturally.

home-made-tamarind-paste-cook

Wait for the tamarind mixture to cool slightly. Blend to a puree and bottle it and use it as required.

home-made-tamarind-paste-grindA Note on bottling.
# Do not store the tamarind in metal containers as it might react. Its advisable to store the tamarind pulp in a glass or a ceramic jar, the one that does not react.

The Tamarind pulp can be stored in the refrigerator for months.

How to use
The tamarind pulp can be substituted in recipes that call for tamarind to be soaked and made into a pulp. Add a teaspoon for every inch or marble size of tamarind asked for in the recipe.

home-made-tamarind-paste

tamarind paste recipe, how to make tamarind paste at home
 
Prep time
Cook time
Total time
 
Recipe for making home made tamarind pulp from scratch. Making Homemade tamarind paste is very easy to make and has a very long shelf life.
Author:
Recipe type: Basics
Cuisine: Tamilnadu
Serves: 2 cups
Ingredients
  • 250 grams Tamarind, cleaned
  • 500 ml water
Instructions
  1. Take the tamarind and break the tamarind block into bits. Try removing the seeds and the thick fiber as much as possible. Set aside. Discard the seeds and fibre.
  2. Take a pressure cooker and add in the cleaned tamarind and water. Cook for 15 minutes in low flame. After 15 minutes, remove from heat and wait for the pressure to release naturally.
  3. Wait for the tamarind mixture to cool slightly. Blend to a puree and bottle it and use it as required.
Notes
This recipe has been adapted from the OPOS cooking manual written by Ramakrishnan.
The term OPOS and One Pot One Shot are registered trademarks owned by Mr.Ramakrishnan. The recipes have been adapted using his OPOS principle. They are used in Kannamma Cooks with prior permission.

The post tamarind paste recipe, how to make tamarind paste at home appeared first on Kannamma Cooks.

Idiyappam Recipe, How to make soft Idiyappam, Nool Puttu

$
0
0

idiyappam-recipe-rice-flour-idiyappam-recipe

Idiyappam is an all time favorite recipe at home. Serve it with sweet coconut milk and stew and it makes for a fantastic breakfast or dinner. You can also serve with Chicken Stew. Idiyappam is also called as Nool Puttu in Karnataka and String Hoppers in Srilanka.

Many people use puttu flour for making Idiyappam. I prefer using just plain old regular rice flour. The trick is in the roasting of the flour. We will be making idiyappam today with just plain rice flour. The key to a good idiyappam is to roast the flour until very hot so it absorbs more water while kneading and that results in a very soft and fluffy idiyappam. Here is how to do idiyappam at home the most easy way. You will need an idiyappam press or an idiyappam maker for this recipe. You can buy it here.

Take a pan and add in a cup of flour to the pan. Roast the flour on medium flame until the flour is very hot to the touch. It will also start to slightly change colour at the bottom. If its kind of becoming yellow here and there, the flour is roasted. Remove and set aside.

idiyappam-recipe-rice-flour-idiyappam-roast

Take a pressure cooker and add in 1.5 cups of water, a teaspoon of oil and half a teaspoon of salt. Cover and cook for one whistle. Remove the pressure manually. Hot water is ready!

idiyappam-recipe-rice-flour-idiyappam-boil

Immediately add in the roasted rice flour and mix well to combine. Cover the cooker, put the whistle on and let it rest for 15 minutes. Remember the stove is off. We are just resting the dough covered. Rest for 15 minutes.

idiyappam-recipe-rice-flour-idiyappam-cook

After 15 minutes, open the cooker and mix the dough. Prepare small oblong balls and load it in the idiyappam press. Press the idiyappam strings onto idli plates.

idiyappam-recipe-rice-flour-idiyappam-press

Once the dough is pressed, transfer the plates to a steamer and steam the idiyappam for 10 minutes.

idiyappam-recipe-rice-flour-idiyappam-steam

After 10 minutes of steaming, rest the idli plates for 5 minutes before removing the idiyappam.

idiyappam-recipe-rice-flour-idiyappam

Serve it with sweet coconut milk and stew and it makes for a fantastic breakfast or dinner.

Here is the video of the recipe. Hope you like it.

Idiyappam Recipe, How to make Idiyappam, Nool Puttu
 
Prep time
Cook time
Total time
 
Home made Idiyappam recipe made with roasted rice flour. Extremely soft and moist idiyappam recipe made from scratch. Idiyappam - Nool Puttu.
Author:
Recipe type: Breakfast
Cuisine: South Indian
Serves: 8-10 Idiyappam
Ingredients
  • 1 Cup Plain Rice Flour
  • 1.5 Cups Water
  • 1 Teaspoon Vegetable Oil
  • ½ Teaspoon Salt
Instructions
  1. Take a pan and add in a cup of flour to the pan. Roast the flour on medium flame until the flour is very hot to the touch. Remove and set aside.
  2. Take a pressure cooker and add in 1.5 cups of water, a teaspoon of oil and half a teaspoon of salt. Cover and cook for one whistle. Remove the pressure manually.
  3. Immediately add in the roasted rice flour and mix well to combine. Cover the cooker, put the whistle on and let it rest for 15 minutes. Remember the stove is off. We are just resting the dough covered. Rest for 15 minutes.
  4. After 15 minutes, open the cooker and mix the dough. Prepare small oblong balls and load it in the idiyappam press. Press the idiyappam strings onto idli plates.
  5. Once the dough is pressed, transfer the plates to a steamer and steam the idiyappam for 10 minutes.
  6. After 10 minutes of steaming, rest the idli plates for 5 minutes before removing the idiyappam.

The post Idiyappam Recipe, How to make soft Idiyappam, Nool Puttu appeared first on Kannamma Cooks.

Kerala Chicken Stew, How to make Chicken Stew, Chicken Ishtu

$
0
0

chicken-stew-ishtu-recipe

Chicken Stew – The perfect partner for idiyappam and appam. Its called as Ishtu, the local word for stew. This is a very mild gravy / curry flavored with a lot of ginger and coconut milk. Here is how to do simple chicken stew. Here is the veg version of the recipe.

Its an extremely simple recipe. Get all the veggies ready. Cut the chicken into cubes. Make 3-4 incisions with the help of a knife into the drumsticks so the meat cooks well. Set aside.chicken-stew-ishtu-veggies

Heat oil in a pan and add in the cinnamon, cloves, cardamom and fennel seeds. Very little of everything. The flavors of the spices are very mild in this recipe. Saute for a few seconds until the spices are aromatic. Add in all the veggies. Onion, ginger, curry leaves, potatoes and peas. Add lots of ginger. I kept some of the ginger pieces a little big so all the juices gets into the gravy but does not come to the mouth as a harsh bite. You can discard the ginger later if you wish.

chicken-stew-ishtu-temper

Add in the chicken, green chillies and the salt. Add in half a cup of water to the pan. Cover the cooker and cook for 3 whitles on medium flame. It will take anywhere between 7-10 minutes. Switch off the stove and wait for the pressure from the cooker release naturally.

chicken-stew-ishtu-cook

Open the cooker and add in a cup of thin coconut milk (second milk). Simmer for 3-4 minutes. Then add half a cup of thick coconut milk and switch off the flame. Here is the recipe for extracting coconut milk at home.
Note: If using canned coconut milk, add 1.5 cups of canned milk and let it simmer for 2 minutes.

chicken-stew-ishtu-add-milk

Serve Chicken Stew, Chicken Ishtu with idiyappam or appam.

chicken-stew-ishtu

Kerala Chicken Stew, How to make Chicken Stew, Chicken Ishtu
 
Prep time
Cook time
Total time
 
Recipe for Kerala Chicken Stew made with coconut milk served with appam and idiyappam. Popularly called as chicken ishtu.
Author:
Recipe type: Side Dish
Cuisine: South Indian
Serves: 4 persons
Ingredients
  • 1 teaspoon coconut oil
  • 1 stick / 2 inches cinnamon
  • 1 cloves
  • 2 cardamom
  • ¼ teaspoon fennel seeds (sombu)
  • 3 sprigs curry leaves
  • 2 inch piece ginger, sliced
  • 2 medium sized onions, sliced
  • 1 cup fresh peas
  • 2 medium sized potatoes, diced
  • 500 grams chicken with bone
  • 4 green chillies, slit
  • 1 teaspoon salt
  • ½ cup water
  • 1 cup thin coconut milk (second milk)
  • 1/2 cup thick coconut milk (first milk)
  • Note: If using canned coconut milk instead of fresh milk, 1.5 cups of canned milk
Instructions
  1. Heat oil in a pan and add in the cinnamon, cloves, cardamom and fennel seeds. Saute for a few seconds until the spices are aromatic. Add in all the veggies. Onion, ginger, curry leaves, potatoes and peas.
  2. Add in the chicken, green chillies and the salt. Add in half a cup of water to the pan. Cook for 3 whistles. It will take anywhere between 7-10 minutes. Switch off the stove and let the pressure from the cooker release naturally.
  3. Open the cooker and add in a cup of thin coconut milk (second milk). Simmer for 3-4 minutes. Then add half a cup of thick coconut milk and switch off the flame.
  4. Serve Chicken Stew, Chicken Ishtu with idiyappam or appam.

The post Kerala Chicken Stew, How to make Chicken Stew, Chicken Ishtu appeared first on Kannamma Cooks.

Viewing all 1072 articles
Browse latest View live