![baingan-bharta-eggplant-bharta]()
The first time I had Baingan Bharta was after marriage. I had this for the first time in a very cozy restaurant in Santana Row, CA called Amber. The smokiness of the eggplants combined with the flavor of butter and the masala’s was something so comforting that I could never forget. Food is nothing but memories. Ain’t it? . Ever since that smoky encounter with the eggplants, I make it all the time at home. Here is how to do Baingan Bharta, my style.
Use one big Eggplant for this recipe. I have used two today as the eggplants I had were really small in size. We will need about 300-350 grams of baingan /eggplant in total. Here is how to smoke the eggplant.
Stove Top: Pierce some holes on the eggplant in 3-4 places with a knife. Place the eggplant on fire and roast the eggplant for 3-4 minutes turning the eggplant frequently with tongs. Char the Eggplant well. Don’t be afraid to bring the black guy out! Let him enjoy his time on fire.
Oven Method: Alternatively, you can bake the eggplant on a 200C / 400F oven for 20 minutes. ( Halve the eggplant and apply a teaspoon of oil on the eggplant before roasting in the oven. )
Note:
If you don’t like the strong smoky charred flavor, use the oven method.
![baingan-bharta-eggplant-bharta-smoke]()
Once the skin is blackened, remove the eggplant and place it in a bowl and cover the bowl with a cling wrap or a lid that fits tight. Leave it aside for 10 minutes. The eggplants would still steam inside the bowl.
![baingan-bharta-eggplant-bharta-sweat]()
After 10 minutes, the skin should peel off easily. Do not wash the eggplant while removing the skin. Many people wash it off. But I don’t prefer that method even though its the easiest. By washing, you will be losing the smoky flavor you worked hard to develop. Chop the peeled eggplant. Set aside.
![baingan-bharta-eggplant-bharta-chop]()
Now lets roast the garlic. The flavor of roasted garlic in baingan bharta can’t be beat. Place 10-12 cloves of garlic with a teaspoon of oil and a pinch of salt on an aluminium foil. (Double the foil to make a thick covering). Make a pocket and place the pocket on fire for 2 minutes. Make sure to seal the pockets well so it does not smoke. ( The oil inside will smoke if the pockets leak. )
![baingan-bharta-eggplant-bharta-garlic]()
After 2 minutes, the garlic will be well roasted. Chop the garlic and set aside.
![baingan-bharta-eggplant-bharta-cut]()
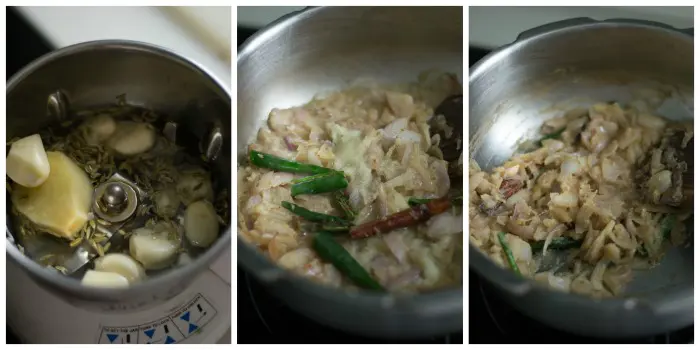
Heat oil in a pan until hot. Add in the cumin seeds and finely chopped onions. Add in the salt. The salt will help the onions in browning fast. Once the onions are nicely brown, add in the tomatoes and the chopped garlic. Add in the red chilli powder, garam masala and the coriander powder. Fry till the tomatoes are cooked and almost dry.
![baingan-bharta-eggplant-bharta-onion]()
Add in the eggplant and fry for a couple of minutes. Switch off the flame and mix in the ghee. Ghee and baingan / eggplant are best friends. The little addition of ghee at last makes the bharta taste heavenly. Garnish with coriander leaves. Serve Baingan Bharta with roti / chapati.
![baingan-bharta-eggplant-bharta-coriander]()
Baingan Bharta, Brinjal Bharta Recipe, Smoked Eggplant Curry
Author: Kannamma - Suguna Vinodh
Recipe type: Side Dish
Cuisine: North Indian
- 1 big eggplant / brinjal (about 300-350 grams)
- 12 cloves garlic
- 1 teaspoon vegetable / canola / sunflower oil
- a pinch of salt
- 2 Tablespoon vegetable / canola / sunflower oil
- ¼ teaspoon cumin seeds
- 2 onions, finely chopped
- 2 ripe tomatoes, finely chopped
- 1 teaspoon salt
- 1 teaspoon red chilli powder
- ½ teaspoon garam masala
- 1 teaspoon coriander powder
- 2 sprigs coriander leaves
- 2 teaspoon ghee
- Pierce some holes on the eggplant in 3-4 places with a knife. Place the eggplant on fire and roast the eggplant. Char the Eggplant till its black. Once the skin is blackened, remove the eggplant and place it in a bowl and cover the bowl with a cling wrap or a lid that fits tight. Leave it aside for 10 minutes. After 10 minutes, the skin should peel off easily. Roughly Chop and set aside.
- Place 10-12 cloves of garlic with a teaspoon of oil and a pinch of salt on an aluminium foil. After 2 minutes, the garlic will be well roasted. Chop the garlic and set aside.
- Heat oil in a pan until hot. Add in the cumin seeds and finely chopped onions. Add in the salt. The salt will help the onions in browning fast. Once the onions are nicely brown, add in the tomatoes and the chopped garlic. Add in the red chilli powder, garam masala and the coriander powder. Fry till the tomatoes are cooked and almost dry.
- Add in the eggplant and fry for a couple of minutes. Switch off the flame, mix in the ghee and garnish with coriander leaves.
3.5.3208
The post Baingan Bharta, Brinjal Bharta Recipe, Smoked Eggplant Curry appeared first on Kannamma Cooks.


 For making Pesarattu:


 For Tempering